Assembly Instructions - Freedom Furniture
Assembly Instructions - Freedom Furniture Assembly Instructions - Freedom Furniture
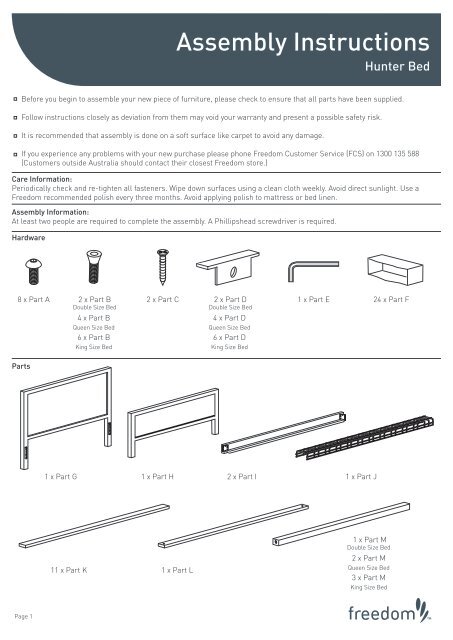
Page 1 Assembly Instructions Hunter Bed Care Information: Periodically check and re-tighten all fasteners. Wipe down surfaces using a clean cloth weekly. Avoid direct sunlight. Use a Freedom recommended polish every three months. Avoid applying polish to mattress or bed linen. Assembly Information: At least two people are required to complete the assembly. A Phillipshead screwdriver is required. Hardware Parts Before you begin to assemble your new piece of furniture, please check to ensure that all parts have been supplied. Follow instructions closely as deviation from them may void your warranty and present a possible safety risk. It is recommended that assembly is done on a soft surface like carpet to avoid any damage. If you experience any problems with your new purchase please phone Freedom Customer Service (FCS) on 1300 135 588 (Customers outside Australia should contact their closest Freedom store.) 8 x Part A 2 x Part B 2 x Part C 2 x Part D 1 x Part E 24 x Part F Double Size Bed Double Size Bed 4 x Part B Queen Size Bed 6 x Part B King Size Bed 1 x Part G 1 x Part H 2 x Part I 1 x Part J 11 x Part K 1 x Part L 4 x Part D Queen Size Bed 6 x Part D King Size Bed 1 x Part M Double Size Bed 2 x Part M Queen Size Bed 3 x Part M King Size Bed
- Page 2 and 3: Page 2 Step 1. Part G Part A Assemb
- Page 4 and 5: Page 4 Step 4. Part L Part L Step 5
- Page 6 and 7: Page 6 Step 7. x 24 Part F Assembly
Page 1<br />
<strong>Assembly</strong> <strong>Instructions</strong><br />
Hunter Bed<br />
Care Information:<br />
Periodically check and re-tighten all fasteners. Wipe down surfaces using a clean cloth weekly. Avoid direct sunlight. Use a<br />
<strong>Freedom</strong> recommended polish every three months. Avoid applying polish to mattress or bed linen.<br />
<strong>Assembly</strong> Information:<br />
At least two people are required to complete the assembly. A Phillipshead screwdriver is required.<br />
Hardware<br />
Parts<br />
Before you begin to assemble your new piece of furniture, please check to ensure that all parts have been supplied.<br />
Follow instructions closely as deviation from them may void your warranty and present a possible safety risk.<br />
It is recommended that assembly is done on a soft surface like carpet to avoid any damage.<br />
If you experience any problems with your new purchase please phone <strong>Freedom</strong> Customer Service (FCS) on 1300 135 588<br />
(Customers outside Australia should contact their closest <strong>Freedom</strong> store.)<br />
8 x Part A 2 x Part B 2 x Part C 2 x Part D<br />
1 x Part E 24 x Part F<br />
Double Size Bed<br />
Double Size Bed<br />
4 x Part B<br />
Queen Size Bed<br />
6 x Part B<br />
King Size Bed<br />
1 x Part G 1 x Part H 2 x Part I 1 x Part J<br />
11 x Part K 1 x Part L<br />
4 x Part D<br />
Queen Size Bed<br />
6 x Part D<br />
King Size Bed<br />
1 x Part M<br />
Double Size Bed<br />
2 x Part M<br />
Queen Size Bed<br />
3 x Part M<br />
King Size Bed
Page 2<br />
Step 1.<br />
Part G<br />
Part A<br />
<strong>Assembly</strong> <strong>Instructions</strong><br />
Hunter Bed<br />
Part H<br />
Option 1: Mattress will sit higher Option 2: Mattress will sit lower<br />
x 4 x 4<br />
OR<br />
Part A
Page 3<br />
Step 2.<br />
Part G<br />
Step 3.<br />
Part I<br />
! At least two people should<br />
! Check Bed is straight<br />
complete this step.<br />
Part I<br />
<strong>Assembly</strong> <strong>Instructions</strong><br />
Hunter Bed<br />
Part H<br />
before tightening bolts.<br />
Part E<br />
x 4<br />
x 4
Page 4<br />
Step 4.<br />
Part L<br />
Part L<br />
Step 5.<br />
! Fit Part D to one end of<br />
Part M only.<br />
Part J<br />
Part M<br />
<strong>Assembly</strong> <strong>Instructions</strong><br />
Hunter Bed<br />
Part L<br />
4<br />
8<br />
Part D<br />
Part K<br />
Part M<br />
Part D<br />
x 1 (Double)<br />
x 2 (Queen)<br />
x 3 (King)<br />
Part B<br />
Part E
Page 5<br />
Step 6.<br />
12<br />
11<br />
10<br />
09<br />
08<br />
07<br />
06<br />
05<br />
04<br />
03<br />
02<br />
01<br />
! Follow the diagram below to<br />
<strong>Assembly</strong> <strong>Instructions</strong><br />
Hunter Bed<br />
correctly position Part M<br />
assembly between the slats<br />
Double Queen King<br />
Bed Head end<br />
Bed Foot end Bed Foot end<br />
Bed Head end<br />
Bed Head end Bed Head end<br />
12<br />
11<br />
10<br />
09<br />
08<br />
07<br />
06<br />
05<br />
04<br />
03<br />
02<br />
01<br />
12<br />
11<br />
10<br />
09<br />
08<br />
07<br />
06<br />
05<br />
04<br />
03<br />
02<br />
01<br />
Bed Foot end<br />
Bed Foot end
Page 6<br />
Step 7.<br />
x 24<br />
Part F<br />
<strong>Assembly</strong> <strong>Instructions</strong><br />
Hunter Bed<br />
Part K & L<br />
Part M<br />
Part D<br />
x 1 (Double)<br />
x 2 (Queen)<br />
x 3 (King)<br />
Part B<br />
Part E
Page 7<br />
Step 8.<br />
Step 9.<br />
<strong>Assembly</strong> <strong>Instructions</strong><br />
Hunter Bed<br />
! At least 2 people should<br />
lower the slat assembly into<br />
the bed<br />
Part C<br />
x 2<br />
Part L


