Assembly Instructions - Freedom Furniture
Assembly Instructions - Freedom Furniture
Assembly Instructions - Freedom Furniture

Create successful ePaper yourself
Turn your PDF publications into a flip-book with our unique Google optimized e-Paper software.
Page 1<br />
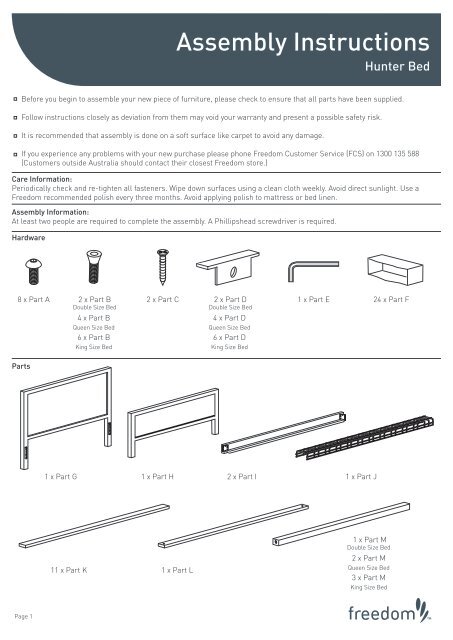
<strong>Assembly</strong> <strong>Instructions</strong><br />
Hunter Bed<br />
Care Information:<br />
Periodically check and re-tighten all fasteners. Wipe down surfaces using a clean cloth weekly. Avoid direct sunlight. Use a<br />
<strong>Freedom</strong> recommended polish every three months. Avoid applying polish to mattress or bed linen.<br />
<strong>Assembly</strong> Information:<br />
At least two people are required to complete the assembly. A Phillipshead screwdriver is required.<br />
Hardware<br />
Parts<br />
Before you begin to assemble your new piece of furniture, please check to ensure that all parts have been supplied.<br />
Follow instructions closely as deviation from them may void your warranty and present a possible safety risk.<br />
It is recommended that assembly is done on a soft surface like carpet to avoid any damage.<br />
If you experience any problems with your new purchase please phone <strong>Freedom</strong> Customer Service (FCS) on 1300 135 588<br />
(Customers outside Australia should contact their closest <strong>Freedom</strong> store.)<br />
8 x Part A 2 x Part B 2 x Part C 2 x Part D<br />
1 x Part E 24 x Part F<br />
Double Size Bed<br />
Double Size Bed<br />
4 x Part B<br />
Queen Size Bed<br />
6 x Part B<br />
King Size Bed<br />
1 x Part G 1 x Part H 2 x Part I 1 x Part J<br />
11 x Part K 1 x Part L<br />
4 x Part D<br />
Queen Size Bed<br />
6 x Part D<br />
King Size Bed<br />
1 x Part M<br />
Double Size Bed<br />
2 x Part M<br />
Queen Size Bed<br />
3 x Part M<br />
King Size Bed
Page 2<br />
Step 1.<br />
Part G<br />
Part A<br />
<strong>Assembly</strong> <strong>Instructions</strong><br />
Hunter Bed<br />
Part H<br />
Option 1: Mattress will sit higher Option 2: Mattress will sit lower<br />
x 4 x 4<br />
OR<br />
Part A
Page 3<br />
Step 2.<br />
Part G<br />
Step 3.<br />
Part I<br />
! At least two people should<br />
! Check Bed is straight<br />
complete this step.<br />
Part I<br />
<strong>Assembly</strong> <strong>Instructions</strong><br />
Hunter Bed<br />
Part H<br />
before tightening bolts.<br />
Part E<br />
x 4<br />
x 4
Page 4<br />
Step 4.<br />
Part L<br />
Part L<br />
Step 5.<br />
! Fit Part D to one end of<br />
Part M only.<br />
Part J<br />
Part M<br />
<strong>Assembly</strong> <strong>Instructions</strong><br />
Hunter Bed<br />
Part L<br />
4<br />
8<br />
Part D<br />
Part K<br />
Part M<br />
Part D<br />
x 1 (Double)<br />
x 2 (Queen)<br />
x 3 (King)<br />
Part B<br />
Part E
Page 5<br />
Step 6.<br />
12<br />
11<br />
10<br />
09<br />
08<br />
07<br />
06<br />
05<br />
04<br />
03<br />
02<br />
01<br />
! Follow the diagram below to<br />
<strong>Assembly</strong> <strong>Instructions</strong><br />
Hunter Bed<br />
correctly position Part M<br />
assembly between the slats<br />
Double Queen King<br />
Bed Head end<br />
Bed Foot end Bed Foot end<br />
Bed Head end<br />
Bed Head end Bed Head end<br />
12<br />
11<br />
10<br />
09<br />
08<br />
07<br />
06<br />
05<br />
04<br />
03<br />
02<br />
01<br />
12<br />
11<br />
10<br />
09<br />
08<br />
07<br />
06<br />
05<br />
04<br />
03<br />
02<br />
01<br />
Bed Foot end<br />
Bed Foot end
Page 6<br />
Step 7.<br />
x 24<br />
Part F<br />
<strong>Assembly</strong> <strong>Instructions</strong><br />
Hunter Bed<br />
Part K & L<br />
Part M<br />
Part D<br />
x 1 (Double)<br />
x 2 (Queen)<br />
x 3 (King)<br />
Part B<br />
Part E
Page 7<br />
Step 8.<br />
Step 9.<br />
<strong>Assembly</strong> <strong>Instructions</strong><br />
Hunter Bed<br />
! At least 2 people should<br />
lower the slat assembly into<br />
the bed<br />
Part C<br />
x 2<br />
Part L