

Instruction Manual - Team Associated
Instruction Manual - Team Associated
Instruction Manual - Team Associated

You also want an ePaper? Increase the reach of your titles
YUMPU automatically turns print PDFs into web optimized ePapers that Google loves.
29<br />
:: Tuning Tips<br />
Tips for Beginners:<br />
Before making any changes to the standard setup, make sure you can get around the track without crashing. Changes<br />
to your vehicle will not be beneficial if you can’t stay on the track. Your goal is consistent laps.<br />
Once you can get around the track consistently, start tuning your vehicle. Make only ONE adjustment at a time, testing<br />
it before making another change. If the result of your adjustment is a faster lap, mark the change on the included setup<br />
sheet (make adddtional copies of the sheet before writing on it). If your adjustment results in a slower lap, revert back to<br />
the previous setup and try another change.<br />
When you are satisfied with your vehicle, fill in the setup sheet thoroughly and file it away. Use this as a guide for future<br />
track days or conditions.<br />
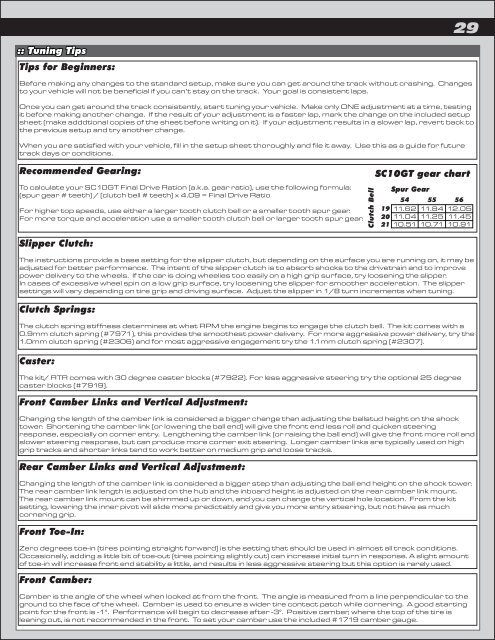
Recommended Gearing:<br />
To calculate your SC10GT Final Drive Ration (a.k.a. gear ratio), use the following formula:<br />
(spur gear # teeth) / (clutch bell # teeth) x 4.09 = Final Drive Ratio<br />
For higher top speeds, use either a larger tooth clutch bell or a smaller tooth spur gear.<br />
For more torque and acceleration use a smaller tooth clutch bell or larger tooth spur gear.<br />
Slipper Clutch:<br />
The instructions provide a base setting for the slipper clutch, but depending on the surface you are running on, it may be<br />
adjusted for better performance. The intent of the slipper clutch is to absorb shocks to the drivetrain and to improve<br />
power delivery to the wheels. If the car is doing wheelies too easily on a high grip surface, try loosening the slipper.<br />
In cases of excessive wheel spin on a low grip surface, try loosening the slipper for smoother acceleration. The slipper<br />
settings will vary depending on tire grip and driving surface. Adjust the slipper in 1/8 turn increments when tuning.<br />
Clutch Springs:<br />
The clutch spring stiffness determines at what RPM the engine begins to engage the clutch bell. The kit comes with a<br />
0.9mm clutch spring (#7971), this provides the smoothest power delivery. For more aggressive power delivery, try the<br />
1.0mm clutch spring (#2306) and for most aggressive engagement try the 1.1mm clutch spring (#2307).<br />
Caster:<br />
The kit/ RTR comes with 30 degree caster blocks (#7922). For less aggressive steering try the optional 25 degree<br />
caster blocks (#7919).<br />
Front Camber Links and Vertical Adjustment:<br />
Changing the length of the camber link is considered a bigger change than adjusting the ballstud height on the shock<br />
tower. Shortening the camber link (or lowering the ball end) will give the front end less roll and quicken steering<br />
response, especially on corner entry. Lengthening the camber link (or raising the ball end) will give the front more roll and<br />
slower steering response, but can produce more corner exit steering. Longer camber links are typically used on high<br />
grip tracks and shorter links tend to work better on medium grip and loose tracks.<br />
Rear Camber Links and Vertical Adjustment:<br />
Changing the length of the camber link is considered a bigger step than adjusting the ball end height on the shock tower.<br />
The rear camber link length is adjusted on the hub and the inboard height is adjusted on the rear camber link mount.<br />
The rear camber link mount can be shimmed up or down, and you can change the vertical hole location. From the kit<br />
setting, lowering the inner pivot will slide more predictably and give you more entry steering, but not have as much<br />
cornering grip.<br />
Front Toe-In:<br />
Zero degrees toe-in (tires pointing straight forward) is the setting that should be used in almost all track conditions.<br />
Occasionally, adding a little bit of toe-out (tires pointing slightly out) can increase initial turn in response. A slight amount<br />
of toe-in will increase front end stability a little, and results in less aggressive steering but this option is rarely used.<br />
Front Camber:<br />
SC10GT gear chart<br />
Camber is the angle of the wheel when looked at from the front. The angle is measured from a line perpendicular to the<br />
ground to the face of the wheel. Camber is used to ensure a wider tire contact patch while cornering. A good starting<br />
point for the front is -1°. Performance will begin to decrease after -3°. Positive camber, where the top of the tire is<br />
leaning out, is not recommended in the front. To set your camber use the included #1719 camber gauge.<br />
Clutch Bell<br />
19<br />
20<br />
21<br />
Spur Gear<br />
54 55 56<br />
11.62 11.84<br />
11.04 11.25<br />
10.51 10.71<br />
12.05<br />
11.45<br />
10.91


