high grass mower ft 155 - Benassi
high grass mower ft 155 - Benassi
high grass mower ft 155 - Benassi

Create successful ePaper yourself
Turn your PDF publications into a flip-book with our unique Google optimized e-Paper software.
SpA<br />
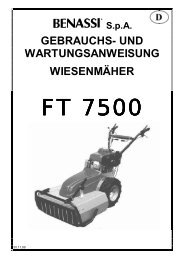
OPERATION AND<br />
MAINTENANCE MANUAL<br />
SERIES<br />
HIGH GRASS MOWER<br />
FT <strong>155</strong>
FT <strong>155</strong><br />
CONTENTS<br />
◊<br />
◊<br />
◊<br />
◊<br />
◊<br />
◊<br />
◊<br />
◊<br />
◊<br />
◊<br />
INTRODUCTION<br />
IDENTIFICATION AND TECHNICAL CHARACTERISTICS<br />
PACKING AND TRANSPORT<br />
SAFETY RULES AND LIMITS ON USE<br />
STARTING AND STOPPING THE MACHINE<br />
OPERATING AND REGULATING THE MACHINE<br />
MAINTENANCE<br />
TESTS FOR SAFETY<br />
WARRANTY<br />
CERTIFICATION<br />
INTRODUCTION<br />
• Thank you for having selected our product. We would like to welcome you<br />
among our many customers.<br />
• We are certain that you will appreciate the performance and the operating<br />
ease of this machine.<br />
• Our wide experience in the sector, the use of top grade materials and the<br />
<strong>high</strong> quality production ensure the flawless efficiency of the machine, which is<br />
designed to give many years of use if operated and maintained correctly.<br />
• We have therefore composed this manual to familiarise you with the use of<br />
the machine, its construction, operating features and applications, which will<br />
also facilitate maintenance.<br />
• Pay special attention to the rules in this manual that are preceded by the<br />
symbol below:<br />
CAUTION<br />
• This symbol indicates that the failure to comply with these rules may lead to<br />
personal injury.<br />
2
FT <strong>155</strong><br />
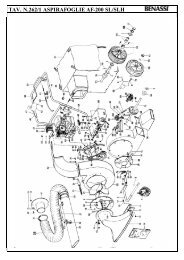
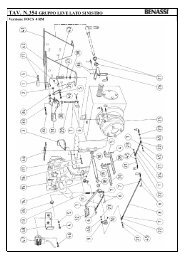
1. Handle adjustment<br />
2. Fuel cap<br />
3. Blade engagement<br />
4. Wheel release lever<br />
5. Accelerator hand lever<br />
6. Clutch lever<br />
7. Motor stop lever<br />
8. Handle<br />
9. Pull start<br />
10. Oil cap<br />
11. Cutting height adjustment<br />
12. Bumper frame<br />
13. Front protection<br />
LIST OF MACHINE PARTS<br />
3
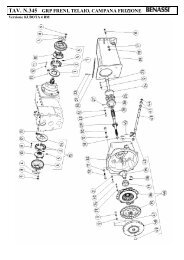
IDENTIFICATION AND TECHNICAL CHARACTERISTICS<br />
FT <strong>155</strong><br />
Model : FT <strong>155</strong><br />
Weight: 67 kg<br />
Motor: 4 stroke<br />
Make: BRIGGS & STRATTON<br />
Model: DIAMOND<br />
Swept volume: 190 cc.<br />
Max. pow er to driv ing sha<strong>ft</strong>:<br />
5.5 HP (kW 4)<br />
Model : FT <strong>155</strong> H<br />
Weight: 68 kg<br />
Motor: 4 stroke<br />
Make: HONDA<br />
Model: GXV 140<br />
Swept volume: 135 cc.<br />
Max. pow er to driv ing sha<strong>ft</strong>:<br />
5 HP (kW 3,7)<br />
• Fuel for 4-stroke motor: Petrol 100/130 Octane<br />
• Start-up w ith self-winding cord<br />
• Dry air filter<br />
• 4-STROKE MOTOR OIL : AGIP DIESEL SIGMA SAE 30 0.6 l<br />
• 1 forw ard gear w ith clutch lever<br />
• Blade engage ment lev er on handle<br />
• Elect rical safety st op abov e hand clut ch<br />
• Height -adjustable handle<br />
• Cut t ing height adjustment<br />
• For machine identification (serial number, motor, w eight, pow er) read the data plate as show n in the photo. See<br />
Fig. 1, Ref. "A".<br />
-Fig. n°1-<br />
-Fig. n°2-<br />
PACKING AND TRANSPORT<br />
◊<br />
◊<br />
◊<br />
WIDTH: 61 cm<br />
DEPTH: 110 cm<br />
WEIGHT: 63 cm<br />
⇒ The machine is delivered in its ow n packing.<br />
⇒ A<strong>ft</strong>er unpacking the <strong>high</strong> <strong>grass</strong> mow er, fasten the handle to the handle support using the screw s provided, and<br />
adjust the height to the most comfortable position.<br />
⇒ Fit the lever for the blade engagement-disengagement on the handlebar:<br />
⇒ A<strong>ft</strong>er unpacking the machine, screw on the nut w ith w asher "B" and register "C" as show n in Fig. 7. Register "C"<br />
should be screwed on all the way. Ensure that the blade engagement lead "D" is not tightened when the blade is<br />
disengaged.<br />
⇒ If it is tightened, move the register of the tightening pulley under the hood. The knob on lever A should be fitted<br />
from the outside part of the handlebar.<br />
⇒ For t ransport ing conv enience, t he handle may be disassembled by unscrew ing t he tw o knobs (Ref. "A" Fig. 2).<br />
⇒ The machine is delivered w ith oil in the gearbox.<br />
4
FT <strong>155</strong><br />
SAFETY RULES<br />
• Please read caref ully the operation and maintenance manual supplied with the machine.<br />
• Persons under 16 years of age are prohibited f rom operating the machine.<br />
• The operator is responsible for all damages as the machine is under his control.<br />
• Empty the tank of petrol should the machine be transported.<br />
• Should the machine be le<strong>ft</strong> unattended, ensure that it cannot start up again.<br />
• Nev er work in bare f eet. Wear sturdy shoes and long pants.<br />
• Bef ore using the machine, inspect the area to be cut and remove sticks, stones and any other extraneous objects.<br />
• Bef ore starting the machine, ensure that there is a 5-meter radius of free space around the machine.<br />
• Dry petrol leaks.<br />
• Alway s add f uel to the tank with the motor off. The supply and/or transfer of f uel must alway s take place outdoors, away<br />
from flames or heat sources. Do not smoke during this operation.<br />
• Bef ore using the <strong>high</strong> <strong>grass</strong> <strong>mower</strong>, the operator must learn how to shut off the motor quickly, and how to utilize the machine<br />
and the controls correctly.<br />
• Do not operate the motor where carbon monoxide exhaust may accumulate.<br />
• Nev er utilize the machine incomplete of or without the relative saf ety dev ice.<br />
• Nev er disassemble or clean the blade with the motor running.<br />
• Caution! Never work on slopes exceeding 50%.<br />
• Caution! Always use the f ront y ellow protection; it should be remov ed only when the material to cut is at a height of more<br />
than 35 cm.<br />
• Cutting shrubs with a diameter of more than 2 cm is not adv ised.<br />
• The manuf acturer shall not be held liable f or any damages resulting f rom the failure to comply with these rules.<br />
• During blade maintenance and cleaning, the spark plug cable must be disconnected.<br />
STARTING AND STOPPING THE MACHINE<br />
Whenev er the motor is started up, f irst make a careful check of the following:<br />
• Check that the tank is f illed with fuel and the cock is open.<br />
• Check the motor's oil lev el.<br />
• REFER TO THE MOTOR INSTRUCTION AND MAINTENANCE MANUAL.<br />
• Bring the gas lever to ”START” position (Fig. 3)<br />
• Squeeze the clutch lev er "A", push down the " Motor stop" lev er "B", and block them with saf ety button "C".<br />
• Start the motor by pulling the self -winding cord (read carefully the motor instruction manual under "START-UP"<br />
• With the motor running, gently engage the blade.<br />
• A<strong>ft</strong>er releasing the clutch lever, the machine is ready to operate.<br />
• The machine is stopped by moving the STOP lever (red) (Fig. 4 Ref. "B") to the resting position.<br />
-Fig. n°3-<br />
-Fig. n°4-<br />
OPERATING AND REGULATING THE MACHINE<br />
• The FT<strong>155</strong> machi ne has been designed to cut and clean very thick <strong>grass</strong>y and w ooded areas.<br />
• The machine is suitable for rugged terrain and for hilly and mountainous areas w hich do not, how ever, have a<br />
slope of more than 50%.<br />
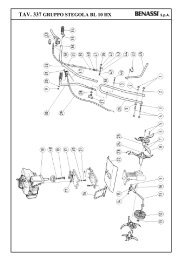
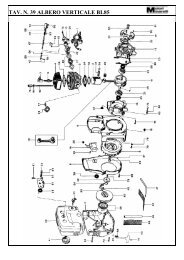
• The handle is height -adjustable in tw o posit ions. The first adjust ment is made on t he handle support by select ing<br />
the appropriate hole (Fig. 2 Ref. "A"); the second adjustment is made on the gearbox by adjusting the low est bolt<br />
(Fig. 10 Ref. "A")<br />
5
FT <strong>155</strong><br />
• Before starting w ork, adjust the cutting height by means of the cutting height adjusting knob (Fig. 6). This height<br />
varies according to the type of terrain, the height of the <strong>grass</strong> to be cut, the diameter of the shrubs to be<br />
cleaned and the feel of the operator.<br />
• W hen both the blade and the machine start operation, it is advised to move very slow ly w ith the machine at<br />
medium speed.<br />
• If the driving belt slips, loosen the register on the lever (Fig. 4 Ref. "D"), taking care to leave a space of<br />
approx imately 5 mm before the clutch engagement.<br />
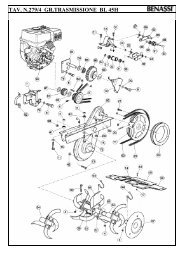
Adjustment of the blade pulley belt tightener :<br />
1. Remove the front hood by unscrewing the four M6 screws that fasten the cover (Fig. 6 Ref. "A").<br />
2. Insert the blade engagement lever (Fig. 7 Ref. "A") so that the belt tightener (Fig. 9 Ref."B") rests on the square<br />
bracket's vibration-damping pad.<br />
3. Adjust the belt tension (Fig. 8 Ref. "A") with the register (Fig.8 Ref. "A") a<strong>ft</strong>er loosening the two M10 screws<br />
blocking the hex agonal pipe (keeping the belt tightener resting on the square bracket's vibration-damping<br />
pad).<br />
4. Lock the tw o M10 screw s and check that in the braked position the cable is free (Fig. 9 Ref. "A"), and that the<br />
belt tightener rests on the vibration-damping pad by means of the blade engagement lever register (Fig. 7 Ref.<br />
"C"). Also check that the belt tension is correct.<br />
• If the machine has been subjected to heavy use, the discharge may tend to jam. If this happens, the operator<br />
should: 1) raise the cutting height and 2) reduce the w orking section if the <strong>grass</strong> is too <strong>high</strong> or thick.<br />
• If the <strong>high</strong> <strong>grass</strong> mow er is used near a w all or sidewalk, take care not to bang the blade as this could lead to<br />
damage to the machine.<br />
• To move the machine forw ard or back, squeeze the clutch lever (Fig. 4 Ref. "A") and release the w heels w ith the<br />
lever (Fig.3 Ref. "B")<br />
-Fig. n°6-<br />
-Fig. n°7-<br />
MAINTENANCE<br />
• To change the oil or to perform other maintenance operations on the motor (spark plugs, air filter, adjustments),<br />
refer to the motor instruction manual provided.<br />
N.B. To unscrew the oil drain cap of the motor, remove the rear cover (Fig.2 Ref. B).<br />
• Make a regular check of the oil in the gearbox (Fig. 10 Ref. "C")<br />
• Every 200 hours change the oil completely by unscrew ing the oil drain cap (Fig. 10 Ref. "B"). Empty out and<br />
screw back the cap. Fill the box from cap "C" (Fig. 10) until the oil level just reaches the hole. Use only<br />
recommended oil.<br />
• For any servicing, especially during the w arranty period, seek the assistance of a dealer-authorized repair shop.<br />
Make a regular check that screws are tightened, specifically the screws fastening the bar to the relative support.<br />
• W hen the blade does not cut adequately, it should be disassembled, sharpened and balanced. An unbalanced<br />
blade may damage t he mac hine w it h vibrat ions.<br />
CAUTION<br />
It is advised not to keep the motor running when the machine is not being<br />
used for its specific purpose.<br />
6
FT <strong>155</strong><br />
-Fig. n°8- -Fig. n°9- -Fig. n°10-<br />
WARRANTY<br />
The machines and accessories are guaranteed for 12 months, w ith the ex ception of electrical parts or parts in<br />
rubber. The manufacturer shall replace pieces recognized as defective free of charge. Labour and transport shall<br />
be at the ex pense of the purchaser. W arranty requests must be made through dealers authorized by the<br />
manufact urer.<br />
With regard to materials not of our manufacture, with special reference to the motor, the rules laid down by the<br />
respective manufacturers shall apply. Any requests for repair shall therefore be directed to the specific service<br />
centres in the respective areas.<br />
For any problem or repair, contact the dealer w here the machine w as purchased.<br />
SAFETY TESTS AND CERTIFICATION<br />
Declar ation of CE conform ity in accor dance wit h EEC directive 89/392 and am endments.<br />
- Via Lampedusa 1 - 40010 San Matteo della Decima BO Italy<br />
We hereby declare that the machine conforms w ith the essential requirements for health and safety in accordance<br />
w ith EEC Directive 89/392 and amendments.<br />
HIGH GRASS MOWER TYPE<br />
MODEL FT <strong>155</strong>, FT <strong>155</strong> H<br />
For verification of the conformity w ith the afore-mentioned Directives reference has been made to the follow ing:<br />
Standard PREN 709/94 dated 16/06/94 for pow er hoes and engine-driven cultivators, documents N67 CEN TC<br />
144/WG4 April '94 for alternative and rotating pow er mow ers PREN 836/92 update 92 for law n mow ers. For garden<br />
vacuum-bags, reference EN 294<br />
CHAIRMAN OF THE BOARD<br />
S. Matteo della Decima 01/04/98<br />
RESULT AND TESTS<br />
HIGH GRASS MOWER TYPE<br />
MODEL FT <strong>155</strong>, FT <strong>155</strong> H<br />
Acoustic pressure to the operator: LAeq = 78.1 dB (A)<br />
Testing condit ions at a height of 1.6 m at handle midpoint .<br />
Vibration to handles w ith w eighting ISO.5349 value 1.84m/sec ².<br />
7
FT <strong>155</strong><br />
SpA<br />
VIA LAMPEDUSA 1<br />
40010 S. MATTEO DELLA DECIMA (BO)<br />
ITALY<br />
TEL. 0039/051/820534 TELEFAX 0039/051/682.61.64<br />
8