User Manual - Etilize
User Manual - Etilize User Manual - Etilize
Reinstalling the side cover If you removed the side cover, reinstall it. Cover-release latch Key lock Note: The rear adapter-retention bracket rests against the server side cover. You might find it easier to lay the server on its side to replace the side cover. To reinstall the side cover, complete the following steps: 1. Make sure that all cables, adapters, and other components are installed and seated correctly and that you have not left loose tools or parts inside the server. Also, make sure that all internal cables are correctly routed. Note: The cover-release latch must be in the unlocked (opened) position before you install the side cover. 2. Position the lip on the bottom edge of the side cover on the ledge on the bottom of the chassis; then, rotate the cover up to the chassis, and then press down on the cover release latch and push the cover completely closed until it latches securely into place. 3. Press down on the cover-release latch and close the cover to secure it in place. 4. Lock the side cover. Note: When you lock the server side cover, it locks both the cover and the bezel. 64 System x3200 M3 Types 7327 and 7328: Installation and User’s Guide
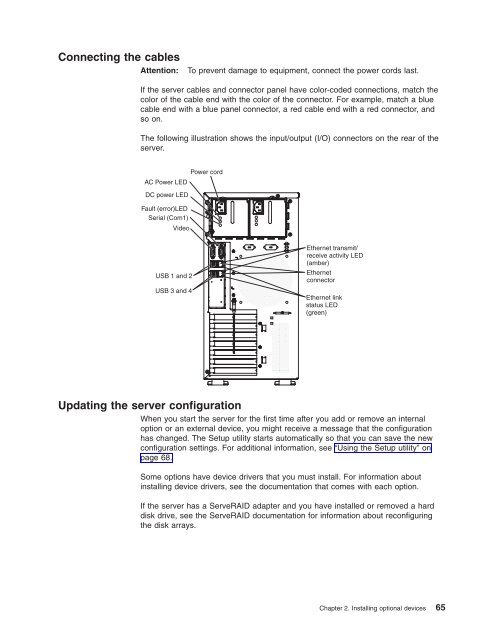
Connecting the cables Attention: To prevent damage to equipment, connect the power cords last. If the server cables and connector panel have color-coded connections, match the color of the cable end with the color of the connector. For example, match a blue cable end with a blue panel connector, a red cable end with a red connector, and so on. The following illustration shows the input/output (I/O) connectors on the rear of the server. Power cord AC Power LED DC power LED Fault (error)LED Serial (Com1) Video USB 1 and 2 USB 3 and 4 Ethernet transmit/ receive activity LED (amber) Ethernet connector Ethernet link status LED (green) Updating the server configuration When you start the server for the first time after you add or remove an internal option or an external device, you might receive a message that the configuration has changed. The Setup utility starts automatically so that you can save the new configuration settings. For additional information, see “Using the Setup utility” on page 68. Some options have device drivers that you must install. For information about installing device drivers, see the documentation that comes with each option. If the server has a ServeRAID adapter and you have installed or removed a hard disk drive, see the ServeRAID documentation for information about reconfiguring the disk arrays. Chapter 2. Installing optional devices 65
- Page 32 and 33: IBM Systems Director v Memory chang
- Page 34 and 35: The following is an illustration of
- Page 36 and 37: Hard disk drive activity LED Power-
- Page 38 and 39: Rear view The following illustratio
- Page 40 and 41: v If a power failure occurs while t
- Page 42 and 43: System-board internal connectors Th
- Page 44 and 45: System-board switches and jumpers T
- Page 46 and 47: System-board external connectors Th
- Page 48 and 49: v Before you install optional hardw
- Page 50 and 51: Removing the side cover Important:
- Page 52 and 53: 6. Carefully pull the two bezel cli
- Page 54 and 55: U = Unbuffered DIMM with no ECC (x6
- Page 56 and 57: v The following table lists the max
- Page 58 and 59: Installing drives Depending on the
- Page 60 and 61: DANGER Some laser products contain
- Page 62 and 63: Drive retainer clip 10. Slide the d
- Page 64 and 65: Server model with four hot-swap dri
- Page 66 and 67: To install a simple-swap hard disk
- Page 68 and 69: Installing an adapter The following
- Page 70 and 71: 8. If you are installing a full-len
- Page 72 and 73: Important: To ensure that any of yo
- Page 74 and 75: Note: Before you continue, check al
- Page 76 and 77: Installing the virtual media key To
- Page 78 and 79: 4. If you are instructed to return
- Page 80 and 81: Completing the installation If you
- Page 84 and 85: Connecting external devices Install
- Page 86 and 87: Using the Setup utility The followi
- Page 88 and 89: Select this choice to view or set t
- Page 90 and 91: Passwords From the User Security me
- Page 92 and 93: Starting the backup server firmware
- Page 94 and 95: 2. The ServerGuide program stores i
- Page 96 and 97: Note: Approximately 1 to 3 minutes
- Page 98 and 99: 3. On the Welcome page, type a time
- Page 100 and 101: In addition, you can download an LS
- Page 102 and 103: Updating IBM Systems Director If yo
- Page 104 and 105: Software service and support You ca
- Page 106 and 107: Important notes Adobe and PostScrip
- Page 108 and 109: Electronic emission notices 3039 E.
- Page 110 and 111: IBM verändert bzw. wenn Erweiterun
- Page 112 and 113: drive bay filler panel 41, 43 bay i
- Page 114 and 115: password administrator 72 forgotten
- Page 116: 98 System x3200 M3 Types 7327 and 7
Connecting the cables<br />
Attention: To prevent damage to equipment, connect the power cords last.<br />
If the server cables and connector panel have color-coded connections, match the<br />
color of the cable end with the color of the connector. For example, match a blue<br />
cable end with a blue panel connector, a red cable end with a red connector, and<br />
so on.<br />
The following illustration shows the input/output (I/O) connectors on the rear of the<br />
server.<br />
Power cord<br />
AC Power LED<br />
DC power LED<br />
Fault (error)LED<br />
Serial (Com1)<br />
Video<br />
USB 1 and 2<br />
USB 3 and 4<br />
Ethernet transmit/<br />
receive activity LED<br />
(amber)<br />
Ethernet<br />
connector<br />
Ethernet link<br />
status LED<br />
(green)<br />
Updating the server configuration<br />
When you start the server for the first time after you add or remove an internal<br />
option or an external device, you might receive a message that the configuration<br />
has changed. The Setup utility starts automatically so that you can save the new<br />
configuration settings. For additional information, see “Using the Setup utility” on<br />
page 68.<br />
Some options have device drivers that you must install. For information about<br />
installing device drivers, see the documentation that comes with each option.<br />
If the server has a ServeRAID adapter and you have installed or removed a hard<br />
disk drive, see the ServeRAID documentation for information about reconfiguring<br />
the disk arrays.<br />
Chapter 2. Installing optional devices 65


