User Manual - Etilize
User Manual - Etilize
User Manual - Etilize

You also want an ePaper? Increase the reach of your titles
YUMPU automatically turns print PDFs into web optimized ePapers that Google loves.
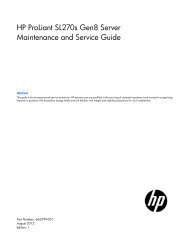
Hard disk drive cable 0 - 3<br />
ServeRAID-MR10is VAULT SAS/<br />
SATA controller<br />
Battery<br />
Hard disk drive<br />
cable connector 0 - 3<br />
Note: The drive cage should be in the open position. This illustration shows it<br />
in the closed position.<br />
8. Press the ServeRAID-MR10i SAS/SATA controller firmly into the connector on<br />
the system board.<br />
9. Take the other end of the signal cable that is attached to the drive backplane<br />
section for drive bays 0 through 3 (as labeled on the front of the drive cage)<br />
and connect it to the connector that is closest to the battery on the<br />
ServeRAID-MR10i SAS/SATA controller.<br />
10. Replace the hard disk drive fan assembly:<br />
a. Insert the hard disk drive fan assembly retaining tab over the right edge of<br />
the hard disk drive backplane; then, rotate the hard disk drive fan assembly<br />
toward the backplane. Do not fully close the hard disk drive fan assembly.<br />
b. Route the signal cables and power cable through the slot on the edge of<br />
the hard disk drive fan assembly. Make sure that the cables will not be<br />
pinched between the hard disk drive fan assembly and the hard disk drive<br />
backplane when the assembly is installed.<br />
c. Rotate the hard disk drive fan assembly toward the backplane until the<br />
release tabs are fully engaged and snap into place.<br />
11. Reconnect the hard disk drive fan assembly cable to the system board.<br />
12. Rotate the drive cage back into the server until it stops; then, press and hold<br />
the retaining tab on top of the drive cage while you rotate the drive cage into<br />
the chassis until it is in the closed position.<br />
13. Reinstall the hard disk drives.<br />
Chapter 2. Installing optional devices 55