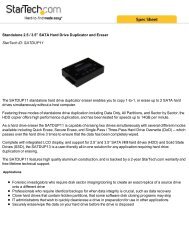
User Manual - Etilize
User Manual - Etilize
User Manual - Etilize

Create successful ePaper yourself
Turn your PDF publications into a flip-book with our unique Google optimized e-Paper software.
Important: To ensure that any of your ServeRAID-MR10i, ServeRAID-MR10is, or<br />
10M adapters function properly on UEFI-based servers, make sure that the adapter<br />
firmware level is updated to at least 11.xx-XXX, and the supporting drivers.<br />
Attention: Some cluster solutions require specific code levels or coordinated code<br />
updates. If the device is part of a cluster solution, verify that the latest level of code<br />
is supported for the cluster solution before you update the code.<br />
To install the ServeRAID-MR10i adapter, complete the following steps:<br />
1. Read the safety information that begins on page vii and “Installation guidelines”<br />
on page 29.<br />
2. Turn off the server and peripheral devices, and disconnect the power cords<br />
and all external cables.<br />
Attention: To avoid breaking the retaining clips or damaging the<br />
ServeRAID-MR10i adapter connector, open and close the clips gently.<br />
3. Unlock and remove the side cover (see “Removing the side cover” on page<br />
32).<br />
4. Remove the hard disk drive fan assembly:<br />
a. Rotate the hard disk drive fan assembly cable out of the system board.<br />
b. Remove all hard disk drives.<br />
c. Press and hold the drive cage release tab on the side of the drive cage;<br />
then, rotate the drive cage out of the chassis until the retaining tab on top<br />
of the cage locks into place.<br />
d. Pull out on the hard disk drive fan assembly release tabs (at the blue dots);<br />
then, rotate the hard disk drive fan assembly away from the drive cage<br />
slightly.<br />
5. Disconnect the signal and power cables and the existing SAS/SATA controller<br />
(if one is installed); then, remove the controller from the server.<br />
6. Touch the static-protective package that contains the ServeRAID-MR10i<br />
SAS/SATA controller to any unpainted metal surface on the server. Then,<br />
remove the ServeRAID-MR10i SAS/SATA controller from the package.<br />
7. Align the ServeRAID-MR10i SAS/SATA controller so that the keys align<br />
correctly with the connector on the system board.<br />
Attention: Incomplete insertion might cause damage to the system board or<br />
the ServeRAID-MR10i controller.<br />
54 System x3200 M3 Types 7327 and 7328: Installation and <strong>User</strong>’s Guide