SOULO MESH INNER TENT - Hilleberg
SOULO MESH INNER TENT - Hilleberg
SOULO MESH INNER TENT - Hilleberg

Create successful ePaper yourself
Turn your PDF publications into a flip-book with our unique Google optimized e-Paper software.
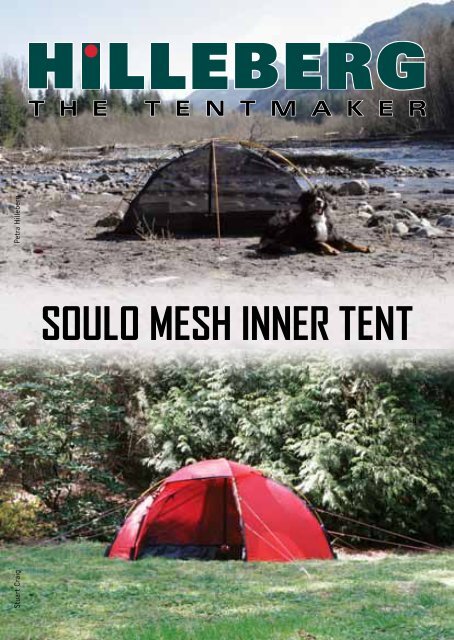
<strong>SOULO</strong> <strong>MESH</strong> <strong>INNER</strong> <strong>TENT</strong><br />
Stuart Craig<br />
Petra <strong>Hilleberg</strong>
<strong>Hilleberg</strong> Soulo Mesh Inner Tent<br />
sv<br />
Välkommen till ditt nya <strong>Hilleberg</strong> Soulo Mesh Innertält<br />
Vi rekommenderar att du läser instruktionshäftet noggrant innan du sätter upp ditt tält och<br />
att du tränar på att sätta upp och ta ner det innan du går ut på din första tur.<br />
Soulo Mesh Innertält levereras med Tältet och en Soulo stånghållarsats bestående av 2<br />
lösa stånghållare, 1 stånghållare med lina med ring i den lösa änden och kopplad med 3<br />
stånghållare med linor och linsträckare plus packpåse och instruktionshäfte. obs: Soulo<br />
Mesh Innertält kräver tre stänger, två 344 cm och en 285 cm och vi rekommenderar att du<br />
fäster alla 6 stånghållarna med markpinnar. Både stänger och markpinnar är standard på<br />
ett ordinarie Soulo tält men de säljs även separat.<br />
Soulo Mesh Innertält är designat för att användas separat men det kan även användas som<br />
innertält i ett standard Soulo. Med ett meshinnertält ökar ventilationen men Soulo blir då<br />
ett 3-säsongers tält istället för ett normalt åretrunttält.<br />
sv<br />
Skötsel av ditt Soulo Mesh Innertält<br />
Förvara aldrig tältet en längre tid utan att torka det först. Häng upp det i ett väl ventilerat<br />
utrymme efter varje användning, helst med stängerna i så att vävarna inte ligger mot varandra.<br />
Städa ur tältet ordentligt innan det torkas och packas. Om det behöver rengöras använd en<br />
trasa med ljummet vatten. Kontrollera hela tältet och laga vid behov. Kontrollera blixtlåsen<br />
och borsta ur dem med en hård borste, det är extra viktigt om tältet har använts i sandiga<br />
eller smutsiga områden. Om blixtlåsen inte hålls rena, minskar deras livslängd! Rengör och<br />
kontrollera markpinnarna och ersätt trasiga eller borttappade. Kontrollera stängerna. Packa<br />
tältet i sin packpåse när det är torrt och allt är kontrollerat.<br />
När du använder tältet, försök att sätta upp det i skugga eftersom UV-strålning skadar<br />
alla vävar.<br />
en<br />
Welcome to your new <strong>Hilleberg</strong> Soulo Mesh Inner Tent!<br />
We strongly recommend that you read these instructions completely before setting up your Soulo<br />
Mesh Inner Tent, and that you practice setting it up at home before taking it on a backcountry trip.<br />
The Soulo Mesh Inner includes the Tent itself; a Soulo pole holder kit: 2 loose pole holders,<br />
plus 1 pole holder that has both a free cord with a ring in the end and 3 pole holders on cords<br />
with line runners connected to it ; stuff bag; and an instruction booklet. note: The Soulo Mesh<br />
Inner Tent requires two 344 cm and one 285 cm poles and we recommend that you peg down<br />
all 6 pole holders. Both poles and pegs come standard with the complete Soulo tent models,<br />
but they are also sold separately.<br />
While designed to be used on its own, the Soulo Mesh Inner Tent can also be used as the inner<br />
tent in a <strong>Hilleberg</strong> Soulo. Doing so will add more ventilation, but it will also make your Soulo a<br />
3-season tent, rather than an all-season one.<br />
en<br />
Care & maintenance of your Soulo Mesh Inner Tent<br />
Do not store your tent for any length of time without drying it first. After each use, hang<br />
it in a dry and well-vented place, preferably so that the walls do not touch. Before drying<br />
and packing your tent, brush off any dirt. If it needs cleaning, use only lukewarm water<br />
and a sponge. Check the entire tent for damage and make repairs if necessary. Check the<br />
zippers and brush these with a small, stiff brush. This is especially important if you have<br />
been using your tent in a sandy or dusty environment. If the zippers are not kept clean their<br />
life expectancy will decrease! Clean the pegs, and replace damaged or lost ones. Check<br />
the poles for potential damage. After your tent is dry and you have checked it completely,<br />
pack it into its stuff bag.<br />
Whenever possible, try and pitch your tent out of direct sunlight, since UV exposure damages<br />
all fabrics.<br />
de<br />
Willkommen zu Deinem neuen <strong>Hilleberg</strong> Soulo Mesh-Innenzelt!<br />
Wir empfehlen Dir, diese Anleitung vor der ersten Tour gründlich durchzulesen und den<br />
Aufbau zu üben.<br />
Das Soulo Mesh-Innenzelt besteht aus dem Mesh-Innenzelt und einem Soulo Stangenhalterset<br />
(2 losen Stangenhaltern und einer Leine kombiniert mit 4 Stangenhaltern, 3 Leinenspannern<br />
und einem Ring), 1 Packsack und einer Anleitung.<br />
achtung: Das Soulo Mesh-Innenzelt benötigt eine 285cm und zwei 344cm lange Stangen<br />
und wir empfehlen alle 6 Stangenhalter mit Heringen zu verankern. Stangen und Heringe<br />
werden mit dem Soulo Zelt geliefert oder können separat erworben werden.<br />
Das Soulo Mesh-Innenzelt kann für sich alleine aufgebaut oder als Innenzelt in einem <strong>Hilleberg</strong><br />
Soulo verwendet werden. Mit dem Mesh-Innenzelt wird die Ventilation gesteigert<br />
und ein 4-Jahreszeitenzelt zu einem 3-Saisonzelt umgerüstet.<br />
2 |<br />
de<br />
Pflege & Wartung Deines Soulo Mesh-Innenzeltes<br />
Lagere Dein Zelt niemals ohne es vorher zu trocknen. Nach jedem Gebrauch sollte es zum<br />
Trocknen aufgehängt werden – am besten mit eingebautem Gestänge, damit die Zeltwände<br />
nicht aufeinander liegen. Bürste Sand und Staub ab. Entferne Schmutzflecken mit lauwarmem<br />
Wasser. Kontrolliere Dein Zelt auf Schäden und repariere sie. Überprüfe alle Reißverschlüsse<br />
und bürste sie vor allem nach Touren in sandigen und schmutzigen Verhältnissen sauber.<br />
Mangelnde Pflege der Reißverschlüsse verkürzt deren Lebensdauer! Reinige die Heringe und<br />
ersetze verlorene oder beschädigte Heringe. Überprüfe das Gestänge auf Schäden. Nach dem<br />
Trocknen und der Kontrolle des Zeltes kann alles wieder in die Packsäcke verstaut werden.<br />
Schütze Dein Zelt vor direkter, langfristiger Sonneneinstrahlung, da UV-Strahlung dem<br />
Gewebe schadet.<br />
| 3
<strong>Hilleberg</strong> Soulo Mesh Inner Tent<br />
1<br />
a<br />
b<br />
a<br />
sv<br />
Lägg ut Soulo Mesh Innertält<br />
Välj en plats som är så vindskyddad och jämn som möjligt. Lägg ut tältet och<br />
montera ihop stängerna.<br />
1 Om den inte redan är fastsatt, montera stånghållarsatsen: Fäst de bägge lösa<br />
stånghållarna a på tältets baksida genom att sätta togglarna i tälthörnen i ringarna<br />
i stånghållarna. Lägg sedan ut de hopkopplade stånghållarna så att den med lös<br />
lina b är i mitten mittför ingången. Tag linan och drag den under golvet och fäst<br />
det togglen på baksidan e . Fäst den återstående 2 stånghållarna till de de övriga<br />
två golvhörnen c & d .<br />
c<br />
d<br />
e<br />
c<br />
a<br />
e<br />
b<br />
a<br />
d<br />
en<br />
Lay out the Soulo Mesh Inner Tent<br />
Find a spot that is as protected as possible from the wind, and that is even and<br />
level, and lay out the tent and extend the poles.<br />
1 If it is not already on, attach the pitching kit: Attach the 2 loose pole holders a<br />
to the corners of the back wall of the tent by inserting the toggle on the webbing<br />
loop on the tent into the rings on the pole holders. Lay out the corded pole holders<br />
so that the one with the free cord b is in front of the tent door. Take the cord e<br />
and pull it underneath the floor of the tent and attach it to the toggle on the back<br />
wall. Attach the remaining 2 pole holders to the remaining two tent corners c & d .<br />
c , d & e<br />
de<br />
Vorbereitung zum Aufbau des Soulo Mesh-Innenzeltes<br />
Wähle eine ebene und windgeschützte Stelle aus. Breite das Mesh-Innenzelt auf<br />
dem Boden aus. Entfalte das Gestänge und setze es sorgfältig zusammen.<br />
1 Das Stangenhalterset am Mesh-Innenzelt befestigen: Befestige die zwei losen<br />
Stangenhalter a an den Ecken der Rückseite. Führe dazu die Knebel des Mesh-<br />
Innenzeltes durch die Ringe der Stangenhalter. Richte das Stangenhalterset so<br />
aus, dass das Ende mit dem freien Leinenende b vor dem Eingang liegt. Führe die<br />
Leine e unter dem Innenzeltboden durch und befestige den Stangenhalter an der<br />
Ecke der Rückwand. Befestige die zwei übrigen Stangenhalter c & d jeweils an<br />
den Ecken neben dem Eingang.<br />
4 |<br />
| 5
<strong>Hilleberg</strong> Soulo Mesh Inner Tent<br />
1 2<br />
sv<br />
Fäst stängerna och sätt upp tältet<br />
1 & 2 Träd de två längre stängerna genom de längsgående resårbanden och<br />
bandöglorna och sätt ena sidans stångändar i stånghållarna. Kontrollera att bägge<br />
stänger går genom bandöglorna [röda pilar]. Böj stängerna och sätt in de andra<br />
stångändarna i motstående sidas stånghållare. 3 Träd den kortare stången genom<br />
resårbanden ovanför ingången och motsvarande resårer på tältets baksida och fäst<br />
stångänden i stånghållaren på baksidan. Böj stången och sätt in den i stånghållaren<br />
på andra sidan. 4 & 5 Tag den lösa linan och vira den uppåt runt stången. Fäst<br />
resårbandets toggle ovanför ingången i ringen på linan. 6 Justera linsträckarna på<br />
linorna som förbinder stånghållarna så att alla stånghållare står jämnt på marken.<br />
3 4<br />
en<br />
Thread the poles and set up the tent<br />
1 & 2 Thread the two longer poles into the lines of elastic and webbing loops that<br />
cross the tent lengthwise and seat the ends into the pole holders. Make sure to<br />
feed both poles through the webbing loops [red arrows]. Arch the poles in<br />
turn and seat the ends into the remaining corner pole holders. 3 Thread the shorter<br />
pole through the elastic loop above the door and the loops opposite it on the tent's<br />
back wall and seat the pole end into the back pole holder. Arch the pole and seat the<br />
other end. 4 & 5 Pull up the free cord and wrap it upward along and around the<br />
pole. Insert the toggle on the elastic loop above the door into the ring on the end of<br />
the cord. 6 Adjust the line runners on the cords connecting the pole holders so that<br />
all the pole holders rest evenly on the ground.<br />
5 6 de Abschluss der Stangenmontage<br />
6 |<br />
1 & 2 Führe die zwei längeren Stangen durch die beiden diagonal verlaufenden<br />
Gummibandreihen am Innenzelt und stecke die Stangenenden in die Stangenhalter.<br />
Achte darauf, beide Stangen durch die Gummischlaufen am Giebel [rote pfeile]<br />
zu führen. Wölbe die Stangen auf und stecke die Stangenenden in die freien Stangenhalter<br />
an den Innenzeltecken. 3 Führe die kürzere Stange durch die Gummischlaufe<br />
oberhalb des Innenzelteingangs und danach durch die Schlaufen an der Rückwand.<br />
Stecke das Ende in den Stangenhalter an der Rückwand, wölbe die Stange und stecke<br />
das andere Stangenende in den Stangenhalter vor dem Eingang. 4 & 5 Wickle die<br />
freie Leine aufwärts um die Stange vor dem Eingang. Befestige den Knebel der Gummischlaufe<br />
oberhalb des Innenzelteingangs am Ring des Leinenendes. 6 Justiere die<br />
Leinenspanner, bis alle Stangenhalter gleichmäßig den Boden berühren.<br />
| 7
<strong>Hilleberg</strong> Soulo Mesh Inner Tent<br />
1<br />
2<br />
sv<br />
Fäst markpinnarna<br />
1 & 2 Om du inte redan gjort det, fäst alla stånghållare i marken med markpinnar<br />
så tältet står spänt.<br />
Korrekt fastsättning av markpinnarna<br />
3 Tryck ner alla pinnar i hela sin längd cirka 45 graders vinkel ner i marken.<br />
4 Om det inte går att få ner dem i rätt vinkel är det bättre att ha en flackare vinkel<br />
än att låta en del av pinnen sticka upp.<br />
5 – 7 Om det är svårt att trycka ner pinnen helt, pressa eller slå ned den med<br />
hjälp av en sten.<br />
3<br />
4<br />
en<br />
Peg the pole holders<br />
1 & 2 If you have not already done so, peg down all the pole holders and make<br />
sure that the tent sits straight.<br />
A note about peg usage<br />
3 Press in all pegs completely at about a 45° angle to the surface of the ground.<br />
4 It is better to use a shallower angle (closer to parallel to the surface) than it is<br />
to leave a peg sticking up from the ground.<br />
5 – 8 If it is hard to get the pegs in, use a rock or other hard object to press – or<br />
if necessary, to lightly hammer – them in fully.<br />
5 6<br />
7<br />
de<br />
Heringe setzen<br />
1 & 2 Verankere alle Stangenhalter mit Heringen. Achte darauf, dass der Zeltboden<br />
gleichmäßig ausgestreckt ist.<br />
Richtiges Setzen der Heringe<br />
3 Presse die Heringe vollständig und im 45°-Winkel in den Boden.<br />
4 Sollte dies nicht möglich sein, ist ein flacherer Winkel besser, als dass ein Teil<br />
des Herings nicht im Boden steckt.<br />
5 – 7 Benutze einen harten Gegenstand, wenn es schwierig ist, den Hering ganz<br />
in den Boden zu schlagen.<br />
8 |<br />
| 9
<strong>Hilleberg</strong> Soulo Mesh Inner Tent<br />
1<br />
sv<br />
Täck Soulo Mesh Innertält med ett Soulo yttertält<br />
1 Lägg Soulo yttertält över Soulo Mesh Innertält så att kanalerna och krokbandet<br />
på yttertältet ligger på stängerna på innertältet. Kontrollera att ingångarna är intill<br />
varandra. 2 Fäst pinnfästena på yttertältet i marken eller fäst dem i markpinnarna<br />
på innertältet. 3 Montera och spänn ventilskyddet.<br />
obs: Du kan byta ut ordinarie innertält i Soulo mot ett Soulo Mesh Innertält, genom<br />
att ta ut standard innertältet och sätta in mesh innertältet istället. Se nedre bilden<br />
på omslaget.<br />
2 3<br />
en<br />
Covering the Soulo Mesh Inner Tent with a Soulo outer tent<br />
1 Drape the Soulo outer tent over the Soulo Mesh Inner Tent and align the lines<br />
of the pole sleeve and clips with the poles themselves. Make sure the outer tent<br />
door is aligned with the Mesh Inner Tent door. 2 Peg down the peg loops at the<br />
end of the sleeve and clip lines or hook them over the pegs used to secure the<br />
Mesh Inner Tent. 3 Secure the vent cover.<br />
note: you can also replace the standard inner tent in a Soulo with the Soulo Mesh<br />
Inner Tent by disconnecting the standard inner and buttoning the Soulo Mesh<br />
Inner Tent in its place. See the bottom cover photo.<br />
de<br />
Das Soulo Mesh-Innenzelt mit einem Soulo Außenzelt bedecken<br />
1 Lege das Soulo Außenzelt über das Soulo Mesh-Innenzelt und richte die Richtung<br />
der Stangenkanäle und Haken nach dem Gestänge aus. Achte auf die Position der<br />
Außen- und Innenzelteingänge. 2 Verankere die Heringsschlaufen, die sich an den<br />
Enden der Stangenkanäle befinden, oder befestige sie einfach an den Heringen, die<br />
bereits das Mesh-Innenzelt sichern. 3 Befestige die Lüfterhaube am Außenzelt.<br />
achtung: Das Soulo Mesh-Innenzelt kann auch als Innenzelt in einem <strong>Hilleberg</strong><br />
Soulo verwendet werden. Trenne die Knebelverbindungen zwischen Außenzelt und<br />
Standard-Innenzelt und setze das Mesh-Innenzelt ein. Siehe unteres Umschlagbild.<br />
10 |<br />
| 11
<strong>Hilleberg</strong> Soulo Mesh Inner Tent<br />
1 2<br />
3 4<br />
sv<br />
Kombinera ett Soulo Mesh Innertält med en <strong>Hilleberg</strong> Tarp<br />
1 & 2 Lägg ut tarpen på längden över Soulo Mesh Innertält, centrera den över<br />
stängernas mitt och fäst linorna löst med markpinnar.<br />
3 & 4 Forma en ås med de mellersta linorna på tarpen, antingen genom att fästa<br />
dem i träd eller liknande, eller, som på bilden, med stavar. Förläng stavarna så<br />
att tarpen inte ligger på någon del av tältet. Fäst stavarnas spetsar i ringarna på<br />
mitten av tarpens kortsidor. Placera den andra änden av staven på marken så att<br />
den lutar svagt utåt. Justera linorna så att stavarna står stabilt.<br />
5 Justera linorna i hörnen och på långsidorna genom att spänna linsträckarna<br />
och/eller ändra markpinnarnas placering.<br />
en<br />
Using the Soulo Mesh Inner Tent with a <strong>Hilleberg</strong> Tarp<br />
1 & 2 Lay the Tarp over the Soulo Mesh Inner Tent lengthwise, center the Tarp’s<br />
middle over the top of the arch in the poles, and peg out all the guy lines loosely.<br />
3 & 4 Create a “ridge” with the Tarp’s middle guy lines, either by suspending<br />
them from trees, or, as shown, with trekking poles. Extend the poles high enough<br />
so the Tarp does not touch the Mesh Inner fabric, and insert the poles’ tips into<br />
the middle attachment point rings on the Tarp’s sides. Position the poles’ handles<br />
on the ground so the poles have a slight outward angle. Adjust the guy lines to<br />
keep tension on the poles so that they stay upright.<br />
5 Adjust the Tarp pitch with the line runners on the guy lines, and/or by adjusting<br />
the placement of the pegs.<br />
5 de Aufbau des Soulo Mesh-Innenzelts mit einem <strong>Hilleberg</strong> Tarp<br />
1 & 2 Stelle alle Abspannleinen am Tarp auf ihre maximale Länge ein. Lege das Tarp<br />
der Länge nach mittig über das aufgebaute Mesh-Innenzelt, sodass die Mittelnaht des<br />
Tarps die Mitte des Zelteinganges kreuzt. Sichere alle Abspannleinen lose mit Heringen.<br />
3 & 4 Fixiere die Abspannleinen der Mittelnaht in ausreichender Höhe an Bäume<br />
oder Stöcke und spanne einen Giebel ab. Fahre verstellbare Trekkingstöcke maximal<br />
aus, damit Tarp und Innenzelt sich nicht berühren. Stecke die Spitzen durch die Ringe<br />
an den kurzen Seiten des Tarps. Stelle die Stockgriffe am Boden ab und straffe die<br />
Abspannleinen an, damit die Stöcke sicher stehen. Die Konstruktion ist stabiler, wenn<br />
die Stöcke oben leicht nach außen zeigen.<br />
5 Straffe die restlichen Abspannleinen an und versetze ggf. die Heringe, bis das<br />
Tarp perfekt steht.<br />
12 |<br />
| 13
<strong>Hilleberg</strong> Soulo Mesh Inner Tent<br />
sv<br />
www.hilleberg.com<br />
Välkommen till vår websida där du kan se hela <strong>Hilleberg</strong>s kollektion inklusive tillbehör,<br />
exempelvis skyddsgolv, snö- och sandpinnar och reservdelar som tältlinor,<br />
stänger mm.<br />
Dessutom kan du se mer om <strong>Hilleberg</strong> the Tentmaker, inklusive vår historia, var<br />
du hittar våra återförsäljare och expeditioner som använder <strong>Hilleberg</strong>tält. Du hittar<br />
dessutom information, utrustningslistor och praktiska råd som kan hjälpa dig<br />
i planeringen av dina turer.<br />
sv<br />
Garantier och Service<br />
<strong>Hilleberg</strong> the Tentmaker gör produkter av högsta kvalitet i material och till verkning. I<br />
våra produkter ingår garanti mot felaktigheter i tillverkning och material. För detaljer<br />
kontakta din butik eller <strong>Hilleberg</strong> direkt då garantierna kan skilja mellan olika länder<br />
beroende på lagar och bestämmelser.<br />
observera: Garantin gäller ej för skador uppkomna på grund av oaktsamhet, olyckor,<br />
felaktig hantering eller bristande utrustningsvård. Effekter av normalt slitage eller<br />
exponering för UV-strålning och liknande täcks inte heller av garantin.<br />
Reparationer som ej täcks av garantin utför vi till en rimlig kostnad. Kontakta den<br />
butik där du köpt tältet eller <strong>Hilleberg</strong> direkt.<br />
en<br />
de<br />
www.hilleberg.com<br />
Please visit our website to see details of the entire <strong>Hilleberg</strong> collection as well as<br />
available accessories, such as extra poles, pegs, Snow & Sand Pegs, and guy line<br />
and line runners.<br />
In addition, you can learn more about <strong>Hilleberg</strong> the Tentmaker, including our history,<br />
dealer locations, and expeditions that use <strong>Hilleberg</strong> tents. You will also find a<br />
wealth of information to help you better enjoy your outdoor adventures, including<br />
practical advice and equipment lists.<br />
www.hilleberg.com<br />
Auf unserer Website kannst Du unser gesamtes Sortiment entdecken. Hier findest<br />
Du auch Zubehör – wie Zeltunterlagen, Schnee- und Sandheringe – sowie alle<br />
Ersatzteile – wie Zeltleinen, Gestänge – und vieles mehr.<br />
Erfahre mehr über uns – <strong>Hilleberg</strong> the Tentmaker – unsere Firmengeschichte,<br />
Philosophie und die Herstellung hochklassiger Zelte. Lese spannende Erfahrungsberichte<br />
von Expeditionen, die unsere Zelte verwenden, und finde Händler in Deiner<br />
nächsten Umgebung. Wir bieten Dir Informationen, Ausrüstungslisten und praktische<br />
Ratschläge, die Dir bei der Planung Deiner nächsten Zelttour helfen können.<br />
14 |<br />
en<br />
de<br />
Warranty and Repair<br />
<strong>Hilleberg</strong> the Tentmaker prides itself on making products with the highest quality<br />
materials and workmanship. We offer a comprehensive warranty against material<br />
and manufacturing defects. Since laws and regulations sometimes differ, warranty<br />
coverage may vary from country to country. For the specific details of our warranty in<br />
your region or country, please contact your dealer or the appropriate <strong>Hilleberg</strong> office.<br />
please note: Our warranty does not cover damages from ordinary wear and tear,<br />
the effects of UV exposure, accidents, inappropriate use or handling, or damages<br />
resulting from the user’s failure to care properly for the product.<br />
For any repairs not covered by the warranty, we will charge a reasonable rate. Please<br />
contact your region or country’s appropriate <strong>Hilleberg</strong> office.<br />
Garantie und Reparaturen<br />
<strong>Hilleberg</strong> the Tentmaker stellt Produkte höchster Qualität her, sowohl im Material<br />
als auch in der Verarbeitung. Alle unsere Produkte haben Garantie auf Produktionsund<br />
Materialfehler. Für genaue Informationen setze Dich bitte mit Deinem Händler<br />
oder <strong>Hilleberg</strong> the Tentmaker direkt in Verbindung, da sich die Garantiebedingungen<br />
wegenverschiedener Gesetze von Land zu Land unterscheiden können.<br />
achtung! Die Garantie deckt keine Schäden, die durch unsachgemäße Handhabung,<br />
Unglücke, Unachtsamkeit, mangelnde Produktpflege, natürliche Abnutzung, UV-<br />
Strahlung oder anders entstanden sind.<br />
Reparaturen, die nicht unter die Garantie fallen, werden zum Selbstkostenpreis<br />
durch ge führt. Wende Dich hierfür an Deinen Händler oder direkt an <strong>Hilleberg</strong> the<br />
Tentmaker.<br />
| 15
<strong>SOULO</strong> <strong>MESH</strong> <strong>INNER</strong> <strong>TENT</strong><br />
inch<br />
cm<br />
87<br />
220<br />
42 inch 38<br />
95<br />
cm<br />
105<br />
Soulo Mesh Inner Tent – 605 g/1 lb 5 oz<br />
EUROPE<br />
<strong>Hilleberg</strong> the Tentmaker AB<br />
Önevägen 34<br />
S-832 51 Frösön, Sweden<br />
tel: +46 (0)63 57 15 50<br />
fax: +46 (0)63 57 15 65<br />
tentmaker@hilleberg.se<br />
OUTSIDE OF EUROPE<br />
<strong>Hilleberg</strong> the Tentmaker, Inc.<br />
14790 NE 95th Street<br />
Redmond, WA 98052 USA<br />
tel: +1 (425) 883 0101<br />
fax: +1 (425) 869 6632<br />
toll free: 1 (866) 848 8368 (n. america only)<br />
tentmaker@hilleberg.com<br />
WWW.HILLEBERG.COM