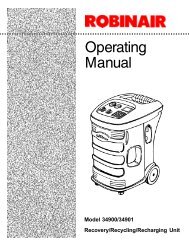
Robinair 34134-2K 134a Recovery Unit - NY Tech Supply
Robinair 34134-2K 134a Recovery Unit - NY Tech Supply
Robinair 34134-2K 134a Recovery Unit - NY Tech Supply

You also want an ePaper? Increase the reach of your titles
YUMPU automatically turns print PDFs into web optimized ePapers that Google loves.
Set-Up Instructions<br />
SETTING UP THE UNIT<br />
To set up the unit to an R-<strong>134a</strong> vehicle:<br />
1. Attach the 60" blue hose to the low side port of the manifold.<br />
2. Attach the 60" yellow hose to the center port of the manifold.<br />
3. Attach the 60" red hose to the high side port of the manifold.<br />
4. Place the assembled manifold onto the manifold support bracket on the back<br />
of the unit.<br />
5. Attach the yellow hose from the manifold to the access port on the back of the<br />
unit.<br />
6. Connect the tank adapter (included with the unit) to the LIQUID port (blue)<br />
of the tank. Attach the blue low side hose from the manifold to the tank<br />
adapter.<br />
NOTE: Use ONLY the tank adapter included with this unit. Use of any other<br />
adapter could result in damage to the compressor, voiding the manufacturer's<br />
warranty.<br />
7. Attach the red vapor hose from the back of the unit to the GAS (red vapor)<br />
valve on the tank.<br />
8. Attach the air purge hose to the air purge fitting on the unit tank.<br />
9. Open both valves on the manifold.<br />
10. Open both valves on the tank.<br />
11. Open the service coupler on the blue low side hose.<br />
12. Verify that the RECOVER/VACUUM switch (see page 4 for switch location)<br />
is in the OFF position.<br />
13. Attach the power cord to the back of the unit (see page 5) and connect to the<br />
correct voltage outlet on the vehicle.<br />
14. Turn the switch on the control panel to VACUUM.<br />
15. Allow the unit to run for 5 minutes.<br />
16. Turn the RECOVER/VACUUM switch to OFF.<br />
17. Close the high side manifold valve (red).<br />
18. Close the service coupler valve on the blue low side hose.<br />
19. Close the LIQUID valve (blue) on the tank.<br />
20. Disconnect the service coupler from the tank adapter.<br />
21. Remove the tank adapter from the tank.<br />
22. Attach LIQUID hose from the back of the unit to LIQUID port on the tank.<br />
Open the LIQUID valve on the tank.<br />
23. Reconnect the tank adapter to the hose holder for storage.<br />
<strong>34134</strong>-<strong>2K</strong> <strong>Recovery</strong>, Recycling and Recharging <strong>Unit</strong><br />
7