NDS Drainage Products Catalog
NDS Drainage Products Catalog
NDS Drainage Products Catalog

You also want an ePaper? Increase the reach of your titles
YUMPU automatically turns print PDFs into web optimized ePapers that Google loves.
profile channel drains<br />
Installation<br />
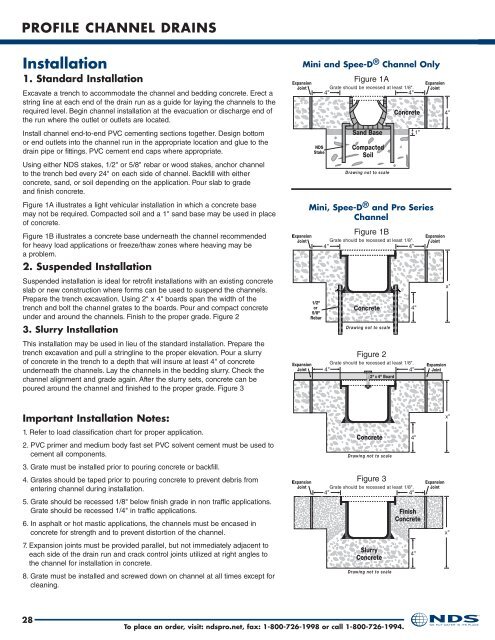
1. Standard Installation<br />
Excavate a trench to accommodate the channel and bedding concrete. Erect a<br />
string line at each end of the drain run as a guide for laying the channels to the<br />
required level. Begin channel installation at the evacuation or discharge end of<br />
the run where the outlet or outlets are located.<br />
Install channel end-to-end PVC cementing sections together. Design bottom<br />
or end outlets into the channel run in the appropriate location and glue to the<br />
drain pipe or fittings. PVC cement end caps where appropriate.<br />
Using either <strong>NDS</strong> stakes, 1/2" or 5/8" rebar or wood stakes, anchor channel<br />
to the trench bed every 24" on each side of channel. Backfill with either<br />
concrete, sand, or soil depending on the application. Pour slab to grade<br />
and finish concrete.<br />
Figure 1A illustrates a light vehicular installation in which a concrete base<br />
may not be required. Compacted soil and a 1" sand base may be used in place<br />
of concrete.<br />
Figure 1B illustrates a concrete base underneath the channel recommended<br />
for heavy load applications or freeze/thaw zones where heaving may be<br />
a problem.<br />
2. Suspended Installation<br />
Suspended installation is ideal for retrofit installations with an existing concrete<br />
slab or new construction where forms can be used to suspend the channels.<br />
Prepare the trench excavation. Using 2" x 4" boards span the width of the<br />
trench and bolt the channel grates to the boards. Pour and compact concrete<br />
under and around the channels. Finish to the proper grade. Figure 2<br />
3. Slurry Installation<br />
This installation may be used in lieu of the standard installation. Prepare the<br />
trench excavation and pull a stringline to the proper elevation. Pour a slurry<br />
of concrete in the trench to a depth that will insure at least 4" of concrete<br />
underneath the channels. Lay the channels in the bedding slurry. Check the<br />
channel alignment and grade again. After the slurry sets, concrete can be<br />
poured around the channel and finished to the proper grade. Figure 3<br />
Mini and Spee-D ® Channel Only<br />
Figure 1A<br />
Grate should be recessed at least 1/8".<br />
Mini, Spee-D ® and Pro Series<br />
Channel<br />
Figure 1B<br />
Grate should be recessed at least 1/8".<br />
Figure 2<br />
Grate should be recessed at least 1/8".<br />
Important Installation Notes:<br />
1. Refer to load classification chart for proper application.<br />
2. PVC primer and medium body fast set PVC solvent cement must be used to<br />
cement all components.<br />
3. Grate must be installed prior to pouring concrete or backfill.<br />
4. Grates should be taped prior to pouring concrete to prevent debris from<br />
entering channel during installation.<br />
5. Grate should be recessed 1/8" below finish grade in non traffic applications.<br />
Grate should be recessed 1/4" in traffic applications.<br />
6. In asphalt or hot mastic applications, the channels must be encased in<br />
concrete for strength and to prevent distortion of the channel.<br />
7. Expansion joints must be provided parallel, but not immediately adjacent to<br />
each side of the drain run and crack control joints utilized at right angles to<br />
the channel for installation in concrete.<br />
8. Grate must be installed and screwed down on channel at all times except for<br />
cleaning.<br />
Figure 3<br />
Grate should be recessed at least 1/8".<br />
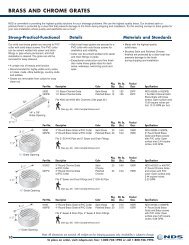
28<br />
To place an order, visit: ndspro.net, fax: 1-800-726-1998 or call 1-800-726-1994.