

Douglas Skybolt - 1/72 scale Rockets, Missiles, Drones and RPVs
Douglas Skybolt - 1/72 scale Rockets, Missiles, Drones and RPVs
Douglas Skybolt - 1/72 scale Rockets, Missiles, Drones and RPVs

Create successful ePaper yourself
Turn your PDF publications into a flip-book with our unique Google optimized e-Paper software.
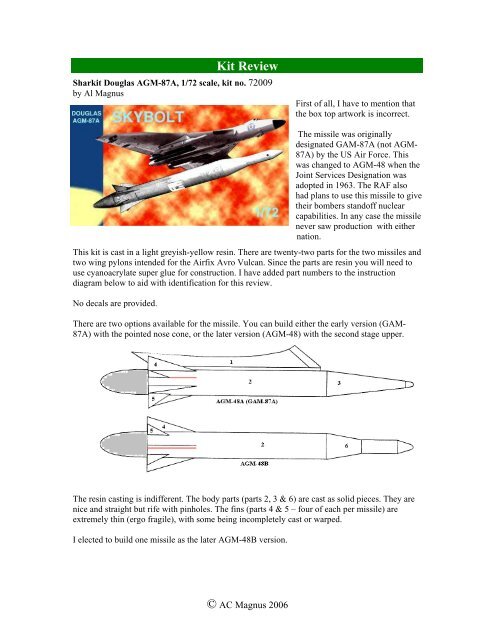
Kit Review<br />
Sharkit <strong>Douglas</strong> AGM-87A, 1/<strong>72</strong> <strong>scale</strong>, kit no. <strong>72</strong>009<br />
by Al Magnus<br />
First of all, I have to mention that<br />
the box top artwork is incorrect.<br />
The missile was originally<br />
designated GAM-87A (not AGM-<br />
87A) by the US Air Force. This<br />
was changed to AGM-48 when the<br />
Joint Services Designation was<br />
adopted in 1963. The RAF also<br />
had plans to use this missile to give<br />
their bombers st<strong>and</strong>off nuclear<br />
capabilities. In any case the missile<br />
never saw production with either<br />
nation.<br />
This kit is cast in a light greyish-yellow resin. There are twenty-two parts for the two missiles <strong>and</strong><br />
two wing pylons intended for the Airfix Avro Vulcan. Since the parts are resin you will need to<br />
use cyanoacrylate super glue for construction. I have added part numbers to the instruction<br />
diagram below to aid with identification for this review.<br />
No decals are provided.<br />
There are two options available for the missile. You can build either the early version (GAM-<br />
87A) with the pointed nose cone, or the later version (AGM-48) with the second stage upper.<br />
The resin casting is indifferent. The body parts (parts 2, 3 & 6) are cast as solid pieces. They are<br />
nice <strong>and</strong> straight but rife with pinholes. The fins (parts 4 & 5 – four of each per missile) are<br />
extremely thin (ergo fragile), with some being incompletely cast or warped.<br />
I elected to build one missile as the later AGM-48B version.<br />
© AC Magnus 2006
Because I wanted to display my missile on a st<strong>and</strong>, the first thing I did was saw off the<br />
aerodynamic housing (they greyed out portion in the parts diagram above) that covered the tail of<br />
the missile while being carried underwing.<br />
Next the nose was glued to the body. Some s<strong>and</strong>ing of the mating surfaces was done beforeh<strong>and</strong><br />
to ensure a nice straight join. The seam was filled with more super glue <strong>and</strong> baking soda, <strong>and</strong><br />
s<strong>and</strong>ed smooth.<br />
I replaced the fins with copies made from plastic sheet <strong>and</strong> then glued them to the fuselage. The<br />
missile body has locating grooves (red lines in the above parts diagram) to aid with placement of<br />
the fins. Surprisingly the fit was excellent, probably because the thickness of the plastic matched<br />
with width of the grooves well. But I still had some other filling to do with respect to the fins. The<br />
missile has eight fins consisting of four long fins (part 4) <strong>and</strong> equal number of short fins (part 5).<br />
Unfortunately all of the grooves (long red line in parts diagram) are of the same length as the long<br />
fins, so I had to fill in the portion of the grooves that remained once the small fins are added<br />
(short red line in parts diagram).<br />
Getting the missile ready for painting was a laborious process. As I mentioned above, the body<br />
parts were rife with pinholes. To remove them I went through a number of steps. First I identified<br />
what holes I could <strong>and</strong> filled them with thick grey paint. Then I s<strong>and</strong>ed the missile smooth with<br />
wet-or-dry s<strong>and</strong>paper moistened with some water. After s<strong>and</strong>ing I inspected for more holes <strong>and</strong><br />
repeated the process many times until I figured that I had most of the holes filled. This was<br />
followed with the first coat of light grey primer, which revealed more holes. These were filled<br />
with more thick grey paint <strong>and</strong> the kit sprayed with grey primer again. These two steps were<br />
repeated as often as required to eliminate the holes.<br />
With the prep finished, final painting commenced with a coat of Floquil Reefer White as the base<br />
primer. The final coats, of which there were about seven, were done with Testors gloss white. I<br />
s<strong>and</strong>ed between coats to get a nice smooth <strong>and</strong> even finish to the paint.<br />
As for markings I had to go to the spares box. I wanted to do a SAC version with the colourful<br />
blue star spangled banner. I had some Model-Aire International decals for the AGM-28 Hound<br />
Dog that looked like they would work but test fitting the decals showed they were about 10mm<br />
short. So I decided to make a British example. I applied roundels from a Blue Rider World War<br />
One RAF roundel sheet, <strong>and</strong> the other markings, which I believe are trestle locations, were<br />
applied using some spare black lines.<br />
So all in all, this kit makes for a very interesting subject, but you will need to have a ton of<br />
patience to eliminate the numerous flaws in the resin to get an acceptable finished model.<br />
© AC Magnus 2006


