4 ehb 7 0 7 v 1 1 - Trade Garage Equipment
4 ehb 7 0 7 v 1 1 - Trade Garage Equipment
4 ehb 7 0 7 v 1 1 - Trade Garage Equipment

Create successful ePaper yourself
Turn your PDF publications into a flip-book with our unique Google optimized e-Paper software.
Walter Finkbeiner GmbH, Alte Poststrasse 9 / 11, D - 72250 Freudenstadt<br />
OPERATOR’S MANUAL FOR MOBILE COLUMN LIFT TYPE EHB<br />
EMERGENCY LOWERING INSTRUCTIONS<br />
WARNING!<br />
• In case of breakdown, do only lower the lift.<br />
• While lowering, pay attention that vehicle does not move into a inclined position.<br />
• Lower columns equally.<br />
• Do not stay underneath the load or in the operation area of the lift columns.<br />
• Pay attention nobody and no obstacles are underneath the load.<br />
Emergency lowering in single operation, power on<br />
1. Normally SINGLE operation mode is still possible even if ALL operation is not working.<br />
2. Lower each lift carriage a small increment at a time keeping the vehicle level.<br />
Emergeny lowering at no power<br />
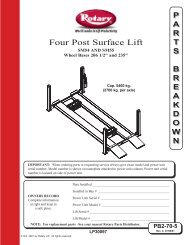
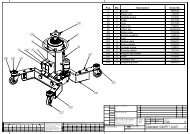
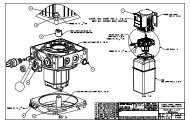
1. Remove cover panel of hydraulic power units<br />
2. Keep mechanical locks open. Use screw M6 (fixed at power unit) to screw into lock<br />
latch, pull back and keep open by plastic slide. Access through rear hole at top of<br />
column. After lowering remove screw M6. If mechanical lock is engaged, slightly lift<br />
carriage until lock is free.<br />
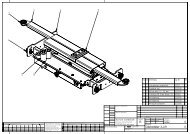
3. Loosen lock nut of emergency lowering screw (2.11) at valve housing of power unit<br />
(M8, size 13 mm).<br />
4. Carefully turn emergency lowering screw counter clockwise about ½ to 1 turn. Carriage<br />
will begin lowering.<br />
5. Turning the emergency lowering screw clockwise, the downward movement will stop.<br />
6. Lower each carriage a small increment at a time keeping the vehicle level.<br />
7. After lowering is finished, close and tighten all emergency lowering screws. Tighten<br />
lock nuts.<br />
8. After lowering do not use the lift until adjusted or repairs are made by qualified lift<br />
service personnel. Secure lift against unauthorised use.<br />
mechanical lock<br />
cover panel<br />
of power unit<br />
fig.7: POWER UNIT<br />
fig.8<br />
page 19