Wicked Air Sportz - PbNation
Wicked Air Sportz - PbNation
Wicked Air Sportz - PbNation

You also want an ePaper? Increase the reach of your titles
YUMPU automatically turns print PDFs into web optimized ePapers that Google loves.
Equalizer<br />
TM<br />
Usage Manual for<br />
PMI Pimp Kit<br />
Equalizer TM is a trademark of <strong>Wicked</strong> <strong>Air</strong> <strong>Sportz</strong><br />
Revision 1.3 - 07/01/05<br />
All material including, but not limited to photographs, text, and concepts contained in<br />
this manual is copyright ©2005 By <strong>Wicked</strong> <strong>Air</strong> <strong>Sportz</strong> and Jim Drew. Distribution of this<br />
data without permission is strictly prohibited! All rights reserved, worldwide.<br />
1
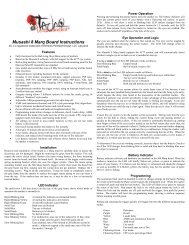
USAGE<br />
The Equalizer has numerous features, which can be a bit overwhelming to<br />
those that are not use to having so much flexibility. However, every<br />
possible step has been taken to make sure that the use of this product is<br />
extremely simple.<br />
Turning on the Equalizer<br />
To turn on the Equalizer, move the power switch toward the rear of the<br />
marker. The LED should light orange and stay that way for several seconds<br />
after releasing the button.<br />
Turning off the Equalizer<br />
To turn off the Equalizer, move the power switch towards the front of the<br />
marker.<br />
Bypassing the Eye System<br />
In order to be able to “dry fire” the marker, the eye system must be<br />
bypassed. When the eye system is enabled, the marker will not fire unless<br />
there is something in the breech. To bypass the eye system, pull and hold<br />
the trigger for at least one full second. The LED will blink orange, indicating<br />
that the eye system has been bypassed. Repeating this procedure will<br />
enable the eye system. WARNING: the marker will fire when the trigger is<br />
pulled if the eye system is already bypassed or something is detected in the<br />
breech!<br />
General Usage Tips<br />
The LED boot sequence is as follows: solid orange (booting), followed by<br />
either solid green (normal mode) or solid red (competition mode).<br />
The rate of fire is limited only by how fast the pneumatics will cycle, how<br />
fast you can pull the trigger, and how fast your loader can feed your marker.<br />
Because the Equalizer can easily exceed the feed rate of any loader in<br />
existence, it is recommended that you use a force-feed type of loader for the<br />
best possible performance.<br />
2
LED Colors and Meanings<br />
The LED used with the Equalizer can light up in one of 3 different colors.<br />
The Equalizer uses this to indicate to the user when certain events are<br />
occurring. This is a breakdown of what the LED states represent:<br />
Blinking Green (once per second): Normal operation, anti-chop system is<br />
enabled, Eye Mode 1 (rate of fire capped at user preset).<br />
Blinking Green (twice per second): Normal operation, anti-chop system is<br />
enabled, Eye Mode 2 (unlimited rate of fire).<br />
Blinking Orange: Normal operation, anti-chop system is disabled.<br />
Blinking Red: Battery is low.<br />
Red/Green toggle: There is an error with the anti-chop system (Eye Mode 2<br />
only).<br />
Flickering green: object is in the breech.<br />
Tournament Lock<br />
It is possible to put the Equalizer into a tournament lock (COMPETITION)<br />
mode. You can do this by making sure the power switch is in the off<br />
position, grounding (connecting) the two center pins on the Equalink<br />
interface connector, and then moving the power switch to on position. Each<br />
time you ‘reboot’ with the pins grounded, the NORMAL and COMPETITION<br />
modes will toggle. The marker will not fire with the jumper in place!<br />
Removing the jumper will allow the normal operation of the marker.<br />
You can also change the tournament lock mode using the Equalink.<br />
3
Trigger Programming<br />
The Dwell, Debounce, Eye Mode, BIP Delay, ROF Cap, and Eye Power<br />
functions are programmable by following these instructions:<br />
Make sure the power switch is in the off position. During programming,<br />
make sure that your marker has a barrel condom in place and the air supply<br />
shut off. Although it is not possible to fire the marker while in programming<br />
mode, it is always good to practice safe marker handling.<br />
Pull the trigger, and hold it in the back position. Now, turn on the power by<br />
moving the power switch towards the rear of the marker. During this time,<br />
the LED will light up green.<br />
Now, release the trigger. The LED will light red. The marker is now in<br />
“trigger programming mode”.<br />
Pulling and releasing the trigger will change the LED color, advancing to the<br />
next programming feature. This is also known as the “programming menu”.<br />
The following colors equate to the feature selected:<br />
Solid Red: Dwell programming mode.<br />
Solid Green: Debounce programming mode.<br />
Solid Orange: Eye Mode programming mode.<br />
Flickering Red: Ball In Place (BIP) Delay programming mode.<br />
Flickering Green: Rate of Fire (ROF) cap programming mode.<br />
Flickering Orange: Eye Power programming mode.<br />
Alternating Green/Orange: Firing Mode programming mode.<br />
Once you have reached the last feature (alternating green/orange), an<br />
additional trigger pull will start the sequence of colors over again. This is<br />
also known as the “programming menu start”.<br />
When you decide which programming feature you want to change, pull the<br />
trigger and hold it until the LED goes out, and then release the trigger.<br />
There will be a 2 second pause, and then the LED will flash the same color of<br />
the programming mode you are in (red=Dwell, green=Debounce,<br />
orange=eye mode, etc.) the number of times that represents something<br />
associated with that feature. For example, if you were programming the<br />
Debounce and the settings were the factory default (10ms), you would see<br />
the LED flash green 10 times in a row, indicating the Debounce is set to<br />
10ms. The flashing of the LED shows you the current setting before you<br />
change it.<br />
4
Once the LED is done flashing, there is a 5 second time period to begin<br />
programming the new setting. To change the setting, pull and release the<br />
trigger the number of times equal to how you wish to program the feature.<br />
On each pull of the trigger, the LED will light up (indicating that the pull has<br />
been detected). If you decide not to change the feature setting at all,<br />
simply do not touch the trigger at all for 5 seconds. The LED will then blink<br />
green/red alternately to indicate there was a programming error, and then<br />
go back to the programming menu. The feature setting will not be changed.<br />
Once you have pulled and released the trigger the number of times you<br />
wanted the feature setting to be, do not touch the trigger. After 5 seconds,<br />
the LED will flash a rainbow of colors indicating that the feature setting<br />
change has been accepted. After this, the marker is in the programming<br />
menu again. If you program a feature outside of its specifications (for<br />
example, programming the dwell to 1ms) the LED will blink green/red<br />
alternately indicating that there was a programming error.<br />
Each feature and its programming is described in detail below:<br />
Dwell<br />
Trigger programming for changing the dwell is different than any other<br />
feature as there are two steps involved instead of one due to allowing for<br />
.1ms (tenths) increments.<br />
After selecting the Dwell programming feature, and once the LED stops<br />
flashing, you can now pull and release the trigger once for every FULL 1ms<br />
of time you want the dwell to be. Once you have pulled the trigger the<br />
number of times you want the full milliseconds to be, after a 2 second pause<br />
the LED will blink orange and then off. You can then pull the trigger again,<br />
but this time with each trigger pull being 1/10 th of a millisecond (.1ms). So,<br />
if you wanted to set the dwell to be 6.3ms, you would select the dwell<br />
programming mode by pulling/releasing the trigger until the LED was solid<br />
red. Next, you would hold the trigger until the LED went out. Next, the<br />
current dwell setting (say 7.5ms) would be shown as 7 red flashes, a pause,<br />
an orange flash, a pause, and then 5 red flashes. The orange flash is there<br />
to separate the full milliseconds from the 1/10 th of a millisecond (.1ms)<br />
intervals.<br />
The default dwell is 10.0ms. The lowest allowable dwell time is 4.0ms and<br />
the longest allowable time is 50.0ms. According to the solenoid<br />
manufacturer, the dwell should never be below 6.0ms for proper operation.<br />
Debounce<br />
5
Pull and release the trigger once for every 1ms of time you want the setting<br />
to be. For example, if you were programming the Debounce to 5ms, you<br />
would pull and release the trigger 5 times. The default Debounce setting<br />
is 10ms.<br />
Eye Mode<br />
Pull and release the trigger the number of times necessary to set the Eye<br />
Mode to what you want to use.<br />
The following is a list of the possible Eye Modes and the flashes (also trigger<br />
pulls required):<br />
1 flash - Bypassed mode<br />
2 flashes - Eye Mode 1 (uses ROF cap)<br />
3 flashes - Eye Mode 2 (monitors bolt)<br />
4 flashes - Simulate mode<br />
If you pull and release the trigger more than 4 times, then the LED will<br />
toggle green/red alternately to indicate there was a programming error, and<br />
then go back to the programming menu. The default Eye Mode is 2.<br />
BIP Delay<br />
Pull and release the trigger once for every 1ms of time you want the setting<br />
to be. For example, if you were programming the BIP Delay to 5ms, you<br />
would pull and release the trigger 5 times. The default BIP Delay setting is<br />
3ms.<br />
ROF Cap<br />
Pull and release the trigger once for the number of times you want the Rate<br />
of Fire (ROF) cap to be. For example, 20 pulls/releases would be 20 bps.<br />
The ROF cap is only used with Eye Mode 1. In Eye Mode 2, the rate of fire is<br />
unlimited. The default ROF Cap is 20 bps.<br />
6
Eye Power<br />
Pull and release the trigger once for the number of times you want the Eye<br />
Power to be. Each trigger pull represents a level increase. So, a setting of 5<br />
would make the eye more powerful (able to see through liquid paint) than a<br />
setting of 4. Higher values use more battery power. The default Eye Power<br />
is 10.<br />
Firing Mode<br />
Pull and release the trigger the number of times necessary to set the Firing<br />
Mode to what you want to use.<br />
The following is a list of the possible Firing Modes and the flashes (trigger<br />
pulls required):<br />
1 flash - Semi- auto (NPPL legal)<br />
2 flashes - 3 shot ramping (PSP legal)<br />
3 flashes - 3 shot full auto (NXL legal)<br />
If you pull and release the trigger more than 3 times, then the LED will<br />
toggle green/red alternately to indicate there was a programming error, and<br />
then go back to the programming menu. The default Firing Mode is 1.<br />
Programming Complete<br />
Once you pulled and released the trigger the number of times necessary to<br />
set the function, wait a few seconds. The LED will flash red/green/orange in<br />
rapid succession (numerous times) to let you know that the new setting has<br />
been saved. After this, the LED will return to the color representing what<br />
the current programming menu item is. At this point, you can once again<br />
pull and release the trigger to toggle between Dwell, Debounce, Eye Mode,<br />
BIP Delay, ROF Cap, and Eye Power programming modes.<br />
You can perform a complete reset, restoring all settings to the factory<br />
defaults. To do this, just hold down the trigger for 6 full seconds. It does<br />
not matter what programming mode you are currently in. The LED will start<br />
flashing red, letting you know that a reset operation is being performed.<br />
After this occurs, you will be back to the programming starting point. DO<br />
NOT release the trigger until you see the LED flashing red or the reset will<br />
not occur.<br />
7
Computer Programming Mode (Equalink)<br />
Just as with all other Equalizer boards, the Pimp Kit version has an Equalink<br />
port. This port allows customers to fine tune settings as well as download<br />
the latest firmware updates for the board from our website (free of charge!)<br />
To get into computer programming mode, hold the trigger and turn on the<br />
marker by moving the power switch towards the rear of the marker. Keep<br />
holding the trigger until the LED switches from the normal green color to off.<br />
The Equalizer is now ready to connect to a PC. If you accidentally get into<br />
computer programming mode, just turn off the marker and repeat the<br />
procedure. If your trigger adjustment setscrew is adjusted too far in so that<br />
it depresses the trigger switch when in the released position, the marker will<br />
go into computer programming mode when it is turned on!<br />
Terminology<br />
Dwell<br />
Dwell is the amount of time that the solenoid will be activated. This time is<br />
measured in milliseconds (1/1000 th of a second). The user can alter the<br />
Dwell only when in NORMAL mode. In COMPETITION mode, the Dwell menu<br />
item is not available. Possible values are from 4.0ms to 50.0ms. The<br />
factory default is 10.0ms. Changes are made in .1ms units via the trigger.<br />
Increasing your Dwell will increase the velocity of your marker. If you are<br />
experiencing a great variance in your chrono results, try increasing your<br />
Dwell and lowering your high pressure regulator. If your dwell is too low,<br />
consistency will suffer greatly.<br />
Debounce<br />
Debounce is the amount of time the trigger switch must be stable in the<br />
up position before checking for another trigger pull. This time is measured<br />
in milliseconds. The user can alter the Debounce only when in NORMAL<br />
mode. In COMPETITION mode, the Debounce menu item is not available.<br />
Possible values are from 1ms to 50ms. The factory default is 10ms.<br />
Changes are made in 1ms units.<br />
8
If you find that your marker is double firing, increase the Debounce time.<br />
To make your marker fire faster due to being more responsive to the trigger,<br />
decrease the Debounce time.<br />
Eye Mode<br />
The Eye Mode is can be set to one of four different modes:<br />
Bypass - The anti-chop system is disabled. When this occurs, the maximum<br />
rate of fire is limited to 13 balls per second to help prevent chopping of balls<br />
in the breech.<br />
Eye Mode 1 – In this mode, the marker will not fire unless there is a ball in<br />
the breech. This mode uses a rate of fire cap to determine the speed of the<br />
cycling. The eye system will never be automatically bypassed in this mode<br />
as the bolt is not monitored.<br />
Eye Mode 2 - In this mode, the marker will not fire unless there is a ball in<br />
the breech. This mode works by monitoring the bolt position, and thus the<br />
rate of fire is unlimited. This is the default eye mode.<br />
Simulate – In this mode, a ball is simulated to be in the breech. This allows<br />
you to fire the marker with just air, at the full speed that the marker is<br />
capable of firing! This mode can be used for practicing trigger pull methods,<br />
without wasting paint. DO NOT SHOOT PAINT IN THIS MODE!<br />
BIP Delay<br />
The BIP Delay is a feature that allows you to adjust for the differences in<br />
the eye sensor, its installation, and the loader being used. When using a<br />
slower gravity-feed loader, it may be necessary to have a longer BIP Delay<br />
to prevent balls from being chopped.<br />
Possible values are from 1ms to 50ms.<br />
Changes are made in 1ms units.<br />
The factory default is 3ms.<br />
9
ROF Cap<br />
The rate of fire (ROF) cap sets the maximum cycle speed of the marker<br />
when Eye Mode 1 is used. Setting this value to low will reduce the usable<br />
speed of the marker. Setting this value too high can cause misfires if the<br />
marker pneumatics are very slow due to bad o-rings or swollen bolt.<br />
Possible values are from 10 bps to 30 bps. The factory default is 15 bps.<br />
Changes are made in 1 bps units.<br />
Eye Power<br />
The eye power controls how much power the eye system uses when<br />
transmitting infrared energy to the receiver. Setting this value too low will<br />
cause problems if debris such paint, dirt, etc. is between the transmitter and<br />
receiver. Setting this value too high can cause problems with paint that<br />
uses a clear shell (the infrared is transmitted through the shell). Possible<br />
values are from 1 to 20. The factory default is 10. Changes are made in 1<br />
unit increments.<br />
Firing Mode<br />
The Firing Mode determines how the marker will fire. Possible modes are<br />
semi-auto (one pull/release of the trigger fires the marker one time), 3 shot<br />
ramping (adheres to the 2005 PSP rules), and 3 shot full auto (adheres to<br />
the 2005 NXL rules).<br />
The firing mode controls how the marker fires regardless of other settings.<br />
For example, if the Eye Mode is set to Eye Mode 2 (unlimited rate of fire),<br />
and the Firing Mode is set to 3 (full auto), then the marker will fire in full<br />
auto as fast as the hopper can feed. Now, if you changed the Eye Mode to<br />
Eye Mode 1 (capped), then the ROF Cap would determine the maximum rate<br />
of fire while in full auto. The factory default is 1 (Semi-auto). Changes are<br />
made in 1 unit increments.<br />
For example, to setup your marker to be legal for PSP competition, set the<br />
Eye Mode to 1 (capped), the rate of fire cap (ROF Cap) to 15bps, and the<br />
Firing Mode to 2.<br />
10
Reset<br />
This option will reset ALL of the settings to the factory default! If you find<br />
that you are having problems remembering the factory defaults, just use<br />
this option to reset your board and start over! The user can Reset the board<br />
only when in NORMAL mode.<br />
11