About the DCS Pro Back Plus - Kodak
About the DCS Pro Back Plus - Kodak
About the DCS Pro Back Plus - Kodak

You also want an ePaper? Increase the reach of your titles
YUMPU automatically turns print PDFs into web optimized ePapers that Google loves.
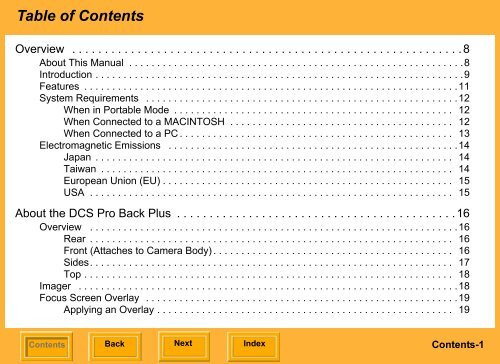
Table of Contents<br />
Overview . . . . . . . . . . . . . . . . . . . . . . . . . . . . . . . . . . . . . . . . . . . . . . . . . . . . . . . . . . . .8<br />
<strong>About</strong> This Manual . . . . . . . . . . . . . . . . . . . . . . . . . . . . . . . . . . . . . . . . . . . . . . . . . . . . . . . . . . . .8<br />
Introduction . . . . . . . . . . . . . . . . . . . . . . . . . . . . . . . . . . . . . . . . . . . . . . . . . . . . . . . . . . . . . . . . . .9<br />
Features . . . . . . . . . . . . . . . . . . . . . . . . . . . . . . . . . . . . . . . . . . . . . . . . . . . . . . . . . . . . . . . . . . .11<br />
System Requirements . . . . . . . . . . . . . . . . . . . . . . . . . . . . . . . . . . . . . . . . . . . . . . . . . . . . . . . .12<br />
When in Portable Mode . . . . . . . . . . . . . . . . . . . . . . . . . . . . . . . . . . . . . . . . . . . . . . . . . . 12<br />
When Connected to a MACINTOSH . . . . . . . . . . . . . . . . . . . . . . . . . . . . . . . . . . . . . . . . 12<br />
When Connected to a PC . . . . . . . . . . . . . . . . . . . . . . . . . . . . . . . . . . . . . . . . . . . . . . . . . 13<br />
Electromagnetic Emissions . . . . . . . . . . . . . . . . . . . . . . . . . . . . . . . . . . . . . . . . . . . . . . . . . . . .14<br />
Japan . . . . . . . . . . . . . . . . . . . . . . . . . . . . . . . . . . . . . . . . . . . . . . . . . . . . . . . . . . . . . . . . 14<br />
Taiwan . . . . . . . . . . . . . . . . . . . . . . . . . . . . . . . . . . . . . . . . . . . . . . . . . . . . . . . . . . . . . . . 14<br />
European Union (EU) . . . . . . . . . . . . . . . . . . . . . . . . . . . . . . . . . . . . . . . . . . . . . . . . . . . . 15<br />
USA . . . . . . . . . . . . . . . . . . . . . . . . . . . . . . . . . . . . . . . . . . . . . . . . . . . . . . . . . . . . . . . . . 15<br />
<strong>About</strong> <strong>the</strong> <strong>DCS</strong> <strong>Pro</strong> <strong>Back</strong> <strong>Plus</strong> . . . . . . . . . . . . . . . . . . . . . . . . . . . . . . . . . . . . . . . . . . .16<br />
Overview . . . . . . . . . . . . . . . . . . . . . . . . . . . . . . . . . . . . . . . . . . . . . . . . . . . . . . . . . . . . . . . . . .16<br />
Rear . . . . . . . . . . . . . . . . . . . . . . . . . . . . . . . . . . . . . . . . . . . . . . . . . . . . . . . . . . . . . . . . . 16<br />
Front (Attaches to Camera Body) . . . . . . . . . . . . . . . . . . . . . . . . . . . . . . . . . . . . . . . . . . . 16<br />
Sides. . . . . . . . . . . . . . . . . . . . . . . . . . . . . . . . . . . . . . . . . . . . . . . . . . . . . . . . . . . . . . . . . 17<br />
Top . . . . . . . . . . . . . . . . . . . . . . . . . . . . . . . . . . . . . . . . . . . . . . . . . . . . . . . . . . . . . . . . . . 18<br />
Imager . . . . . . . . . . . . . . . . . . . . . . . . . . . . . . . . . . . . . . . . . . . . . . . . . . . . . . . . . . . . . . . . . . . .18<br />
Focus Screen Overlay . . . . . . . . . . . . . . . . . . . . . . . . . . . . . . . . . . . . . . . . . . . . . . . . . . . . . . . .19<br />
Applying an Overlay . . . . . . . . . . . . . . . . . . . . . . . . . . . . . . . . . . . . . . . . . . . . . . . . . . . . . 19<br />
Contents<br />
<strong>Back</strong><br />
Next<br />
Index<br />
Contents-1
Table of Contents<br />
IR Filter . . . . . . . . . . . . . . . . . . . . . . . . . . . . . . . . . . . . . . . . . . . . . . . . . . . . . . . . . . . . . . . . . . .20<br />
Anti-aliasing Filter . . . . . . . . . . . . . . . . . . . . . . . . . . . . . . . . . . . . . . . . . . . . . . . . . . . . . . . . . . . .20<br />
Removing an IR or Anti-aliasing Filter . . . . . . . . . . . . . . . . . . . . . . . . . . . . . . . . . . . . . . . 21<br />
Inserting a Filter . . . . . . . . . . . . . . . . . . . . . . . . . . . . . . . . . . . . . . . . . . . . . . . . . . . . . . . . 21<br />
Image LCD . . . . . . . . . . . . . . . . . . . . . . . . . . . . . . . . . . . . . . . . . . . . . . . . . . . . . . . . . . . . . . . . .22<br />
How <strong>the</strong> Image LCD Works . . . . . . . . . . . . . . . . . . . . . . . . . . . . . . . . . . . . . . . . . . . . . . . 22<br />
Turning <strong>the</strong> Image LCD On and Off . . . . . . . . . . . . . . . . . . . . . . . . . . . . . . . . . . . . . . . . . 23<br />
Tilting <strong>the</strong> Image LCD . . . . . . . . . . . . . . . . . . . . . . . . . . . . . . . . . . . . . . . . . . . . . . . . . . . . 23<br />
Menu Bar . . . . . . . . . . . . . . . . . . . . . . . . . . . . . . . . . . . . . . . . . . . . . . . . . . . . . . . . . . . . . 24<br />
Menus . . . . . . . . . . . . . . . . . . . . . . . . . . . . . . . . . . . . . . . . . . . . . . . . . . . . . . . . . . . . . . . . 25<br />
Status Screen . . . . . . . . . . . . . . . . . . . . . . . . . . . . . . . . . . . . . . . . . . . . . . . . . . . . . . . . . . . . . . .27<br />
Displaying <strong>the</strong> Status screen . . . . . . . . . . . . . . . . . . . . . . . . . . . . . . . . . . . . . . . . . . . . . . 27<br />
Digital Buttons . . . . . . . . . . . . . . . . . . . . . . . . . . . . . . . . . . . . . . . . . . . . . . . . . . . . . . . . . . . . . .28<br />
Four-way Switch . . . . . . . . . . . . . . . . . . . . . . . . . . . . . . . . . . . . . . . . . . . . . . . . . . . . . . . . 28<br />
Menu Button . . . . . . . . . . . . . . . . . . . . . . . . . . . . . . . . . . . . . . . . . . . . . . . . . . . . . . . . . . . 28<br />
OK Button . . . . . . . . . . . . . . . . . . . . . . . . . . . . . . . . . . . . . . . . . . . . . . . . . . . . . . . . . . . . . 28<br />
Cancel Button . . . . . . . . . . . . . . . . . . . . . . . . . . . . . . . . . . . . . . . . . . . . . . . . . . . . . . . . . . 28<br />
Quick Guide for Using <strong>the</strong> Image LCD and Digital Buttons . . . . . . . . . . . . . . . . . . . . . . . . . . . .29<br />
Power Button . . . . . . . . . . . . . . . . . . . . . . . . . . . . . . . . . . . . . . . . . . . . . . . . . . . . . . . . . . . . . . .30<br />
Ports and Jacks . . . . . . . . . . . . . . . . . . . . . . . . . . . . . . . . . . . . . . . . . . . . . . . . . . . . . . . . . . . . .31<br />
Lens Sync Cable Jack . . . . . . . . . . . . . . . . . . . . . . . . . . . . . . . . . . . . . . . . . . . . . . . . . . . 31<br />
IEEE 1394 Port . . . . . . . . . . . . . . . . . . . . . . . . . . . . . . . . . . . . . . . . . . . . . . . . . . . . . . . . . 31<br />
Flash Sync Cable Jack . . . . . . . . . . . . . . . . . . . . . . . . . . . . . . . . . . . . . . . . . . . . . . . . . . . 31<br />
Contents<br />
<strong>Back</strong><br />
Next<br />
Index<br />
Contents-2
Table of Contents<br />
Battery Connection Jack. . . . . . . . . . . . . . . . . . . . . . . . . . . . . . . . . . . . . . . . . . . . . . . . . . 31<br />
Remote Shutter Release Port. . . . . . . . . . . . . . . . . . . . . . . . . . . . . . . . . . . . . . . . . . . . . . 32<br />
S-Video Output Port . . . . . . . . . . . . . . . . . . . . . . . . . . . . . . . . . . . . . . . . . . . . . . . . . . . . . 32<br />
The Basics . . . . . . . . . . . . . . . . . . . . . . . . . . . . . . . . . . . . . . . . . . . . . . . . . . . . . . . . . .33<br />
Assembling <strong>the</strong> Camera . . . . . . . . . . . . . . . . . . . . . . . . . . . . . . . . . . . . . . . . . . . . . . . . . . . . . . .33<br />
Connecting <strong>the</strong> <strong>DCS</strong> <strong>Pro</strong> <strong>Back</strong> <strong>Plus</strong> to <strong>the</strong> Camera Body and Accessories . . . . . . . . . . . . . . . .34<br />
MAMIYA Interface Plate . . . . . . . . . . . . . . . . . . . . . . . . . . . . . . . . . . . . . . . . . . . . . . . . . . 34<br />
Connecting <strong>the</strong> <strong>DCS</strong> <strong>Pro</strong> <strong>Back</strong> <strong>Plus</strong> to <strong>the</strong> Camera Body . . . . . . . . . . . . . . . . . . . . . . . . 35<br />
Disconnecting <strong>the</strong> <strong>DCS</strong> <strong>Pro</strong> <strong>Back</strong> <strong>Plus</strong> from <strong>the</strong> Camera Body . . . . . . . . . . . . . . . . . . . . 37<br />
Connecting <strong>the</strong> Camera Lens . . . . . . . . . . . . . . . . . . . . . . . . . . . . . . . . . . . . . . . . . . . . . . 38<br />
Connecting Flash/Strobe Units . . . . . . . . . . . . . . . . . . . . . . . . . . . . . . . . . . . . . . . . . . . . . 39<br />
Image Files . . . . . . . . . . . . . . . . . . . . . . . . . . . . . . . . . . . . . . . . . . . . . . . . . . . . . . . . . . . . . . . . .40<br />
Storing Images . . . . . . . . . . . . . . . . . . . . . . . . . . . . . . . . . . . . . . . . . . . . . . . . . . . . . . . . . . . . . .41<br />
Compact Flash (CF) Cards . . . . . . . . . . . . . . . . . . . . . . . . . . . . . . . . . . . . . . . . . . . . . . . . . . . .42<br />
Inserting a CF Card . . . . . . . . . . . . . . . . . . . . . . . . . . . . . . . . . . . . . . . . . . . . . . . . . . . . . 43<br />
Ejecting a CF Card . . . . . . . . . . . . . . . . . . . . . . . . . . . . . . . . . . . . . . . . . . . . . . . . . . . . . . 44<br />
Selecting a CF Card or Folder . . . . . . . . . . . . . . . . . . . . . . . . . . . . . . . . . . . . . . . . . . . . . 45<br />
Accessing Images on a CF Card . . . . . . . . . . . . . . . . . . . . . . . . . . . . . . . . . . . . . . . . . . . 46<br />
Formatting a CF Card . . . . . . . . . . . . . . . . . . . . . . . . . . . . . . . . . . . . . . . . . . . . . . . . . . . . 47<br />
Recovering Data on a CF Card . . . . . . . . . . . . . . . . . . . . . . . . . . . . . . . . . . . . . . . . . . . . 48<br />
Configuring Your Camera . . . . . . . . . . . . . . . . . . . . . . . . . . . . . . . . . . . . . . . . . . . . . .49<br />
Contents<br />
<strong>Back</strong><br />
Next<br />
Index<br />
Contents-3
Table of Contents<br />
Setting <strong>the</strong> Date and Time . . . . . . . . . . . . . . . . . . . . . . . . . . . . . . . . . . . . . . . . . . . . . . . . . . . . .49<br />
Setting Camera <strong>Pro</strong>perties . . . . . . . . . . . . . . . . . . . . . . . . . . . . . . . . . . . . . . . . . . . . . . . . . . . . .50<br />
Displaying <strong>the</strong> <strong>Pro</strong>perties Menu . . . . . . . . . . . . . . . . . . . . . . . . . . . . . . . . . . . . . . . . . . . . 50<br />
Setting Battery Save Onset . . . . . . . . . . . . . . . . . . . . . . . . . . . . . . . . . . . . . . . . . . . . . . . 51<br />
Setting Display Off Time . . . . . . . . . . . . . . . . . . . . . . . . . . . . . . . . . . . . . . . . . . . . . . . . . . 51<br />
Total Actuations . . . . . . . . . . . . . . . . . . . . . . . . . . . . . . . . . . . . . . . . . . . . . . . . . . . . . . . . 52<br />
Use Folder01 . . . . . . . . . . . . . . . . . . . . . . . . . . . . . . . . . . . . . . . . . . . . . . . . . . . . . . . . . . 52<br />
Video Format . . . . . . . . . . . . . . . . . . . . . . . . . . . . . . . . . . . . . . . . . . . . . . . . . . . . . . . . . . 53<br />
Video Signal . . . . . . . . . . . . . . . . . . . . . . . . . . . . . . . . . . . . . . . . . . . . . . . . . . . . . . . . . . . 53<br />
Using <strong>the</strong> Camera Connected to a Computer . . . . . . . . . . . . . . . . . . . . . . . . . . . . . . .54<br />
Getting Started . . . . . . . . . . . . . . . . . . . . . . . . . . . . . . . . . . . . . . . . . . . . . . . . . . . . . . . . . . . . . .54<br />
Connecting <strong>the</strong> Camera to <strong>the</strong> Computer and Power Supply . . . . . . . . . . . . . . . . . . . . . . . . . .55<br />
AC Adapter . . . . . . . . . . . . . . . . . . . . . . . . . . . . . . . . . . . . . . . . . . . . . . . . . . . . . . . . . . . . 55<br />
Connecting to a Computer with Two IEEE 1394 Ports . . . . . . . . . . . . . . . . . . . . . . . . . . . 56<br />
Connecting to a Computer with a Single IEEE 1394 Port. . . . . . . . . . . . . . . . . . . . . . . . . 57<br />
Connecting to a Computer and Using Battery Power . . . . . . . . . . . . . . . . . . . . . . . . . . . . 58<br />
Powering Your Camera . . . . . . . . . . . . . . . . . . . . . . . . . . . . . . . . . . . . . . . . . . . . . . . . . . . . . . .59<br />
Using <strong>the</strong> Camera in Portable Mode . . . . . . . . . . . . . . . . . . . . . . . . . . . . . . . . . . . . . .60<br />
Getting Started . . . . . . . . . . . . . . . . . . . . . . . . . . . . . . . . . . . . . . . . . . . . . . . . . . . . . . . . . . . . . .60<br />
Connecting to a Power Supply . . . . . . . . . . . . . . . . . . . . . . . . . . . . . . . . . . . . . . . . . . . . . . . . . .61<br />
Connecting to a Compatible Third Party Battery . . . . . . . . . . . . . . . . . . . . . . . . . . . . . . . 61<br />
Contents<br />
<strong>Back</strong><br />
Next<br />
Index<br />
Contents-4
Table of Contents<br />
Connecting to <strong>the</strong> AC Adapter . . . . . . . . . . . . . . . . . . . . . . . . . . . . . . . . . . . . . . . . . . . . . 62<br />
Turning <strong>the</strong> Camera On and Off . . . . . . . . . . . . . . . . . . . . . . . . . . . . . . . . . . . . . . . . . . . . 62<br />
Conserving Batteries . . . . . . . . . . . . . . . . . . . . . . . . . . . . . . . . . . . . . . . . . . . . . . . . . . . . 63<br />
Battery Save State . . . . . . . . . . . . . . . . . . . . . . . . . . . . . . . . . . . . . . . . . . . . . . . . . . . . . . 63<br />
Capturing Images . . . . . . . . . . . . . . . . . . . . . . . . . . . . . . . . . . . . . . . . . . . . . . . . . . . .64<br />
Overview . . . . . . . . . . . . . . . . . . . . . . . . . . . . . . . . . . . . . . . . . . . . . . . . . . . . . . . . . . . . . . . . . .64<br />
Formatting Images . . . . . . . . . . . . . . . . . . . . . . . . . . . . . . . . . . . . . . . . . . . . . . . . . . . . . . . . . . .65<br />
Intervalometer . . . . . . . . . . . . . . . . . . . . . . . . . . . . . . . . . . . . . . . . . . . . . . . . . . . . . . . . . . . . . .66<br />
Intervalometer Options . . . . . . . . . . . . . . . . . . . . . . . . . . . . . . . . . . . . . . . . . . . . . . . . . . . 67<br />
Using <strong>the</strong> Image LCD . . . . . . . . . . . . . . . . . . . . . . . . . . . . . . . . . . . . . . . . . . . . . . . . .68<br />
Reviewing Images . . . . . . . . . . . . . . . . . . . . . . . . . . . . . . . . . . . . . . . . . . . . . . . . . . . . . . . . . . .68<br />
Selecting a Display Mode . . . . . . . . . . . . . . . . . . . . . . . . . . . . . . . . . . . . . . . . . . . . . . . . . 68<br />
Single Image Display Mode . . . . . . . . . . . . . . . . . . . . . . . . . . . . . . . . . . . . . . . . . . . . . . . 69<br />
Zoom Display Mode . . . . . . . . . . . . . . . . . . . . . . . . . . . . . . . . . . . . . . . . . . . . . . . . . . . . . 69<br />
Histogram Display Mode. . . . . . . . . . . . . . . . . . . . . . . . . . . . . . . . . . . . . . . . . . . . . . . . . . 71<br />
Multiple Image Display Mode . . . . . . . . . . . . . . . . . . . . . . . . . . . . . . . . . . . . . . . . . . . . . . 71<br />
Image Delete Display Mode . . . . . . . . . . . . . . . . . . . . . . . . . . . . . . . . . . . . . . . . . . . . . . . 72<br />
Status Bar . . . . . . . . . . . . . . . . . . . . . . . . . . . . . . . . . . . . . . . . . . . . . . . . . . . . . . . . . . . . . 73<br />
Location Bar . . . . . . . . . . . . . . . . . . . . . . . . . . . . . . . . . . . . . . . . . . . . . . . . . . . . . . . . . . . 73<br />
Navigating through Displayed Images . . . . . . . . . . . . . . . . . . . . . . . . . . . . . . . . . . . . . . . 74<br />
Deleting Groups of Images . . . . . . . . . . . . . . . . . . . . . . . . . . . . . . . . . . . . . . . . . . . . . . . . . . . . .75<br />
Contents<br />
<strong>Back</strong><br />
Next<br />
Index<br />
Contents-5
Table of Contents<br />
Display Contrast . . . . . . . . . . . . . . . . . . . . . . . . . . . . . . . . . . . . . . . . . . . . . . . . . . . . . . . . . . . . .76<br />
Overexposure Indicator . . . . . . . . . . . . . . . . . . . . . . . . . . . . . . . . . . . . . . . . . . . . . . . . . . . . . . .76<br />
Tagging Images . . . . . . . . . . . . . . . . . . . . . . . . . . . . . . . . . . . . . . . . . . . . . . . . . . . . . . . . . . . . .77<br />
Caring for Your <strong>DCS</strong> <strong>Pro</strong> <strong>Back</strong> <strong>Plus</strong> . . . . . . . . . . . . . . . . . . . . . . . . . . . . . . . . . . . . . .78<br />
Cleaning . . . . . . . . . . . . . . . . . . . . . . . . . . . . . . . . . . . . . . . . . . . . . . . . . . . . . . . . . . . . . . . . . . .78<br />
Cleaning <strong>the</strong> <strong>DCS</strong> <strong>Pro</strong> <strong>Back</strong> <strong>Plus</strong> . . . . . . . . . . . . . . . . . . . . . . . . . . . . . . . . . . . . . . . . . . . 78<br />
Cleaning <strong>the</strong> IR or Anti-aliasing Filter . . . . . . . . . . . . . . . . . . . . . . . . . . . . . . . . . . . . . . . . 78<br />
Storing . . . . . . . . . . . . . . . . . . . . . . . . . . . . . . . . . . . . . . . . . . . . . . . . . . . . . . . . . . . . . . . . . . . .79<br />
Firmware . . . . . . . . . . . . . . . . . . . . . . . . . . . . . . . . . . . . . . . . . . . . . . . . . . . . . . . . . . . . . . . . . .81<br />
Checking <strong>the</strong> Current Firmware Version. . . . . . . . . . . . . . . . . . . . . . . . . . . . . . . . . . . . . . 81<br />
Updating Firmware . . . . . . . . . . . . . . . . . . . . . . . . . . . . . . . . . . . . . . . . . . . . . . . . . . . . . . 82<br />
Specifications . . . . . . . . . . . . . . . . . . . . . . . . . . . . . . . . . . . . . . . . . . . . . . . . . . . . . . . .83<br />
Unsupported Features . . . . . . . . . . . . . . . . . . . . . . . . . . . . . . . . . . . . . . . . . . . . . . . . .84<br />
Unsupported or Partially Supported Features (HASSELBLAD Cameras) . . . . . . . . . . . . . . . . .84<br />
Unsupported or Partially Supported Features (MAMIYA RZ67 PRO II) . . . . . . . . . . . . . . . . . . .85<br />
Using an S-Video Monitor . . . . . . . . . . . . . . . . . . . . . . . . . . . . . . . . . . . . . . . . . . . . . .86<br />
Connecting . . . . . . . . . . . . . . . . . . . . . . . . . . . . . . . . . . . . . . . . . . . . . . . . . . . . . . . . . . . . . . . . .86<br />
Enabling . . . . . . . . . . . . . . . . . . . . . . . . . . . . . . . . . . . . . . . . . . . . . . . . . . . . . . . . . . . . . . . . . . .87<br />
Disabling . . . . . . . . . . . . . . . . . . . . . . . . . . . . . . . . . . . . . . . . . . . . . . . . . . . . . . . . . . . . . . . . . . .87<br />
Contents<br />
<strong>Back</strong><br />
Next<br />
Index<br />
Contents-6
Table of Contents<br />
Navigating Through Images . . . . . . . . . . . . . . . . . . . . . . . . . . . . . . . . . . . . . . . . . . . . . . . . . . . .87<br />
Warnings and Cautions . . . . . . . . . . . . . . . . . . . . . . . . . . . . . . . . . . . . . . . . . . . . . . . .88<br />
Glossary . . . . . . . . . . . . . . . . . . . . . . . . . . . . . . . . . . . . . . . . . . . . . . . . . . . . . . . . . . . .89<br />
Warranty . . . . . . . . . . . . . . . . . . . . . . . . . . . . . . . . . . . . . . . . . . . . . . . . . . . . . . . . . . .93<br />
Contents<br />
<strong>Back</strong><br />
Next<br />
Index<br />
Contents-7
Overview<br />
Overview<br />
<strong>About</strong> This Manual<br />
This manual describes <strong>the</strong> functions available<br />
with <strong>the</strong> KODAK PROFESSIONAL <strong>DCS</strong> <strong>Pro</strong><br />
<strong>Back</strong> <strong>Plus</strong> (<strong>DCS</strong> <strong>Pro</strong> <strong>Back</strong> <strong>Plus</strong>). It does not<br />
describe <strong>the</strong> following:<br />
! Functions available with <strong>the</strong> HASSELBLAD<br />
555ELD, 553ELX, 503CXi, 503CW, or<br />
MAMIYA RZ67 PRO II camera bodies,<br />
except to point out unsupported features<br />
(page 84). Refer to <strong>the</strong> manual included<br />
with your HASSELBLAD or MAMIYA<br />
camera body.<br />
! Functions in <strong>the</strong> KODAK PROFESSIONAL<br />
<strong>DCS</strong> Capture Studio, <strong>DCS</strong> Photo Desk, or<br />
<strong>DCS</strong> Camera Manager software that open,<br />
edit and convert images from your <strong>DCS</strong> <strong>Pro</strong><br />
<strong>Back</strong> <strong>Plus</strong>. Refer to <strong>the</strong> user’s manuals or<br />
Help on <strong>the</strong> software CDs.<br />
This is an on-line manual. Click <strong>the</strong> following<br />
items to jump to <strong>the</strong> associated topic:<br />
! Entries in <strong>the</strong> Table of Contents or Index<br />
! Page numbers underlined in blue<br />
! The Contents, <strong>Back</strong>, Next, or Index buttons<br />
In this manual, <strong>the</strong> term “camera” refers to <strong>the</strong><br />
camera body with attached <strong>DCS</strong> <strong>Pro</strong> <strong>Back</strong> <strong>Plus</strong>.<br />
Some menu screens (page 26) have OK and<br />
Cancel choices. These choices are implemented<br />
by pressing <strong>the</strong> OK or Cancel digital buttons<br />
(page 28).<br />
Contents <strong>Back</strong> Next Index<br />
8
Overview<br />
Introduction<br />
Thank you for purchasing <strong>the</strong> KODAK<br />
PROFESSIONAL <strong>DCS</strong> <strong>Pro</strong> <strong>Back</strong> <strong>Plus</strong>. This<br />
digital camera back attaches to <strong>the</strong> following<br />
camera bodies:<br />
! HASSELBLAD 555ELD, 553ELX, 503CXi,<br />
and 503CW<br />
! MAMIYA RZ67 PRO II (when used with <strong>the</strong><br />
optional KODAK PROFESSIONAL <strong>DCS</strong><br />
<strong>Pro</strong> <strong>Back</strong> <strong>Plus</strong> RZ Interface Kit)<br />
The <strong>DCS</strong> <strong>Pro</strong> <strong>Back</strong> <strong>Plus</strong> is interchangeable with<br />
<strong>the</strong> camera body’s film magazine. You can use<br />
<strong>the</strong> camera body for digital or film photography.<br />
If you use a HASSELBLAD 503CXi or 503CW<br />
camera body, you must use <strong>the</strong> HASSELBLAD<br />
Winder CW and <strong>the</strong> KODAK PROFESSIONAL<br />
<strong>DCS</strong> <strong>Pro</strong> <strong>Back</strong> <strong>Plus</strong> 503CW/CXi Cable Assembly<br />
(EK Cat. Number 195 3736).<br />
If you use a HASSELBLAD 553ELX camera<br />
body, you must use <strong>the</strong> KODAK<br />
PROFESSIONAL <strong>DCS</strong> <strong>Pro</strong> <strong>Back</strong> <strong>Plus</strong> 553ELX<br />
Cable Assembly (EK Cat Number 837 1205).<br />
Contents <strong>Back</strong> Next Index<br />
9
Overview<br />
The <strong>DCS</strong> <strong>Pro</strong> <strong>Back</strong> <strong>Plus</strong> is designed for studio<br />
and portable use. Take care to avoid inclement<br />
wea<strong>the</strong>r.<br />
You can use <strong>the</strong> <strong>DCS</strong> <strong>Pro</strong> <strong>Back</strong> <strong>Plus</strong> connected<br />
to a MACINTOSH computer (page 54), a PC, or<br />
in portable mode (page 60).<br />
When connected to a computer, use <strong>the</strong> included<br />
AC adapter as <strong>the</strong> power source. Power is<br />
supplied to <strong>the</strong> <strong>DCS</strong> <strong>Pro</strong> <strong>Back</strong> <strong>Plus</strong> through <strong>the</strong><br />
IEEE 1394 cable. If <strong>the</strong> included Capture Studio<br />
software is running, images are saved on <strong>the</strong><br />
computer. If <strong>the</strong> software is not running, images<br />
are saved on a Compact Flash Card (CF Card).<br />
When used in portable mode, you must supply<br />
<strong>the</strong> <strong>DCS</strong> <strong>Pro</strong> <strong>Back</strong> <strong>Plus</strong> power from a battery.<br />
Suitable batteries may be obtained from <strong>the</strong>se<br />
Web sites: DIGITAL CAMERA BATTERY<br />
(www.digitalcamerabattery.com) or QUANTUM<br />
INSTRUMENTS Inc. (www.qtm.com.)<br />
Contents <strong>Back</strong> Next Index<br />
10
Overview<br />
Features<br />
! 16 Megapixel imager (4080 x 4080 pixels)<br />
! Unte<strong>the</strong>red burst rate: 1 image / 2 seconds,<br />
burst depth: 6 images (varies depending on<br />
image content and type of Compact Flash<br />
Card)<br />
! ISO:100<br />
! Removable IR filter<br />
! Image Display LCD with two-position<br />
viewing (vertical and 45°) provides image<br />
thumbnails and status of digital features<br />
! S-Video output jack for viewing images on<br />
an external monitor (not included)<br />
! Remote Shutter Release jack for<br />
connection to HASSELBLAD camera<br />
bodies 553ELX, 503CXi, and 503CW<br />
(cables not included)<br />
! Power source<br />
When connected to computer: From<br />
included AC adapter<br />
When in portable mode: Battery pack from<br />
DIGITAL CAMERA BATTERY, QUANTUM<br />
INSTRUMENTS Inc. or o<strong>the</strong>r third party<br />
vendor.<br />
! Two slots for Type II Compact Flash Cards,<br />
each slot with a card-busy LED<br />
! Images can be edited using <strong>DCS</strong> Capture<br />
Studio or <strong>DCS</strong> Photo Desk software<br />
(included with <strong>DCS</strong> <strong>Pro</strong> <strong>Back</strong> <strong>Plus</strong>)<br />
! 400 Mbps IEEE 1394 interface<br />
Contents <strong>Back</strong> Next Index<br />
11
Overview<br />
System Requirements<br />
In addition to items included with <strong>the</strong> <strong>DCS</strong> <strong>Pro</strong><br />
<strong>Back</strong> <strong>Plus</strong>, your camera body and its<br />
accessories, <strong>the</strong> following items are required:<br />
When in Portable Mode<br />
! Battery pack and cable from DIGITAL<br />
CAMERA BATTERY or from QUANTUM<br />
INSTRUMENTS Inc. Refer to <strong>the</strong>ir web<br />
sites for model numbers and ordering<br />
information: www.digitalcamerabattery.com<br />
or www.qtm.com<br />
! QUANTUM battery cable adapter:<br />
QUANTUM INSTRUMENTS part MDC3<br />
! Compact Flash Cards<br />
! Card reader<br />
When Connected to a MACINTOSH<br />
! Mac OS 9.1 or higher (with CarbonLib 1.5<br />
or higher) or Mac OS 10.2.3 or higher<br />
! MACINTOSH or compatible with<br />
POWERPC G3 processor (G4<br />
recommended)<br />
! 256 MB RAM (512 MB recommended)<br />
! 200 MB free disk space<br />
! Free IEEE 1394 port for te<strong>the</strong>red camera<br />
operation<br />
" To process <strong>the</strong> images, you need a computer<br />
with an operating system and RAM as<br />
described in <strong>the</strong> following sections.<br />
Contents <strong>Back</strong> Next Index<br />
12
Overview<br />
When Connected to a PC<br />
! WINDOWS 2000 or WINDOWS XP<br />
! WINDOWS/INTEL PC with 266 MHz<br />
PENTIUM II processor<br />
! 256 MB RAM (512 MB recommended)<br />
! 200 MB free disk space<br />
! IEEE 1394 OHCI compatible adapter with a<br />
free port for te<strong>the</strong>red camera operation<br />
! 1024 pixel by 768 pixel display<br />
If your PC does not have IEEE 1394 ports, you<br />
need an IEEE 1394 card with dual ports or an<br />
IEEE 1394 card with a single port and an IEEE<br />
1394 hub. If you do not have an IEEE 1394 hub<br />
and you have a computer with a single IEEE<br />
1394 port, you must operate <strong>the</strong> <strong>DCS</strong> <strong>Pro</strong> <strong>Back</strong><br />
<strong>Plus</strong> using battery power.<br />
Contents <strong>Back</strong> Next Index<br />
13
Overview<br />
Electromagnetic Emissions<br />
Japan<br />
This is a Class A product based on <strong>the</strong> standard of <strong>the</strong> Voluntary Control Council for Interference by<br />
Information Technology Equipment (VCCI). If this equipment is used in a domestic environment, radio<br />
disturbance may arise. When such trouble occurs, <strong>the</strong> user may be required to take corrective action.<br />
Taiwan<br />
Contents <strong>Back</strong> Next Index<br />
14
Overview<br />
European Union (EU)<br />
Warning:<br />
This is a class A product. In a domestic environment this product may cause radio interference in which<br />
case <strong>the</strong> user may be required to take adequate measures.<br />
USA<br />
NOTE: This equipment has been tested and found to comply with <strong>the</strong> limits for a Class A digital device,<br />
pursuant to part 15 of <strong>the</strong> FCC rules. These limits are designed to provide reasonable protection against<br />
harmful interference when <strong>the</strong> equipment is operated in a commercial environment. This equipment<br />
generates, uses and can radiate radio frequency energy and, if not installed and used in accordance with<br />
<strong>the</strong> instruction manual, may cause harmful interference to radio communications. Operation of this<br />
equipment in a residential area is likely to cause harmful interference in which case <strong>the</strong> user will be<br />
required to correct <strong>the</strong> interference at his own expense.<br />
Contents <strong>Back</strong> Next Index<br />
15
<strong>About</strong> <strong>the</strong> <strong>DCS</strong> <strong>Pro</strong> <strong>Back</strong> <strong>Plus</strong><br />
<strong>About</strong> <strong>the</strong> <strong>DCS</strong> <strong>Pro</strong> <strong>Back</strong> <strong>Plus</strong><br />
Overview<br />
Rear<br />
Front (Attaches to Camera Body)<br />
Image LCD<br />
Filter latch<br />
PWR<br />
<strong>DCS</strong> <strong>Pro</strong> <strong>Back</strong> <strong>Plus</strong><br />
MENU<br />
CANCEL<br />
Image LCD Tilt Latch<br />
Power button<br />
Camera Ready LED<br />
OK<br />
Cancel button<br />
Menu button<br />
OK button<br />
Four-way<br />
switch<br />
IR Filter *<br />
Slots for<br />
connecting to<br />
camera body<br />
or MAMIYA<br />
Interface Plate<br />
* To obtain correct focus you must use ei<strong>the</strong>r an<br />
IR filter (included) or an anti-aliasing filter<br />
(available as an accessory).<br />
Contents <strong>Back</strong> Next Index<br />
16
<strong>About</strong> <strong>the</strong> <strong>DCS</strong> <strong>Pro</strong> <strong>Back</strong> <strong>Plus</strong><br />
Sides<br />
Lens Sync Cable<br />
jack<br />
Flash Sync Cable<br />
jack<br />
IEEE 1394 Port<br />
Battery Connection<br />
jack<br />
Card2 Busy LED<br />
Card1 Eject button<br />
Remote Shutter<br />
Release jack<br />
Card2 slot<br />
Card1 slot<br />
Card door<br />
S-Video Output<br />
jack<br />
Card1 Busy LED<br />
Card2 Eject button<br />
Contents <strong>Back</strong> Next Index<br />
17
<strong>About</strong> <strong>the</strong> <strong>DCS</strong> <strong>Pro</strong> <strong>Back</strong> <strong>Plus</strong><br />
Top<br />
Imager<br />
The imager converts light into electrical charges<br />
when you capture an image. Its specifications are<br />
noted below:<br />
<strong>DCS</strong> <strong>Pro</strong> <strong>Back</strong><br />
<strong>Plus</strong> Release<br />
button with safety<br />
release catch<br />
Horizontal pixels: 4080<br />
Vertical pixels: 4080<br />
Total pixels: 16,646,400<br />
Horizontal active area (mm): 36.72<br />
Vertical active area (mm): 36.72<br />
The imager is located behind <strong>the</strong> IR or antialiasing<br />
filter (page 20).<br />
Contents <strong>Back</strong> Next Index<br />
18
<strong>About</strong> <strong>the</strong> <strong>DCS</strong> <strong>Pro</strong> <strong>Back</strong> <strong>Plus</strong><br />
Focus Screen Overlay<br />
The viewfinder’s field of view is greater than that<br />
of <strong>the</strong> imager. Therefore, an apparent focal<br />
length magnification or telephoto effect appears<br />
in <strong>the</strong> captured image.<br />
Five viewfinder overlays are included with <strong>the</strong><br />
<strong>DCS</strong> <strong>Pro</strong> <strong>Back</strong> <strong>Plus</strong>. Each indicates <strong>the</strong> scene<br />
content that is actually captured. Each overlay<br />
has crop indicators which indicate <strong>the</strong> view<br />
captured when you choose an Image Format<br />
option (page 65).<br />
Applying an Overlay<br />
1 Remove <strong>the</strong> viewfinder from <strong>the</strong> camera body.<br />
2 Lay a Focus Screen overlay over <strong>the</strong> focus<br />
screen.<br />
3 Replace <strong>the</strong> viewfinder.<br />
Contents <strong>Back</strong> Next Index<br />
19
<strong>About</strong> <strong>the</strong> <strong>DCS</strong> <strong>Pro</strong> <strong>Back</strong> <strong>Plus</strong><br />
IR Filter<br />
A removable (page 21) IR filter is included with<br />
<strong>the</strong> <strong>DCS</strong> <strong>Pro</strong> <strong>Back</strong> <strong>Plus</strong>. This filter, which is<br />
installed in front of <strong>the</strong> imager, maintains proper<br />
focus, filters out infrared light to improve image<br />
quality, and helps protect <strong>the</strong> imager’s<br />
coverglass.<br />
Anti-aliasing Filter<br />
You can replace <strong>the</strong> IR filter with an anti-aliasing<br />
filter which can be purchased separately from<br />
<strong>Kodak</strong>. The filter performs <strong>the</strong> IR filter functions<br />
and helps reduce aliasing at certain focal<br />
distances.<br />
" The anti-aliasing filter has a white dot in its<br />
upper-right corner. The IR filter does not.<br />
" For proper focus, you must use ei<strong>the</strong>r <strong>the</strong> IR<br />
filter or <strong>the</strong> anti-aliasing filter.<br />
Contents <strong>Back</strong> Next Index<br />
20
<strong>About</strong> <strong>the</strong> <strong>DCS</strong> <strong>Pro</strong> <strong>Back</strong> <strong>Plus</strong><br />
Removing an IR or Anti-aliasing Filter<br />
CAUTION:<br />
The Anti-aliasing filter and IR filter are fragile<br />
devices and must be handled with care.<br />
Inserting a Filter<br />
1 Insert <strong>the</strong> two tabs at <strong>the</strong> bottom of <strong>the</strong> filter<br />
into <strong>the</strong> slots on <strong>the</strong> <strong>DCS</strong> <strong>Pro</strong> <strong>Back</strong> <strong>Plus</strong>.<br />
Slide <strong>the</strong> Filter latch to <strong>the</strong> right, <strong>the</strong>n carefully<br />
remove <strong>the</strong> filter.<br />
" Store <strong>the</strong> unused filter in <strong>the</strong> pocket of <strong>the</strong><br />
included body cap (page 79).<br />
2 Gently press <strong>the</strong> top of <strong>the</strong> filter into place until<br />
it is latched.<br />
Contents <strong>Back</strong> Next Index<br />
21
<strong>About</strong> <strong>the</strong> <strong>DCS</strong> <strong>Pro</strong> <strong>Back</strong> <strong>Plus</strong><br />
Image LCD<br />
There is a two-inch diagonal Image LCD on <strong>the</strong><br />
rear of <strong>the</strong> <strong>DCS</strong> <strong>Pro</strong> <strong>Back</strong> <strong>Plus</strong> where you can<br />
view images and change settings.<br />
When an S-Video monitor (page 86) is in use, <strong>the</strong><br />
Image LCD turns off. (Pressing <strong>the</strong> OK, Cancel,<br />
or Menu buttons (page 28) restores <strong>the</strong> display to<br />
<strong>the</strong> Image LCD and disables <strong>the</strong> external<br />
monitor.)<br />
How <strong>the</strong> Image LCD Works<br />
You can view images on <strong>the</strong> Image LCD in a<br />
variety of display modes. You can also access<br />
options from <strong>the</strong> Menu bar and from menus<br />
which are accessible from <strong>the</strong> Menu bar.<br />
Access <strong>the</strong> options on <strong>the</strong> Image LCD in a<br />
hierarchical manner:<br />
Display mode (page 68): Appears when you<br />
turn <strong>the</strong> Image LCD on<br />
Menu bar (page 24): Accessible from Display<br />
mode<br />
Menus (page 25): Accessible from <strong>the</strong> Menu<br />
bar<br />
Contents <strong>Back</strong> Next Index<br />
22
<strong>About</strong> <strong>the</strong> <strong>DCS</strong> <strong>Pro</strong> <strong>Back</strong> <strong>Plus</strong><br />
Turning <strong>the</strong> Image LCD On and Off<br />
1 Power <strong>the</strong> <strong>DCS</strong> <strong>Pro</strong> <strong>Back</strong> <strong>Plus</strong> by battery<br />
(page 61) or AC Adapter (page 55).<br />
2 Press <strong>the</strong> OK button to turn <strong>the</strong> Image LCD<br />
on.<br />
3 Press <strong>the</strong> Cancel button to turn <strong>the</strong> Image<br />
LCD off. If <strong>the</strong> LCD is not in Display mode,<br />
press <strong>the</strong> Cancel button more than once.<br />
Tilting <strong>the</strong> Image LCD<br />
Slide <strong>the</strong> Image LCD Tilt Latch and tilt <strong>the</strong> LCD to<br />
a 45° angle for easier viewing, if needed.<br />
Slide <strong>the</strong> latch and gently press to return <strong>the</strong> tilted<br />
section to its original position.<br />
Contents <strong>Back</strong> Next Index<br />
23
<strong>About</strong> <strong>the</strong> <strong>DCS</strong> <strong>Pro</strong> <strong>Back</strong> <strong>Plus</strong><br />
Menu Bar<br />
The Menu bar is available in any Display mode<br />
(page 68) except Zoom mode when <strong>the</strong> Region<br />
of Interest box is disabled. The Menu bar<br />
appears on <strong>the</strong> Image LCD and contains icons<br />
which access various digital functions.<br />
Folder icon<br />
Menu icon<br />
Status screen icon<br />
Video icon (appears when Video is enabled)<br />
Tag icon<br />
Contrast icon<br />
Displaying and Navigating <strong>the</strong> Menu Bar<br />
1 Turn <strong>the</strong> Image LCD on (page 23).<br />
2 Press <strong>the</strong> Menu button to turn <strong>the</strong> Menu bar<br />
on.<br />
3 Press <strong>the</strong> left or right side of <strong>the</strong> Four-way<br />
switch to highlight <strong>the</strong> needed Menu bar icon.<br />
4 Press <strong>the</strong> Cancel button or Menu button to<br />
turn <strong>the</strong> Menu bar off.<br />
Contents <strong>Back</strong> Next Index<br />
24
<strong>About</strong> <strong>the</strong> <strong>DCS</strong> <strong>Pro</strong> <strong>Back</strong> <strong>Plus</strong><br />
Menus<br />
Many <strong>DCS</strong> <strong>Pro</strong> <strong>Back</strong> <strong>Plus</strong> functions can be<br />
accessed through <strong>the</strong> menus on <strong>the</strong> Image LCD.<br />
Making a Menu Selection<br />
1 Navigate <strong>the</strong> Menu bar (page 24) until <strong>the</strong><br />
Folder or Menu icon is highlighted.<br />
The appropriate menu appears.<br />
3 Press <strong>the</strong> OK button to activate <strong>the</strong> option.<br />
Additional screens may appear, depending on<br />
your choice.<br />
4 Repeat steps 2 and 3 for each screen. (If <strong>the</strong><br />
choices are “horizontal” as in <strong>the</strong> example<br />
below, use <strong>the</strong> left or right of <strong>the</strong> Four-way<br />
switch when highlighting options.)<br />
2 Press <strong>the</strong> top or bottom of <strong>the</strong> Four-way switch<br />
to highlight a menu option.<br />
Contents <strong>Back</strong> Next Index<br />
25
<strong>About</strong> <strong>the</strong> <strong>DCS</strong> <strong>Pro</strong> <strong>Back</strong> <strong>Plus</strong><br />
Menu Hierarchy<br />
Contents <strong>Back</strong> Next Index<br />
26
<strong>About</strong> <strong>the</strong> <strong>DCS</strong> <strong>Pro</strong> <strong>Back</strong> <strong>Plus</strong><br />
Status Screen<br />
You can view information about <strong>the</strong> <strong>DCS</strong> <strong>Pro</strong><br />
<strong>Back</strong> <strong>Plus</strong> on <strong>the</strong> Status screen.<br />
Displaying <strong>the</strong> Status screen<br />
Highlight <strong>the</strong> Status screen icon (page 24).<br />
The Status screen appears with <strong>the</strong> following<br />
information:<br />
a<br />
c<br />
d<br />
a - Number of available images that can be<br />
captured to <strong>the</strong> active CF Card (page 42)<br />
b - Fill level (in color) indicates <strong>the</strong> approximate<br />
amount of space available on <strong>the</strong> active card<br />
c - Current image format - full frame, horizontal,<br />
or vertical (page 65)<br />
d - Appears if <strong>the</strong> <strong>DCS</strong> <strong>Pro</strong> <strong>Back</strong> <strong>Plus</strong> is<br />
connected to a computer (page 55) and<br />
flashes if <strong>the</strong> Capture Studio software is not<br />
running<br />
e - Indicates <strong>the</strong> active card if two are inserted<br />
(page 42)<br />
b<br />
e<br />
f<br />
g<br />
f - Name of active folder and <strong>the</strong> number of<br />
images in that folder<br />
g - Number of <strong>the</strong> currently selected image<br />
(page 74)<br />
Contents <strong>Back</strong> Next Index<br />
27
<strong>About</strong> <strong>the</strong> <strong>DCS</strong> <strong>Pro</strong> <strong>Back</strong> <strong>Plus</strong><br />
Digital Buttons<br />
The Four-way switch and <strong>the</strong> OK, Cancel, and<br />
Menu buttons activate <strong>the</strong> digital functions.<br />
Four-way Switch<br />
Press <strong>the</strong> left or right side to:<br />
! Navigate through images<br />
! Navigate <strong>the</strong> Menu bar<br />
! Move <strong>the</strong> Region of Interest box (Zoom<br />
mode)<br />
Press <strong>the</strong> top or bottom to:<br />
! Change <strong>the</strong> Display mode<br />
! Navigate a drop-down menu<br />
! Move <strong>the</strong> Region of Interest box (Zoom<br />
mode)<br />
Menu Button<br />
! Toggles <strong>the</strong> Menu bar off and on<br />
OK Button<br />
! Turns <strong>the</strong> Image LCD on<br />
! Enables <strong>the</strong> Region of Interest box (Zoom<br />
mode)<br />
! Implements a zoom when Region of<br />
Interest box is enabled<br />
! Implements a highlighted menu option<br />
! Deletes <strong>the</strong> active image (Delete mode)<br />
! Turns <strong>the</strong> Overexposure indicator on<br />
Cancel Button<br />
! Exits from menus without applying any<br />
changes<br />
! Turns <strong>the</strong> Image LCD off<br />
! Disables <strong>the</strong> Region of Interest box (Zoom<br />
mode)<br />
! Turns <strong>the</strong> Overexposure indicator off<br />
Contents <strong>Back</strong> Next Index<br />
28
<strong>About</strong> <strong>the</strong> <strong>DCS</strong> <strong>Pro</strong> <strong>Back</strong> <strong>Plus</strong><br />
Quick Guide for Using <strong>the</strong> Image LCD and Digital Buttons<br />
The digital buttons take on different functions, depending on <strong>the</strong> current state of <strong>the</strong> Image LCD.<br />
Turn <strong>the</strong> Image LCD on:<br />
Select a highlighted menu option:<br />
Enable Region of Interest box (Zoom mode):<br />
Implement a zoom (Zoom mode):<br />
Delete an image (Delete mode):<br />
Toggle <strong>the</strong> Menu bar on/off:<br />
Turn <strong>the</strong> Image LCD off:<br />
Dismiss a menu without implementing change:<br />
Disable Region of Interest box (Zoom mode):<br />
Navigate through images in all Display modes<br />
(except Zoom mode when Region of Interest<br />
box is enabled):<br />
Navigate <strong>the</strong> Menu bar and display menus:<br />
Navigate a drop-down menu:<br />
Change to a different Display mode:<br />
Move <strong>the</strong> Region of Interest box (Zoom mode):<br />
Press <strong>the</strong> OK button.<br />
Press <strong>the</strong> OK button.<br />
Press <strong>the</strong> OK button.<br />
Press <strong>the</strong> OK button.<br />
Press <strong>the</strong> OK button.<br />
Press <strong>the</strong> Menu button.<br />
Press <strong>the</strong> Cancel button.<br />
Press <strong>the</strong> Cancel button.<br />
Press <strong>the</strong> Cancel button.<br />
Press <strong>the</strong> left or right side of <strong>the</strong> Four-way switch.<br />
Press <strong>the</strong> left or right side of <strong>the</strong> Four-way switch.<br />
Press <strong>the</strong> top or bottom of <strong>the</strong> Four-way switch.<br />
Press <strong>the</strong> top or bottom of <strong>the</strong> Four-way switch.<br />
Press any edge of <strong>the</strong> Four-way switch.<br />
Contents <strong>Back</strong> Next Index<br />
29
<strong>About</strong> <strong>the</strong> <strong>DCS</strong> <strong>Pro</strong> <strong>Back</strong> <strong>Plus</strong><br />
Power Button<br />
The Power button turns <strong>the</strong> camera on and off<br />
when <strong>the</strong> camera is powered by a battery. This<br />
button does not function when <strong>the</strong> camera is<br />
powered by <strong>the</strong> IEEE 1394 connection.<br />
The Camera Ready LED is illuminated when <strong>the</strong><br />
<strong>DCS</strong> <strong>Pro</strong> <strong>Back</strong> <strong>Plus</strong> is receiving power.<br />
Camera<br />
Ready LED<br />
Power button<br />
PWR<br />
CANCEL<br />
MENU<br />
OK<br />
<strong>DCS</strong> <strong>Pro</strong> <strong>Back</strong> <strong>Plus</strong><br />
Contents <strong>Back</strong> Next Index<br />
30
<strong>About</strong> <strong>the</strong> <strong>DCS</strong> <strong>Pro</strong> <strong>Back</strong> <strong>Plus</strong><br />
Ports and Jacks<br />
Lens Sync Cable<br />
jack<br />
Flash Sync Cable<br />
jack<br />
IEEE 1394 Port<br />
Battery Connection<br />
jack<br />
Lens Sync Cable Jack<br />
The included lens sync cable plugs in here and<br />
allows <strong>the</strong> <strong>DCS</strong> <strong>Pro</strong> <strong>Back</strong> <strong>Plus</strong> to monitor<br />
whe<strong>the</strong>r <strong>the</strong> lens-shutter is open or closed.<br />
IEEE 1394 Port<br />
The included 10 m IEEE 1394 cable connects<br />
here.<br />
Flash Sync Cable Jack<br />
Your flash sync cable connects here. The <strong>DCS</strong><br />
<strong>Pro</strong> <strong>Back</strong> <strong>Plus</strong> triggers your flash/strobe when <strong>the</strong><br />
lens-shutter opens.<br />
Battery Connection Jack<br />
The cable from your compatible battery pack<br />
plugs in here.<br />
Contents <strong>Back</strong> Next Index<br />
31
<strong>About</strong> <strong>the</strong> <strong>DCS</strong> <strong>Pro</strong> <strong>Back</strong> <strong>Plus</strong><br />
Remote Shutter Release Port<br />
<strong>Kodak</strong> carries two accessory cables which plug<br />
into <strong>the</strong> Remote Shutter Release Port. One cable<br />
allows <strong>the</strong> <strong>DCS</strong> <strong>Pro</strong> <strong>Back</strong> <strong>Plus</strong> to work with <strong>the</strong><br />
HASSELBLAD 555ELX camera body. The o<strong>the</strong>r<br />
cable allows <strong>the</strong> <strong>DCS</strong> <strong>Pro</strong> <strong>Back</strong> <strong>Plus</strong> to work with<br />
<strong>the</strong> HASSELBLAD 503CW or 503CXi camera<br />
bodies (page 8).<br />
Remote Shutter<br />
Release jack<br />
S-Video Output port<br />
S-Video Output Port<br />
An industry standard S-Video cable connects<br />
here and allows you to review your images on an<br />
external S-Video monitor (page 86). You can<br />
obtain this type of cable at any high-end video<br />
dealer.<br />
Contents <strong>Back</strong> Next Index<br />
32
The Basics<br />
The Basics<br />
Assembling <strong>the</strong> Camera<br />
Do <strong>the</strong> following before using your camera.<br />
" In this manual, <strong>the</strong> term “camera” refers to<br />
<strong>the</strong> camera body with attached <strong>DCS</strong> <strong>Pro</strong><br />
<strong>Back</strong> <strong>Plus</strong>.<br />
1 Verify that your computer meets system<br />
requirements (page 12).<br />
2 Install an included focus screen overlay<br />
(page 19).<br />
3 Connect <strong>the</strong> <strong>DCS</strong> <strong>Pro</strong> <strong>Back</strong> to <strong>the</strong><br />
HASSELBLAD 555ELD, 553ELX, 503CXi or<br />
503CW (page 34) or to <strong>the</strong> <strong>DCS</strong> <strong>Pro</strong> <strong>Back</strong><br />
<strong>Plus</strong> MAMIYA interface plate that has been<br />
attached to <strong>the</strong> MAMIYA RZ67 PRO II<br />
(page 34).<br />
4 Connect <strong>the</strong> following cables, as needed:<br />
! <strong>DCS</strong> <strong>Pro</strong> <strong>Back</strong> <strong>Plus</strong> Lens Shutter Sync cord<br />
(page 38)<br />
! Flash Sync cable (page 39)<br />
! IEEE 1394 cable (page 55) or battery cable<br />
(page 61)<br />
! S-Video cable (page 86)<br />
If you are using a HASSELBLAD 503CW,<br />
503CXi or 553ELX camera body, connect <strong>the</strong><br />
KODAK PROFESSIONAL <strong>DCS</strong> <strong>Pro</strong> <strong>Back</strong><br />
<strong>Plus</strong> 503CW/CXi Cable Assembly or <strong>the</strong><br />
553ELX Cable Assembly. Follow <strong>the</strong><br />
instructions included with your cable.<br />
5 Follow <strong>the</strong> instructions for using your camera<br />
connected to a computer (page 54) or in<br />
portable mode (page 60).<br />
Contents <strong>Back</strong> Next Index<br />
33
The Basics<br />
Connecting <strong>the</strong> <strong>DCS</strong> <strong>Pro</strong> <strong>Back</strong> <strong>Plus</strong> to <strong>the</strong> Camera Body and Accessories<br />
This section provides instructions for connecting<br />
<strong>the</strong> <strong>DCS</strong> <strong>Pro</strong> <strong>Back</strong> <strong>Plus</strong> to <strong>the</strong> camera body, and<br />
for connecting a lens, a flash, and an S-Video<br />
monitor to <strong>the</strong> <strong>DCS</strong> <strong>Pro</strong> <strong>Back</strong> <strong>Plus</strong>.<br />
For instructions on connecting <strong>the</strong> <strong>DCS</strong> <strong>Pro</strong> <strong>Back</strong><br />
<strong>Plus</strong> to <strong>the</strong> computer and/or power supply, refer<br />
to <strong>the</strong> sections on using <strong>the</strong> camera connected to<br />
<strong>the</strong> computer (page 54) or in portable mode<br />
(page 60).<br />
MAMIYA Interface Plate<br />
A <strong>DCS</strong> <strong>Pro</strong> <strong>Back</strong> <strong>Plus</strong> MAMIYA Interface Plate<br />
(available from <strong>Kodak</strong>) must be attached to <strong>the</strong><br />
MAMIYA RZ67 PRO II camera body before<br />
connecting <strong>the</strong> <strong>DCS</strong> <strong>Pro</strong> <strong>Back</strong> <strong>Plus</strong>.<br />
Refer to <strong>the</strong> instructions included with <strong>the</strong> <strong>DCS</strong><br />
<strong>Pro</strong> <strong>Back</strong> <strong>Plus</strong> MAMIYA interface plate.<br />
Contents <strong>Back</strong> Next Index<br />
34
The Basics<br />
Connecting <strong>the</strong> <strong>DCS</strong> <strong>Pro</strong> <strong>Back</strong> <strong>Plus</strong> to <strong>the</strong><br />
Camera Body<br />
1 If using a MAMIYA RZ67 PRO II, you must first<br />
attach a <strong>DCS</strong> <strong>Pro</strong> <strong>Back</strong> <strong>Plus</strong> MAMIYA<br />
interface plate (page 34). (This is not<br />
necessary with <strong>the</strong> HASSELBLAD 555ELD,<br />
553ELX, 503CXi or 503CW.)<br />
2 Remove <strong>the</strong> protective body cap from <strong>the</strong> <strong>DCS</strong><br />
<strong>Pro</strong> <strong>Back</strong> <strong>Plus</strong>. (Pull <strong>the</strong> bottom off, <strong>the</strong>n lift <strong>the</strong><br />
top slightly to clear <strong>the</strong> release button.)<br />
IMPORTANT:<br />
Do not touch or strike <strong>the</strong> exposed IR filter (or<br />
anti-aliasing filter) or set it down on a surface.<br />
3 Using isopropyl alcohol on a lint-free lens<br />
cleaning tissue, clean <strong>the</strong> contact pads on <strong>the</strong><br />
<strong>DCS</strong> <strong>Pro</strong> <strong>Back</strong> <strong>Plus</strong> and <strong>the</strong> contact pins and<br />
locating posts on <strong>the</strong> camera body.<br />
IMPORTANT:<br />
Do not connect a power source to <strong>the</strong> <strong>DCS</strong> <strong>Pro</strong><br />
<strong>Back</strong> <strong>Plus</strong> until it is connected to <strong>the</strong> camera<br />
body or <strong>the</strong> MAMIYA Interface Plate.<br />
Contents <strong>Back</strong> Next Index<br />
35
The Basics<br />
4 Position <strong>the</strong> slots at <strong>the</strong> bottom of <strong>the</strong> <strong>DCS</strong> <strong>Pro</strong><br />
<strong>Back</strong> <strong>Plus</strong> on <strong>the</strong> locating posts on <strong>the</strong> camera<br />
body or MAMIYA interface plate.<br />
Contact pads<br />
5 Press <strong>the</strong> safety release pin (located at <strong>the</strong> top<br />
of <strong>the</strong> <strong>DCS</strong> <strong>Pro</strong> <strong>Back</strong> <strong>Plus</strong> Release button) and<br />
slide <strong>the</strong> <strong>DCS</strong> <strong>Pro</strong> <strong>Back</strong> <strong>Plus</strong> Release button<br />
to <strong>the</strong> right.<br />
6 Gently press <strong>the</strong> <strong>DCS</strong> <strong>Pro</strong> <strong>Back</strong> <strong>Plus</strong> onto <strong>the</strong><br />
camera back or to <strong>the</strong> attached <strong>DCS</strong> <strong>Pro</strong> <strong>Back</strong><br />
<strong>Plus</strong> MAMIYA interface plate.<br />
The <strong>DCS</strong> <strong>Pro</strong> <strong>Back</strong> <strong>Plus</strong> Release button snaps<br />
back to its original position.<br />
IMPORTANT:<br />
Ensure that <strong>the</strong> <strong>DCS</strong> <strong>Pro</strong> <strong>Back</strong> <strong>Plus</strong> is firmly<br />
attached before releasing your grip.<br />
7 Complete <strong>the</strong> assembly (page 33).<br />
Contents <strong>Back</strong> Next Index<br />
36
The Basics<br />
Disconnecting <strong>the</strong> <strong>DCS</strong> <strong>Pro</strong> <strong>Back</strong> <strong>Plus</strong><br />
from <strong>the</strong> Camera Body<br />
1 Place <strong>the</strong> camera on a table or o<strong>the</strong>r flat<br />
surface.<br />
2 If <strong>the</strong> <strong>DCS</strong> <strong>Pro</strong> <strong>Back</strong> <strong>Plus</strong> is being powered by<br />
a battery pack, turn <strong>the</strong> camera off and unplug<br />
<strong>the</strong> battery cable (page 61).<br />
3 Remove <strong>the</strong> following cables if <strong>the</strong>y are<br />
connected:<br />
! Lens Sync cable (page 38)<br />
! Flash Sync cable (page 39)<br />
! IEEE 1394 cable (page 55) or battery cable<br />
(page 61)<br />
! S-Video cable (page 86)<br />
! KODAK PROFESSIONAL <strong>DCS</strong> <strong>Pro</strong> <strong>Back</strong><br />
<strong>Plus</strong> 503CW/CXi or 553ELX Cable<br />
Assembly<br />
4 Press <strong>the</strong> safety release pin (located at <strong>the</strong> top<br />
of <strong>the</strong> <strong>DCS</strong> <strong>Pro</strong> <strong>Back</strong> <strong>Plus</strong> Release button).<br />
5 Slide <strong>the</strong> <strong>DCS</strong> <strong>Pro</strong> <strong>Back</strong> <strong>Plus</strong> Release button<br />
to <strong>the</strong> right.<br />
6 Carefully remove <strong>the</strong> <strong>DCS</strong> <strong>Pro</strong> <strong>Back</strong> <strong>Plus</strong> from<br />
<strong>the</strong> camera body.<br />
Contents <strong>Back</strong> Next Index<br />
37
The Basics<br />
Connecting <strong>the</strong> Camera Lens<br />
You must connect <strong>the</strong> included Lens Sync cable<br />
to <strong>the</strong> camera lens and <strong>the</strong> <strong>DCS</strong> <strong>Pro</strong> <strong>Back</strong> <strong>Plus</strong><br />
so that <strong>the</strong> <strong>DCS</strong> <strong>Pro</strong> <strong>Back</strong> <strong>Plus</strong> knows when <strong>the</strong><br />
lens shutter opens and closes.<br />
3 Connect <strong>the</strong> o<strong>the</strong>r end of <strong>the</strong> cord to <strong>the</strong> Lens<br />
Sync Cable jack on <strong>the</strong> <strong>DCS</strong> <strong>Pro</strong> <strong>Back</strong> <strong>Plus</strong>.<br />
1 Attach <strong>the</strong> lens to <strong>the</strong> camera body.<br />
2 Connect one end of <strong>the</strong> <strong>DCS</strong> <strong>Pro</strong> <strong>Back</strong> <strong>Plus</strong><br />
Lens Shutter Sync cord to <strong>the</strong> PC socket on<br />
<strong>the</strong> lens.<br />
Contents <strong>Back</strong> Next Index<br />
38
The Basics<br />
Connecting Flash/Strobe Units<br />
Only external flash/strobe units can be used with<br />
<strong>the</strong> <strong>DCS</strong> <strong>Pro</strong> <strong>Back</strong> <strong>Plus</strong>. There is no built-in flash<br />
or hot shoe.<br />
Connect your studio flash sync cable to <strong>the</strong> Flash<br />
Sync Cable jack.<br />
Contents <strong>Back</strong> Next Index<br />
39
The Basics<br />
Image Files<br />
Images captured using <strong>the</strong> <strong>DCS</strong> <strong>Pro</strong> <strong>Back</strong> <strong>Plus</strong><br />
are saved in a proprietary format with a .DCR<br />
extension.<br />
You must use <strong>the</strong> <strong>DCS</strong> Capture Studio or <strong>DCS</strong><br />
Photo Desk software to convert <strong>the</strong> .DCR files to<br />
a format such as JPEG or TIFF before you can<br />
open, view, or print <strong>the</strong>m using o<strong>the</strong>r image<br />
editing or processing applications.<br />
The <strong>DCS</strong> Capture Studio and <strong>DCS</strong> Photo Desk<br />
software convert <strong>the</strong> images as well as provide<br />
image-editing features.<br />
Contents <strong>Back</strong> Next Index<br />
40
The Basics<br />
Storing Images<br />
Images are stored on ei<strong>the</strong>r a Compact Flash<br />
Card (page 42) inserted in <strong>the</strong> <strong>DCS</strong> <strong>Pro</strong> <strong>Back</strong><br />
<strong>Plus</strong> or on <strong>the</strong> computer hard drive.<br />
Refer to <strong>the</strong> <strong>DCS</strong> Capture Studio, <strong>DCS</strong> Camera<br />
Manager, or <strong>DCS</strong> Photo Desk software User’s<br />
Manual or Help for instructions on storing images<br />
on <strong>the</strong> computer.<br />
Images are stored on an inserted Compact Flash<br />
Card when ANY of <strong>the</strong> following conditions occur:<br />
! Camera is operating in portable mode<br />
! Camera is connected to a computer but <strong>the</strong><br />
computer is not turned on<br />
! Camera is connected to a computer that is<br />
powered but <strong>the</strong> Capture Studio software is<br />
not running<br />
Images are stored on <strong>the</strong> computer hard drive<br />
when BOTH of <strong>the</strong> following conditions occur<br />
! Camera is connected to an appropriately<br />
configured computer<br />
! Capture Studio software is running<br />
Contents <strong>Back</strong> Next Index<br />
41
The Basics<br />
Compact Flash (CF) Cards<br />
The <strong>DCS</strong> <strong>Pro</strong> <strong>Back</strong> <strong>Plus</strong> has two slots for<br />
Compact Flash+ Type 2 Cards (CF Cards). The<br />
cards can be solid state or IBM MicroDrives.<br />
Card2 slot<br />
Card1 slot<br />
Card door<br />
You can use one or two cards. Only one card is<br />
active at a time, and captured images are saved<br />
on <strong>the</strong> active card.<br />
The cards are referenced as Card1 and Card2 on<br />
various menus which appear on <strong>the</strong> Image LCD.<br />
" When <strong>the</strong> camera is connected to <strong>the</strong><br />
computer and <strong>the</strong> Capture Studio software is<br />
running, images are saved to <strong>the</strong> computer,<br />
regardless of whe<strong>the</strong>r a card is present.<br />
The front slot (closest to <strong>the</strong> camera body) holds<br />
Card1, and <strong>the</strong> rear slot holds Card2.<br />
Contents <strong>Back</strong> Next Index<br />
42
The Basics<br />
Inserting a CF Card<br />
1 Open <strong>the</strong> Card door.<br />
2 Insert a card in a slot and press firmly until you<br />
feel <strong>the</strong> card seat.<br />
The card can only be inserted in one<br />
orientation.<br />
When using a single card, you can use ei<strong>the</strong>r<br />
slot.<br />
3 Insert a second card, if needed.<br />
The first card inserted is <strong>the</strong> active card unless<br />
you select <strong>the</strong> o<strong>the</strong>r card (page 45).<br />
4 Close <strong>the</strong> Card door.<br />
Contents <strong>Back</strong> Next Index<br />
43
The Basics<br />
Ejecting a CF Card<br />
1 Open <strong>the</strong> Card door.<br />
CAUTION:<br />
The Card Busy LED flashes when images are<br />
being accessed. Do not remove <strong>the</strong> card<br />
when <strong>the</strong> LED is flashing. Doing so could<br />
destroy all image files on <strong>the</strong> card.<br />
Card2 Busy LED<br />
Card1 Eject button<br />
Card2 slot<br />
Card1 slot<br />
Card door<br />
Card1 Busy LED<br />
Card2 Eject button<br />
2 Press <strong>the</strong> Eject button next to <strong>the</strong> card to be<br />
ejected.<br />
Contents <strong>Back</strong> Next Index<br />
44
The Basics<br />
Selecting a CF Card or Folder<br />
1 Highlight <strong>the</strong> Folder icon (page 24).<br />
This procedure applies only when you are<br />
working in portable mode. When connected to<br />
<strong>the</strong> computer, images are saved on <strong>the</strong><br />
computer. Use <strong>the</strong> Capture Studio or Camera<br />
Manager software to select folders on <strong>the</strong><br />
computer.<br />
With two CF Cards, <strong>the</strong> first card inserted is<br />
automatically selected. With ei<strong>the</strong>r one or two<br />
cards, <strong>the</strong> default folder specified in <strong>Pro</strong>perties<br />
(page 52) is selected. You can select a different<br />
card or folder, if needed.<br />
If no card is inserted, an x appears in <strong>the</strong> Folder<br />
icon on <strong>the</strong> Menu bar.<br />
2 If two cards are inserted, press <strong>the</strong> top or<br />
bottom of <strong>the</strong> Four-way switch until CARD1 or<br />
CARD2 is highlighted, indicating <strong>the</strong> card to be<br />
made active.<br />
3 Press <strong>the</strong> OK button.<br />
4 Repeat to select a folder.<br />
The active card and folder are indicated by a •<br />
symbol.<br />
5 Press <strong>the</strong> OK button.<br />
Contents <strong>Back</strong> Next Index<br />
45
The Basics<br />
Accessing Images on a CF Card<br />
After you capture images to a CF Card, you need<br />
to copy <strong>the</strong>m to a computer with Capture Studio<br />
software.<br />
1 Eject <strong>the</strong> CF Card (page 44) from <strong>the</strong> <strong>DCS</strong> <strong>Pro</strong><br />
<strong>Back</strong> <strong>Plus</strong>.<br />
2 If your computer has a CF Card reader, insert<br />
<strong>the</strong> CF Card in <strong>the</strong> reader. If your computer<br />
uses a PC Card reader, first insert <strong>the</strong> CF<br />
Card into a PC Card adapter.<br />
3 If <strong>the</strong> <strong>DCS</strong> Capture Studio or <strong>DCS</strong> Photo Desk<br />
software is installed on your computer, you<br />
can access <strong>the</strong> images directly from <strong>the</strong> CF<br />
Card or copy <strong>the</strong>m from <strong>the</strong> card to a folder on<br />
<strong>the</strong> computer’s hard drive. O<strong>the</strong>rwise, copy<br />
<strong>the</strong> image files to a server which can be<br />
accessed by a computer that has <strong>DCS</strong><br />
Capture Studio or <strong>DCS</strong> Photo Desk software<br />
installed.<br />
Contents <strong>Back</strong> Next Index<br />
46
The Basics<br />
Formatting a CF Card<br />
Occasionally you may need to format a CF Card<br />
if it was formatted incorrectly or if <strong>the</strong> data on <strong>the</strong><br />
card becomes corrupted.<br />
There are two ways to format a card:<br />
! Quick format removes <strong>the</strong> directory<br />
structure but does not erase data. It may be<br />
possible to recover files (page 48) after a<br />
Quick format.<br />
! Full format erases all information and<br />
“cleans up” <strong>the</strong> card. Images cannot be<br />
recovered.<br />
" Cards are formatted in PC DOS format.<br />
1 If two CF Cards are inserted, remove <strong>the</strong> card<br />
that you do not plan to format.<br />
" The format operation will not occur when two<br />
cards are inserted, to prevent formatting <strong>the</strong><br />
wrong card.<br />
2 Highlight <strong>the</strong> Menu icon (page 24), and<br />
choose Main Menu from <strong>the</strong> drop-down menu<br />
(page 25).<br />
3 Choose Card from <strong>the</strong> Main menu.<br />
4 Choose Quick Format or Full Format from <strong>the</strong><br />
Card menu.<br />
5 If you didn’t remove <strong>the</strong> inactive card in step 1,<br />
remove it now, <strong>the</strong>n press <strong>the</strong> OK button.<br />
If you removed <strong>the</strong> active card, re-insert it in<br />
<strong>the</strong> proper slot, <strong>the</strong>n press <strong>the</strong> OK button.<br />
6 Press <strong>the</strong> OK or Cancel button.<br />
Contents <strong>Back</strong> Next Index<br />
47
The Basics<br />
Recovering Data on a CF Card<br />
The Recover Card feature lets you recover files<br />
recently deleted from a CF Card. Files can be<br />
recovered if:<br />
! The card was formatted using a <strong>DCS</strong> <strong>Pro</strong><br />
<strong>Back</strong> <strong>Plus</strong><br />
! The images were captured using a <strong>DCS</strong><br />
<strong>Pro</strong> <strong>Back</strong> <strong>Plus</strong><br />
! The files have not been overwritten<br />
When you recover files, a folder named Recover<br />
is automatically created on <strong>the</strong> card, and <strong>the</strong><br />
recovered files are saved <strong>the</strong>re.<br />
" You cannot capture images to <strong>the</strong> Recover<br />
folder. If you capture an image while <strong>the</strong><br />
Recover folder is selected, <strong>the</strong> image is<br />
saved in <strong>the</strong> default folder specified in<br />
<strong>Pro</strong>perties (page 52).<br />
1 Highlight <strong>the</strong> Menu icon (page 24), and<br />
choose Main Menu from <strong>the</strong> drop-down menu<br />
(page 25).<br />
2 Choose Card from <strong>the</strong> Main menu.<br />
3 Choose Recover Card from <strong>the</strong> Card menu.<br />
Images that have not been overwritten are<br />
recovered and saved in <strong>the</strong> Recover folder.<br />
A Recovering Files screen appears during <strong>the</strong><br />
recovery. When complete, ano<strong>the</strong>r screen<br />
displays <strong>the</strong> number of files recovered.<br />
4 Press <strong>the</strong> OK button.<br />
Ano<strong>the</strong>r screen recommends that you format<br />
<strong>the</strong> card before capturing more images.<br />
5 Press <strong>the</strong> OK button.<br />
IMPORTANT:<br />
Do not format until you save all needed images in<br />
ano<strong>the</strong>r location.<br />
Contents <strong>Back</strong> Next Index<br />
48
Configuring Your Camera<br />
Configuring Your Camera<br />
Setting <strong>the</strong> Date and Time<br />
A date and time stamp is associated with each<br />
image file.<br />
Inside <strong>the</strong> <strong>DCS</strong> <strong>Pro</strong> <strong>Back</strong> <strong>Plus</strong>, a small built-in<br />
rechargeable battery maintains <strong>the</strong> date and time<br />
when <strong>the</strong> camera is not receiving power. It is<br />
recharged when <strong>the</strong> camera is powered, and<br />
maintains <strong>the</strong> date and time for up to 14 days. If<br />
this battery loses its charge, you need to reset<br />
<strong>the</strong> date and time.<br />
" You cannot access this battery.<br />
To Set <strong>the</strong> Date and Time<br />
1 Highlight <strong>the</strong> Menu icon (page 24) <strong>the</strong>n<br />
choose Main Menu from <strong>the</strong> dropdown menu<br />
(page 25).<br />
2 Choose Date/Time from <strong>the</strong> Main menu.<br />
3 Press <strong>the</strong> left or right side of <strong>the</strong> Four-way<br />
switch to sequence through <strong>the</strong> numeric fields.<br />
4 Press <strong>the</strong> top or bottom of <strong>the</strong> Four-way switch<br />
to change <strong>the</strong> highlighted numeric value.<br />
5 Press <strong>the</strong> OK or Cancel button.<br />
Contents <strong>Back</strong> Next Index<br />
49
Configuring Your Camera<br />
Setting Camera <strong>Pro</strong>perties<br />
You can change <strong>the</strong> following camera properties:<br />
! Delay before Battery Save mode activation<br />
(page 51)<br />
! Delay before <strong>the</strong> Image LCD display turns<br />
off (page 51)<br />
! Default folder for image capture (page 52)<br />
! Video format (page 53)<br />
! Video signal (page 53)<br />
In addition, you can view <strong>the</strong> total number of<br />
camera actuations (page 52)<br />
Displaying <strong>the</strong> <strong>Pro</strong>perties Menu<br />
Highlight <strong>the</strong> Menu icon (page 24) <strong>the</strong>n choose<br />
<strong>Pro</strong>perties from <strong>the</strong> drop-down menu (page 25).<br />
The <strong>Pro</strong>perties menu appears.<br />
Contents <strong>Back</strong> Next Index<br />
50
Configuring Your Camera<br />
Setting Battery Save Onset<br />
When <strong>the</strong> <strong>DCS</strong> <strong>Pro</strong> <strong>Back</strong> <strong>Plus</strong> is powered by<br />
battery and you don’t touch any controls during<br />
<strong>the</strong> specified Battery Save Onset time, it enters<br />
Battery Save state. You can change <strong>the</strong> onset<br />
time (page 63) from 1:00:00 to 23:59:59<br />
(HH:MM:SS).<br />
The default onset time is 60 minutes.<br />
1 Display <strong>the</strong> <strong>Pro</strong>perties menu (page 50).<br />
2 Choose Battery Save Onset from <strong>the</strong><br />
<strong>Pro</strong>perties menu.<br />
The Battery Save Onset screen appears.<br />
3 Press <strong>the</strong> left or right side of <strong>the</strong> Four-way<br />
switch to sequence through <strong>the</strong> numeric fields.<br />
4 Press <strong>the</strong> top or bottom of <strong>the</strong> Four-way switch<br />
to change <strong>the</strong> highlighted numeric value.<br />
5 Press <strong>the</strong> OK or Cancel button.<br />
Setting Display Off Time<br />
Extended use of <strong>the</strong> Image LCD can drain your<br />
battery. For this reason, <strong>the</strong> LCD turns off after<br />
<strong>the</strong> length of time specified in <strong>the</strong> Display Off<br />
Time property.<br />
The default Display Off Time is 60 seconds.<br />
1 Display <strong>the</strong> <strong>Pro</strong>perties menu (page 50).<br />
2 Choose Display Off Time from <strong>the</strong> <strong>Pro</strong>perties<br />
menu.<br />
3 Press <strong>the</strong> left or right side of <strong>the</strong> Four-way<br />
switch to sequence through <strong>the</strong> numeric fields.<br />
4 Press <strong>the</strong> top or bottom of <strong>the</strong> Four-way switch<br />
to change <strong>the</strong> highlighted numeric value.<br />
5 Press <strong>the</strong> OK or Cancel button.<br />
Contents <strong>Back</strong> Next Index<br />
51
Configuring Your Camera<br />
Total Actuations<br />
You can determine <strong>the</strong> number of images<br />
captured by <strong>the</strong> <strong>DCS</strong> <strong>Pro</strong> <strong>Back</strong> <strong>Plus</strong> from <strong>the</strong> time<br />
of its manufacture.<br />
1 Display <strong>the</strong> <strong>Pro</strong>perties menu (page 50).<br />
2 Select Total Actuations.<br />
The total number of images captured appears.<br />
Use Folder01<br />
You can change <strong>the</strong> default folder used when a<br />
CF Card is inserted (page 43).<br />
If you do not change <strong>the</strong> default folder, <strong>the</strong> default<br />
is <strong>the</strong> lowest numbered empty folder.<br />
1 Display <strong>the</strong> <strong>Pro</strong>perties menu (page 50).<br />
2 Select Use FOLDER01.<br />
3 Choose Yes or No.<br />
If you choose Yes, FOLDER01 will be active<br />
when you insert a CF Card.<br />
If you choose No, <strong>the</strong> lowest numbered empty<br />
folder will be active when you insert a CF<br />
Card.<br />
Contents <strong>Back</strong> Next Index<br />
52
Configuring Your Camera<br />
Video Format<br />
You can specify <strong>the</strong> format standard used when<br />
you view images on an external monitor<br />
(page 86):<br />
! NTSC - North America (default)<br />
! PAL - Europe and Asia<br />
1 Display <strong>the</strong> <strong>Pro</strong>perties menu (page 50).<br />
2 Select Video Format.<br />
3 Choose NTSC or PAL on <strong>the</strong> Video Format<br />
screen.<br />
Video Signal<br />
You can specify <strong>the</strong> video signal standard used<br />
when you view images on an external monitor:<br />
! S-Video (page 86) provides a higher level of<br />
image quality (default - requires an S-Video<br />
cable - not included)<br />
! Composite (requires a special cable - not<br />
included)<br />
1 Display <strong>the</strong> <strong>Pro</strong>perties menu (page 50).<br />
2 Select Video Signal.<br />
3 Select S-Video or Composite on <strong>the</strong> Video<br />
Signal screen.<br />
Contents <strong>Back</strong> Next Index<br />
53
Before You Begin<br />
Using <strong>the</strong> Camera Connected to a Computer<br />
Using <strong>the</strong> Camera Connected to a Computer<br />
Getting Started<br />
To start using your camera connected to a<br />
computer, do <strong>the</strong> following.<br />
" It is not necessary to turn <strong>the</strong> computer off.<br />
1 Assemble <strong>the</strong> camera (page 33).<br />
2 Install <strong>the</strong> included <strong>DCS</strong> Capture Studio, <strong>DCS</strong><br />
Camera Manager, and <strong>DCS</strong> Photo Desk<br />
software. (Follow <strong>the</strong> instructions on <strong>the</strong><br />
software CDs.)<br />
3 Connect <strong>the</strong> camera to <strong>the</strong> computer and<br />
power supply (page 55).<br />
4 Turn <strong>the</strong> computer on, if it isn’t already.<br />
5 Start <strong>the</strong> Capture Studio software or Camera<br />
Manager software.<br />
6 Capture images.<br />
7 Review and edit <strong>the</strong> images, as needed, in <strong>the</strong><br />
<strong>DCS</strong> Capture Studio or <strong>DCS</strong> Photo Desk<br />
software and save <strong>the</strong>m to <strong>the</strong> computer’s<br />
hard drive in <strong>the</strong> desired format.<br />
" The Power button has no effect when <strong>the</strong><br />
camera is connected to a computer.<br />
Contents <strong>Back</strong> Next Index<br />
54
Using <strong>the</strong> Camera Connected to a Computer<br />
Connecting <strong>the</strong> Camera to <strong>the</strong> Computer and Power Supply<br />
Depending on your computer configuration and<br />
your available accessories, choose one of <strong>the</strong><br />
following ways to connect <strong>the</strong> <strong>DCS</strong> <strong>Pro</strong> <strong>Back</strong><br />
<strong>Plus</strong> to a computer and a power supply.<br />
! <strong>DCS</strong> <strong>Pro</strong> <strong>Back</strong> <strong>Plus</strong> and <strong>DCS</strong> <strong>Pro</strong> <strong>Back</strong><br />
<strong>Plus</strong> AC adapter connect to a computer<br />
with two IEEE 1394 ports (page 56)<br />
! <strong>DCS</strong> <strong>Pro</strong> <strong>Back</strong> <strong>Plus</strong> and <strong>DCS</strong> <strong>Pro</strong> <strong>Back</strong><br />
<strong>Plus</strong> AC adapter connect to an IEEE 1394<br />
hub which connects to a computer with one<br />
IEEE 1394 port (page 57)<br />
! <strong>DCS</strong> <strong>Pro</strong> <strong>Back</strong> <strong>Plus</strong> connects to a battery<br />
power source and a computer with one or<br />
more IEEE 1394 ports (page 58)<br />
AC Adapter<br />
A <strong>DCS</strong> <strong>Pro</strong> <strong>Back</strong> <strong>Plus</strong> 24VDC AC adapter is<br />
included with <strong>the</strong> <strong>DCS</strong> <strong>Pro</strong> <strong>Back</strong> <strong>Plus</strong>. Do not use<br />
any o<strong>the</strong>r type of AC adapter with your camera.<br />
Contents <strong>Back</strong> Next Index<br />
55
Using <strong>the</strong> Camera Connected to a Computer<br />
Connecting to a Computer with Two IEEE<br />
1394 Ports<br />
1 Connect one end of <strong>the</strong> included 10m IEEE<br />
1394 cable to <strong>the</strong> IEEE 1394 port on <strong>the</strong> <strong>DCS</strong><br />
<strong>Pro</strong> <strong>Back</strong> <strong>Plus</strong>.<br />
IEEE<br />
1394 cable<br />
<strong>DCS</strong> <strong>Pro</strong> <strong>Back</strong> <strong>Plus</strong><br />
DC<br />
Computer<br />
AC<br />
AC adapter<br />
2 Connect <strong>the</strong> o<strong>the</strong>r end of <strong>the</strong> IEEE 1394 cable<br />
to an IEEE 1394 port on <strong>the</strong> computer.<br />
3 Connect <strong>the</strong> cable from <strong>the</strong> included AC<br />
adapter to a different IEEE 1394 port on <strong>the</strong><br />
computer.<br />
4 Plug <strong>the</strong> AC adapter into a wall socket.<br />
Contents <strong>Back</strong> Next Index<br />
56
Using <strong>the</strong> Camera Connected to a Computer<br />
Connecting to a Computer with a Single<br />
IEEE 1394 Port<br />
In addition to accessories included with <strong>the</strong> <strong>DCS</strong><br />
<strong>Pro</strong> <strong>Back</strong> <strong>Plus</strong>, you need:<br />
! IEEE 1394 hub<br />
! 6-wire IEEE 1394 cable<br />
Computer<br />
DC<br />
AC adapter<br />
IEEE<br />
1394 cable<br />
IEEE<br />
1394 hub<br />
<strong>DCS</strong> <strong>Pro</strong> <strong>Back</strong> <strong>Plus</strong><br />
AC<br />
1 Connect one end of <strong>the</strong> included 10m IEEE<br />
1394 cable to <strong>the</strong> IEEE 1394 port on <strong>the</strong> <strong>DCS</strong><br />
<strong>Pro</strong> <strong>Back</strong> <strong>Plus</strong> (page 56).<br />
2 Connect <strong>the</strong> o<strong>the</strong>r end of <strong>the</strong> IEEE 1394 cable<br />
to any of <strong>the</strong> ports on <strong>the</strong> IEEE 1394 hub.<br />
3 Connect <strong>the</strong> cable from <strong>the</strong> included AC<br />
adapter to ei<strong>the</strong>r one of <strong>the</strong> remaining ports on<br />
<strong>the</strong> IEEE 1394 hub.<br />
4 Connect ano<strong>the</strong>r 6-wire IEEE 1394 cable (not<br />
included) from ano<strong>the</strong>r port on <strong>the</strong> IEEE 1394<br />
hub to <strong>the</strong> single IEEE 1394 port on <strong>the</strong><br />
computer.<br />
5 Plug <strong>the</strong> AC adapter into a wall socket.<br />
Contents <strong>Back</strong> Next Index<br />
57
Using <strong>the</strong> Camera Connected to a Computer<br />
Connecting to a Computer and Using<br />
Battery Power<br />
IEEE 1394 cable<br />
Battery<br />
<strong>DCS</strong> <strong>Pro</strong> <strong>Back</strong> <strong>Plus</strong><br />
2 Connect <strong>the</strong> o<strong>the</strong>r end of <strong>the</strong> IEEE 1394 cable<br />
to an IEEE 1394 port on <strong>the</strong> computer.<br />
3 Following <strong>the</strong> instructions included with your<br />
battery pack, connect <strong>the</strong> battery pack and its<br />
cable.<br />
4 Insert <strong>the</strong> cable into <strong>the</strong> Battery Connection<br />
jack on <strong>the</strong> <strong>DCS</strong> <strong>Pro</strong> <strong>Back</strong> <strong>Plus</strong>.<br />
Computer<br />
Battery cable<br />
1 Connect one end of <strong>the</strong> included 10m IEEE<br />
1394 cable to <strong>the</strong> IEEE 1394 port on <strong>the</strong> <strong>DCS</strong><br />
<strong>Pro</strong> <strong>Back</strong> <strong>Plus</strong>.<br />
5 Turn on <strong>the</strong> battery pack’s power switch.<br />
Contents <strong>Back</strong> Next Index<br />
58
Using <strong>the</strong> Camera Connected to a Computer<br />
Powering Your Camera<br />
When connected to <strong>the</strong> computer, your camera<br />
receives its power from <strong>the</strong> included AC adapter<br />
(via <strong>the</strong> IEEE 1394 interface) or a compatible<br />
battery. If you use an IEEE 1394 cable o<strong>the</strong>r than<br />
<strong>the</strong> one included with your <strong>DCS</strong> <strong>Pro</strong> <strong>Back</strong> <strong>Plus</strong>,<br />
ensure that it is a 6-wire IEEE 1394 cable (4-wire<br />
cables will not work).<br />
If you do not use <strong>the</strong> AC adapter with <strong>the</strong> IEEE<br />
1394 cable, <strong>the</strong> <strong>DCS</strong> <strong>Pro</strong> <strong>Back</strong> <strong>Plus</strong> will not<br />
receive enough power. An error message<br />
appears.<br />
To Power <strong>the</strong> Camera<br />
With <strong>the</strong> IEEE 1394 cable and <strong>DCS</strong> <strong>Pro</strong> <strong>Back</strong><br />
<strong>Plus</strong> AC Adapter (page 55) or a compatible<br />
battery (page 61) connected, turn <strong>the</strong> computer<br />
on.<br />
It takes 5-6 seconds for <strong>the</strong> <strong>DCS</strong> <strong>Pro</strong> <strong>Back</strong> <strong>Plus</strong><br />
to activate once <strong>the</strong> initial power signal is<br />
received. When ready, <strong>the</strong> Camera Ready LED<br />
illuminates. (The Power button has no effect<br />
when power is supplied by <strong>the</strong> IEEE 1394<br />
connection.)<br />
" If you turn <strong>the</strong> Image LCD on, it turns off<br />
automatically after <strong>the</strong> time specified in <strong>the</strong><br />
Display Off Time property (page 51).<br />
To Turn <strong>the</strong> <strong>DCS</strong> <strong>Pro</strong> <strong>Back</strong> <strong>Plus</strong> Off<br />
Disconnect <strong>the</strong> IEEE 1394 cable.<br />
Contents <strong>Back</strong> Next Index<br />
59
Using <strong>the</strong> Camera in Portable Mode<br />
Using <strong>the</strong> Camera in Portable Mode<br />
Getting Started<br />
To start using your camera in portable mode (not<br />
connected to a computer), do <strong>the</strong> following:<br />
1 Assemble <strong>the</strong> camera (page 33).<br />
2 Connect a power supply (page 61).<br />
3 Insert one or two CF Cards (page 42).<br />
4 Turn <strong>the</strong> camera on (page 62).<br />
5 Capture images.<br />
6 Review <strong>the</strong> images (page 68) on <strong>the</strong> Image<br />
Display LCD (or enable <strong>the</strong> video output<br />
(page 86) to view <strong>the</strong>m on a monitor.)<br />
7 Remove <strong>the</strong> CF Cards from <strong>the</strong> camera and<br />
insert <strong>the</strong>m in a card reader.<br />
8 Copy <strong>the</strong> image files to <strong>the</strong> computer.<br />
If images are copied to a computer (page 12)<br />
running <strong>DCS</strong> Capture Studio or <strong>DCS</strong> Photo<br />
Desk software, you can access <strong>the</strong>m using <strong>the</strong><br />
software.<br />
Alternatively, you can copy <strong>the</strong>m to a server<br />
accessible from a computer running <strong>the</strong> <strong>DCS</strong><br />
Capture Studio or <strong>DCS</strong> Photo Desk software.<br />
9 Edit <strong>the</strong> images, as needed, in <strong>the</strong> <strong>DCS</strong><br />
Capture Studio or <strong>DCS</strong> Photo Desk software<br />
and save <strong>the</strong>m in <strong>the</strong> desired format.<br />
Contents <strong>Back</strong> Next Index<br />
60
Using <strong>the</strong> Camera in Portable Mode<br />
Connecting to a Power Supply<br />
When you are working in portable mode, your<br />
camera may receive its power from ei<strong>the</strong>r a<br />
compatible third party battery or <strong>the</strong> included<br />
<strong>DCS</strong> <strong>Pro</strong> <strong>Back</strong> <strong>Plus</strong> AC adapter (page 55).<br />
Connecting to a Compatible Third Party<br />
Battery<br />
In addition to included accessories, you need:<br />
! Compatible battery<br />
! Battery cable<br />
1 Following <strong>the</strong> instructions you received with<br />
your battery, connect its cable to <strong>the</strong> battery<br />
pack.<br />
2 Insert <strong>the</strong> cable into <strong>the</strong> Battery Connection<br />
port on <strong>the</strong> <strong>DCS</strong> <strong>Pro</strong> <strong>Back</strong> <strong>Plus</strong>.<br />
Contents <strong>Back</strong> Next Index<br />
61
Using <strong>the</strong> Camera in Portable Mode<br />
Connecting to <strong>the</strong> AC Adapter<br />
1 Connect <strong>the</strong> cable from <strong>the</strong> included AC<br />
adapter (page 55) to <strong>the</strong> IEEE 1394 port on<br />
<strong>the</strong> <strong>DCS</strong> <strong>Pro</strong> <strong>Back</strong> <strong>Plus</strong>.<br />
Turning <strong>the</strong> Camera On and Off<br />
Press <strong>the</strong> Power button to turn <strong>the</strong> camera on or<br />
off.<br />
PWR<br />
CANCEL<br />
MENU<br />
OK<br />
<strong>DCS</strong> <strong>Pro</strong> <strong>Back</strong> <strong>Plus</strong><br />
2 Plug <strong>the</strong> AC adapter into a wall socket.<br />
" The button is only effective when <strong>the</strong> camera<br />
is powered by battery. When powered by AC<br />
adapter, <strong>the</strong> camera is always on.<br />
The Camera Ready LED illuminates when <strong>the</strong><br />
power is on.<br />
" If you turn <strong>the</strong> camera off while <strong>the</strong> <strong>DCS</strong> <strong>Pro</strong><br />
<strong>Back</strong> <strong>Plus</strong> is busy, <strong>the</strong> Camera Ready LED<br />
flashes until <strong>the</strong> task completes.<br />
Contents <strong>Back</strong> Next Index<br />
62
Using <strong>the</strong> Camera in Portable Mode<br />
Conserving Batteries<br />
To extend <strong>the</strong> life of <strong>the</strong> battery pack, keep <strong>the</strong><br />
following in mind:<br />
! Follow <strong>the</strong> instructions you received with<br />
your compatible third party battery for its<br />
care and use.<br />
! Older batteries may not last as long as<br />
newer batteries.<br />
! Minimize use of <strong>the</strong> Image LCD and turn it<br />
off when not in use.<br />
" You may be able to obtain information about<br />
<strong>the</strong> battery’s charge level from lights on <strong>the</strong><br />
battery pack. This information is not provided<br />
on <strong>the</strong> <strong>DCS</strong> <strong>Pro</strong> <strong>Back</strong> <strong>Plus</strong>.<br />
Battery Save State<br />
To conserve <strong>the</strong> battery’s charge, <strong>the</strong> <strong>DCS</strong> <strong>Pro</strong><br />
<strong>Back</strong> <strong>Plus</strong> enters Battery Save state if no <strong>DCS</strong><br />
<strong>Pro</strong> <strong>Back</strong> <strong>Plus</strong> controls are touched for a<br />
specified period of time. When this happens, <strong>the</strong><br />
Camera Ready LED is extinguished, and <strong>the</strong><br />
Image LCD and <strong>DCS</strong> <strong>Pro</strong> <strong>Back</strong> <strong>Plus</strong> buttons<br />
become inactive.<br />
The default onset of Battery Save state is 60<br />
minutes. You can change <strong>the</strong> Battery Save Onset<br />
time in <strong>Pro</strong>perties (page 51).<br />
To Exit Battery Save State<br />
Press <strong>the</strong> Power button.<br />
The <strong>DCS</strong> <strong>Pro</strong> <strong>Back</strong> <strong>Plus</strong> turns on with <strong>the</strong> same<br />
settings it had before Battery Save state began.<br />
Contents <strong>Back</strong> Next Index<br />
63
Capturing Images<br />
Capturing Images<br />
Overview<br />
This section describes operations specific to <strong>the</strong><br />
<strong>DCS</strong> <strong>Pro</strong> <strong>Back</strong> <strong>Plus</strong>.<br />
Refer to <strong>the</strong> User’s Manual for your<br />
HASSELBLAD 555ELD, 553ELX, 503CXi, or<br />
503CW, or MAMIYA RZ67 PRO II camera body<br />
for additional instructions on image capture.<br />
Refer also to <strong>the</strong> list of unsupported features<br />
(page 84) for <strong>the</strong> HASSELBLAD or MAMIYA<br />
camera when used with <strong>the</strong> <strong>DCS</strong> <strong>Pro</strong> <strong>Back</strong> <strong>Plus</strong>.<br />
Contents <strong>Back</strong> Next Index<br />
64
Before You Begin<br />
Capturing Images<br />
Formatting Images<br />
The <strong>DCS</strong> <strong>Pro</strong> <strong>Back</strong> <strong>Plus</strong> has a square imager<br />
that captures images with a square format. You<br />
can change this format, if needed.<br />
The new format is applied to subsequently<br />
captured images.<br />
The Focus Screen overlay indicates <strong>the</strong><br />
approximate area of coverage for each format.<br />
To Format Images<br />
1 Highlight <strong>the</strong> Menu icon (page 24), and<br />
choose Main Menu from <strong>the</strong> drop-down menu<br />
(page 25).<br />
2 Choose Image Format from <strong>the</strong> Main menu.<br />
3 Choose <strong>the</strong> desired option from <strong>the</strong> Image<br />
Format menu (Full Frame, 4x5, or 5x4):<br />
5x5<br />
Full Frame (4x4)<br />
5x4<br />
Horizontal format<br />
indicators (4x3)<br />
4x5<br />
Vertical format<br />
5x5<br />
Full Frame (4x4)<br />
The current format is indicated on <strong>the</strong> Status<br />
screen (page 27).<br />
F - Full frame image (5x5)<br />
H - Horizontal format (5x4)<br />
V - Vertical format (4x5)<br />
Contents <strong>Back</strong> Next Index<br />
65
Capturing Images<br />
Intervalometer<br />
Your camera has an Intervalometer that<br />
automatically captures a sequence of images at<br />
specified intervals over a specified time period.<br />
You might use <strong>the</strong> Intervalometer to capture a<br />
flower bud opening or for unattended<br />
surveillance.<br />
The Intervalometer is disabled automatically after<br />
<strong>the</strong> specified time has elapsed, even if <strong>the</strong><br />
specified number of images have not been<br />
captured. For example, if you set <strong>the</strong><br />
Intervalometer for fifteen exposures at one<br />
second intervals, <strong>the</strong> buffer would fill after a few<br />
exposures, and <strong>the</strong> camera would not be able to<br />
maintain <strong>the</strong> one second interval. It would stop<br />
capturing images after fifteen seconds even<br />
though fifteen images had not been captured.<br />
" While <strong>the</strong> Intervalometer is enabled, <strong>the</strong><br />
camera does not enter Battery Save state.<br />
1 Highlight <strong>the</strong> Menu icon (page 24), and<br />
choose Main Menu from <strong>the</strong> drop-down menu<br />
(page 25).<br />
2 Choose Intervalometer from <strong>the</strong> Main menu.<br />
3 Choose <strong>the</strong> desired option from <strong>the</strong><br />
Intervalometer menu.<br />
4 Change settings, as needed, on <strong>the</strong><br />
Intervalometer options screens (page 67).<br />
5 Press <strong>the</strong> left or right side of <strong>the</strong> Four-way<br />
switch to sequence through <strong>the</strong> numeric fields.<br />
Press <strong>the</strong> top or bottom of <strong>the</strong> Four-way switch<br />
to change <strong>the</strong> highlighted numeric value.<br />
Press <strong>the</strong> OK or Cancel button. (In <strong>the</strong> Enable<br />
screen, choose Yes or No.)<br />
Contents <strong>Back</strong> Next Index<br />
66
Capturing Images<br />
Intervalometer Options<br />
Screen:<br />
Frame Count Interval Delay Enable<br />
Description:<br />
Specifies <strong>the</strong><br />
number of frames<br />
to capture<br />
Specifies <strong>the</strong><br />
interval between<br />
image captures<br />
Range: 1-9999 frames 3 seconds to<br />
23:59:59<br />
(HH:MM:SS)<br />
Specifies <strong>the</strong> delay<br />
before onset of <strong>the</strong><br />
Intervalometer<br />
function<br />
1 second to<br />
23:59:59<br />
(HH:MM:SS)<br />
Default: 10 frames 10 seconds 1 second<br />
Yes enables <strong>the</strong><br />
Intervalometer with<br />
<strong>the</strong> values<br />
displayed in <strong>the</strong><br />
Intervalometer<br />
screen<br />
No disables <strong>the</strong><br />
Intervalometer<br />
Contents <strong>Back</strong> Next Index<br />
67
Using <strong>the</strong> Image LCD<br />
Using <strong>the</strong> Image LCD<br />
Reviewing Images<br />
You can review images on <strong>the</strong> active CF Card<br />
(page 42) in one of five Display modes:<br />
! Single Image mode<br />
! Zoom mode<br />
! Histogram mode<br />
! Multiple Image mode<br />
! Delete mode<br />
" The Location bar (page 73) appears at <strong>the</strong><br />
bottom of <strong>the</strong> screen in Single Image or<br />
Multiple Image Display mode.<br />
Selecting a Display Mode<br />
1 Press <strong>the</strong> OK button to turn <strong>the</strong> Image LCD on<br />
or, if a menu is displayed, press <strong>the</strong> Cancel or<br />
Menu button to return to Display mode.<br />
2 Press <strong>the</strong> top or bottom of <strong>the</strong> Four-way switch<br />
to change <strong>the</strong> Display mode.<br />
A pop-up display containing icons for each<br />
Display mode appears briefly, with <strong>the</strong> active<br />
icon highlighted.<br />
Single<br />
Zoom<br />
Histogram<br />
Multiple<br />
Delete<br />
Contents <strong>Back</strong> Next Index<br />
68
Before You Begin<br />
Using <strong>the</strong> Image LCD<br />
Single Image Display Mode<br />
The thumbnail for <strong>the</strong> current image appears with<br />
<strong>the</strong> Status bar (page 73) at <strong>the</strong> left.<br />
Zoom Display Mode<br />
The thumbnail for <strong>the</strong> current image appears with<br />
a Region of Interest box and crosshairs (page<br />
70). The Region of Interest box includes <strong>the</strong> area<br />
of <strong>the</strong> image that appears when you zoom in.<br />
Enabling or Disabling <strong>the</strong> Region of Interest Box<br />
Press <strong>the</strong> OK button to enable <strong>the</strong> Region of<br />
Interest box.<br />
You can pan or zoom when <strong>the</strong> Region of<br />
Interest box is enabled.<br />
Press <strong>the</strong> Cancel button to disable <strong>the</strong> Region of<br />
Interest box.<br />
You can navigate to a different image when<br />
<strong>the</strong> Region of Interest box is disabled.<br />
Contents <strong>Back</strong> Next Index<br />
69
Using <strong>the</strong> Image LCD<br />
Zooming<br />
With <strong>the</strong> Region of Interest box enabled<br />
(page 69) press <strong>the</strong> OK button.<br />
The first actuation zooms to 1:4 (one pixel<br />
displayed for every four), <strong>the</strong> second to 1:1, and<br />
<strong>the</strong> third returns to <strong>the</strong> un-zoomed 1:16.<br />
" When zoomed in to 1:1, <strong>the</strong> crosshairs<br />
appear but <strong>the</strong> Region of Interest box does<br />
not. You can still pan, however.<br />
Panning<br />
With <strong>the</strong> Region of Interest box enabled, press<br />
<strong>the</strong> appropriate part of <strong>the</strong> Four-way switch to<br />
move <strong>the</strong> Region of Interest box around.<br />
Navigating Through Images in Zoom Mode<br />
Press <strong>the</strong> Cancel button to turn <strong>the</strong> Region of<br />
Interest box off and navigate (page 74) to o<strong>the</strong>r<br />
images.<br />
Luminometer Crosshairs<br />
The crosshairs, which appear when <strong>the</strong> Region<br />
of Interest box is on, indicate <strong>the</strong> level of<br />
luminance channel saturation of pixels below <strong>the</strong><br />
center of <strong>the</strong> crosshairs. This level is indicated in<br />
stops (-3 to 3.25) and percentages (2 to 180%).<br />
If <strong>the</strong> edge of <strong>the</strong> thumbnail is reached, <strong>the</strong> image<br />
moves in <strong>the</strong> opposite direction.<br />
Contents <strong>Back</strong> Next Index<br />
70
Using <strong>the</strong> Image LCD<br />
Histogram Display Mode<br />
When Histogram mode is active, <strong>the</strong> following<br />
information appears for <strong>the</strong> active image:<br />
! Active folder number/name<br />
! Image number<br />
! Date and time of image capture<br />
! Image thumbnail<br />
! Histogram for <strong>the</strong> image<br />
Multiple Image Display Mode<br />
Four image thumbnails appear with <strong>the</strong> Status<br />
bar (page 73) at <strong>the</strong> left. The current image is<br />
highlighted.<br />
" Thumbnails may appear with varying image<br />
formats (page 65) as each thumbnail is<br />
displayed in its selected image format.<br />
Contents <strong>Back</strong> Next Index<br />
71
Using <strong>the</strong> Image LCD<br />
Image Delete Display Mode<br />
Use Image Delete Display mode to delete <strong>the</strong><br />
current image. You can also delete groups of<br />
images (page 75) using a Main menu option.<br />
" If you delete an image by mistake, you can<br />
get it back if you immediately perform <strong>the</strong><br />
Recover function (page 48).<br />
To Delete a Single Image<br />
1 Press <strong>the</strong> OK button to delete <strong>the</strong> displayed<br />
image.<br />
2 Press <strong>the</strong> OK or Cancel button in response to<br />
<strong>the</strong> confirmation screen. (The Cancel button<br />
dismisses <strong>the</strong> screen without deleting <strong>the</strong><br />
image.)<br />
One image thumbnail (for <strong>the</strong> current image)<br />
appears with instructions for deleting it.<br />
A feedback screen appears for two seconds or<br />
until you manipulate a button on <strong>the</strong> <strong>DCS</strong> <strong>Pro</strong><br />
<strong>Back</strong> <strong>Plus</strong>.<br />
Contents <strong>Back</strong> Next Index<br />
72
Using <strong>the</strong> Image LCD<br />
Status Bar<br />
When image thumbnails are displayed in Single<br />
Image or Multiple Image Display mode (page 68),<br />
a Status bar appears at <strong>the</strong> left of <strong>the</strong> display. It<br />
contains some or all of <strong>the</strong> following information.<br />
Card # (if 2 cards)<br />
Folder #<br />
Location Bar<br />
A Location bar appears at <strong>the</strong> bottom of <strong>the</strong><br />
Image LCD when you are navigating through<br />
images in Single Image or Multiple Image Display<br />
mode (page 68). It indicates <strong>the</strong> position of <strong>the</strong><br />
current image relative to <strong>the</strong> o<strong>the</strong>r images in <strong>the</strong><br />
active folder.<br />
Tag - if image<br />
tagged (page 77)<br />
Image number<br />
Contents <strong>Back</strong> Next Index<br />
73
Using <strong>the</strong> Image LCD<br />
Navigating through Displayed Images<br />
Press <strong>the</strong> left or right side of <strong>the</strong> Four-way switch<br />
to navigate through images in <strong>the</strong> selected folder.<br />
" This works in all Display modes except Zoom<br />
mode (page 69) when <strong>the</strong> Region of Interest<br />
box is enabled.<br />
The right side navigates “forward” to highernumbered<br />
images in <strong>the</strong> folder, and <strong>the</strong> left side<br />
navigates “backward.”<br />
Selecting an Image<br />
As you navigate through <strong>the</strong> images in Multiple<br />
Image Display, <strong>the</strong> images are highlighted one at<br />
a time. Release <strong>the</strong> Four-way switch when <strong>the</strong><br />
desired image is highlighted.<br />
In <strong>the</strong> o<strong>the</strong>r Display modes, release <strong>the</strong> Four-way<br />
switch when <strong>the</strong> desired image appears.<br />
If you continue navigating forward after <strong>the</strong> last<br />
image is reached, <strong>the</strong> navigation wraps around to<br />
<strong>the</strong> first image. If you continue navigating<br />
backward after <strong>the</strong> first image is reached, <strong>the</strong><br />
navigation wraps around to <strong>the</strong> last image.<br />
To indicate <strong>the</strong> first or last image in <strong>the</strong> folder, a<br />
blank screen appears after <strong>the</strong> last or first image.<br />
Contents <strong>Back</strong> Next Index<br />
74
Using <strong>the</strong> Image LCD<br />
Deleting Groups of Images<br />
You can delete groups of images using a Main<br />
menu option. You can also delete single images<br />
using Image Delete Display mode (page 72).<br />
To Delete Groups of Images<br />
1 Highlight <strong>the</strong> Menu icon (page 24), and<br />
choose Main Menu from <strong>the</strong> dropdown menu<br />
(page 25).<br />
2 Choose Delete Images from <strong>the</strong> Main menu.<br />
3 Choose <strong>the</strong> desired option from <strong>the</strong> Delete<br />
Images menu.<br />
4 When prompted, Press <strong>the</strong> OK or Cancel<br />
button.<br />
If you Press <strong>the</strong> OK button, a progress screen<br />
appears. If you press <strong>the</strong> Cancel button while<br />
<strong>the</strong> deletion is in progress, images that have<br />
not yet been deleted remain on <strong>the</strong> card.<br />
A final screen appears informing you of <strong>the</strong><br />
number of images deleted.<br />
5 Press <strong>the</strong> OK button.<br />
Contents <strong>Back</strong> Next Index<br />
75
Using <strong>the</strong> Image LCD<br />
Display Contrast<br />
You can change <strong>the</strong> contrast and lighten or<br />
darken <strong>the</strong> images displayed on <strong>the</strong> Image LCD<br />
panel.<br />
" Changing contrast does not affect <strong>the</strong> stored<br />
images, only <strong>the</strong> view of <strong>the</strong> images on <strong>the</strong><br />
Image LCD.<br />
1 Highlight <strong>the</strong> Contrast icon (page 24).<br />
2 Press <strong>the</strong> top or bottom of <strong>the</strong> Four-way switch<br />
to move <strong>the</strong> slider bar up to lighten, or down to<br />
darken <strong>the</strong> displayed image.<br />
Overexposure Indicator<br />
You can highlight areas of overexposure in<br />
Single or Multiple Image Display modes.<br />
1 Choose Single or Multiple Image mode<br />
(page 68).<br />
2 Highlight <strong>the</strong> Menu icon (page 24), and<br />
choose Main Menu from <strong>the</strong> drop-down menu<br />
(page 25).<br />
3 Choose Overexposure Indicator from <strong>the</strong> Main<br />
menu.<br />
A check mark appears when highlighting is on.<br />
4 Press <strong>the</strong> OK button to toggle highlighting on<br />
or off.<br />
Contents <strong>Back</strong> Next Index<br />
76
Using <strong>the</strong> Image LCD<br />
Tagging Images<br />
You can tag one or more images <strong>the</strong>n perform<br />
operations on <strong>the</strong> tagged (or untagged) images.<br />
1 Select any Display mode except Delete mode<br />
(page 68).<br />
2 Select <strong>the</strong> image to be tagged (page 74).<br />
3 Highlight <strong>the</strong> Tag icon in <strong>the</strong> Menu bar.<br />
A check mark appears in <strong>the</strong> Status bar.<br />
To untag a tagged image, highlight <strong>the</strong> Tag<br />
icon when a tagged image is selected.<br />
Contents <strong>Back</strong> Next Index<br />
77
Caring for Your <strong>DCS</strong> <strong>Pro</strong> <strong>Back</strong> <strong>Plus</strong><br />
Caring for Your <strong>DCS</strong> <strong>Pro</strong> <strong>Back</strong> <strong>Plus</strong><br />
Cleaning<br />
Clean <strong>the</strong> camera body as described in <strong>the</strong><br />
HASSELBLAD or MAMIYA User’s Manual.<br />
Cleaning <strong>the</strong> <strong>DCS</strong> <strong>Pro</strong> <strong>Back</strong> <strong>Plus</strong><br />
1 Turn <strong>the</strong> <strong>DCS</strong> <strong>Pro</strong> <strong>Back</strong> <strong>Plus</strong> off or disconnect<br />
<strong>the</strong> <strong>DCS</strong> <strong>Pro</strong> <strong>Back</strong> <strong>Plus</strong> from <strong>the</strong> computer.<br />
2 Using a lint-free cloth with light pressure, clean<br />
only <strong>the</strong> outside enclosures and <strong>the</strong> Image<br />
LCD panel.<br />
IMPORTANT:<br />
Do not use liquid cleaners or aerosol cleaners on<br />
<strong>the</strong> outside of <strong>the</strong> <strong>DCS</strong> <strong>Pro</strong> <strong>Back</strong> <strong>Plus</strong>.<br />
Before connecting <strong>the</strong> <strong>DCS</strong> <strong>Pro</strong> <strong>Back</strong> <strong>Plus</strong> to <strong>the</strong><br />
camera body, clean <strong>the</strong> slots at <strong>the</strong> bottom of <strong>the</strong><br />
<strong>DCS</strong> <strong>Pro</strong> <strong>Back</strong> <strong>Plus</strong> and <strong>the</strong> locating posts on <strong>the</strong><br />
camera body using isopropyl alcohol on a lintfree<br />
lens cleaning tissue.<br />
Cleaning <strong>the</strong> IR or Anti-aliasing Filter<br />
1 Remove <strong>the</strong> filter from <strong>the</strong> <strong>DCS</strong> <strong>Pro</strong> <strong>Back</strong> <strong>Plus</strong><br />
(page 21).<br />
2 Gently blow off <strong>the</strong> dust using commercially<br />
available canned air (low pressure). If <strong>the</strong> filter<br />
is still dirty, contact your dealer or service<br />
representative.<br />
3 If <strong>the</strong> imager is dirty, check <strong>the</strong> KODAK Web<br />
site (www.kodak.com) for instructions on<br />
cleaning. Choose Service and Support, <strong>the</strong>n<br />
under <strong>Pro</strong>fessional Photography choose<br />
Cameras, Digital and choose <strong>DCS</strong> <strong>Pro</strong> <strong>Back</strong><br />
<strong>Plus</strong>. Follow <strong>the</strong> instructions under Cleaning<br />
Recommendations for CCD Coverglass.<br />
Contents <strong>Back</strong> Next Index<br />
78
Before You Begin<br />
Caring for Your <strong>DCS</strong> <strong>Pro</strong> <strong>Back</strong> <strong>Plus</strong><br />
Storing<br />
These storage tips apply to <strong>the</strong> <strong>DCS</strong> <strong>Pro</strong> <strong>Back</strong><br />
<strong>Plus</strong>. Store <strong>the</strong> camera body as described in <strong>the</strong><br />
HASSELBLAD or MAMIYA User’s Manual.<br />
! If you have an IR or anti-aliasing filter not in<br />
use, store it in <strong>the</strong> pocket on <strong>the</strong> included<br />
body cap.<br />
! Wrap in a clean, soft cloth and place in a<br />
well-ventilated, cool, dry, dust-free place.<br />
! Keep out of direct sunlight and away from<br />
“hot spots” such as <strong>the</strong> trunk of a car.<br />
! Avoid places where chemical agents such<br />
as moth balls are used.<br />
! In extreme humidity, use a desiccant.<br />
! If <strong>the</strong> <strong>DCS</strong> <strong>Pro</strong> <strong>Back</strong> <strong>Plus</strong> has been stored<br />
for a long period of time, carefully check <strong>the</strong><br />
operation or have it thoroughly tested at an<br />
authorized service center.<br />
" After storing <strong>the</strong> <strong>DCS</strong> <strong>Pro</strong> <strong>Back</strong> <strong>Plus</strong> for<br />
several days, you may need to set <strong>the</strong> date<br />
and time (page 49).<br />
Contents <strong>Back</strong> Next Index<br />
79
Caring for Your <strong>DCS</strong> <strong>Pro</strong> <strong>Back</strong> <strong>Plus</strong><br />
! When <strong>the</strong> <strong>DCS</strong> <strong>Pro</strong> <strong>Back</strong> <strong>Plus</strong> is removed<br />
from <strong>the</strong> camera body, attach <strong>the</strong> body cap.<br />
Place <strong>the</strong> top of <strong>the</strong> body cap at an angle so<br />
that it catches <strong>the</strong> Release button, <strong>the</strong>n<br />
press <strong>the</strong> bottom of <strong>the</strong> body cap in place.<br />
Contents <strong>Back</strong> Next Index<br />
80
Caring for Your <strong>DCS</strong> <strong>Pro</strong> <strong>Back</strong> <strong>Plus</strong><br />
Firmware<br />
Firmware is <strong>the</strong> software program that runs within<br />
<strong>the</strong> <strong>DCS</strong> <strong>Pro</strong> <strong>Back</strong> <strong>Plus</strong> and controls its<br />
operation. If a new firmware version becomes<br />
available, you can download it from <strong>the</strong> KODAK<br />
Web site (www.kodak.com/go/proback) and<br />
update <strong>the</strong> firmware within <strong>the</strong> <strong>DCS</strong> <strong>Pro</strong> <strong>Back</strong><br />
<strong>Plus</strong> (page 82).<br />
Checking <strong>the</strong> Current Firmware Version<br />
You can check <strong>the</strong> firmware version currently<br />
running on your <strong>DCS</strong> <strong>Pro</strong> <strong>Back</strong> <strong>Plus</strong>.<br />
3 Choose Version from <strong>the</strong> Firmware menu.<br />
The firmware version appears.<br />
4 Press <strong>the</strong> OK button.<br />
1 Highlight <strong>the</strong> Menu icon (page 24), and<br />
choose Main Menu from <strong>the</strong> drop-down menu<br />
(page 25).<br />
2 Choose Firmware from <strong>the</strong> Main menu.<br />
Contents <strong>Back</strong> Next Index<br />
81
Caring for Your <strong>DCS</strong> <strong>Pro</strong> <strong>Back</strong> <strong>Plus</strong><br />
Updating Firmware<br />
1 On a computer with Internet access, go to<br />
www.kodak.com, <strong>the</strong>n choose Service and<br />
Support. Choose Cameras, Digital from <strong>the</strong><br />
<strong>Pro</strong>fessional Photography list, choose <strong>DCS</strong><br />
<strong>Pro</strong> <strong>Back</strong> <strong>Plus</strong>, <strong>the</strong>n choose Firmware and<br />
Host Software.<br />
2 Download <strong>the</strong> firmware to your computer.<br />
3 Insert a CF Card into <strong>the</strong> card reader attached<br />
to your computer.<br />
4 On <strong>the</strong> computer, copy <strong>the</strong> firmware file to <strong>the</strong><br />
card’s root directory.<br />
IMPORTANT:<br />
6 Highlight <strong>the</strong> Menu icon (page 24), and<br />
choose Main Menu from <strong>the</strong> drop-down menu<br />
(page 25).<br />
7 Choose Firmware from <strong>the</strong> Main menu.<br />
8 Choose Update from Card from <strong>the</strong> Firmware<br />
menu.<br />
A confirmation screen appears.<br />
9 Press <strong>the</strong> OK or Cancel button.<br />
If you press OK, approximately fifteen seconds<br />
pass. A progress screen appears while <strong>the</strong><br />
firmware is updating.<br />
" The camera automatically restarts after <strong>the</strong><br />
firmware is updated.<br />
The firmware can be updated only from <strong>the</strong><br />
card’s root directory.<br />
5 Insert <strong>the</strong> CF Card (page 43) in <strong>the</strong> <strong>DCS</strong> <strong>Pro</strong><br />
<strong>Back</strong> <strong>Plus</strong>.<br />
Contents <strong>Back</strong> Next Index<br />
82
Specifications<br />
Specifications<br />
Type<br />
Digital camera back which attaches to existing medium format<br />
camera bodies having removable film magazines<br />
Imager size 16 million pixels (4080 x 4080)<br />
Image LCD<br />
2-inch diagonal LCD provides image thumbnail, adjustable contrast,<br />
and status of digital features<br />
IEEE 1394 interface and Used to connect power from <strong>the</strong> AC Adapter to <strong>the</strong> <strong>DCS</strong> <strong>Pro</strong> <strong>Back</strong><br />
power source<br />
<strong>Plus</strong> and to transfer images from <strong>the</strong> <strong>DCS</strong> <strong>Pro</strong> <strong>Back</strong> <strong>Plus</strong> to a<br />
computer running Capture Studio or Camera Manager software<br />
Power source in portable<br />
mode<br />
AC adapter<br />
Weight<br />
Dimensions<br />
Burst rate<br />
Burst depth<br />
DRAM on-board<br />
ISO 100<br />
S-Video<br />
NTSC or PAL<br />
• DIGITAL CAMERA BATTERY with cable <strong>DCS</strong>-9.6V—see<br />
www.digitalcamerabattery.com<br />
• QUANTUM Battery 2 with cable MDC3—see www.qtm.com<br />
• O<strong>the</strong>r compatible third party battery and cable<br />
24VDC<br />
Approximately 3.5 pounds (with two CF Cards and lens sync cable)<br />
90 mm x 90 mm x 100 mm<br />
1 image every 2 seconds<br />
6 (possibly more, depending on scene content)<br />
128 MB<br />
Contents <strong>Back</strong> Next Index<br />
83
Unsupported Features<br />
Features<br />
Unsupported or Partially Supported Features (HASSELBLAD Cameras)<br />
Most camera body features are supported when<br />
<strong>the</strong> <strong>DCS</strong> <strong>Pro</strong> <strong>Back</strong> <strong>Plus</strong> is attached. (Refer to <strong>the</strong><br />
HASSELBLAD instruction manual.) Exceptions<br />
are listed below.<br />
Unsupported Camera Body Features<br />
! When using HASSELBLAD lenses of <strong>the</strong><br />
C/CB/CR/CFi and CFE series with <strong>the</strong> <strong>DCS</strong><br />
<strong>Pro</strong> <strong>Back</strong> <strong>Plus</strong>, shutter speeds greater than<br />
1/4 second are not supported.<br />
! The Mode Selector dial must only be used<br />
in <strong>the</strong> O (Normal mode) or A (Automatic<br />
mode) positions. When a <strong>DCS</strong> <strong>Pro</strong> <strong>Back</strong><br />
<strong>Plus</strong> is installed on a HASSELBLAD<br />
555ELD or 553ELX, <strong>the</strong> O and A modes are<br />
essentially <strong>the</strong> same.<br />
! Infrared photography is not supported.<br />
! Trigger release commands sent to <strong>the</strong><br />
remote control socket on <strong>the</strong> 555ELD<br />
autowinder are not supported.<br />
! Multiple exposures are not supported.<br />
! ISO settings o<strong>the</strong>r than 100 are not<br />
supported.<br />
! The Automatic setting of <strong>the</strong> 555ELD and<br />
553ELX Mode Selector dial has a frame<br />
rate of about 1 frame/second. The <strong>DCS</strong> <strong>Pro</strong><br />
<strong>Back</strong> <strong>Plus</strong> does not support this frame rate.<br />
Accessories<br />
The <strong>DCS</strong> <strong>Pro</strong> <strong>Back</strong> <strong>Plus</strong> supports most<br />
accessories used by <strong>the</strong> HASSELBLAD 555ELD.<br />
Exceptions are listed below:<br />
! HASSELBLAD Prism Viewfinder PM90<br />
! Meter Prism Viewfinder PME90<br />
Contents <strong>Back</strong> Next Index<br />
84
Before You Begin<br />
Unsupported Features<br />
Unsupported or Partially Supported Features (MAMIYA RZ67 PRO II)<br />
Most camera body features are supported when<br />
<strong>the</strong> <strong>DCS</strong> <strong>Pro</strong> <strong>Back</strong> <strong>Plus</strong> is attached. (Refer to <strong>the</strong><br />
RZ67 PRO II Instruction Manual by MAMIYA.)<br />
Exceptions are listed below.<br />
Unsupported Camera Body Features<br />
! With <strong>the</strong> <strong>DCS</strong> <strong>Pro</strong> <strong>Back</strong> <strong>Plus</strong> attached,<br />
shutter speeds greater than 1/4 second are<br />
not supported.<br />
! With <strong>the</strong> <strong>DCS</strong> <strong>Pro</strong> <strong>Back</strong> <strong>Plus</strong> attached, <strong>the</strong><br />
R-M lever must be set to <strong>the</strong> multiple<br />
exposure (M) position.<br />
! Infrared photography is not supported.<br />
! With <strong>the</strong> <strong>DCS</strong> <strong>Pro</strong> <strong>Back</strong> <strong>Plus</strong> attached, only<br />
a single ISO can be used.<br />
! Multiple exposures are not supported.<br />
Contents <strong>Back</strong> Next Index<br />
85
Using an S-Video Monitor<br />
Using an S-Video Monitor<br />
You can preview images on an external S-Video<br />
monitor. This provides a larger version of <strong>the</strong><br />
image displayed on <strong>the</strong> Image LCD.<br />
" When <strong>the</strong> external monitor is enabled, <strong>the</strong><br />
Image LCD turns off.<br />
When you capture an image, it automatically<br />
appears on <strong>the</strong> connected S-Video monitor. You<br />
can preview it and make necessary camera<br />
adjustments. When you capture ano<strong>the</strong>r image,<br />
<strong>the</strong> new one appears.<br />
Connecting<br />
Connect an S-Video cable (not included) to <strong>the</strong><br />
S-Video Output port.<br />
Contents <strong>Back</strong> Next Index<br />
86
Using an S-Video Monitor<br />
Enabling<br />
1 Highlight <strong>the</strong> Menu icon (page 24) <strong>the</strong>n<br />
choose Main Menu from <strong>the</strong> drop-down menu<br />
(page 25).<br />
2 Choose External Video from <strong>the</strong> Main menu.<br />
3 Choose On from <strong>the</strong> External Video screen.<br />
4 Highlight <strong>the</strong> Video icon.<br />
5 Press <strong>the</strong> OK button.<br />
The current image appears on <strong>the</strong> external<br />
monitor and <strong>the</strong> Image LCD turns off.<br />
Disabling<br />
Press <strong>the</strong> OK, Cancel, or Menu button (page 28)<br />
to disable <strong>the</strong> external monitor and turn <strong>the</strong><br />
Image LCD on.<br />
Navigating Through Images<br />
A Video icon appears on <strong>the</strong> Menu bar.<br />
Press <strong>the</strong> left or right side of <strong>the</strong> Four-way switch<br />
to navigate through images in <strong>the</strong> selected folder.<br />
" This works only in Single Image Display<br />
mode (page 69).<br />
Contents <strong>Back</strong> Next Index<br />
87
Warnings and Cautions<br />
Warnings and Cautions<br />
! To prevent fire or shock hazard, use only <strong>the</strong><br />
recommended accessories and attachments.<br />
! Use only <strong>the</strong> power source type indicated on<br />
<strong>the</strong> name plate of <strong>the</strong> AC adapter. A line<br />
voltage outside this range can destroy <strong>the</strong> AC<br />
adapter and/or <strong>the</strong> <strong>DCS</strong> <strong>Pro</strong> <strong>Back</strong> <strong>Plus</strong>.<br />
! Do not substitute o<strong>the</strong>r types of cables for<br />
supplied cables or cables listed in <strong>the</strong> System<br />
Requirements section (page 12).<br />
! Do not remove a CF Card from <strong>the</strong> camera,<br />
disconnect or turn off a battery supply, or<br />
disable <strong>the</strong> AC adapter while <strong>the</strong> Card Busy<br />
LED inside <strong>the</strong> Card door is blinking. The<br />
blinking indicates that data is being read from<br />
or written to <strong>the</strong> card. You may lose data if you<br />
remove a card at this time.<br />
! Use extreme care when handling CF Cards as<br />
<strong>the</strong>y are easily damaged. If dropped, <strong>the</strong> CF<br />
Card may be destroyed, resulting in <strong>the</strong> loss of<br />
all data.<br />
! Do not use <strong>the</strong> <strong>DCS</strong> <strong>Pro</strong> <strong>Back</strong> <strong>Plus</strong> where it<br />
can come in contact with water. It is not<br />
waterproof or splash-resistant.<br />
! Handle <strong>the</strong> <strong>DCS</strong> <strong>Pro</strong> <strong>Back</strong> <strong>Plus</strong> with care.<br />
Treat <strong>the</strong> anti-aliasing filter with <strong>the</strong> greatest of<br />
care. It is a very expensive device.<br />
! Retain <strong>the</strong> safety and operating instructions for<br />
future reference. Retain <strong>the</strong> packing case for<br />
use if your camera needs to be shipped.<br />
! Treat <strong>the</strong> imager with extreme care. It is very<br />
expensive to replace.<br />
! The anti-aliasing or IR filter is exposed when<br />
<strong>the</strong> cap is removed. Do not touch or strike this<br />
filter or set it down on a surface.<br />
Contents <strong>Back</strong> Next Index<br />
88
Glossary<br />
Glossary<br />
Aliasing<br />
Artifacts that appear on an image but were not<br />
in <strong>the</strong> original scene<br />
Anti-aliasing filter<br />
Helps to reduce aliasing at certain focal<br />
distances<br />
Camera Manager<br />
Included software application used to capture<br />
images, copy and transfer images, and set<br />
properties for <strong>the</strong> <strong>DCS</strong> <strong>Pro</strong> <strong>Back</strong> <strong>Plus</strong><br />
Capture Studio software<br />
Included software application used to capture<br />
and process images from <strong>the</strong> <strong>DCS</strong> <strong>Pro</strong> <strong>Back</strong><br />
<strong>Plus</strong> (Macintosh only)<br />
Compact Flash Card<br />
(CF Card) A small, removable device with<br />
PCMCIA-ATA functionality which stores<br />
images captured by <strong>the</strong> <strong>DCS</strong> <strong>Pro</strong> <strong>Back</strong> <strong>Plus</strong><br />
.DCR files<br />
Image files created by <strong>the</strong> <strong>DCS</strong> <strong>Pro</strong> <strong>Back</strong> <strong>Plus</strong><br />
which can only be opened using <strong>the</strong> included<br />
<strong>DCS</strong> Capture Studio or <strong>DCS</strong> Photo Desk<br />
software<br />
Focus screen overlay<br />
Included overlays that fit over <strong>the</strong> viewfinder to<br />
indicate <strong>the</strong> scene content that is actually<br />
captured using <strong>the</strong> <strong>DCS</strong> <strong>Pro</strong> <strong>Back</strong> <strong>Plus</strong><br />
Contents <strong>Back</strong> Next Index 89
Glossary<br />
IEEE 1394 interface<br />
High-speed serial interface that transfers<br />
image files from <strong>the</strong> <strong>DCS</strong> <strong>Pro</strong> <strong>Back</strong> <strong>Plus</strong> to <strong>the</strong><br />
computer, provides power (using <strong>the</strong> included<br />
AC adapter) to <strong>the</strong> <strong>DCS</strong> <strong>Pro</strong> <strong>Back</strong> <strong>Plus</strong>, and<br />
allows <strong>the</strong> <strong>DCS</strong> <strong>Pro</strong> <strong>Back</strong> <strong>Plus</strong> to<br />
communicate with <strong>the</strong> Capture Studio and<br />
Camera Manager software<br />
Image format<br />
In <strong>the</strong> <strong>DCS</strong> <strong>Pro</strong> <strong>Back</strong> <strong>Plus</strong>, image format<br />
refers to cropping of images as <strong>the</strong>y are<br />
captured. Choices are: 5x5, 4x5, and 5x4<br />
Image LCD<br />
A two-inch diagonal LCD where you can view<br />
images and change settings on <strong>the</strong> <strong>DCS</strong> <strong>Pro</strong><br />
<strong>Back</strong> <strong>Plus</strong><br />
Intervalometer<br />
Automatically captures a sequence of images<br />
at specified intervals over a specified period of<br />
time<br />
IR filter<br />
Maintains proper focus, filters out infrared<br />
light, and helps protect <strong>the</strong> imager’s<br />
coverglass<br />
IEEE 1394 hub<br />
An IEEE 1394 accessory that lets you connect<br />
a number of IEEE 1394 peripherals to a<br />
computer. To be compatible with <strong>the</strong> <strong>DCS</strong> <strong>Pro</strong><br />
<strong>Back</strong> <strong>Plus</strong>, use a hub which conforms to <strong>the</strong><br />
IEEE 1394 standard (hot pluggable, can send<br />
and receive data at 00/200/400MBps) and has<br />
at least three ports<br />
Contents <strong>Back</strong> Next Index 90
Glossary<br />
ISO<br />
International Standards Organization settings<br />
regarding <strong>the</strong> properties of photographic<br />
speed<br />
S-Video<br />
A video interface standard that enables you to<br />
view a camera image on an external monitor<br />
Luminometer<br />
Measures <strong>the</strong> levels of luminance channel<br />
saturation in pixels at <strong>the</strong> center of <strong>the</strong><br />
crosshairs in zoom box<br />
Photo Desk<br />
Included software application used to review<br />
and process images from <strong>the</strong> <strong>DCS</strong> <strong>Pro</strong> <strong>Back</strong><br />
<strong>Plus</strong><br />
Portable mode<br />
Using <strong>the</strong> camera without connections to <strong>the</strong><br />
computer<br />
Contents <strong>Back</strong> Next Index 91
Glossary<br />
Te<strong>the</strong>red<br />
Connected to a host computer with an<br />
approved IEEE1394 cable<br />
Contents <strong>Back</strong> Next Index 92
Warranty<br />
Warranty<br />
CAREFULLY READ THE FOLLOWING WARRANTY TERMS AND CONDITIONS BEFORE USING<br />
YOUR CAMERA. USE OF YOUR CAMERA INDICATES YOUR ACCEPTANCE OF THESE TERMS<br />
AND CONDITIONS. IF YOU DO NOT AGREE WITH THEM, PROMPTLY RETURN THE CAMERA,<br />
UNUSED, ALONG WITH THE ACCOMPANYING MATERIALS, IN THE ORIGINAL PACKAGING.<br />
WARRANTY<br />
KODAK PROFESSIONAL <strong>DCS</strong> <strong>Pro</strong> <strong>Back</strong> <strong>Plus</strong><br />
THIS WARRANTY APPLIES ONLY TO EQUIPMENT PURCHASED IN THE UNITED STATES.<br />
<strong>Kodak</strong> warrants your KODAK PROFESSIONAL <strong>DCS</strong> <strong>Pro</strong> <strong>Back</strong> <strong>Plus</strong> internal electronics and mechanical<br />
assemblies to be free from defects in material and workmanship for 1 year from <strong>the</strong> day of purchase.<br />
<strong>Kodak</strong> warrants <strong>the</strong> Imager to be free from defects in material and workmanship for 4 years from <strong>the</strong> date<br />
of purchase. <strong>Kodak</strong> warrants <strong>the</strong> Infrared Blocking Filter (IR Filter) to be free from defects in material and<br />
workmanship for 30 days from <strong>the</strong> date of purchase.<br />
Contents <strong>Back</strong> Next Index<br />
93
Warranty<br />
Warranty Repair Coverage<br />
If this equipment does not function properly during <strong>the</strong> warranty period due to defects in material or<br />
workmanship, <strong>Kodak</strong> will, at its option, ei<strong>the</strong>r repair or replace <strong>the</strong> equipment without charge, subject to<br />
<strong>the</strong> conditions and limitations stated herein. Such repair service will include all labor as well as any<br />
necessary adjustments and/or replacement parts.<br />
If replacement parts are used in making repairs, <strong>the</strong>se parts may be remanufactured, or may contain<br />
remanufactured materials. If it is necessary to replace <strong>the</strong> entire system, <strong>Kodak</strong> may replace with a<br />
remanufactured system. Repair or replacement carries a 30-day warranty effective at <strong>the</strong> time of service<br />
problem resolution. This warranty will not extend <strong>the</strong> original warranty period, and, in <strong>the</strong> case of parts<br />
replacement, will only apply to parts and labor performed to repair <strong>the</strong> equipment.<br />
Limitations<br />
REPAIR OR REPLACEMENT WITHOUT CHARGE IS KODAK’S ONLY OBLIGATION UNDER THIS<br />
WARRANTY.<br />
Warranty service will not be provided without dated proof of purchase. Please return <strong>the</strong> Warranty<br />
Registration card within 30 days of purchase.<br />
As a condition of warranty service, before sending in your equipment to a <strong>Kodak</strong> authorized service<br />
center for repair, you must first contact a <strong>Kodak</strong> representative for return authorization and instructions.<br />
Contents <strong>Back</strong> Next Index<br />
94
Warranty<br />
Should you need to return equipment to <strong>Kodak</strong>, <strong>Kodak</strong> is not responsible for <strong>the</strong> loss or damage of<br />
equipment while in transport to a <strong>Kodak</strong> authorized service center. You may, at your option, choose to<br />
insure equipment for loss or damage with <strong>the</strong> carrier of your choice.<br />
This warranty becomes null and void if, during shipment, you fail to pack your KODAK PROFESSIONAL<br />
<strong>DCS</strong> <strong>Pro</strong> <strong>Back</strong> <strong>Plus</strong> in a manner consistent with <strong>the</strong> repacking instructions.<br />
This warranty does not cover <strong>the</strong> following:<br />
! Scratches on Imager Cover Glass or IR Filter<br />
! Cracked or damaged Imager Cover Glass or IR Filter<br />
! Circumstances beyond <strong>Kodak</strong>’s control<br />
! Service or parts to correct problems resulting from <strong>the</strong> use of attachments, accessories or<br />
alterations not marketed by <strong>Kodak</strong><br />
! Unauthorized modifications or service<br />
! Misuse<br />
! Abuse<br />
! Failure to follow <strong>Kodak</strong>’s operating, maintenance, or repacking instructions<br />
! Failure to use <strong>Kodak</strong>-supplied items (such as cables).<br />
Contents <strong>Back</strong> Next Index<br />
95
Warranty<br />
KODAK MAKES NO OTHER WARRANTIES, EXPRESS OR IMPLIED, AND SPECIFICALLY<br />
DISCLAIMS THE IMPLIED WARRANTIES OF MERCHANTABILITY AND FITNESS FOR A<br />
PARTICULAR PURPOSE.<br />
KODAK WILL NOT BE RESPONSIBLE FOR ANY CONSEQUENTIAL OR INCIDENTAL DAMAGES<br />
RESULTING FROM THE PURCHASE, USE, OR IMPROPER FUNCTIONING OF THIS EQUIPMENT<br />
EVEN IF THE LOSS OR DAMAGE IS CAUSED BY THE NEGLIGENCE OR OTHER FAULT OF<br />
KODAK. SUCH DAMAGES FOR WHICH KODAK WILL NOT BE RESPONSIBLE INCLUDE, BUT ARE<br />
NOT LIMITED TO, LOSS OF REVENUE OR PROFIT, DOWNTIME COSTS, LOSS OF USE OF YOUR<br />
CAMERA, COST OF ANY SUBSTITUTE EQUIPMENT, FACILITIES, OR SERVICES, OR CLAIMS OF<br />
YOUR CUSTOMERS FOR SUCH DAMAGES.<br />
Outside <strong>the</strong> United States<br />
In countries o<strong>the</strong>r than <strong>the</strong> United States, warranty terms may be different. Unless a specific <strong>Kodak</strong><br />
warranty is communicated to <strong>the</strong> purchaser in writing by <strong>Kodak</strong>, no warranty or liability exists even though<br />
defect, damage or loss may be by negligence or o<strong>the</strong>r act of <strong>Kodak</strong>.<br />
Contents <strong>Back</strong> Next Index<br />
96
Warranty<br />
How to obtain service<br />
See your authorized <strong>Kodak</strong> dealer.<br />
If service is required, your <strong>Kodak</strong> dealer will instruct you to return <strong>the</strong> unit to <strong>the</strong> nearest service center for<br />
repair and will issue a return authorization number.<br />
When returning a KODAK PROFESSIONAL <strong>DCS</strong> <strong>Pro</strong> <strong>Back</strong> <strong>Plus</strong> for repair, you should pack <strong>the</strong> unit in its<br />
original packing materials according to <strong>the</strong> repacking instructions located on <strong>the</strong> shipping container.<br />
Packing will be <strong>the</strong> purchaser’s responsibility if <strong>the</strong> original packing has been discarded or is not available.<br />
Return of <strong>the</strong> repaired or replaced equipment to <strong>the</strong> customer can be expected five to seven business<br />
days from <strong>the</strong> date <strong>the</strong> equipment is received by <strong>the</strong> service center.<br />
<strong>Pro</strong>duct Support Options<br />
During <strong>the</strong> warranty period for <strong>the</strong> KODAK PROFESSIONAL <strong>DCS</strong> <strong>Pro</strong> <strong>Back</strong> <strong>Plus</strong>, you are entitled to<br />
product support for both hardware and software, provided your camera is registered with Eastman <strong>Kodak</strong><br />
Company. You may register with <strong>Kodak</strong> via mail, fax, or through <strong>Kodak</strong>’s World Wide Web site: http://<br />
www.kodak.com.<br />
Support is provided through a variety of options:<br />
Contents <strong>Back</strong> Next Index<br />
97
Warranty<br />
1 Technical Support through <strong>the</strong> Web site: http://www.kodak.com.<br />
Support includes FAQs (Frequently Asked Questions), downloadable software updates, and technical<br />
topic articles for reading and downloading.<br />
2 Fax<strong>Back</strong> Documents on a variety of subjects. In North America <strong>the</strong> Fax<strong>Back</strong> system is available at <strong>the</strong><br />
following phone number: 1-800-508-1531.<br />
3 Authorized Dealers:<br />
Contact your authorized KODAK PROFESSIONAL dealer for help with operation and connection to<br />
your computer. Your dealer can also provide training for your <strong>DCS</strong> <strong>Pro</strong> <strong>Back</strong> <strong>Plus</strong> application software.<br />
Authorized dealers can also provide help in purchasing a service maintenance agreement.<br />
4 Telephone Support:<br />
Telephone support is provided without charge during your warranty period only by calling your<br />
authorized dealer. Your camera must be registered with Eastman <strong>Kodak</strong> Company. Fill out and return<br />
to Eastman <strong>Kodak</strong> Company <strong>the</strong> warranty registration card included with your camera. Failure to<br />
register your camera will cause delays in requesting repair of your camera during <strong>the</strong> warranty period.<br />
5 Out-of-Warranty Support Options<br />
There will be a charge for out-of-warranty call incidents if you wish to speak to a <strong>Kodak</strong> support<br />
representative. A call incident is defined to include only those issues raised during <strong>the</strong> first telephone or<br />
e-mail contact. Follow-up telephone calls by <strong>Kodak</strong>’s representative, and callbacks to <strong>Kodak</strong>’s Support<br />
Center to resolve <strong>the</strong> call incident will not be charged as long as charges for any valid, active call<br />
Contents <strong>Back</strong> Next Index<br />
98
Warranty<br />
number are provided. Calls to report bugs or anomalies will be cancelled. Calls to arrange for service<br />
will be cancelled or applied as a credit against <strong>the</strong> repair estimate or invoice.<br />
Service maintenance agreements, which cover <strong>the</strong> repair and support of <strong>the</strong> <strong>DCS</strong> <strong>Pro</strong> <strong>Back</strong> <strong>Plus</strong> and<br />
software are available. In North America, contact <strong>the</strong> regional Service Marketing group at: 1-800-<br />
645-6325<br />
No-charge options include:<br />
! KODAK PROFESSIONAL World Wide Web site: http://www.kodak.com/go/support<br />
! Fax<strong>Back</strong> Documents<br />
! Your <strong>Kodak</strong> <strong>Pro</strong>fessional dealer<br />
Contents <strong>Back</strong> Next Index<br />
99
Index<br />
A<br />
Accessing images on a CF Card 46<br />
Activate button 28<br />
Actuations 52<br />
Anti-aliasing filter 20<br />
Assembling <strong>the</strong> camera 33<br />
B<br />
Batteries, Conserving 63<br />
Battery connection jack 31<br />
Battery Save onset 51<br />
Battery Save state 63<br />
Buttons 28<br />
Activate 28<br />
Cancel 28<br />
Four-way switch 28<br />
Menu 28<br />
Power 30<br />
C<br />
Camera<br />
Assembling 33<br />
Firmware. See Firmware 81<br />
Turning on and off 62<br />
Camera properties. See <strong>Pro</strong>perties 50<br />
Cancel button 28<br />
CF Cards 42<br />
Cleaning 78<br />
Compact Flash Cards 42<br />
Accessing images on 46<br />
Ejecting 44<br />
Formatting 47<br />
Inserting 43<br />
Selecting 45<br />
Computer, Connecting to 55<br />
Connecting<br />
Camera lens to <strong>DCS</strong> <strong>Pro</strong> <strong>Back</strong> <strong>Plus</strong> 38<br />
Camera to <strong>the</strong> computer and power<br />
supply 55<br />
Battery power 58<br />
Single IEEE 1394 port 57<br />
Contents <strong>Back</strong> Next Index<br />
Index-1
Index<br />
Two IEEE 1394 ports 56<br />
<strong>DCS</strong> <strong>Pro</strong> <strong>Back</strong> <strong>Plus</strong> to <strong>the</strong> camera<br />
body 35<br />
Flash/Strobe units to <strong>the</strong> <strong>DCS</strong> <strong>Pro</strong><br />
<strong>Back</strong> <strong>Plus</strong> 39<br />
Power supply in portable mode<br />
AC adapter 62<br />
Contrast, Changing on Image LCD 76<br />
D<br />
Date and time 49<br />
<strong>DCS</strong> <strong>Pro</strong> <strong>Back</strong> <strong>Plus</strong><br />
Connecting Flash/Strobe units 39<br />
Connecting <strong>the</strong> camera lens 38<br />
Connecting to <strong>the</strong> camera body 34<br />
Storing 79<br />
Deleting<br />
Groups of images 75<br />
Single image 72<br />
Digital buttons and Image LCD<br />
Using 29<br />
Digital buttons. See Buttons 28<br />
Display contrast 76<br />
Display mode 68<br />
Histogram 71<br />
Multiple Image 71<br />
Navigating 74<br />
Pan/Zoom. Zoom mode 69<br />
Selecting 68<br />
Single image 69<br />
Display off time 51<br />
Dropdown menus 25<br />
E<br />
Ejecting a CF Card 44<br />
F<br />
Features 11<br />
Unsupported 84<br />
Filters<br />
Anti-aliasing 20<br />
IR 20<br />
Firmware 81<br />
Contents <strong>Back</strong> Next Index<br />
Index-2
Index<br />
Checking version 81<br />
Updating 82<br />
Flash Sync Cable jack 31<br />
Focus screen overlay 19<br />
Folder, Selecting 45<br />
Folder01 as default 52<br />
Formatting a CF Card 47<br />
Formatting images 65<br />
Four-way switch 28<br />
H<br />
Histogram Display mode 71<br />
I<br />
IEEE 1394 interface<br />
Connecting 56, 57, 58<br />
IEEE 1394 port 31<br />
Image 72<br />
Image Delete Display mode 72<br />
Image files 40<br />
Image LCD 22<br />
Location bar 73<br />
Menu bar 24<br />
Status bar 73<br />
Turning on and off 23<br />
Image LCD and digital buttons<br />
Using 29<br />
Imager 18<br />
Images<br />
Deleting groups of 75<br />
Deleting one 72<br />
Formatting 65<br />
Reviewing 68<br />
Storing 41<br />
Inserting a CF Card 43<br />
Intervalometer 66<br />
Options 67<br />
Introduction 9<br />
IR filter 20<br />
L<br />
Lens Sync Cable jack 31<br />
Location bar 73<br />
Contents <strong>Back</strong> Next Index<br />
Index-3
Index<br />
M<br />
Menu bar 24<br />
Displaying 24<br />
Navigating 24<br />
Menu button 28<br />
Menus 25<br />
Multiple Image Display mode 71<br />
N<br />
Navigating<br />
In Image Display mode 74<br />
In Zoom mode 70<br />
O<br />
Overexposure indicator 76<br />
P<br />
Pan/Zoom mode<br />
Enabling or Disabling <strong>the</strong> Region of<br />
Interest box 69<br />
Panning 70<br />
Zooming 70<br />
Panning 70<br />
PC Cards, See Compact Flash Cards 42<br />
Portable mode 60<br />
Ports and Jacks 31<br />
Battery connection 31<br />
Flash Sync Cable connector 31<br />
IEEE 1394 31<br />
Lens Sync Cable 31<br />
S-Video Output port 32<br />
Power button 30<br />
Powering <strong>the</strong> camera<br />
In portable mode 61<br />
When connected to a computer 59<br />
<strong>Pro</strong>perties 50<br />
Battery Save onset 51<br />
Display off time 51<br />
Total actuations 52<br />
Use Folder 01 52<br />
Video format 53<br />
Video signal 53<br />
Contents <strong>Back</strong> Next Index<br />
Index-4
Index<br />
<strong>Pro</strong>perties menu<br />
Displaying 50<br />
R<br />
Recovering Data 48<br />
Requirements 12<br />
Reviewing images 68<br />
S<br />
Saving images 41<br />
Selecting a CF Card or folder 45<br />
Single Image Display mode 69<br />
Specifications 83<br />
State 63<br />
Status bar 73<br />
Status screen 27<br />
Storing images 41<br />
Storing <strong>the</strong> <strong>DCS</strong> <strong>Pro</strong> <strong>Back</strong> <strong>Plus</strong> 79<br />
S-Video 86<br />
Connecting 86<br />
Enabling/disabling 87<br />
Output port 32<br />
System requirements 12<br />
T<br />
Tagging images 77<br />
Total actuations 52<br />
Turning <strong>the</strong> camera on and off 62<br />
U<br />
Unsupported camera features 84<br />
V<br />
Video<br />
Format 53<br />
Signal 53<br />
Z<br />
Zoom Display mode 69<br />
Zoom mode<br />
Contents <strong>Back</strong> Next Index<br />
Index-5
Index<br />
Navigating through images in 70<br />
Zooming 70<br />
Contents <strong>Back</strong> Next Index<br />
Index-6