Configuration Guide Configuring a SIP Trunking Gateway for Use ...
Configuration Guide Configuring a SIP Trunking Gateway for Use ...
Configuration Guide Configuring a SIP Trunking Gateway for Use ...

You also want an ePaper? Increase the reach of your titles
YUMPU automatically turns print PDFs into web optimized ePapers that Google loves.
6AOSCG0034-29A<br />
July 2012<br />
<strong>Configuration</strong> <strong>Guide</strong><br />
<strong>Configuring</strong> a <strong>SIP</strong> <strong>Trunking</strong> <strong>Gateway</strong><br />
<strong>for</strong> <strong>Use</strong> with NetVanta ECS<br />
This configuration guide outlines the steps necessary to configure an<br />
ADTRAN session border controller (SBC) as a Session Initiation<br />
Protocol (<strong>SIP</strong>) trunking gateway to use with the NetVanta Enterprise<br />
Communications System (ECS). The guide includes an overview of the<br />
ADTRAN SBC, an overview of the <strong>SIP</strong> trunking gateway, outlines the<br />
steps necessary to configure the AOS device using the command line<br />
interface (CLI) and the Web-based graphical user interface (GUI), as well<br />
as troubleshooting in<strong>for</strong>mation.<br />
This guide consists of the following sections:<br />
• ADTRAN SBC Overview on page 2<br />
• Hardware and Software Requirements and Limitations on page 2<br />
• <strong>Configuring</strong> the <strong>SIP</strong> <strong>Trunking</strong> <strong>Gateway</strong> Using the CLI on page 2<br />
• <strong>Configuring</strong> the <strong>SIP</strong> <strong>Trunking</strong> <strong>Gateway</strong> Using the GUI on page 7<br />
• <strong>Configuration</strong> Example on page 16<br />
• Command Summary on page 18<br />
• Troubleshooting on page 20<br />
• Additional Resources on page 21
ADTRAN SBC Overview<br />
<strong>Configuring</strong> a <strong>SIP</strong> <strong>Trunking</strong> <strong>Gateway</strong><br />
ADTRAN SBC Overview<br />
ADTRAN added functionality to their IP business gateways and NetVanta routers with the introduction of<br />
the SBC feature pack (available with AOS release R10.1.0). The SBC feature pack is an additional<br />
firmware package that can be installed on specific ADTRAN products as outlined in the Product Feature<br />
Matrix, available online at https://support<strong>for</strong>ums.adtran.com. The features described in this document do<br />
not apply to any prior firmware release.<br />
Among the many features included with the SBC feature pack is the enhanced ability <strong>for</strong> the AOS device<br />
to serve as a <strong>SIP</strong> trunking gateway with the NetVanta ECS as a unified communications solution. By<br />
incorporating this function into the AOS device, the IP business gateway or router can provide Voice over<br />
Internet Protocol (VoIP) telephony service <strong>for</strong> public switched telephone networks (PSTNs) access <strong>for</strong><br />
enterprise networks. The AOS SBC device is an integrated all-in-one solution that providers can use <strong>for</strong> all<br />
levels of their VoIP requirements.<br />
There is additional in<strong>for</strong>mation available online at ADTRAN’s Support Forum,<br />
https://support<strong>for</strong>ums.adtran.com. Specific resources are listed in Additional Resources on page 21.<br />
<strong>SIP</strong> <strong>Trunking</strong><br />
<strong>SIP</strong> trunking is a packet-based voice service that routes calls over an IP network to an IP private branch<br />
exchange (PBX) or voice switch using <strong>SIP</strong> signaling to place and receive calls. The typical <strong>SIP</strong> trunk<br />
service provider offers extensive cost savings compared to conventional trunk services. The IP connection<br />
to the provider carries all traffic, such as local, long distance, and toll free calls, video, email, Internet, data,<br />
and other media over a single circuit. Calls into PSTNs are also handled by the <strong>SIP</strong> service provider by<br />
passing the calls off to a media gateway that connects to the PSTN <strong>for</strong> users not using VoIP service. <strong>SIP</strong><br />
trunks are configured over data connections, they can be configured over an Ethernet or a T1 connection.<br />
Hardware and Software Requirements and Limitations<br />
The <strong>SIP</strong> trunking gateway feature is only available on ADTRAN products running the SBC feature pack as<br />
outlined in the Product Feature Matrix, available online at ADTRAN’s Support Forum,<br />
https://support<strong>for</strong>ums.adtran.com.<br />
<strong>Configuring</strong> the <strong>SIP</strong> <strong>Trunking</strong> <strong>Gateway</strong> Using the CLI<br />
To configure the <strong>SIP</strong> trunking gateway functionality on an AOS product using the CLI, use the following<br />
steps:<br />
1. Configure global voice modes <strong>for</strong> local handling.<br />
2. Configure the voice trunk to the service provider.<br />
3. Configure voice trunk to NetVanta ECS.<br />
4. Configure a trunk group <strong>for</strong> the service provider.<br />
5. Configure a trunk group <strong>for</strong> NetVanta ECS.<br />
6. Enable the RTP symmetric filter.<br />
2 Copyright © 2012 ADTRAN, Inc. 6AOSCG0034-29A
<strong>Configuring</strong> a <strong>SIP</strong> <strong>Trunking</strong> <strong>Gateway</strong> <strong>Configuring</strong> the <strong>SIP</strong> <strong>Trunking</strong> <strong>Gateway</strong> Using the CLI<br />
7. Enable media anchoring.<br />
8. Configure double reINVITE preference.<br />
Accessing the CLI<br />
To access the CLI on your AOS unit, follow these steps:<br />
1. Boot up the unit.<br />
2. Telnet to the unit (telnet ), <strong>for</strong> example:<br />
telnet 10.10.10.1.<br />
If during the unit’s setup process you have changed the default IP address (10.10.10.1),<br />
use the configured IP address.<br />
3. Enter your user name and password at the prompt.<br />
The AOS default user name is admin and the default password is password. If your<br />
product no longer has the default user name and password, contact your system<br />
administrator <strong>for</strong> the appropriate user name and password.<br />
4. Enable your unit by entering enable at the prompt as follows:<br />
>enable<br />
5. If configured, enter your Enable mode password at the prompt.<br />
6. Enter the unit’s Global <strong>Configuration</strong> mode as follows:<br />
#configure terminal<br />
(config)#<br />
Step 1: Configure Global Voice Modes <strong>for</strong> Local Handling<br />
Configure the ADTRAN SBC to use the local mode <strong>for</strong> <strong>for</strong>warding and call transfer handling. By default,<br />
both of these functions are handled by the network. To change this setting, use the voice transfer-mode<br />
local and voice <strong>for</strong>ward-mode local commands entered from the Global <strong>Configuration</strong> mode. By using<br />
the local keyword, both commands specify allowing the unit to handle <strong>for</strong>warding and call transfers<br />
locally.<br />
The following example demonstrates these commands entered in sequence, starting with voice<br />
transfer-mode local command at the Global <strong>Configuration</strong> mode prompt:<br />
(config)#voice transfer-mode local<br />
(config)#voice <strong>for</strong>ward-mode local<br />
6AOSCG0034-29A Copyright © 2012 ADTRAN, Inc. 3
<strong>Configuring</strong> the <strong>SIP</strong> <strong>Trunking</strong> <strong>Gateway</strong> Using the CLI<br />
<strong>Configuring</strong> a <strong>SIP</strong> <strong>Trunking</strong> <strong>Gateway</strong><br />
Step 2: Configure the Voice Trunk to the Service Provider<br />
The first of two voice trunks is configured in this step. The parameters <strong>for</strong> this trunk configure the <strong>SIP</strong><br />
trunk to the service provider from the ADTRAN SBC. The minimum amount of configuration is provided<br />
in this example but your application may require additional settings depending on your service provider<br />
requirements. Check with your service provider <strong>for</strong> any specific requirements beyond those listed here.<br />
<strong>Use</strong> the voice trunk type sip command to define a new <strong>SIP</strong> trunk and activate the Voice Trunk<br />
<strong>Configuration</strong> mode <strong>for</strong> the individual trunk. Once in the Voice Trunk <strong>Configuration</strong> mode, you can<br />
provide a descriptive name <strong>for</strong> the trunk and define the <strong>SIP</strong> server’s primary IPv4 address (or hostname).<br />
<strong>Use</strong> the description command to label the trunk. <strong>Use</strong> the sip-server primary command to define the<br />
hostname or IPv4 address of the primary server to which the trunk will send call-related <strong>SIP</strong> messages.<br />
The following example demonstrates these commands entered in sequence, starting with the voice trunk<br />
type sip command at the Global <strong>Configuration</strong> mode prompt:<br />
(config)#voice trunk T01 type sip<br />
(config-T01)#description PROVIDER<br />
(config-T01)#sip-server primary 198.51.100.2<br />
Step 3: Configure Voice Trunk to NetVanta ECS<br />
A second voice trunk is configured defining the connection from the ADTRAN SBC to the NetVanta ECS.<br />
<strong>Use</strong> the same commands as in Step 2: Configure the Voice Trunk to the Service Provider on page 4, only<br />
change the trunk identifier, trunk description, and IPv4 address (or hostname). In addition, this <strong>SIP</strong> trunk<br />
requires the NetVanta ECS to control call transfers, which is configured by issuing the transfer-mode<br />
network command.<br />
The following example demonstrates these commands entered in sequence, starting with the voice trunk<br />
type sip command at the Global <strong>Configuration</strong> mode prompt:<br />
(config)#voice trunk T11 type sip<br />
(config-T11)#description UC SERVER<br />
(config-T11)#sip-server primary 192.168.2.200<br />
(config-T11)#transfer-mode network<br />
Step 4: Configure a Trunk Group <strong>for</strong> the Service Provider<br />
In this step, an individual trunk group is created <strong>for</strong> the service provider trunk account. The trunk group is<br />
used to assign outbound call destinations (local calls, long distance calls, etc.) to the group, which in turn is<br />
applied to the trunk account once the <strong>SIP</strong> trunk is added to the trunk group. A cost is also assigned to each<br />
accept template in the trunk group.<br />
<strong>Use</strong> the voice grouped-trunk command to create a trunk group and to enter the Voice Trunk<br />
Group <strong>Configuration</strong> mode. The trunk command adds an existing trunk to the trunk group so<br />
outbound calls may be placed out that particular trunk. The parameter specifies the trunk identity<br />
where xx is the trunk ID number.<br />
<strong>Use</strong> the accept command to specify number patterns that are accepted <strong>for</strong> routing out the trunk.<br />
This command controls the type of outbound calls users can place on the system. <strong>Use</strong> the no <strong>for</strong>m of this<br />
command to remove a configured dial pattern. The parameter is specified by entering a<br />
complete phone number or using wildcards to help define accepted numbers.<br />
4 Copyright © 2012 ADTRAN, Inc. 6AOSCG0034-29A
<strong>Configuring</strong> a <strong>SIP</strong> <strong>Trunking</strong> <strong>Gateway</strong> <strong>Configuring</strong> the <strong>SIP</strong> <strong>Trunking</strong> <strong>Gateway</strong> Using the CLI<br />
The available wildcards <strong>for</strong> this command are:<br />
0-9 = Match exact digit only.<br />
M = Any digit 1 to 8.<br />
X = Any single digit (0 to 9).<br />
N = Any digit 2 to 9.<br />
[123] = Any digit contained in the bracketed list.<br />
The following special characters are always ignored; ( ), +, commas, and spaces. The dash<br />
character is used inside brackets to imply a range of numbers. For example, [1-4] defines<br />
numbers 1, 2, 3, or 4. Commas are implied between numbers in the brackets.<br />
The following are some examples of outbound call templates:<br />
1. 555-81xx matches 555-8100 to 555-8199.<br />
2. 555-812[012] matches 555-8120 to 555-8122.<br />
3. 1-800$ matches any 1-800 calls.<br />
4. NXX-XXXX matches 7 digit local.<br />
5. 1-NXX-NXX-XXXX matches long distance calls in North America.<br />
The cost parameter specifies the cost value <strong>for</strong> the trunk if a call is accepted by several trunks. The call will<br />
be routed to the trunk with the lowest cost value. The valid range is 0 to 499.<br />
The following CLI example demonstrates these commands entered in sequence, starting with the voice<br />
grouped-trunk command at the Global <strong>Configuration</strong> mode prompt:<br />
(config)#voice grouped-trunk PROVIDER<br />
(config-PROVIDER)#trunk T01<br />
(config-PROVIDER)#accept N11<br />
(config-PROVIDER)#accept NXX-XXXX cost 0<br />
(config-PROVIDER)#accept NXX-NXX-XXXX cost 0<br />
(config-PROVIDER)#accept 1-NXX-NXX-XXXX cost 0<br />
(config-PROVIDER)#accept 011-X$ cost 0<br />
Step 5: Configure a Trunk Group <strong>for</strong> NetVanta ECS<br />
In this step, an individual trunk group is created <strong>for</strong> the NetVanta ECS trunk account. An existing trunk is<br />
added to the trunk group using the trunk command. The allowed outbound calls are defined using<br />
the accept command and assigned a cost using the cost parameter. The valid ranges <strong>for</strong> each of<br />
the command in this step are explained in detail in the previous step, Step 4: Configure a Trunk Group <strong>for</strong><br />
the Service Provider on page 4.<br />
The following CLI example demonstrates these commands entered in sequence, starting with the voice<br />
grouped-trunk command at the Global <strong>Configuration</strong> mode prompt:<br />
(config)#voice grouped-trunk UC_SERVER<br />
(config-UC_SERVER)#trunk T11<br />
(config-UC_SERVER)#accept XXXX cost 0<br />
(config-UC_SERVER)#accept 256-555-XXXX cost 0<br />
6AOSCG0034-29A Copyright © 2012 ADTRAN, Inc. 5
<strong>Configuring</strong> the <strong>SIP</strong> <strong>Trunking</strong> <strong>Gateway</strong> Using the CLI<br />
<strong>Configuring</strong> a <strong>SIP</strong> <strong>Trunking</strong> <strong>Gateway</strong><br />
Step 6: Enable the RTP Symmetric Filter<br />
The Realtime Transport Protocol (RTP) symmetric filter works in conjunction with media anchoring to<br />
filter nonsymmetric RTP packets. It is enabled by default on some plat<strong>for</strong>ms and disabled on others. If this<br />
feature is enabled, it will drop RTP packets destined to a particular port that are sourced from an IP address<br />
and port that does not match what was received in Session Description Protocol (SDP). To enable the RTP<br />
symmetric filter, use the ip rtp symmetric-filter command. <strong>Use</strong> the no <strong>for</strong>m of this command to disable<br />
the feature.<br />
To enable the RTP symmetric filter, enter the command as follows from the Global <strong>Configuration</strong> mode:<br />
(config)#ip rtp symmetric-filter<br />
Step 7: Enable Media Anchoring<br />
Media anchoring honors the setting <strong>for</strong> the RTP symmetric filter which was configured in Step 6: Enable<br />
the RTP Symmetric Filter. Additionally, media anchoring must be enabled. The media anchoring settings<br />
described in this guide provide only the minimal configuration. Media Anchoring is a complex feature and<br />
includes many optional settings. Additional settings and configuration may be necessary <strong>for</strong> your<br />
particular application. Refer to the configuration guide <strong>Configuring</strong> Media Anchoring in AOS available<br />
online at https://support<strong>for</strong>ums.adtran.com <strong>for</strong> more details.<br />
Enable media anchoring using the ip rtp media-anchoring command from the Global <strong>Configuration</strong><br />
mode. This command enables media anchoring on a global basis <strong>for</strong> all RTP-to-RTP calls. By default,<br />
media anchoring is disabled. Using the no <strong>for</strong>m of this command disables the media anchoring feature.<br />
To enable media anchoring, enter the command as follows from the Global <strong>Configuration</strong> mode:<br />
(config)#ip rtp media-anchoring<br />
Step 8: Configure Double ReINVITE Preference<br />
The ip sip prefer double-reinvite command is used in the Global <strong>Configuration</strong> mode to determine<br />
whether a double reINVITE is preferred globally <strong>for</strong> all calls in the system. Calls that typically require a<br />
double reINVITE are <strong>for</strong>warded calls and any attended transfer. When these calls connect, a double<br />
reINVITE is initiated.<br />
By default, the system is configured so that double reINVITEs are preferred. If a transfer involves a <strong>SIP</strong><br />
trunk operating in local transfer mode, a double reINVITE will be executed regardless of this preference<br />
setting. To avoid extra <strong>SIP</strong> messaging in situations where it is not necessary, set this feature to not prefer<br />
double reINVITEs. Using the no <strong>for</strong>m of this command indicates that double reINVITEs are not globally<br />
preferred.<br />
To specify that <strong>SIP</strong> double reINVITEs are not preferred in the system, enter the command as follows from<br />
the Global <strong>Configuration</strong> mode:<br />
(config)#no ip sip prefer double-reinvite<br />
6 Copyright © 2012 ADTRAN, Inc. 6AOSCG0034-29A
<strong>Configuring</strong> a <strong>SIP</strong> <strong>Trunking</strong> <strong>Gateway</strong> <strong>Configuring</strong> the <strong>SIP</strong> <strong>Trunking</strong> <strong>Gateway</strong> Using the GUI<br />
<strong>Configuring</strong> the <strong>SIP</strong> <strong>Trunking</strong> <strong>Gateway</strong> Using the GUI<br />
The GUI is an especially useful tool <strong>for</strong> those who are less familiar with CLI configuration. AOS products<br />
ship with a user-friendly GUI that can be used to per<strong>for</strong>m many basic management and configuration<br />
functions on the AOS product.<br />
Most of the configuration steps explained previously in <strong>Configuring</strong> the <strong>SIP</strong> <strong>Trunking</strong> <strong>Gateway</strong> Using the<br />
CLI on page 2 can also be per<strong>for</strong>med using the GUI, with exception of the final two steps. This section<br />
provides all of the steps that can be completed using the GUI, with the final two steps provided using the<br />
CLI. This section will explain how to access the GUI to per<strong>for</strong>m the steps necessary to configure the <strong>SIP</strong><br />
<strong>Trunking</strong> <strong>Gateway</strong> functionality using the GUI. It is written in a manner which allows you to complete the<br />
steps without referring to <strong>Configuring</strong> the <strong>SIP</strong> <strong>Trunking</strong> <strong>Gateway</strong> Using the CLI on page 2.<br />
To configure the <strong>SIP</strong> trunking gateway functionality on an AOS product using the GUI, use the following<br />
steps:<br />
1. Configure global voice modes <strong>for</strong> local handling.<br />
2. Configure the voice trunk to the service provider.<br />
3. Configure the voice trunk to NetVanta ECS.<br />
4. Configure a trunk group <strong>for</strong> the service provider.<br />
5. Configure a trunk group <strong>for</strong> NetVanta ECS.<br />
6. Enable the RTP symmetric filter.<br />
7. Enable media anchoring.<br />
8. Configure double reINVITE preference.<br />
Accessing the GUI<br />
To begin configuring the <strong>SIP</strong> trunking gateway through the GUI, follow these steps to access the GUI:<br />
1. Open a new Web page in your Internet browser.<br />
2. Enter your AOS product’s IP address in the browser’s address field, http://, <strong>for</strong> example:<br />
http://10.10.10.1<br />
3. At the prompt, enter your user name and password and select OK.<br />
The default user name is admin and the default password is password.<br />
Step 1: Configure Global Voice Modes <strong>for</strong> Local Handling<br />
Configure the ADTRAN SBC to use local mode <strong>for</strong> <strong>for</strong>warding and call transfer handling. By default, both<br />
of these functions are handled by the network. To change this setting, navigate to Voice > System Setup ><br />
System Parameters. In the System Parameter menu, select Local from the drop-down box <strong>for</strong> both<br />
Transfer Mode and Forward Mode. Select Apply at the bottom of the menu to accept the changes.<br />
6AOSCG0034-29A Copyright © 2012 ADTRAN, Inc. 7
<strong>Configuring</strong> the <strong>SIP</strong> <strong>Trunking</strong> <strong>Gateway</strong> Using the GUI<br />
<strong>Configuring</strong> a <strong>SIP</strong> <strong>Trunking</strong> <strong>Gateway</strong><br />
Select Local <strong>for</strong> both<br />
the Transfer Mode and<br />
the Forward Mode.<br />
Figure 1. Setting System Parameters<br />
Step 2: Configure the Voice Trunk to the Service Provider<br />
The first of two voice trunks is configured in this step. The parameters <strong>for</strong> this trunk configure the <strong>SIP</strong><br />
trunk to the service provider from the ADTRAN SBC. The minimum configuration is covered in this<br />
example, but your application may require additional settings depending on your service provider<br />
requirements. Check with your service provider <strong>for</strong> any specific requirements beyond those listed here.<br />
To create the voice trunk, navigate to Voice > Trunks > Trunk Accounts. Enter the Trunk Name, and<br />
select <strong>SIP</strong> <strong>for</strong> the Type from the drop down menu. Select Add to create the voice trunk.<br />
Enter a name <strong>for</strong> the<br />
trunk account.<br />
Select <strong>SIP</strong> <strong>for</strong> the<br />
Type from the<br />
drop-down menu.<br />
Select ADD to add<br />
the new voice trunk.<br />
Figure 2. Creating a Voice Trunk to the Service Provider<br />
8 Copyright © 2012 ADTRAN, Inc. 6AOSCG0034-29A
<strong>Configuring</strong> a <strong>SIP</strong> <strong>Trunking</strong> <strong>Gateway</strong> <strong>Configuring</strong> the <strong>SIP</strong> <strong>Trunking</strong> <strong>Gateway</strong> Using the GUI<br />
Once the new trunk account is created, select it from the list to further configure the voice trunk.<br />
Add the primary <strong>SIP</strong> server IPv4 address or hostname under the <strong>SIP</strong> Settings tab as shown in Figure 3.<br />
Select Apply at the bottom of the Edit <strong>SIP</strong> Trunk menu to accept the changes.<br />
Enter an IPv4 address<br />
<strong>for</strong> the primary <strong>SIP</strong><br />
server.<br />
Figure 3. <strong>Configuring</strong> a Voice Trunk to the Service Provider<br />
Step 3: Configure the Voice Trunk to the NetVanta ECS<br />
A second voice trunk is configured defining the connection from the ADTRAN SBC to the NetVanta ECS.<br />
<strong>Use</strong> the same method as described in Step 2: Configure the Voice Trunk to the Service Provider.<br />
To create the voice trunk, navigate to Voice > Trunks > Trunk Accounts. Enter the Trunk Name, and<br />
select <strong>SIP</strong> <strong>for</strong> the Type from the drop down menu. Create the <strong>SIP</strong> trunk using a different name and primary<br />
IPv4 address or hostname. For this configuration example, we used the name UC SERVER. Select Add to<br />
create the voice trunk.<br />
Enter a name <strong>for</strong> the<br />
voice trunk.<br />
Select <strong>SIP</strong> <strong>for</strong> the<br />
type from the<br />
drop-down menu.<br />
Select ADD to add<br />
the new voice trunk.<br />
Figure 4. Create a Voice Trunk to the NetVanta ECS<br />
6AOSCG0034-29A Copyright © 2012 ADTRAN, Inc. 9
<strong>Configuring</strong> the <strong>SIP</strong> <strong>Trunking</strong> <strong>Gateway</strong> Using the GUI<br />
<strong>Configuring</strong> a <strong>SIP</strong> <strong>Trunking</strong> <strong>Gateway</strong><br />
Enter an IPv4 address <strong>for</strong><br />
the primary <strong>SIP</strong> server.<br />
Figure 5. <strong>Configuring</strong> a Voice Trunk to the NetVanta ECS<br />
In addition, this <strong>SIP</strong> trunk requires the NetVanta ECS to control call transfers, which is configured by<br />
setting the Transfer Mode to Network. The Transfer Mode setting is located halfway down the menu on<br />
the <strong>SIP</strong> Settings tab (shown in Figure 6).<br />
Scroll down the <strong>SIP</strong><br />
Settings tab menu until<br />
you locate the Transfer<br />
Mode option. Select<br />
Network <strong>for</strong> the Transfer<br />
Mode.<br />
Figure 6. Setting the Transfer Mode <strong>for</strong> this Voice Trunk Only<br />
Select Apply at the bottom of the Edit <strong>SIP</strong> Trunk menu to accept the changes.<br />
10 Copyright © 2012 ADTRAN, Inc. 6AOSCG0034-29A
<strong>Configuring</strong> a <strong>SIP</strong> <strong>Trunking</strong> <strong>Gateway</strong> <strong>Configuring</strong> the <strong>SIP</strong> <strong>Trunking</strong> <strong>Gateway</strong> Using the GUI<br />
Step 4: Configure a Trunk Group <strong>for</strong> the Service Provider<br />
In this step, an individual trunk group is created <strong>for</strong> the service provider trunk account. The trunk group is<br />
used to assign outbound call destinations (local calls, long distance calls, etc.) to the group, which in turn is<br />
applied to the trunk account once the <strong>SIP</strong> trunk is added to the trunk group. A cost is also assigned to each<br />
accept template in the trunk group.<br />
Navigate to Voice > Trunks > Trunk Groups to create a grouped trunk. Enter a name <strong>for</strong> the trunk group<br />
and select Add as shown in Figure 7 on page 11.<br />
Enter a name <strong>for</strong> the<br />
trunk group.<br />
Select Add to<br />
add the new<br />
trunk group.<br />
Figure 7. Creating a Trunk Group <strong>for</strong> the Service Provider<br />
Select the newly created trunk group from the Add/Modify/Delete Trunk Groups list <strong>for</strong> further<br />
configuration.<br />
Select the trunk group<br />
from the list.<br />
Figure 8. <strong>Configuring</strong> the Trunk Group <strong>for</strong> the Service Provider<br />
6AOSCG0034-29A Copyright © 2012 ADTRAN, Inc. 11
<strong>Configuring</strong> the <strong>SIP</strong> <strong>Trunking</strong> <strong>Gateway</strong> Using the GUI<br />
<strong>Configuring</strong> a <strong>SIP</strong> <strong>Trunking</strong> <strong>Gateway</strong><br />
To add an existing trunk to the trunk group so outbound calls can be placed out that particular trunk, select<br />
Add Members from the Edit Trunk Group menu as shown in Figure 9.<br />
Select Add Members<br />
to associate a voice<br />
trunk with the trunk<br />
group.<br />
Figure 9. Associating a Voice Trunk with the Trunk Group<br />
Select the voice trunk <strong>for</strong> the service provider from the Add Members to Trunk Group menu. Select Add<br />
Selected Trunks to accept the association as shown in Figure 10.<br />
Select the service provider<br />
voice trunk.<br />
Select Add Selected<br />
Trunks to associate the<br />
voice trunk to the trunk<br />
group.<br />
Figure 10. Associating a Voice Trunk with the Trunk Group<br />
Next, specify number patterns that are accepted <strong>for</strong> routing out the trunk from the Outbound Call<br />
Templates menu. This controls the type of outbound calls users can place on the system. Select from the<br />
existing call templates shown in Figure 11 by checking the box next to the template.<br />
Select the call templates to<br />
allow on this trunk.<br />
If the call templates<br />
provided do not cover the<br />
number patterns necessary<br />
<strong>for</strong> your configuration,<br />
select Detailed View to<br />
enter your own template.<br />
Select Apply to accept the<br />
changes.<br />
Figure 11. <strong>Configuring</strong> Outbound Call Templates<br />
12 Copyright © 2012 ADTRAN, Inc. 6AOSCG0034-29A
<strong>Configuring</strong> a <strong>SIP</strong> <strong>Trunking</strong> <strong>Gateway</strong> <strong>Configuring</strong> the <strong>SIP</strong> <strong>Trunking</strong> <strong>Gateway</strong> Using the GUI<br />
If the call templates provided do not suit your needs, refer to Defining Advanced Call Templates below <strong>for</strong><br />
instructions <strong>for</strong> creating custom call templates.<br />
Select Apply at the bottom of the Edit Trunk Groups menu to accept the changes.<br />
Step 5: Configure a Trunk Group <strong>for</strong> NetVanta ECS<br />
Repeat the same steps as described in Step 4: Configure a Trunk Group <strong>for</strong> the Service Provider on page<br />
11 to create and configure a trunk group <strong>for</strong> the NetVanta ECS. For this step, name the trunk group<br />
UC_SERVER and associate it with the trunk account UC Server (created in Step 3: Configure the Voice<br />
Trunk to the NetVanta ECS on page 9).<br />
Defining Advanced Call Templates<br />
If the provided call templates (shown in Figure 11) are not sufficient <strong>for</strong> this trunk group, your application<br />
could require advanced configuration. Select The Detailed View - Permit/Restriction Call Templates<br />
option from the Outbound Call Templates menu, and select Configure Advanced Templates as shown<br />
in Figure 12.<br />
Select Configure Advanced Templates to<br />
access the Add/Delete Permit Templates<br />
menu.<br />
Figure 12. Accessing Advanced Templates<br />
The advanced templates allow entering a complete phone number or using wildcards to help define<br />
accepted numbers. Valid characters <strong>for</strong> entering number patterns are:<br />
0-9 = Match exact digit only.<br />
M = Any digit 1 to 8.<br />
X = Any single digit (0 to 9).<br />
N = Any digit 2 to 9.<br />
[123] = Any digit contained in the bracketed list.<br />
The following special characters are always ignored; ( ), +, commas, and spaces. The dash<br />
character is used inside brackets to imply a range of numbers. For example, [1-4] defines<br />
numbers 1, 2, 3, or 4. Commas are implied between numbers in the brackets.<br />
<strong>Use</strong> the Add/Delete Permit Templates menu to define custom call templates allowing outbound calls as<br />
needed <strong>for</strong> this trunk group.<br />
6AOSCG0034-29A Copyright © 2012 ADTRAN, Inc. 13
<strong>Configuring</strong> the <strong>SIP</strong> <strong>Trunking</strong> <strong>Gateway</strong> Using the GUI<br />
<strong>Configuring</strong> a <strong>SIP</strong> <strong>Trunking</strong> <strong>Gateway</strong><br />
Enter the number pattern<br />
to match and permit calls<br />
using valid characters.<br />
Enter a cost value <strong>for</strong> the<br />
template.<br />
Select Add to<br />
accept the new<br />
template.<br />
Figure 13. Adding Custom Templates<br />
Associate the trunk group<br />
UC_SERVER to the trunk<br />
account with the same<br />
name by selecting Add<br />
Members.<br />
Specify the types of calls to<br />
allow on this trunk by<br />
checking the box next to<br />
the call template.<br />
If the call templates<br />
provided do not cover the<br />
number patterns necessary<br />
<strong>for</strong> your configuration,<br />
select Detailed View to<br />
enter your own template.<br />
Select Apply to accept the<br />
changes.<br />
Figure 14. <strong>Configuring</strong> the Trunk Group <strong>for</strong> the NetVanta ECS<br />
Select Apply at the bottom of the Edit Trunk Groups menu to accept the changes.<br />
Step 6: Enable the RTP Symmetric Filter<br />
The last step to be per<strong>for</strong>med through the GUI is setting the RTP symmetric filter. This functionality filters<br />
nonsymmetric RTP packets and should be enabled on the ADTRAN SBC <strong>for</strong> media anchoring. When this<br />
setting is enabled, it will drop RTP packets destined to a particular port that are sourced from an IP address<br />
and port that does not match what was received in SDP.<br />
14 Copyright © 2012 ADTRAN, Inc. 6AOSCG0034-29A
<strong>Configuring</strong> a <strong>SIP</strong> <strong>Trunking</strong> <strong>Gateway</strong> <strong>Configuring</strong> the <strong>SIP</strong> <strong>Trunking</strong> <strong>Gateway</strong> Using the GUI<br />
Navigate to Voice > System Setup > VoIP Settings. From the RTP Settings tab, select the checkbox to<br />
enable RTP Symmetric Filter. Select Apply to accept the changes.<br />
Navigate to Voice ><br />
System Setup > VoIP<br />
Settings.<br />
Select the RTP<br />
Settings tab.<br />
Select the checkbox to<br />
enable RTP Symmetric<br />
Filter.<br />
Select Apply to<br />
accept the<br />
changes.<br />
Figure 15. Enabling RTP Symmetric Filter<br />
Step 7: Enable Media Anchoring Through the CLI<br />
Step 7 and Step 8 cannot be completed through the GUI and must be per<strong>for</strong>med using the CLI. Access the<br />
CLI using the steps explained previously in Accessing the CLI on page 3. If you are unfamiliar with using<br />
the CLI, more detailed in<strong>for</strong>mation is provided in the AOS Command Reference <strong>Guide</strong> available online<br />
from https://support<strong>for</strong>ums.adtran.com.<br />
Media anchoring honors the settings <strong>for</strong> the RTP symmetric filter which were configured through the GUI<br />
in Step 6: Enable the RTP Symmetric Filter on page 14. Additionally, media anchoring must be enabled,<br />
which is the last step in configuring this feature.<br />
The media anchoring settings described in this guide provide only the minimum configuration. Additional<br />
settings and configuration may be necessary <strong>for</strong> your particular application. Refer to the configuration<br />
guide <strong>Configuring</strong> Media Anchoring in AOS available online at https://support<strong>for</strong>ums.adtran.com <strong>for</strong><br />
further details.<br />
Enable media anchoring using the ip rtp media-anchoring command from the Global <strong>Configuration</strong><br />
mode. This command enables media anchoring on a global basis <strong>for</strong> all RTP-to-RTP calls. By default,<br />
media anchoring is disabled. Using the no <strong>for</strong>m of this command disables the media anchoring feature.<br />
To enable media anchoring, enter the command as follows from the Global <strong>Configuration</strong> mode:<br />
(config)#ip rtp media-anchoring<br />
6AOSCG0034-29A Copyright © 2012 ADTRAN, Inc. 15
<strong>Configuration</strong> Example<br />
<strong>Configuring</strong> a <strong>SIP</strong> <strong>Trunking</strong> <strong>Gateway</strong><br />
Step 8: Configure Double ReINVITE Preferences Through the CLI<br />
The ip sip prefer double-reinvite command is used in the Global <strong>Configuration</strong> mode to determine<br />
whether a double reINVITE is preferred globally <strong>for</strong> all calls in the system. Typically, calls that require a<br />
double reINVITE are <strong>for</strong>warded calls and any attended transfer. When these calls connect, a double<br />
reINVITE message is initiated.<br />
By default, the system is configured so that double reINVITEs are preferred. If a transfer involves a <strong>SIP</strong><br />
trunk operating in local transfer mode, a double reINVITE will be executed regardless of this preference<br />
setting. To avoid extra <strong>SIP</strong> messaging in situations where it is not necessary, set this feature to not prefer<br />
double reINVITEs. Using the no <strong>for</strong>m of this command indicates that double reINVITEs are not globally<br />
preferred.<br />
To specify that <strong>SIP</strong> double reINVITEs are not preferred in the system, enter the command as follows from<br />
the Global <strong>Configuration</strong> mode:<br />
(config)#no ip sip prefer double-reinvite<br />
<strong>Configuration</strong> Example<br />
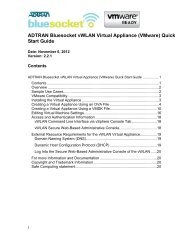
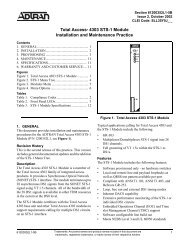
The following example demonstrates a typical installation of an ADTRAN SBC configured as the <strong>SIP</strong><br />
trunking gateway between a NetVanta ECS and a service provider. All of the following configuration in<br />
this example occurs on the ADTRAN SBC shown in Figure 16.<br />
Two <strong>SIP</strong> trunks are configured, T01 and T11. T01 is configured as the <strong>SIP</strong> trunk to the service provider<br />
with the IPv4 address of 198.51.100.2. T11 is configured as the <strong>SIP</strong> trunk to the NetVanta ECS with the<br />
IPv4 address of 192.168.2.200. Two voice trunk groups are created and configured with outbound call<br />
templates. Additionally, a cost is assigned to each accept template in the trunk group.<br />
<strong>SIP</strong><br />
Service<br />
Provider<br />
<strong>SIP</strong> Trunk T01<br />
ADTRAN SBC<br />
Provider<br />
Softswitch<br />
198.51.100.2<br />
<strong>SIP</strong> Trunk T11<br />
NetVanta<br />
ECS<br />
192.168.2.200<br />
Figure 16. <strong>SIP</strong> <strong>Trunking</strong> <strong>Gateway</strong> with NetVanta ECS<br />
16 Copyright © 2012 ADTRAN, Inc. 6AOSCG0034-29A
<strong>Configuring</strong> a <strong>SIP</strong> <strong>Trunking</strong> <strong>Gateway</strong> <strong>Configuration</strong> Example<br />
The configuration parameters entered in this example are sample configurations only, and<br />
only pertain to the configuration of the <strong>SIP</strong> trunking gateway functionality. This<br />
application should be configured in a manner consistent with the needs of your particular<br />
network. CLI prompts have been removed from the configuration example to provide a<br />
method of copying and pasting configurations directly from this configuration guide into<br />
the CLI. This configuration should not be copied without first making the necessary<br />
adjustments to ensure it will function properly in your network.<br />
!<br />
voice transfer-mode local<br />
voice <strong>for</strong>ward-mode local<br />
!<br />
!<br />
voice trunk T01 type sip<br />
description PROVIDER"<br />
sip-server primary 198.51.100.2<br />
!<br />
!<br />
voice trunk T11 type sip<br />
description UC Server<br />
sip-server primary 192.168.2.200<br />
transfer-mode network<br />
!<br />
!<br />
!<br />
voice grouped-trunk PROVIDER<br />
trunk T01<br />
accept N11<br />
accept NXX-XXXX cost 0<br />
accept NXX-NXX-XXXX cost 0<br />
accept 1-NXX-NXX-XXXX cost 0<br />
accept 011-X$ cost 0<br />
!<br />
voice grouped-trunk UC_SERVER<br />
trunk T11<br />
accept XXXX cost 0<br />
accept 256-555-XXXX cost 0<br />
!<br />
!<br />
no ip sip prefer double-reinvite<br />
!<br />
!<br />
ip rtp symmetric-filter<br />
ip rtp media-anchoring<br />
!<br />
end<br />
6AOSCG0034-29A Copyright © 2012 ADTRAN, Inc. 17
Command Summary<br />
<strong>Configuring</strong> a <strong>SIP</strong> <strong>Trunking</strong> <strong>Gateway</strong><br />
Command Summary<br />
The following table summarizes the commands used to configure simple remote phone in AOS products.<br />
Table 1. Remote Phone Command Summary<br />
Step Command Description<br />
Step 1<br />
Configure global voice modes <strong>for</strong> local handling.<br />
(config)#voice transfer-mode local<br />
(config)#voice <strong>for</strong>ward-mode local<br />
Specifies the local unit will control call<br />
transfers.<br />
Specifies the local unit will control <strong>for</strong>warding<br />
of calls.<br />
Step 2<br />
Configure the voice trunk to the service provider.<br />
(config)#voice trunk type sip<br />
(config-Txx)#description <br />
(config-Txx)#sip-server primary <br />
Creates a <strong>SIP</strong> trunk and enters the <strong>SIP</strong> Trunk<br />
<strong>Configuration</strong> mode.<br />
<strong>Use</strong> the description command to provide a<br />
descriptive label to the trunk. <strong>Use</strong> the<br />
sip-server primary command to define the<br />
hostname or IPv4 address of the primary<br />
server to which the trunk will send <strong>SIP</strong><br />
messages. The parameter is<br />
specified using the fully qualified domain<br />
name (FQDN) or IPv4 address of the <strong>SIP</strong><br />
server. IPv4 addresses should be expressed<br />
in dotted decimal notation (<strong>for</strong> example,<br />
10.10.10.1).<br />
Step 3<br />
Configure voice trunk to NetVanta ECS.<br />
(config)#voice trunk type sip<br />
(config-Txx)#description <br />
(config-Txx)#sip-server primary <br />
(config-Txx)#transfer-mode network<br />
Creates a <strong>SIP</strong> trunk and enters the <strong>SIP</strong> Trunk<br />
<strong>Configuration</strong> mode.<br />
<strong>Use</strong> the description command to provide a<br />
descriptive label to the trunk. <strong>Use</strong> the<br />
sip-server primary command to define the<br />
hostname or IPv4 address of the primary<br />
server to which the trunk will send <strong>SIP</strong><br />
messages. The parameter is<br />
specified using the fully qualified domain<br />
name (FQDN) or IPv4 address of the <strong>SIP</strong><br />
server. IPv4 addresses should be expressed<br />
in dotted decimal notation (<strong>for</strong> example,<br />
10.10.10.1).<br />
Specifies the behavior of the <strong>SIP</strong> trunk to<br />
allow the network to control call transfers.<br />
This setting is only necessary on the <strong>SIP</strong><br />
trunk to the NetVanta ECS and not on the<br />
<strong>SIP</strong> trunk to the service provider.<br />
18 Copyright © 2012 ADTRAN, Inc. 6AOSCG0034-29A
<strong>Configuring</strong> a <strong>SIP</strong> <strong>Trunking</strong> <strong>Gateway</strong> Command Summary<br />
Table 1. Remote Phone Command Summary (Continued)<br />
Step Command Description<br />
Step 4<br />
Configure a trunk group <strong>for</strong> the service provider.<br />
(config)#voice grouped-trunk <br />
(config-grouped-trunk-name)#trunk <br />
(config-grouped-trunk-name)#accept<br />
[cost ]<br />
Creates a trunk group and enters the Voice<br />
Trunk Group <strong>Configuration</strong> mode.<br />
Adds a trunk to the trunk group. The <br />
parameter specifies a 2-digit identifier in the<br />
<strong>for</strong>mat Txx where xx is the trunk ID number.<br />
Enter a trunk ID between 1 and 99.<br />
Specifies the numbers allowed <strong>for</strong> routing on<br />
the trunk using outbound call templates. The<br />
variable specifies a number<br />
pattern using complete phone numbers or<br />
wildcards. The cost parameter is<br />
optional and specifies the cost value<br />
associated with the number pattern <strong>for</strong> the<br />
trunk. The call is routed to the trunk with the<br />
lowest cost. Valid range <strong>for</strong> is<br />
0 to 499.<br />
Step 5<br />
Configure a trunk group <strong>for</strong> NetVanta ECS.<br />
(config)#voice grouped-trunk <br />
(config-grouped-trunk-name)#trunk <br />
(config-grouped-trunk-name)#accept<br />
[cost ]<br />
Creates a trunk group and enters the Voice<br />
Trunk Group <strong>Configuration</strong> mode.<br />
Adds a trunk to the trunk group <strong>for</strong> outbound<br />
call capability. The parameter<br />
specifies a 2-digit identifier in the <strong>for</strong>mat Txx<br />
where xx is the trunk ID number. Enter a<br />
trunk ID between 1 and 99.<br />
Specifies the numbers allowed <strong>for</strong> routing on<br />
the trunk using outbound call templates. The<br />
variable specifies a number<br />
pattern using complete phone numbers or<br />
wildcards. The cost parameter is<br />
optional and specifies the cost value<br />
associated with the number pattern <strong>for</strong> the<br />
trunk. The call is routed to the trunk with the<br />
lowest cost. Valid range <strong>for</strong> is<br />
0 to 499.<br />
Step 6<br />
Enable the RTP symmetric filter.<br />
(config)#ip rtp symmetric-filter<br />
Enables filtering of received nonsymmetric<br />
RTP packets. When enabled, the RTP<br />
symmetric-filter drops packets destined to a<br />
particular port that are sourced from an IP<br />
address and port that was not specified in<br />
received SDP. By default, the RTP symmetric<br />
filter is disabled.<br />
6AOSCG0034-29A Copyright © 2012 ADTRAN, Inc. 19
Troubleshooting<br />
<strong>Configuring</strong> a <strong>SIP</strong> <strong>Trunking</strong> <strong>Gateway</strong><br />
Table 1. Remote Phone Command Summary (Continued)<br />
Step Command Description<br />
Step 7<br />
Enable media anchoring.<br />
(config)#ip rtp media-anchoring<br />
Enable media anchoring on a global basis <strong>for</strong><br />
all RTP to RTP calls. By default, media<br />
anchoring is disabled.<br />
Step 8<br />
Configure double reINVITE preferences.<br />
(config)#[no] ip sip prefer double-reinvite<br />
Globally specifies <strong>SIP</strong> double reINVITEs are<br />
preferred <strong>for</strong> certain call flows. Using the no<br />
<strong>for</strong>m of this command indicates that double<br />
reINVITEs are not preferred.<br />
Troubleshooting<br />
After configuring <strong>SIP</strong> trunking on the ADTRAN SBC, several commands can be issued from the Enable<br />
mode in the CLI to assist in troubleshooting. The following section explains the show and debug<br />
commands that can be useful.<br />
Show Commands<br />
The following show commands can be used to display and troubleshoot specific portions of the<br />
configuration.<br />
The output of all show commands can be limited by appending the following modifiers to<br />
the end of the command: | begin , | exclude , and | include . The<br />
include modifier limits output to lines that contain the specified text, the exclude modifier<br />
excludes any lines with the specified text, and the begin modifier displays the first line of<br />
output with the specified text and all lines thereafter.<br />
<strong>Use</strong> the show ip rtp media-anchoring sessions command to display all of the anchored RTP flow<br />
associations and the number of relayed packets per association currently active in an anchored RTP flow.<br />
In addition, the time to live (TTL) <strong>for</strong> the association is displayed. To display media-anchoring<br />
in<strong>for</strong>mation, enter the command as follows:<br />
>enable<br />
#show ip rtp media-anchoring sessions<br />
CallID Anchored Address Remote Address TTL Packets Ovrd Type<br />
--------------------------------------------------------------------------------------------------------------------------<br />
7 10.10.10.1:40008 10.10.10.2:2230 45 108062 No Audio<br />
7 10.17.250.12:40010 10.17.250.14:10262 45 108063 No Audio<br />
7 10.10.10.1:40009 10.10.10.2:2231 44 432 No Audio<br />
7 10.17.250.12:40011 10.17.250.14:10263 44 432 No Audio<br />
20 Copyright © 2012 ADTRAN, Inc. 6AOSCG0034-29A
<strong>Configuring</strong> a <strong>SIP</strong> <strong>Trunking</strong> <strong>Gateway</strong> Troubleshooting<br />
Debug Commands<br />
There are several debug messages that can be enabled to assist in troubleshooting your <strong>SIP</strong> trunking<br />
gateways configuration. Debug messages are displayed in real time. You can activate multiple debug<br />
messages simultaneously.<br />
Turning on a large amount of debug in<strong>for</strong>mation can adversely affect the per<strong>for</strong>mance of<br />
your unit.<br />
<strong>Use</strong> the debug ip rtp media-anchoring command to enable debug messaging <strong>for</strong> media anchoring<br />
activity. Debug messages are generated <strong>for</strong> media anchoring functions, such as the beginning and ending of<br />
anchoring sessions, and the creation and destruction of associations. To enable media anchoring debug<br />
messages, enter the command as follows:<br />
>enable<br />
#debug ip rtp media-anchoring<br />
<strong>Use</strong> the debug voice verbose command to activate debug messages associated with voice functionality. To<br />
enable voice debug messages, enter the command as follows:<br />
>enable<br />
#debug voice verbose<br />
<strong>Use</strong> the debug sip cldu command to activate debug messages associated with <strong>SIP</strong> call leg distribution unit<br />
(CLDU) events. To enable sip cldu debug messages, enter the command as follows:<br />
>enable<br />
#debug sip cldu<br />
<strong>Use</strong> the debug sip stack messages command to activate debug messages associated with <strong>SIP</strong> messaging.<br />
<strong>Use</strong> the no <strong>for</strong>m of this command to disable the debug messages. To enable sip stack message debug<br />
messages, enter the command as follows:<br />
>enable<br />
#debug sip stack message<br />
6AOSCG0034-29A Copyright © 2012 ADTRAN, Inc. 21
Additional Resources<br />
<strong>Configuring</strong> a <strong>SIP</strong> <strong>Trunking</strong> <strong>Gateway</strong><br />
Additional Resources<br />
There are additional resources available to aid in configuring your ADTRAN unit. Many of the topics<br />
discussed in this guide are complex and require additional understanding, such as using the CLI, SBC in<br />
AOS, configuring media anchoring, and implementing remote phones <strong>for</strong> AOS <strong>SIP</strong> <strong>Gateway</strong>s. The<br />
documents listed in Table 2 are available online at ADTRAN’s Support Forum at<br />
https://support<strong>for</strong>ums.adtran.com.<br />
Table 2. Additional ADTRAN Documentation<br />
Feature<br />
All AOS Commands<br />
Media Anchoring<br />
Remote Phones<br />
SBC Product Overview<br />
Document Title<br />
AOS Command Reference <strong>Guide</strong><br />
<strong>Configuring</strong> Media Anchoring in AOS<br />
Remote Phone <strong>Configuration</strong> <strong>for</strong> AOS <strong>SIP</strong> <strong>Gateway</strong><br />
Session Border Controllers in AOS<br />
22 Copyright © 2012 ADTRAN, Inc. 6AOSCG0034-29A