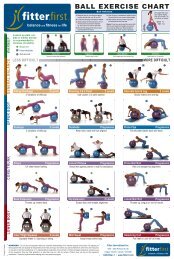
Foam Roller Exercise Chart
Foam Roller Exercise Chart
Foam Roller Exercise Chart

You also want an ePaper? Increase the reach of your titles
YUMPU automatically turns print PDFs into web optimized ePapers that Google loves.
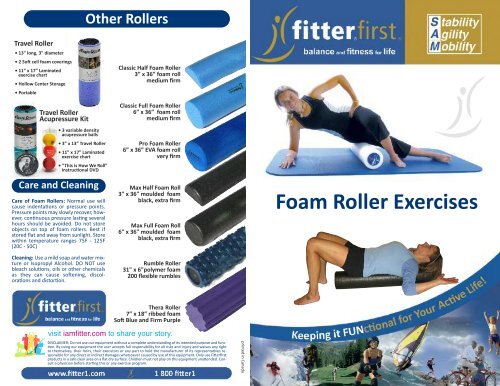
Other <strong>Roller</strong>s<br />
Travel <strong>Roller</strong><br />
• 13" long, 3" diameter<br />
• 2 So cell foam coverings<br />
• 11” x 17” Laminated<br />
exercise chart<br />
• Hollow Center Storage<br />
• Portable<br />
Travel <strong>Roller</strong><br />
Acupressure Kit<br />
• 3 variable density<br />
acupressure balls<br />
• 3” x 13” Travel <strong>Roller</strong><br />
• 11” x 17” Laminated<br />
exercise chart<br />
• “This is How We Roll”<br />
Instruconal DVD<br />
Care and Cleaning<br />
Care of <strong>Foam</strong> <strong>Roller</strong>s: Normal use will<br />
cause indentaons or pressure points.<br />
Pressure points may slowly recover, however,<br />
connuous pressure lasng several<br />
hours should be avoided. Do not store<br />
objects on top of foam rollers. Best if<br />
stored flat and away from sunlight. Store<br />
within temperature ranges 75F - 125F<br />
(20C - 50C)<br />
Cleaning: Use a mild soap and water mixture<br />
or Isopropyl Alcohol. DO NOT use<br />
bleach soluons, oils or other chemicals<br />
as they can cause soening, discoloraons<br />
and distoron.<br />
Classic Half <strong>Foam</strong> <strong>Roller</strong><br />
3” x 36” foam roll<br />
medium firm<br />
Classic Full <strong>Foam</strong> <strong>Roller</strong><br />
6” x 36” foam roll<br />
medium firm<br />
Pro <strong>Foam</strong> <strong>Roller</strong><br />
6” x 36” EVA foam roll<br />
very firm<br />
Max Half <strong>Foam</strong> Roll<br />
3" x 36" moulded foam<br />
black, extra firm<br />
Max Full <strong>Foam</strong> Roll<br />
6" x 36" moulded foam<br />
black, extra firm<br />
Rumble <strong>Roller</strong><br />
31" x 6"polymer foam<br />
200 flexible rumbles<br />
<strong>Foam</strong> <strong>Roller</strong> <strong>Exercise</strong>s<br />
Thera <strong>Roller</strong><br />
7” x 18” ribbed foam<br />
So Blue and Firm Purple<br />
visit iamfitter.com to share your story.<br />
DISCLAIMER: Do not use our equipment without a complete understanding of its intended purpose and func-<br />
on. By using our equipment the user accepts full responsibility for all risks and injury and waives any right<br />
to themselves, their heirs, their executors or any part to hold the manufacturer of its representaves responsible<br />
for any direct or indirect damages whatsoever caused by use of this equipment. Only use Fierfirst<br />
products in a safe clear area on a flat dry surface. Children must not play on this equipment unaended. Consult<br />
a physician before starng this or any exercise program.<br />
printed in Canada
ITB Roll<br />
Lay on the roller so that the roll sits under the side of the leg just<br />
below the hip joint. Support the weight of your body on your<br />
hands, and opposite leg (which is crossed out in front of the leg<br />
on the roll). This exercise helps loosen up your Ilio-Tibial Band<br />
(ITB) which runs down the outside of your leg from your hip to<br />
your knee. Roll back and forth from below the hip until just<br />
above the knee.<br />
TFL Roll<br />
Lay on your side so that the roller is placed just above the hip<br />
joint (NOT on the hip joint). The tensor fasciae latae (TFL) is a<br />
muscle that runs from the hip to the top of the pelvis. You will<br />
not have to roll much with this exercise, as it is a small muscle. If<br />
you set the roller just above the bony part of the hip and below<br />
the pelvis you should be in the location of the TFL.<br />
Calf Roll<br />
Support your weight with your hands on the floor and one calf on<br />
the roller. Do not sit on the floor. Using your upper body roll from<br />
your heel to the top of your calf. Both knees bent and legs up so<br />
that your thighs are at 90 degrees to your body. Slowly lower one<br />
leg towards the floor. Without touching the floor, lift the leg back<br />
to the starting position and alternate legs. Maintain the neutral<br />
spine position throughout the entire exercise.<br />
Back Stretch<br />
Sit on one end of the roller and lay back so that your head is<br />
supported on the roller, and your spine is in line with the roller.<br />
Bend knees to provide balance. Bring your arms straight up so<br />
that they are pointing towards the ceiling. Now drop your arms<br />
over your head and allow gravity to cause a stretch. This will<br />
stretch your latissimus dorsi muscles and help extend your thoracic<br />
spine.<br />
Thoracic Spine Mobility<br />
Lay on the roller so that your spine is perpendicular with the roll,<br />
bend knees and lift hips off ground while maintaining a flat body<br />
position. Roll back and forth from the top of the shoulders (NOT<br />
on the neck) down to the bottom of the rib cage. This exercise<br />
will help improve the mobility of the thoracic spine by encouraging<br />
movement in each segment.<br />
Glute Roll<br />
Sit on the roller with your legs slightly extended in front of you<br />
and your body leaning back. Placing your weight on either your<br />
left glute or your right glute, roll across the gluteal muscles. Take<br />
longer through the tighter areas.<br />
Quad Roll<br />
Lay face down on your elbows with the roller under your<br />
quadriceps (the front of your upper leg). Roll from the bottom<br />
of your pelvis to above your knee. (NOT over your knee!)<br />
Chest Stretch<br />
Sit on one end of the roller and then lay back. Your head should<br />
be resting on the roller and your knees should be bent with your<br />
feet flat on the floor shoulder width apart to provide balance.<br />
Bring both arms up in front of you and bend both elbows to 90<br />
degrees, forearms will be parallel to the ground. Keeping your<br />
elbows bent, open your arms out to the sides and relax. Let<br />
gravity stretch the muscles of your chest and shoulders.<br />
Abdominal Strengthening (Beginner)<br />
Sit on one end of the roller and lay back so that your head is<br />
again supported on the roller. Reach your arms out to each side<br />
like a ‘T’. Have your knees shoulder width apart and bent approximately<br />
90 degrees with your feet flat on the ground. Begin by<br />
tightening your stomach muscles trying to pull your belly button<br />
to the back of your spine without tucking your tailbone under.<br />
Maintaining the neutral position of the spine slowly lift one knee<br />
up till your thigh is perpendicular to the ground then lower the<br />
leg back to the starting position. Alternate legs until fatigued.<br />
Abdominal Strengthening (Advanced)<br />
Lay in the same body position as in the beginner exercise, maintaining<br />
the neutral spine position. Begin with both knees bent<br />
and legs up so that your thighs are at 90 degrees to your body.<br />
Slowly lower one leg towards the floor. Without touching the<br />
floor, lift the leg back to the starting position and alternate legs.<br />
Maintain the neutral spine position throughout the entire exercise.<br />
For both abdominal exercises:<br />
A) Increase difficulty to an intermediate level move your arms to your sides<br />
B) For even more difficulty reach your arms directly over your head<br />
A. B.