Course Genie
Course Genie
Course Genie

Create successful ePaper yourself
Turn your PDF publications into a flip-book with our unique Google optimized e-Paper software.
<strong>Course</strong> <strong>Genie</strong> 2.4<br />
Customization and<br />
Localization
<strong>Course</strong> <strong>Genie</strong><br />
<strong>Course</strong> <strong>Genie</strong> - Customization and Localization<br />
Overview ........................................................................................................................................................ 3<br />
Overview...................................................................................................................................................... 4<br />
Localization............................................................................................................................................................. 4<br />
Schemes................................................................................................................................................................. 5<br />
Creating/Modifying Schemes....................................................................................................................... 6<br />
Adding new design schemes....................................................................................................................... 7<br />
The Buttons Directory.................................................................................................................................. 9<br />
The CSS stylesheet..................................................................................................................................... 9<br />
Warning - Design Schemes and <strong>Course</strong> <strong>Genie</strong> updates ! .................................................................................... 10<br />
Sections of the stylesheet..................................................................................................................................... 10<br />
Main...................................................................................................................................................................... 10<br />
Links ..................................................................................................................................................................... 10<br />
Tables................................................................................................................................................................... 10<br />
Display Formats.................................................................................................................................................... 10<br />
Questions ............................................................................................................................................................. 10<br />
Popups ................................................................................................................................................................. 10<br />
Header.................................................................................................................................................................. 10<br />
Logo ..................................................................................................................................................................... 10<br />
Index..................................................................................................................................................................... 10<br />
Table of Contents ................................................................................................................................................. 11<br />
Main Content ........................................................................................................................................................ 11<br />
Footer ................................................................................................................................................................... 11<br />
The XML stylesheet................................................................................................................................... 12<br />
Warning! ............................................................................................................................................................... 12<br />
Element ................................................................................................................................................................ 12<br />
Description............................................................................................................................................................ 12<br />
Adding a logo to every page...................................................................................................................... 17<br />
Info.string................................................................................................................................................... 18<br />
Upgrading Existing Schemes .................................................................................................................... 19<br />
Upgrading existing schemes from previous versions................................................................................ 20<br />
Creating Localizations................................................................................................................................23<br />
Adding new localizations ........................................................................................................................... 24<br />
The .strings files ........................................................................................................................................ 27<br />
CGMedic.................................................................................................................................................... 28<br />
Map.dat file ................................................................................................................................................ 28<br />
Documentation .......................................................................................................................................... 28<br />
Schemes.................................................................................................................................................... 29<br />
Styles.xml ............................................................................................................................................................. 29<br />
CGLocale.js .......................................................................................................................................................... 29<br />
Button images....................................................................................................................................................... 29<br />
Samples................................................................................................................................................................ 29<br />
page 2 of 29
<strong>Course</strong> <strong>Genie</strong><br />
Overview<br />
page 3 of 29
<strong>Course</strong> <strong>Genie</strong><br />
Overview<br />
Localization<br />
Every resource that can be localized is found in a language subdirectory within the resources directory<br />
of the <strong>Course</strong> <strong>Genie</strong> installation. The name of the language directory is the languages ISO language<br />
code.<br />
The image below shows directory structure for the English language, it contains the documentation,<br />
samples, schemes, basically anything which can be translated.<br />
Particular locales can also be support by appending the ISO country code the directory name, for<br />
example the French language code is 'fr' so if we were creating a generic French translation the
<strong>Course</strong> <strong>Genie</strong><br />
in the 'fr.lproj' directory <strong>Course</strong> <strong>Genie</strong> will look in the Englsh 'en.lproj' directory and use that resource<br />
since the English directory and resources are always guaranteed to be there.<br />
For more specifc information on how to create a localization see the 'Creating Localizations' section later<br />
on in this document.<br />
Schemes<br />
The changes to support localization affects the Schemes which used to be located in the 'Config'<br />
directory which has now been removed.<br />
Schemes are located within each languages directory as you could see from the image above.<br />
Shemes used to be registered in <strong>Course</strong> <strong>Genie</strong> by adding them to a file named 'Schemes.dat', this is no<br />
longer required.<br />
When <strong>Course</strong> <strong>Genie</strong> loads it will search all installed language packs and find any schemes they contain.<br />
All the schemes will be displayed in the settings dialog with a prefix before their names identifying<br />
which language pack they belong to.<br />
<strong>Course</strong> <strong>Genie</strong> uses a specific file named 'Info.string' contained in every scheme to identify it as a<br />
scheme, it also provides the name of the scheme, a short description and what character encoding the<br />
scheme will cause <strong>Course</strong> <strong>Genie</strong> to use when generating a course.<br />
This method allows the scheme directories be named anything you choose.<br />
As mentioned above Schemes modify the way <strong>Course</strong> <strong>Genie</strong> generates a course, the character encoding<br />
was one example. They also provide information to the generation process about the names and<br />
dimensions of the images used for the navigation buttons and any localized text used in the generation<br />
process, for example the 'Table of contents' that is used in the generated HTML is provided by the<br />
scheme.<br />
For more details on creating a new scheme see the 'Creating/Modifying Schemes' section below. For<br />
more information of the localization aspects of a scheme see the 'Creating Localizations' section.<br />
-o--o--o-<br />
page 5 of 29
<strong>Course</strong> <strong>Genie</strong><br />
Creating/Modifying Schemes<br />
page 6 of 29
<strong>Course</strong> <strong>Genie</strong><br />
Adding new design schemes<br />
You can choose from several design schemes using the dropdown menu located on the General tab of<br />
the Settings dialog. For more details see the topic Choosing a design scheme.<br />
It's possible to add your own design schemes to this dropdown menu, for example to allow a different<br />
scheme for each department or faculty.<br />
Schemes are located in the language specific directory in the resources directory of the <strong>Course</strong> <strong>Genie</strong><br />
installation. See image below.<br />
Within each Scheme there are several items:<br />
• buttons<br />
This directory contains the button images which are used in the generated course, for<br />
example navigation buttons, buttons used with the selftest questions, etc.<br />
See the Buttons Directory topic below for more details.<br />
• cg.css<br />
This file is the style sheet which controls the appearance of the generate course.<br />
See the CSS Stylesheet topic below for more details.<br />
• cgloacle.js<br />
This file contains text used within the JavaScript for selftest questions.<br />
See the Schemes topic in the Creating Localization section below.<br />
• Info.strings<br />
This file contains information aout the Scheme which <strong>Course</strong> <strong>Genie</strong> uses to add it to the<br />
list of Schemes in the settings dialog.<br />
See the Info.strings topic below.<br />
page 7 of 29
<strong>Course</strong> <strong>Genie</strong><br />
• styles.xml<br />
This file contain information about the Scheme used during generation of a course,<br />
including dimensions and filenames for the button images in the 'buttons' directory, text<br />
strings used in the generated course and various other properties.<br />
See the XML Stylesheet topic below for more details.<br />
See also Schemes topic in the Creating Localizations section below.<br />
To create a new scheme:<br />
• Copy an existing Scheme directory, for instance 'Standard' and paste a copy of it back<br />
into the Schemes directory<br />
• Rename the copied directory (for example, to 'My Scheme')<br />
• Edit the file Info.strings (using notepad or a text editor that supports 'Unicode UTF-16<br />
Big Endian' character encoding). Change the Scheme name and description to their new<br />
values and if changing the Character Encoding modify that also.<br />
• Edit the file cg.css in your new scheme directory to change colours and font properties<br />
• Edit the button state images in the buttons subdirectory of your new scheme directory<br />
When <strong>Course</strong> <strong>Genie</strong> is next restarted, the new scheme will be shown in the dropdown menu.<br />
For more information on editing the files, see their topics below.<br />
-o--o--o-<br />
page 8 of 29
<strong>Course</strong> <strong>Genie</strong><br />
The Buttons Directory<br />
The buttons directory contains the image files used in the generated course.<br />
For each button used in the navigation and questions there are two states, up and down. When a user's<br />
cursor is over a button in a browser the buttons down state will be show, otherwise it will display the up<br />
state.<br />
You will also find here the image files used for the links to media player downloads, such as Flash,<br />
QuickTime, etc.<br />
There is also an optional logo image which is used on each page if that option is set in the XML Style<br />
sheet.<br />
Each file in this directory is listed in the XML Stylesheet, its filename and dimensions in pixels.<br />
See the XML Stylesheet topic for more information.<br />
The CSS stylesheet<br />
Many aspects of the generated HTML are controlled by the CSS stylesheet cg.css. Each <strong>Course</strong> <strong>Genie</strong><br />
design scheme has its own version of the cg.css file.<br />
The stylesheet for the chosen scheme is copied to the current output folder each time a course is<br />
generated. If you want to change the style of all generated courses, then edit the stylesheet in the<br />
scheme folder. If you want to change the style of a particular course that you have already generated,<br />
then edit the stylesheet in that course's own folder.<br />
For more information on implementing a new design scheme see the topic Adding new design schemes.<br />
page 9 of 29
<strong>Course</strong> <strong>Genie</strong><br />
Although a stylesheet is a plain text file and can be edited using a text editor such as Notepad, the task<br />
of editing a large stylesheet such as this one is made much easier if you use a specialist stylesheet<br />
editor such as StyleMaster ( www.westciv.com/style_master/index.html ).<br />
You should back up the CSS file in the scheme directory before you make any changes. Since the<br />
stylesheet controls almost every aspect of the layout, even minor changes to it can have drastic and<br />
unexpected effects on the presentation of the HTML if you are not careful.<br />
Warning - Design Schemes and <strong>Course</strong> <strong>Genie</strong> updates !<br />
Whenever updated versions of <strong>Course</strong> <strong>Genie</strong> versions are released, the Design Schemes and CSS<br />
stylesheets in the Config directory have often been extended and updated to support the new release.<br />
If you are making use of stylesheets that you have customised, you will need to start with one of the<br />
new standard stylesheets and customise it in a similar way. If you overwrite one of the new stylesheets<br />
with one from a previous <strong>Course</strong> <strong>Genie</strong> version, you may get unpredictable results.<br />
Sections of the stylesheet<br />
The stylesheet is divided into the following sections:<br />
Main<br />
In the body selector you can edit the background color, text color and font size. All other font sizes in<br />
the stylesheet are relative to this one, so changing this font size is the easiest way of scaling all fonts<br />
up or down. In this section there are also selectors for all the headings which you can use to control<br />
relative heading sizes.<br />
Links<br />
In this section you can control the colors of all links.<br />
Tables<br />
Controls layout and border width of all tables.<br />
Display Formats<br />
Controls layout of boxtext, paneltext, quotetext, definitions and literals.<br />
Questions<br />
Controls layout of questions and question feedback.<br />
Popups<br />
Controls layout of popups.<br />
Header<br />
Controls layout of the header section running across the top of each page that includes the title and<br />
navigation buttons.<br />
Logo<br />
Controls layout of the optional logo image at the top of each page. Other aspects of the logo image,<br />
including whether it is displayed at all, are controlled in the XML stylesheet styles.xml.<br />
Index<br />
Controls layout of the list of pages shown on the Index page index.htm.<br />
page 10 of 29
<strong>Course</strong> <strong>Genie</strong><br />
Table of Contents<br />
Controls layout of the optional navigation bar shown at the left hand side of each page. You don't need<br />
to edit the stylesheet to control whether this bar is shown at all or to set the width, as these can both<br />
be controlled using the setting on the Navigation tab of the <strong>Course</strong> <strong>Genie</strong> Settings dialog.<br />
Main Content<br />
Controls layout of the main content area. The selector #main-content-withtoc controls layout for pages<br />
with a left navigation bar, while #main-content-notoc controls layout for pages without a left navigation<br />
bar.<br />
Footer<br />
Controls layout of the footer running across the bottom of each HTML page. The selector #footerwithtoc<br />
controls layout for pages with a left navigation bar, while #footer-notoc controls layout for<br />
pages without a left navigation bar.<br />
-o--o--o-<br />
page 11 of 29
<strong>Course</strong> <strong>Genie</strong><br />
The XML stylesheet<br />
Some aspects of the generated HTML are controlled by the XML stylesheet styles.xml, located in the<br />
root of the scheme.<br />
This XML file is used by the <strong>Course</strong> <strong>Genie</strong> engine when it generates the HTML pages. Individual HTML<br />
pages do not access this stylesheet directly in the same way as they do CSS files, so this does not need<br />
to be copied to the output folder.<br />
Warning!<br />
Back up this file before you make any changes. If the file is altered in such a way that it is no longer<br />
well-formed XML, the <strong>Course</strong> <strong>Genie</strong> engine will not run.<br />
Element<br />
Localization<br />
output_encoding<br />
text_direction<br />
langstrings<br />
Description<br />
Determines the character encoding used for the<br />
generated HTML<br />
Determines the text direction for the HTML,<br />
values are 'ltr' or 'rtl'<br />
Text used during the generation process<br />
See the Schemes topic of the Creating<br />
Localizations section for details on the above<br />
elements<br />
Logo<br />
logo\filename<br />
logo\width<br />
logo\height<br />
logo\show-on-indexpage<br />
logo\show-on-contentpages<br />
logo\alt<br />
logo\url<br />
Filename of logo image<br />
Width of logo image<br />
Height of logo image<br />
Determines whether logo is shown on index<br />
page<br />
Determines whether logo is shown on content<br />
pages<br />
Alt text for logo image<br />
URL for logo image<br />
Selftests<br />
questiontable\feedback-correct Default correct feedback<br />
questiontable\feedback-incorrect Default incorrect feedback<br />
questiontab Td/x(textenry Tdboxk-c( Tdes )]TJEMC /P BDC<br />
page 12 of 29
<strong>Course</strong> <strong>Genie</strong><br />
Element<br />
Description<br />
questions<br />
questiontable\answer-labels Answer labelling - can be a), A), i) or 1)<br />
Buttons<br />
prevbutton\image-topup<br />
prevbutton\image-topdown<br />
prevbutton\image-botup<br />
prevbutton\image-botdown<br />
prevbutton\width<br />
prevbutton\height<br />
Image file for previous button at top in up state<br />
Image file for previous button at top in down<br />
state<br />
Image file for previous button at bottom in up<br />
state<br />
Image file for previous button at bottom in<br />
down state<br />
Width of previous button image<br />
Height of previous button image<br />
checkbutton\image-up<br />
checkbutton\image-down<br />
checkbutton\width<br />
checkbutton\height<br />
Image file for question check button in up state<br />
Image file for question check button in down<br />
state<br />
Width of question check button image<br />
Height of question check button image<br />
closebutton\image-up<br />
closebutton\image-down<br />
closebutton\width<br />
closebutton\height<br />
Image file for close button in up state<br />
Image file for close button in down state<br />
Width of close button image<br />
Height of close button image<br />
contentsbutton\image-topup<br />
contentsbutton\image-topdown<br />
contentsbutton\image-botup<br />
contentsbutton\image-botdown<br />
contentsbutton\width<br />
contentsbutton\height<br />
Image file for contents button at top in up state<br />
Image file for contents button at top in down<br />
state<br />
Image file for contents button at bottom in up<br />
state<br />
Image file for contents button at bottom in<br />
down state<br />
Width of contents button image<br />
Height of contents button image<br />
nextbutton\image-topup<br />
nextbutton\image-topdown<br />
nextbutton\image-botup<br />
Image file for next button at top in up state<br />
Image file for next button at top in down state<br />
Image file for next button at bottom in up state<br />
page 13 of 29
<strong>Course</strong> <strong>Genie</strong><br />
Element<br />
nextbutton\image-botdown<br />
nextbutton\width<br />
nextbutton\height<br />
Description<br />
Image file for next button at bottom in down<br />
state<br />
Width of next button image<br />
Height of next button image<br />
savebutton\image-up<br />
savebutton\image-down<br />
savebutton\width<br />
savebutton\height<br />
Image file for save button in up state<br />
Image file for save button in down state<br />
Width of save button image<br />
Height of save button image<br />
Other Elements<br />
audio\playerwidth<br />
audio\playerheight<br />
Default width of audio player<br />
Default height of audio player<br />
flash\width<br />
flash\height<br />
Default width of Flash movie<br />
Default height of Flash movie<br />
image\border<br />
Width of border round images<br />
include\width<br />
include\height<br />
Default width of Include frame<br />
Default height of Include frame<br />
longdesc\window-title<br />
longdesc\bgcolour<br />
longdesc\linktext<br />
longdesc\backtext<br />
Title of long description window<br />
Background color of long description window<br />
Text that links to long description window<br />
Text that links back to original window<br />
popup\big-width<br />
popup\big-height<br />
popup\medium-width<br />
popup\medium-height<br />
popup\small-width<br />
popup\small-height<br />
popup\scrolling-width<br />
popup\scrolling-height<br />
Width of popups specified as big<br />
Height of popups specified as big<br />
Width of popups specified as medium<br />
Height of popups specified as medium<br />
Width of popups specified as small<br />
Height of popups specified as small<br />
Width of popups specified as scrolling<br />
Height of popups specified as scrolling<br />
page 14 of 29
<strong>Course</strong> <strong>Genie</strong><br />
Element<br />
popup\window-title<br />
popup\bgcolour<br />
Description<br />
Title text of popup windows<br />
Background color of popup windows<br />
video\playerwidth<br />
video\playerheight<br />
video\controlheight<br />
Default width of video player<br />
Default height of video player<br />
Height of video player controls<br />
Players<br />
flashplayer\image<br />
flashplayer\width<br />
flashplayer\height<br />
flashplayer\alt<br />
flashplayer\url<br />
Filename of Flash player download image<br />
Width of Flash player download image<br />
Height of Flash player download image<br />
Alt text for Flash player download image<br />
URL for Flash player download image<br />
realplayer\image<br />
realplayer\width<br />
realplayer\height<br />
realplayer\alt<br />
realplayer\url<br />
Filename of RealMedia player download image<br />
Width of RealMedia player download image<br />
Height of RealMedia player download image<br />
Alt text for RealMedia player download image<br />
URL for RealMedia player download image<br />
quicktimeplayer\image<br />
quicktimeplayer\width<br />
quicktimeplayer\height<br />
quicktimeplayer\alt<br />
quicktimeplayer\url<br />
Filename of QuickTime player download image<br />
Width of QuickTime player download image<br />
Height of QuickTime player download image<br />
Alt text for QuickTime player download image<br />
URL for QuickTime player download image<br />
winmediaplayer\image<br />
winmediaplayer\width<br />
winmediaplayer\height<br />
winmediaplayer\alt<br />
winmediaplayer\url<br />
Filename of Windows Media player download<br />
image<br />
Width of Windows Media player download image<br />
Height of Windows Media player download<br />
image<br />
Alt text for Windows Media player download<br />
image<br />
URL for Windows Media player download image<br />
page 15 of 29
<strong>Course</strong> <strong>Genie</strong><br />
-o--o--o-<br />
page 16 of 29
<strong>Course</strong> <strong>Genie</strong><br />
Adding a logo to every page<br />
You can set up <strong>Course</strong> <strong>Genie</strong> so that it adds a logo image, optionally hyperlinked to a URL of your<br />
choice, to the top of every page. The image is automatically inserted between the blue title bar and the<br />
start of the page content, so short wide logos work better than tall thin ones.<br />
To set this up, you first copy the logo image into the buttons subdirectory of each scheme directory,<br />
then edit the Logo entries in the styles.xml stylesheet to reflect the required logo name, width, height,<br />
alt text, url, and whether it is shown on index and content pages.<br />
-o--o--o-<br />
page 17 of 29
<strong>Course</strong> <strong>Genie</strong><br />
Info.string<br />
The Info.strings file is used to identify the scheme to <strong>Course</strong> <strong>Genie</strong>.<br />
It contains three line of text which <strong>Course</strong> <strong>Genie</strong> will read when loading the Schemes.<br />
Scheme.Name is used in <strong>Course</strong> <strong>Genie</strong> to present the Scheme to the user in the Settings dialog, the<br />
name will be prefixed with the name of the language pack it is contained in.<br />
Scheme.Description provides a short description of the Scheme, currently this property is not shown in<br />
the user interface but may be used in a future version of <strong>Course</strong> <strong>Genie</strong>.<br />
Scheme.CharacterEncoding should be set to the character encoding that is defined in the XML<br />
Stylesheet, this is also currently not displayed in the user interface.<br />
To edit this file you will need to use a text editor that supports Unicode UTF-16 Big Endian character<br />
encoding. Notepad in Windows 2000 and Windows XP suports this encoding.<br />
-o--o--o-<br />
page 18 of 29
<strong>Course</strong> <strong>Genie</strong><br />
Upgrading Existing Schemes<br />
page 19 of 29
<strong>Course</strong> <strong>Genie</strong><br />
Upgrading existing schemes from previous versions<br />
If you have customized a scheme from a previous version of <strong>Course</strong> <strong>Genie</strong> it will be necessay to update<br />
it for it to work with this release of <strong>Course</strong> <strong>Genie</strong>.<br />
Your existing customization of the CSS and/or images in the buttons directory can be used without<br />
modification, however, it is required that you make a couple of additions to the scheme for <strong>Course</strong><br />
<strong>Genie</strong> to recognize it.<br />
Schemes are located in the language specific directory in the resources directory of the <strong>Course</strong> <strong>Genie</strong><br />
installation. See image below.<br />
First you will need to copy your existing Scheme to the new Schemes sub-directory.<br />
<strong>Course</strong> <strong>Genie</strong> uses a specific file named 'Info.string' contained in every scheme to identify it as a<br />
scheme, it also provides the name of the scheme, a short description and which character encoding the<br />
scheme will cause <strong>Course</strong> <strong>Genie</strong> to use when generating a course.<br />
This file removes the requirement to add new schemes to 'schemes.dat' as you would have done in the<br />
previous version. This method also allows the scheme directories be named anything you choose.<br />
page 20 of 29
<strong>Course</strong> <strong>Genie</strong><br />
To begin updating you scheme simply copy an 'Info.strings' file from one of the supplied schemes and<br />
paste it in to your scheme directory, then edit the file using Notepad and update the name and<br />
description to suite your scheme. If you require Unicode UTF-8 encoding for your scheme update the<br />
character encoding to "UTF-8".<br />
Schemes modify the way <strong>Course</strong> <strong>Genie</strong> generates a course, the character encoding is one example.<br />
They also provide information to the generation process about the names and dimensions of the images<br />
used for the navigation buttons and any localized text used in the generation process, for example the<br />
'Table of contents' that is used in the generated HTML is provided by the scheme. This information is<br />
contained in the file 'styles.xml'. If you have replaced the button images you will likely be familiar with<br />
this file as you may have edited the dimensions specified here for the the display of the button images.<br />
There has been some additions to the 'styles.xml' file which you will need to add to your schemes<br />
'styles.xml' file.<br />
A snippet from the top of the 'styles.xml' file from a previous version of <strong>Course</strong> <strong>Genie</strong> looks like:<br />
<br />
<br />
<br />
<br />
en<br />
Table of Contents<br />
True<br />
False<br />
Your browser does not support Javascript. You should still be able<br />
to navigate through these materials but selftest questions will not work.<br />
Layout table<br />
Skip to main content<br />
Next page<br />
Previous page<br />
Contents page<br />
Check your answer<br />
Close this window<br />
Save your answer<br />
Main layout table for two-column layout<br />
Choose...<br />
Your answer has been saved.<br />
<br />
<br />
<br />
And in the new version you will see we have added some more language strings and the encoding and<br />
text directions information. The comment for the section has changed from Language Strings to<br />
Localization.<br />
To update you existing 'styles.xml' you may simply copy the localization section from a 'styles.xml' file<br />
in one of the supplied schemes to your 'styles.xml' file replacing the 'Language Strings' section so that<br />
this section of your file looks like the snippet below.<br />
page 21 of 29
<strong>Course</strong> <strong>Genie</strong><br />
<br />
<br />
<br />
iso-8859-1<br />
ltr<br />
<br />
en<br />
Table of Contents<br />
True<br />
False<br />
Your browser does not support Javascript. You should still be able<br />
to navigate through these materials but selftest questions will not work.<br />
Layout table<br />
Skip to main content<br />
Next page<br />
Previous page<br />
Contents page<br />
Check your answer<br />
Close this window<br />
Save your answer<br />
Main layout table for two-column layout<br />
Choose...<br />
Your answer has been saved.<br />
<strong>Course</strong>:<br />
Content generated as a Blackboard<br />
package:<br />
Content generated as a WebCT package:<br />
Content generated as a WebCT IMS<br />
package:<br />
Content generated as a LRN IMS package:<br />
Content generated as a SCORM v1.2<br />
package:<br />
Content generated as a SCORM 2004<br />
package:<br />
Content generated as normal web<br />
pages:<br />
HTML Generated OK.<br />
<br />
<br />
<br />
Once you have completed updating 'styles.xml' and added the 'Info.strings' file you can start or restart<br />
<strong>Course</strong> <strong>Genie</strong> and the scheme will be available to you from the <strong>Course</strong> <strong>Genie</strong> Settings dialog.<br />
For more details about the structure of a scheme see the 'Creating/Modifying Schemes' section above.<br />
For more information of the localization aspects of a scheme see the 'Creating Localizations' section.<br />
Please email cgsupport@wimba.com if you require any assistance.<br />
-o--o--o-<br />
page 22 of 29
<strong>Course</strong> <strong>Genie</strong><br />
Creating Localizations<br />
page 23 of 29
<strong>Course</strong> <strong>Genie</strong><br />
Adding new localizations<br />
As described in the introduction every language specific resource is contained in a directory for the<br />
language it is used with.<br />
Within each localization there are several items:<br />
• documentation<br />
This directory contains the <strong>Course</strong> <strong>Genie</strong> documentation PDF files and the Windows Help<br />
file.<br />
• images<br />
This directory contains images used in the interface, for example the 'Question' image<br />
that is used in the <strong>Course</strong> <strong>Genie</strong> questions table in the Word document.<br />
• media samples<br />
This directory contains the media files used to generate the sample courses.<br />
• sample output<br />
This directory contains the generated html sample courses.<br />
• schemes<br />
This directory contatins the schemes.<br />
• templates<br />
This directory contains the template <strong>Course</strong> <strong>Genie</strong> Word documents<br />
• word source documents<br />
This directory contains the Word documents used to create the sample output<br />
• cgMedic.doc<br />
This file is the diagnostic utility for <strong>Course</strong> <strong>Genie</strong>, it uses the cgm.dot template.<br />
• .string files<br />
These files contain the text used in the User Interface.<br />
page 24 of 29
<strong>Course</strong> <strong>Genie</strong><br />
To create a new localization:<br />
• Copy the 'en.lproj' directory and paste a copy of it back into the resources directory<br />
• Rename the copied directory to language you wish to create, see the table below for a<br />
list of possible localizations.<br />
• Translate the.strings files (using notepad or a text editor that supports 'Unicode UTF-16<br />
Big Endian' character encoding). See the .string files topic below for more information<br />
• Translate the cgMedic document. See the CGMedic topic below for more information.<br />
• Modify the map.dat file to suit the style names used in your language. See the Map.dat<br />
toic for more information.<br />
• Translate the documentation. See the Documentation topic below for more details.<br />
• Translate the schemes. See the Schemes topic below for more information.<br />
• Translate the sample files. See the Sample Files topic below for more information.<br />
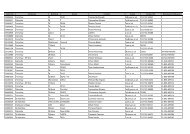
The table below list the Word interface language and the localization directory name which should be<br />
used for the language.<br />
Language<br />
Afrikaans<br />
Arabic<br />
Basque<br />
Dutch (Belgum)<br />
French (Belgium)<br />
French (Switzerland)<br />
Bulgarian<br />
Byelorussian<br />
Catalan<br />
Croatian<br />
Czech<br />
Danish<br />
Dutch<br />
English (Australia)<br />
English (Canada)<br />
English (New-Zealand)<br />
English (South Africa)<br />
English (United Kingdom)<br />
English (United States)<br />
Estonian<br />
Farsi<br />
Finnish<br />
French (France)<br />
French (Quebec)<br />
German<br />
German (Switzerland)<br />
Greek<br />
Hebrew<br />
Hungarian<br />
Italian<br />
Italian (Switzerland)<br />
Icelandic<br />
Japanese<br />
Korean<br />
Latvian<br />
Directory Name<br />
af.lproj<br />
ar.lproj<br />
eu.lproj<br />
nl_BE.lproj<br />
fr_BE.lproj<br />
fr_CH.lproj<br />
bg.lproj<br />
be.lproj<br />
ca.lproj<br />
hr.lproj<br />
cs.lproj<br />
da.lproj<br />
nl.lproj<br />
en_AU.lproj<br />
en_CA.lproj<br />
en_NZ.lproj<br />
en_SA.lproj<br />
en_UK.lproj<br />
en.lproj<br />
et.lproj<br />
fa.lproj<br />
fi.lproj<br />
fr.lproj<br />
fr_CA.lproj<br />
de.lproj<br />
de_CH.lproj<br />
el.lproj<br />
he.lproj<br />
hu.lproj<br />
it.lproj<br />
it_CH.lproj<br />
is.lproj<br />
ja.lproj<br />
ko.lproj<br />
lv.lproj<br />
page 25 of 29
<strong>Course</strong> <strong>Genie</strong><br />
Macedonian<br />
Malaysian<br />
Norwegian<br />
Polish<br />
Portuguese (Brazil)<br />
Portuguese (Potugal)<br />
Romanian<br />
Russian<br />
Serbian<br />
Chinese<br />
Slovak<br />
Slovenian<br />
Spanish<br />
Spanish (Mexico)<br />
Swedish<br />
Tsonga<br />
Tswana<br />
Turkish<br />
Ukrainian<br />
Venda<br />
Xhosa<br />
Zulu<br />
mk.lproj<br />
ms.lproj<br />
no.lproj<br />
pl.lproj<br />
pt_BR.lproj<br />
pt.lproj<br />
ro.lproj<br />
ru.lproj<br />
sr.lproj<br />
zh.lproj<br />
sk.lproj<br />
sl.lproj<br />
es.lproj<br />
es_MX.lproj<br />
sv.lproj<br />
ts.lproj<br />
ts.lproj<br />
tr.lproj<br />
uk.lproj<br />
ve.lproj<br />
xh.lproj<br />
zu.lproj<br />
-o--o--o-<br />
page 26 of 29
<strong>Course</strong> <strong>Genie</strong><br />
The .strings files<br />
The .string files in the root of the language directory contain all of the text using in the user interface.<br />
When translating the stings files it is very important that the filenames remain un-changed. If the<br />
names are changed <strong>Course</strong> <strong>Genie</strong> will not be able to locate them.<br />
Using the file Welcome.strings as a small example, you need only translate the text between the quotes<br />
after the = sign. Do not change the text before the = sign, <strong>Course</strong> <strong>Genie</strong> uses this to locate the require<br />
text for the interface, if you change this text <strong>Course</strong> <strong>Genie</strong> will no longer be recognize the text.<br />
To edit these files you will need to use a text editor that supports Unicode UTF-16 Big Endian character<br />
encoding. Notepad in Windows 2000 and Windows XP suports this encoding.<br />
-o--o--o-<br />
page 27 of 29
<strong>Course</strong> <strong>Genie</strong><br />
CGMedic<br />
The CGMedic utility consists of the CGMedic.doc file and an accompanying cgm.dot template.<br />
Only the CGMedic.doc file requires translating. To edit the file you will want to open it in Word,<br />
however, you need to hold down the 'Shift' key whilst it is opening. This prevents the macros from<br />
running and filling in the details which you will not want in a file that is to be distributed.<br />
Once you have the document open you may translate the text and update the images, pay special<br />
attention to the text in the table on the second page. The text in the second column of this table has<br />
Word Bookmarks around it, these bookmarks are used by the cgm.dot template to fill in the<br />
information, and if they are missing no information will be filled in.<br />
Map.dat file<br />
You can customize <strong>Course</strong> <strong>Genie</strong> so that any built-in Word paragraph style or any user-defined<br />
paragraph style maps onto any <strong>Course</strong> <strong>Genie</strong> style.<br />
This is controlled by the plain text file map.dat. This file consists of comma-separated pairs of style<br />
names.<br />
For example the default setup is for the built-in Heading 1 style to be mapped onto the <strong>Course</strong> <strong>Genie</strong><br />
cgHeading style, and for the built-in Heading 2 style to be mapped onto the <strong>Course</strong> <strong>Genie</strong><br />
cgSubHeading style. This mapping is represented by the following entries:<br />
Heading 1,cgHeading<br />
Heading 2,cgSubHeading<br />
You might want to change this so that Heading 1 mapped onto cgSectionTitle and Heading 2 mapped<br />
onto cgPageTitle. To do this you would change the entries in map.dat to:<br />
Heading 1,cgSectionTitle<br />
Heading 2,cgPageTitle<br />
Since the style names may differ for languages other than English you will want to update this file<br />
accordingly.<br />
You need to restart <strong>Course</strong> <strong>Genie</strong> to activate any changes to map.dat.<br />
Documentation<br />
The <strong>Course</strong> <strong>Genie</strong> documentation is written in Microsoft Word from which we create the Adobe PDF files.<br />
If you wish to translate the documentation you may start from a blank document and use the existing<br />
PDF files as a guide. Or you may request copies of the documentation in Word format by emailing<br />
cgsupport@wimba.com. When you email explain who you are and that you require the Word<br />
Documents for the documentation.<br />
We currently use Adobe Acrobat Professional to create the PDF files as this allows us to maintain the<br />
links in the Table of Contents and map our Heading Styles to PDF Bookmarks. We would recommend<br />
that you do the same, or use another utility that provides the same functionality.<br />
Part of the documentation is the quick tutorials, these refer to a Word document in the Word Source<br />
Docs directory. You will want to translate this file also to suit your updated tutorial.<br />
page 28 of 29
<strong>Course</strong> <strong>Genie</strong><br />
Schemes<br />
The <strong>Course</strong> <strong>Genie</strong> Schemes contain various resources which are language specific. To translate these<br />
you will need to edit the following files.<br />
Styles.xml<br />
This file contains a Language string section near the top of the file, you will need to edit this file and<br />
replace the text between the XML tags with you translated version.<br />
You may also want to change the character encoding used to generate the HTML, currently <strong>Course</strong><br />
<strong>Genie</strong> comes with the schemes in both ISO-8859-1 and Unicode UTF-8 character encoding so you can<br />
use either of these. If ISO-8859-1 is no use in your language you may remove these Schemes from<br />
your language pack.<br />
You can also change the direction of the text by modifying the contents of the Text_Direction tag, there<br />
are two possible values 'ltr' for Left-to-Right languages or 'rtl' for Right-to-Left languages. Currently<br />
<strong>Course</strong> <strong>Genie</strong> only support Left-to-Right Languages for the user interface text, but it is possible to<br />
create a scheme that will allow Right-to-Left content to be generate in the HTML.<br />
If you change the text direction you may also need to modify the cg.css stylesheet to suit the new<br />
layout. See the CSS stylesheet topic in the Creating/Modifying Schemes section above.<br />
CGLocale.js<br />
This file contains text which is used by the JavaScript file cgmain.js, the text is used in the <strong>Course</strong><br />
<strong>Genie</strong> questions in build responses for whether a question has been answered correctly. You will need<br />
to translate this text, again only translate the text within the quotes.<br />
Button images<br />
Most of the button images are language neutral however there are some that contain text which are<br />
used with the <strong>Course</strong> <strong>Genie</strong> questions, you will need to modify these images and add your translated<br />
text. If translating the text requires you to modify the dimension of the image you will need to update<br />
the dimensions in the styles.xml file. See the Creating/Modifying Schemes section above more details<br />
on modifying the styles.xml file.<br />
Samples<br />
The samples consist of the Word Source Docs, the Media Samples used in them and the Sample Output.<br />
Once you have translated the interface and the schemes you will want to translate these document and<br />
create the Sample Output in you language by generating the Source Documents with <strong>Course</strong> <strong>Genie</strong>.<br />
You may also wish to select alternative Media Samples appropriate to your language and update the<br />
Demo document accordingly. It is recommended that you use sample which do not have any copyright<br />
or redistribution restrictions.<br />
-o--o--o-<br />
page 29 of 29