USER MANUAL FOR F.I.O. INSTALLATION - Pietro Fiorentini
USER MANUAL FOR F.I.O. INSTALLATION - Pietro Fiorentini USER MANUAL FOR F.I.O. INSTALLATION - Pietro Fiorentini
F.I.O. User’s Manual 2.2.2 Installation on the pipeline or vertical circular support: If there is no Q-kit because the indirect measurement of the flow rate is not requested, is necessary to fix the ECU in another position. The position of the ECU can be selected according to the distance from the solenoid valves and the flow rate meter. Pict 1- Fix the two brackets with the nuts Pict 2- Cut a piece of stainless steel band. The length has to be measured as the circumference of the pipeline + 150 mm (6 inch) Pict 3- Pass one side of the stainless steel band in the endless-head as shown in pict 3 Pict 4- Pass the opposite side of the band on the slits of the bracket as shown in picture 4. Pict 5- Pass the band around the pipe and then insert it inside the endless-head, screwing the endless screw Pict 6- Adjust the bracket in the proper position and then fix it definitively Pict 7- Prepare the screws with the nut on the bracket. Pict 8- Install the ECU and fix the screws 1 4 7 ENGLISH F.I.O. User Manual – Ed.2. Rev.5 Page 8/ 53 The information contained in this document is confidential and the property of Pietro Fiorentini S.p.A. Technical data may undergo changes without notice 2 3 5 6 8
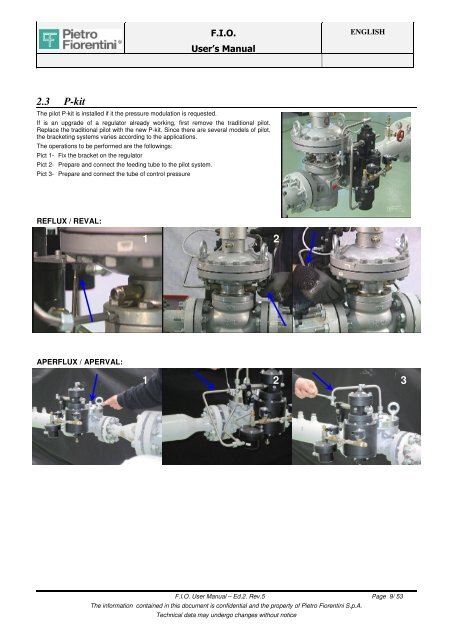
2.3 P-kit The pilot P-kit is installed if it the pressure modulation is requested. F.I.O. User’s Manual If is an upgrade of a regulator already working, first remove the traditional pilot. Replace the traditional pilot with the new P-kit. Since there are several models of pilot, the bracketing systems varies according to the applications. The operations to be performed are the followings: Pict 1- Fix the bracket on the regulator Pict 2- Prepare and connect the feeding tube to the pilot system. Pict 3- Prepare and connect the tube of control pressure REFLUX / REVAL: APERFLUX / APERVAL: ENGLISH 1 2 3 1 2 3 F.I.O. User Manual – Ed.2. Rev.5 Page 9/ 53 The information contained in this document is confidential and the property of Pietro Fiorentini S.p.A. Technical data may undergo changes without notice
- Page 1 and 2: F.I.O. User’s Manual F.I.O. USER
- Page 3 and 4: F.I.O. User’s Manual ENGLISH 7.2
- Page 5 and 6: F.I.O. User’s Manual 2. Installat
- Page 7: 2.2 ECU Electronic Control Unit 2.2
- Page 11 and 12: 3. Connections PROCEDURE STEP 2: F.
- Page 13 and 14: F.I.O. User’s Manual 3.2.5 Connec
- Page 15 and 16: 3.2.5.3 ECU B 2 nd stream version (
- Page 17 and 18: 3.2.5.5 Detail of connections on th
- Page 19 and 20: 4.2.2 External supply 230 Vac F.I.O
- Page 21 and 22: F.I.O. User’s Manual 6- Insert th
- Page 23 and 24: F.I.O. User’s Manual 5.2 Measurem
- Page 25 and 26: F.I.O. User’s Manual 6. Basic con
- Page 27 and 28: 7.1.1.1 Master Table Here are displ
- Page 29 and 30: 7.1.2 ECU F.I.O. User’s Manual EN
- Page 31 and 32: 7.1.2.4 Event In the page “Event
- Page 33 and 34: 7.1.2.8 Commissioning of the system
- Page 35 and 36: 7.1.2.12 Pressure compensation The
- Page 37 and 38: 7.2.1 Alarm configuration Enter the
- Page 39 and 40: F.I.O. User’s Manual ENGLISH ENCL
- Page 41 and 42: B.2 ECU B.2.1 Export of ECU configu
- Page 43 and 44: F.I.O. User’s Manual ENGLISH ENCL
- Page 45 and 46: F.I.O. User’s Manual ENCLOSURE D
- Page 47 and 48: F.I.O. User’s Manual ENCLOSURE E
- Page 49 and 50: F.I.O. User’s Manual Code (1) ELE
- Page 51 and 52: F.I.O. User’s Manual Code KIT FOR
- Page 53: OTHER 3 F.I.O. User’s Manual 1 2
2.3 P-kit<br />
The pilot P-kit is installed if it the pressure modulation is requested.<br />
F.I.O.<br />
User’s Manual<br />
If is an upgrade of a regulator already working, first remove the traditional pilot.<br />
Replace the traditional pilot with the new P-kit. Since there are several models of pilot,<br />
the bracketing systems varies according to the applications.<br />
The operations to be performed are the followings:<br />
Pict 1- Fix the bracket on the regulator<br />
Pict 2- Prepare and connect the feeding tube to the pilot system.<br />
Pict 3- Prepare and connect the tube of control pressure<br />
REFLUX / REVAL:<br />
APERFLUX / APERVAL:<br />
ENGLISH<br />
1 2 3<br />
1 2 3<br />
F.I.O. User Manual – Ed.2. Rev.5 Page 9/ 53<br />
The information contained in this document is confidential and the property of <strong>Pietro</strong> <strong>Fiorentini</strong> S.p.A.<br />
Technical data may undergo changes without notice


