FS-B2510 Start-Up Manual - FieldServer Technologies
FS-B2510 Start-Up Manual - FieldServer Technologies
FS-B2510 Start-Up Manual - FieldServer Technologies

You also want an ePaper? Increase the reach of your titles
YUMPU automatically turns print PDFs into web optimized ePapers that Google loves.
Sierra Monitor Company<br />
<strong>FieldServer</strong> X-25 <strong>Start</strong>-<strong>Up</strong> Guide<br />
APPLICABILITY & EFFECTIVITY<br />
Effective for all systems manufactured after April 2013<br />
Kernel Version: 6.10<br />
Document Revision: 0
<strong>FieldServer</strong> <strong>FS</strong>-X25 <strong>Start</strong>-<strong>Up</strong> Guide<br />
Table of Contents<br />
TABLE OF CONTENTS<br />
1 Equipment Set-<strong>Up</strong> .......................................................................................................................................... 3<br />
1.1 Supplied equipment....................................................................................................................................... 3<br />
1.2 Mounting ....................................................................................................................................................... 3<br />
1.3 Wiring ............................................................................................................................................................ 3<br />
1.3.1 Compliance with UL Regulations ........................................................................................................... 3<br />
1.4 Specifications ................................................................................................................................................. 4<br />
2 Product Description ....................................................................................................................................... 5<br />
2.1 Features ......................................................................................................................................................... 5<br />
2.2 LED Indicators ................................................................................................................................................ 5<br />
3 Connection to the Device ............................................................................................................................... 6<br />
3.1 Serial Connection ........................................................................................................................................... 6<br />
3.1.1 DB-9 Pinouts for RS-232 Connection ...................................................................................................... 6<br />
3.1.2 DB-9 Pinouts for RS-485 Connection ...................................................................................................... 7<br />
3.2 Ethernet Connection ...................................................................................................................................... 7<br />
4 Operation ....................................................................................................................................................... 8<br />
4.1 Record Identification Data ............................................................................................................................. 8<br />
4.2 Power up the device ...................................................................................................................................... 8<br />
4.3 Install and Run the Utility Software ............................................................................................................... 8<br />
4.4 Connect the PC to the <strong>FieldServer</strong> over the Ethernet port. ........................................................................... 8<br />
4.5 Identification of the <strong>FieldServer</strong> on the Network .......................................................................................... 8<br />
4.6 Connection to the <strong>FieldServer</strong> Using RUI (Ruinet)......................................................................................... 9<br />
4.7 <strong>Up</strong>load the Default Configuration ................................................................................................................. 9<br />
4.8 Change the Configuration File to Meet the Application ................................................................................ 9<br />
4.9 Download the updated Configuration file ..................................................................................................... 9<br />
4.10 Test and Commission the <strong>FieldServer</strong> .......................................................................................................... 10<br />
Appendix A. Troubleshooting Tips ....................................................................................................................... 11<br />
Appendix A.1. Connection to the <strong>FieldServer</strong> .......................................................................................................... 11<br />
Appendix A.2. Technical support ............................................................................................................................. 11<br />
Appendix A.3. Material Service Orders (MSO) Procedure ....................................................................................... 11<br />
Appendix B. Limited Warranty ............................................................................................................................. 12<br />
<strong>FieldServer</strong> <strong>Technologies</strong> 1991 Tarob Court Milpitas, California 95035 USA Web: www.fieldserver.com<br />
Tel: (408) 262 2299 Fax: (408) 262 2269 Toll Free: (888) 509 1970 email: support@fieldserver.com
<strong>FieldServer</strong> <strong>FS</strong>-X25 <strong>Start</strong>-<strong>Up</strong> Guide Page 3 of 12<br />
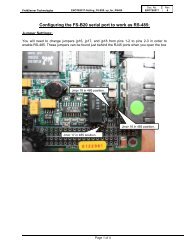
1 EQUIPMENT SET-UP<br />
1.1 Supplied equipment<br />
<strong>FS</strong>-X25 Series <strong>FieldServer</strong>.<br />
loaded with Modbus RTU driver, SMT Ethernet driver and any other drivers ordered. A default<br />
configuration file has already been loaded onto the <strong>FieldServer</strong>. Check the Driver <strong>Manual</strong> and the<br />
<strong>FieldServer</strong> Configuration <strong>Manual</strong> for further information on this file.<br />
USB Flash Drive loaded with:<br />
<br />
<br />
<br />
<br />
<br />
<br />
<br />
Accessories:<br />
<br />
<strong>FS</strong>-X25 Series <strong>Start</strong>-up Guide<br />
<strong>FieldServer</strong> Configuration <strong>Manual</strong><br />
<strong>FieldServer</strong> Utilities <strong>Manual</strong><br />
All <strong>FieldServer</strong> Driver <strong>Manual</strong>s<br />
Support Utilities<br />
Any additional folders related to special files configured for a specific <strong>FieldServer</strong><br />
Additional components as required - See Driver <strong>Manual</strong> Supplement for details<br />
7-ft Cat5 cable with RJ45 connectors at both ends (Part # <strong>FS</strong>-8915-10)<br />
Power Supply (Part # 69196)<br />
Power Cord (Part # 53029)<br />
<br />
DB9F/RJ45 Connection Adapter. (Part # <strong>FS</strong>-8917-02)<br />
Self-Adhesive feet (Part # 69178)<br />
1.2 Mounting<br />
The <strong>FS</strong>-X25 Series <strong>FieldServer</strong> is supplied with an<br />
accessory bag which allows selection of adhesive<br />
feet (for standing on a shelf) or mounting plates for<br />
wall or panel mount. A DIN Rail Mounting Kit (P/N<br />
<strong>FS</strong>-8915-28) may be ordered separately.<br />
Din Rail Clip<br />
– 2 required.<br />
1.3 Wiring<br />
5-30VDC must be connected to the terminal block<br />
1.3.1 Compliance with UL Regulations<br />
For UL compliance, the following instructions must be met when operating the <strong>FieldServer</strong>.<br />
<br />
<br />
<br />
The units shall be powered by listed LPS or Class 2 power supply suited to the expected operating temperature<br />
range.<br />
The interconnecting power connector and power cable shall:<br />
<br />
<br />
<br />
Comply with local electrical code.<br />
Be suited to the expected operating temperature range.<br />
Meet the current and voltage rating for the <strong>FieldServer</strong>/Net<br />
Furthermore, the interconnecting power cable shall:<br />
Be of length not exceeding 3.05m (118.3”)<br />
<br />
Be constructed of materials rated VW-1 or FT-1 or better.<br />
<strong>FieldServer</strong> <strong>Technologies</strong> 1991 Tarob Court Milpitas, California 95035 USA Web: www.fieldserver.com<br />
Tel: (408) 262 2299 Fax: (408) 262 2269 Toll Free: (888) 509 1970 email: support@fieldserver.com
<strong>FieldServer</strong> <strong>FS</strong>-X25 <strong>Start</strong>-<strong>Up</strong> Guide Page 4 of 12<br />
<br />
<br />
If the unit is to be installed in an operating environment with a temperature above 65 °C, it should be installed<br />
in a Restricted Access Area requiring a key or a special tool to gain access<br />
This device must not be connected to a LAN segment with outdoor wiring.<br />
1.4 Specifications<br />
Power requirements<br />
Multi-mode power adapter: 5V-30VDC, 2.5W, 120VAC to 9VDC power supply is provided<br />
Physical Dimensions<br />
(LxWxD):<br />
Weight:<br />
Field Connections<br />
4.55 x 4.50 x 1.35 in. (11.56 x 11.68 x 3.43 cm)<br />
0.4 lb (0.18 Kg)<br />
Ethernet Port<br />
10BaseT, 100BaseTX RJ45 (auto-sensing)<br />
Serial Port<br />
RS-232/RS-422/RS-485 switchable<br />
<strong>Up</strong> to 115K baud<br />
DB9 connector<br />
Drivers<br />
Drivers available for a wide range of Ethernet and serial protocols – check driver information sheet<br />
Environment:<br />
Operating Temperature:<br />
Humidity:<br />
Approvals:<br />
-40-85°C (-40 – 185°F)<br />
10 - 95% RH (non-condensing)<br />
UL<br />
FCC Class A, Part 15<br />
CE EN55022, EN 55024<br />
(Specifications subject to change without notice)<br />
<strong>FieldServer</strong> <strong>Technologies</strong> 1991 Tarob Court Milpitas, California 95035 USA Web: www.fieldserver.com<br />
Tel: (408) 262 2299 Fax: (408) 262 2269 Toll Free: (888) 509 1970 email: support@fieldserver.com
<strong>FieldServer</strong> <strong>FS</strong>-X25 <strong>Start</strong>-<strong>Up</strong> Guide Page 5 of 12<br />
2 PRODUCT DESCRIPTION<br />
2.1 Features<br />
<br />
<br />
<br />
<br />
<br />
<br />
<br />
<br />
Two DB-9 serial ports (defaulted to RS-485 unless specified differently at the time of purchase).<br />
Data communications speeds of 300 to 115200 baud supported.<br />
10/100BaseT Ethernet LAN interface (auto-sensing)<br />
Easy configuration via text editor or spreadsheet and the available utilities.<br />
OPC server available<br />
Configuration utility<br />
Diagnostic utility<br />
System integration services available<br />
2.2 LED Indicators<br />
Ethernet connection – Tx/Rx communication activity<br />
Green LED – 10/100 indicator<br />
LED on: 100 megabit connection<br />
LED off: 10 megabit connection<br />
Orange LED – Link activity indicator<br />
LED on: Link active<br />
LED off: Link inactive<br />
Serial connection – CPU communication activity<br />
Serial 1, Serial 2<br />
CPU communication activity<br />
Flashes to indicate communication<br />
activity on the associated serial<br />
port<br />
Flashes once a second to indicate<br />
normal operation.<br />
<strong>FieldServer</strong> <strong>Technologies</strong> 1991 Tarob Court Milpitas, California 95035 USA Web: www.fieldserver.com<br />
Tel: (408) 262 2299 Fax: (408) 262 2269 Toll Free: (888) 509 1970 email: support@fieldserver.com
<strong>FieldServer</strong> <strong>FS</strong>-X25 <strong>Start</strong>-<strong>Up</strong> Guide Page 6 of 12<br />
3 CONNECTION TO THE DEVICE<br />
3.1 Serial Connection<br />
A DB-9 cable should be connected between the Serial port on the <strong>FS</strong>-X25 and the serial port of the target serial<br />
device.<br />
The Serial 1 port can be configured as either P1 (for RS-232 connection) or R1 (for RS-485 connection). Likewise<br />
the Serial 2 port can be configured as P2 or R2. Note that if a P1 and a R1 connection is declared, the one declared<br />
second will cause a configuration error on the error screen.<br />
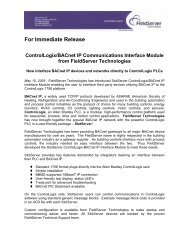
1<br />
9<br />
6<br />
5<br />
9<br />
Figure 1: Serial Connection Ports<br />
3.1.1 DB-9 Pinouts for RS-232 Connection<br />
Used to connect to DTE type devices.<br />
Typical null modem connection. (Used when<br />
Hardware RTS→CTS flow control is required).<br />
“3 wire” null modem connection (Used when Hardware<br />
RTS→CTS flow control is not required).<br />
The cable used (serial cross-over cable) is available at any electronics retailer/distributor.<br />
<strong>FieldServer</strong> <strong>Technologies</strong> 1991 Tarob Court Milpitas, California 95035 USA Web: www.fieldserver.com<br />
Tel: (408) 262 2299 Fax: (408) 262 2269 Toll Free: (888) 509 1970 email: support@fieldserver.com
<strong>FieldServer</strong> <strong>FS</strong>-X25 <strong>Start</strong>-<strong>Up</strong> Guide Page 7 of 12<br />
3.1.2 DB-9 Pinouts for RS-485 Connection<br />
Four Wire (full duplex multidrop)<br />
Two Wire (1/2 duplex)<br />
Note: The flow signals, RTS and CTS, should be connected as per diagram when unused to prevent loss of<br />
performance on the <strong>FieldServer</strong>.<br />
For users who do not wish to construct their own connector, we recommend using a DB-9 to screw block<br />
connector which can be purchased from L-Com, Inc.<br />
Item #: DGB9FT Ph: 1-800-341-5266 http://www.l-com.com/item.aspx?id=8141<br />
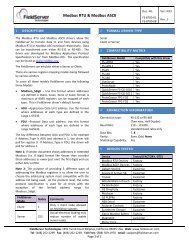
3.2 Ethernet Connection<br />
The <strong>FS</strong>-X25 Ethernet port automatically senses an uplink connection, and may therefore be connected to a PC or a<br />
hub/switch using either a crossover cable (not supplied) or a direct Ethernet cable (supplied).<br />
Figure 2: Ethernet Connection port<br />
<strong>FieldServer</strong> <strong>Technologies</strong> 1991 Tarob Court Milpitas, California 95035 USA Web: www.fieldserver.com<br />
Tel: (408) 262 2299 Fax: (408) 262 2269 Toll Free: (888) 509 1970 email: support@fieldserver.com
<strong>FieldServer</strong> <strong>FS</strong>-X25 <strong>Start</strong>-<strong>Up</strong> Guide Page 8 of 12<br />
4 OPERATION<br />
4.1 Record Identification Data<br />
Each <strong>FS</strong>-x25 has a unique serial number and MAC address located on the underside of the unit. These numbers<br />
should be recorded as they may be required for technical support.<br />
Serial Number: __________________________________________________<br />
MAC Address: __________________________________________________<br />
4.2 Power up the device<br />
<br />
Apply power to the device. Ensure that the power supply used complies with the specifications provided in<br />
Section 1.3<br />
4.3 Install and Run the Utility Software<br />
<br />
Plug the supplied USB flash drive into the USB port on a PC/laptop. Open Index.html to get the menu of<br />
options, run the Install option and follow the installation instructions.<br />
<br />
Once installed, the <strong>FieldServer</strong> Utilities can be located in the Windows <strong>Start</strong> menu and as a desktop icon.<br />
4.4 Connect the PC to the <strong>FieldServer</strong> over the Ethernet port.<br />
<br />
Use the supplied Cat5 UTP Ethernet cable to connect between the N1 port of the <strong>FieldServer</strong> and the hub.<br />
Refer to Section 3.2 for more information.<br />
<br />
<br />
Disable any wireless Ethernet adapters on the PC/Laptop,<br />
It is important that the PC/Laptop is on the same subnet as the <strong>FieldServer</strong>. The <strong>FS</strong>-x25 does not have a<br />
default IP address, but it will be 192.168.2.xxx. Refer to the <strong>FieldServer</strong> Utilities <strong>Manual</strong> for information on<br />
how to change the <strong>FieldServer</strong>’s IP address.<br />
4.5 Identification of the <strong>FieldServer</strong> on the Network<br />
Select <strong>Start</strong>|Programs|<strong>FieldServer</strong> Utilities; double click on the Ruiping Utility. The display should show<br />
<strong>FieldServer</strong> Name IP Number (192.168.2.X) <strong>FieldServer</strong>Version<br />
If necessary, refer to Appendix A for troubleshooting tips.<br />
<strong>FieldServer</strong> <strong>Technologies</strong> 1991 Tarob Court Milpitas, California 95035 USA Web: www.fieldserver.com<br />
Tel: (408) 262 2299 Fax: (408) 262 2269 Toll Free: (888) 509 1970 email: support@fieldserver.com
<strong>FieldServer</strong> <strong>FS</strong>-X25 <strong>Start</strong>-<strong>Up</strong> Guide Page 9 of 12<br />
4.6 Connection to the <strong>FieldServer</strong> Using RUI (Ruinet)<br />
Select <strong>Start</strong>|Programs|<strong>FieldServer</strong> Utilities, double click on the Remote User Interface icon or double click on the<br />
Remote User Interface Icon on the desktop.<br />
If Ruinet does not automatically bring you to the main menu, select the <strong>FieldServer</strong> by typing the 2-digit number to<br />
the left of the title name.<br />
If necessary, refer to Appendix A for troubleshooting tips.<br />
4.7 <strong>Up</strong>load the Default Configuration<br />
The configuration of the <strong>FieldServer</strong> is provided to the <strong>FieldServer</strong>’s operating system via a comma-delimited file<br />
called “CONFIG.CSV”. If ordered with the <strong>FieldServer</strong>, the custom configuration is installed; (Reference<br />
documentation <strong>FS</strong>-8790-XX). If a custom configuration is not purchased, a template config.csv is shipped on the<br />
<strong>FieldServer</strong>. Refer to the Configuration <strong>Manual</strong> and the Driver <strong>Manual</strong>(s) provided with the <strong>FieldServer</strong> for further<br />
information on configuration files.<br />
In the main menu of the Remote User Interface screen, type “U” to upload the configuration. Then type “U” again.<br />
The Remote User Interface Utility will fetch the default configuration and put it into the Configuration File folder<br />
(<strong>Start</strong>|Programs|<strong>FieldServer</strong>Utilities|Configuration File folder).<br />
4.8 Change the Configuration File to Meet the Application<br />
Refer to the Configuration <strong>Manual</strong> in conjunction with the Driver supplements for information on configuring the<br />
<strong>FieldServer</strong>. <strong>FieldServer</strong> <strong>Technologies</strong> offers training on this topic as well as a configuration service to complete<br />
this portion of the work. See www.fieldserver.com for specific details.<br />
4.9 Download the updated Configuration file<br />
<br />
<br />
Before attempting to send files to the <strong>FieldServer</strong>, ensure that the files are in the configuration file folder.<br />
Refer to the <strong>FieldServer</strong> Utilities manual for further information.<br />
From the main menu, type "D" to access the “download” menu,<br />
<strong>FieldServer</strong> <strong>Technologies</strong> 1991 Tarob Court Milpitas, California 95035 USA Web: www.fieldserver.com<br />
Tel: (408) 262 2299 Fax: (408) 262 2269 Toll Free: (888) 509 1970 email: support@fieldserver.com
<strong>FieldServer</strong> <strong>FS</strong>-X25 <strong>Start</strong>-<strong>Up</strong> Guide Page 10 of 12<br />
<br />
<br />
<br />
Type "L" (for local filename) to specify the name and extension of the file to be sent to the <strong>FieldServer</strong>. Hit<br />
when done.<br />
The Remote User Interface Utility will automatically select config.csv for download of csv files. On rare<br />
occasions where other files need to be downloaded to the <strong>FieldServer</strong> type “O” for other files, then type “R”<br />
to specify the remote filename needed on the <strong>FieldServer</strong>.<br />
When satisfied that the correct file names are specified, Type "D" to download the file to the <strong>FieldServer</strong>. The<br />
Remote User Interface Utility will display a menu showing download progress.<br />
Note: the Remote User Interface Utility will indicate when download is complete.<br />
<strong>FieldServer</strong> before this message displays, as this could corrupt the <strong>FieldServer</strong>.<br />
DO NOT reset the<br />
<br />
<br />
Once download is complete, hit to get back to the main menu and use the "!" option (or simply cycle<br />
power to the <strong>FieldServer</strong>) to put the new file into operation. Note that it is possible to do multiple downloads<br />
to the <strong>FieldServer</strong> before resetting it.<br />
Firmware created by <strong>FieldServer</strong> <strong>Technologies</strong> can be downloaded from the configuration file by simply typing<br />
“F” from the download menu. Note that <strong>FieldServer</strong> usually supplies firmware upgrades as an install.zip, for<br />
which a separate procedure is used, (See ENote 037 on the USB flash drive in a folder called Library).<br />
4.10 Test and Commission the <strong>FieldServer</strong><br />
<br />
<br />
<br />
Connect the <strong>FieldServer</strong> to the third party device(s), and test the application.<br />
From the main menu of Ruinet, type “O” to see the number of messages on each protocol.<br />
In case of problems, refer to Appendix A or the Troubleshooting Guide which can be found in the <strong>FieldServer</strong><br />
Utilities directory under Documentation<br />
<strong>FieldServer</strong> <strong>Technologies</strong> 1991 Tarob Court Milpitas, California 95035 USA Web: www.fieldserver.com<br />
Tel: (408) 262 2299 Fax: (408) 262 2269 Toll Free: (888) 509 1970 email: support@fieldserver.com
<strong>FieldServer</strong> <strong>FS</strong>-X25 <strong>Start</strong>-<strong>Up</strong> Guide Page 11 of 12<br />
Appendix A. Troubleshooting Tips<br />
Appendix A.1. Connection to the <strong>FieldServer</strong><br />
<br />
<br />
<br />
<br />
<br />
<br />
<br />
<br />
<br />
<br />
Confirm that the network cabling is correct.<br />
Confirm that the computer network card is operational and correctly configured.<br />
Confirm that there is an Ethernet adapter installed in the PC’s Device Manager List,, and that it is configured to<br />
run the TCP/IP protocol.<br />
Check the Ethernet OK LED<br />
Check the “Activity” LED on the Ethernet connection - this should flash at least once every 2 seconds if RUI is<br />
still running.<br />
Check that the netmask is correct.<br />
<br />
<br />
<br />
Go to <strong>Start</strong>|Run<br />
Type in “ipconfig”<br />
The account settings should be displayed.<br />
Ensure that the IP address is 192.168.2.xxx and the netmask 255.255.255.0<br />
Ensure that the PC and <strong>FieldServer</strong> are on the same IP Network, or assign a Static IP Address to the PC on the<br />
192.168.2.0 network using the Remote User Interface Utility. Refer to the <strong>FieldServer</strong> Utilities manual for<br />
information.<br />
If using Windows XP or later, ensure that the firewall is disabled.<br />
Ensure that all other Ethernet cards active on the PC, especially wireless adapters are disabled.<br />
Refer to the <strong>FieldServer</strong> Troubleshooting Guide which can be found in the <strong>FieldServer</strong> Utilities directory under<br />
Documentation<br />
Appendix A.2. Technical support<br />
Before contacting Technical support to report an issue, go to <strong>Start</strong>|Programs|<strong>FieldServer</strong> utilities|Tools and run<br />
the <strong>FS</strong>T_Diag program. Take a log (See ENote0058 in the folder called Library on the USB Flash Drive). Send this<br />
log together with the configuration file to support@fieldserver.com for evaluation.<br />
Note that while all necessary documentation is shipped with the <strong>FieldServer</strong> on the USB flash drive, these<br />
documents are constantly being updated. Newer versions may be available on the web at www.fieldserver.com<br />
Appendix A.3. Material Service Orders (MSO) Procedure<br />
A <strong>FieldServer</strong> Sales Customer Representative can be contacted at 408-262-2299 x104 if a manufacturing defect is<br />
suspected. The serial number and reason for return of the product will be requested, and a MSO number will be<br />
supplied should the circumstances warrant a return.<br />
Note: 1. Please pack the item for repair securely and ship it prepaid and insured. <strong>FieldServer</strong> <strong>Technologies</strong> is not<br />
responsible for any damages caused to the product due to shipping.<br />
Note 2. <strong>FieldServer</strong> <strong>Technologies</strong> will not accept items for repair without an MSO number.<br />
<strong>FieldServer</strong> <strong>Technologies</strong> 1991 Tarob Court Milpitas, California 95035 USA Web: www.fieldserver.com<br />
Tel: (408) 262 2299 Fax: (408) 262 2269 Toll Free: (888) 509 1970 email: support@fieldserver.com
<strong>FieldServer</strong> <strong>FS</strong>-X25 <strong>Start</strong>-<strong>Up</strong> Guide Page 12 of 12<br />
Appendix B. Limited Warranty<br />
<strong>FieldServer</strong> <strong>Technologies</strong> warrants its products to be free from defects in workmanship or material under normal<br />
use and service for two years after date of shipment. <strong>FieldServer</strong> <strong>Technologies</strong> will repair or replace without<br />
charge any equipment found to be defective during the warranty period. Final determination of the nature and<br />
responsibility for defective or damaged equipment will be made by <strong>FieldServer</strong> <strong>Technologies</strong> personnel.<br />
All warranties hereunder are contingent upon proper use in the application for which the product was intended<br />
and do not cover products which have been modified or repaired without <strong>FieldServer</strong> <strong>Technologies</strong> approval or<br />
which have been subjected to accident, improper maintenance, installation or application, or on which original<br />
identification marks have been removed or altered. This Limited Warranty also will not apply to interconnecting<br />
cables or wires, consumables or to any damage resulting from battery leakage.<br />
In all cases <strong>FieldServer</strong> Technology’s responsibility and liability under this warranty shall be limited to the cost of<br />
the equipment. The purchaser must obtain shipping instructions for the prepaid return of any item under this<br />
warranty provision and compliance with such instruction shall be a condition of this warranty.<br />
Except for the express warranty stated above, <strong>FieldServer</strong> <strong>Technologies</strong> disclaims all warranties with regard to the<br />
products sold hereunder including all implied warranties of merchantability and fitness and the express warranties<br />
stated herein are in lieu of all obligations or liabilities on the part of <strong>FieldServer</strong> <strong>Technologies</strong> for damages<br />
including, but not limited to, consequential damages arising out of/or in connection with the use or performance<br />
of the product.<br />
<strong>FieldServer</strong> <strong>Technologies</strong> 1991 Tarob Court Milpitas, California 95035 USA Web: www.fieldserver.com<br />
Tel: (408) 262 2299 Fax: (408) 262 2269 Toll Free: (888) 509 1970 email: support@fieldserver.com