RULES FOR SAFE MARKER HANDLING - Paintball Manuals
RULES FOR SAFE MARKER HANDLING - Paintball Manuals
RULES FOR SAFE MARKER HANDLING - Paintball Manuals

Create successful ePaper yourself
Turn your PDF publications into a flip-book with our unique Google optimized e-Paper software.
2<br />
<strong>RULES</strong> <strong>FOR</strong> <strong>SAFE</strong> <strong>MARKER</strong> <strong>HANDLING</strong><br />
1. Treat every marker as if it were loaded.<br />
2. Never look down the barrel of a paintball marker.<br />
3. Keep your finger off the trigger until ready to shoot.<br />
4. Never point the marker at anything you don’t wish to shoot.<br />
5. Keep the marker on safe until ready to shoot.<br />
6. Keep the barrel blocking device in/on the marker’s muzzle when not<br />
shooting.<br />
7. Always remove paintballs and propellant source before disassembly.<br />
8. After removing propellant source, point marker in safe direction and<br />
discharge until marker is degassed.<br />
9. Store the marker unloaded and de-gassed in a secure place.<br />
10. Follow warnings listed on propellant source for handling and storage.<br />
11. Do not shoot at fragile objects such as windows.<br />
12. Every person within range must wear eye, face, and ear protection<br />
designed specifically to stop paintballs and meeting ASTM standard<br />
F1776.<br />
13. Always measure your marker’s velocity before playing paintball and<br />
never shoot at velocities in excess of 91.44 meters (300 feet) per second.
3<br />
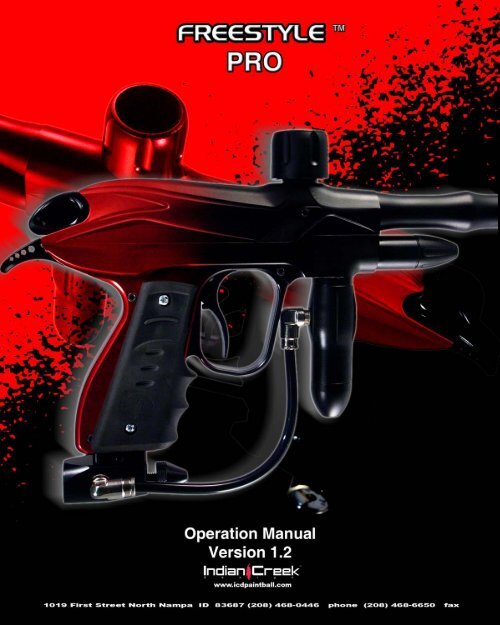
TABLE OF CONTENTS<br />
INSTRUCTION MANUAL<br />
Version 1.2<br />
Indian Creek Design, Inc.<br />
Model 2005 FreeStyle Pro<br />
Copyright 1992…. 2005<br />
Statement of Liability……………………………………………………………………4<br />
Limited Warranty………………………………………………………………………...5<br />
Overview…………………………………………………………………………………6<br />
Operation…………………………………………………………………………………6<br />
Firing the FREESTYLE PRO…………………………………………………………...8<br />
Unloading the FREESTYLE PRO………………………………………………………9<br />
Maintenance………………………………………………………………………………9<br />
Storage and Transportation………………………………………………………………10<br />
Adjusting the Trigger Pull……………………………………………………………….11<br />
Tuning Guide…………………………………………………………………………….12<br />
Troubleshooting Guide…………………………………………………………………..13<br />
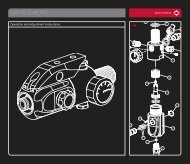
Pictures and Schematics<br />
Tools you will need………………………………………………………………………16<br />
Replacing the Battery…………………………………………………………………….17<br />
Field-Stripping…………………………………………………………………………...18<br />
Lubricating the Cylinder…………………………………………………………………19<br />
Maintaining your Regulators…………………………………………………………….20<br />
Cleaning the Ball Detents………………………………………………………………..21<br />
Adjusting the Low Pressure Regulator…………………………………………………..22<br />
Adjusting the High Pressure Regulator…………………………………………………..23<br />
Schematics Part 1………………………………………………………………………...24<br />
Schematics Part 2………………………………………………………………………...25
4<br />
INSTRUCTION MANUAL<br />
Version 1.2<br />
Indian Creek Design, Inc.<br />
Model 2005 FreeStyle Pro<br />
Copyright 1992…. 2005<br />
All Rights Reserved<br />
No part of this document may be copied or reproduced in any form or by any means without the prior<br />
written consent of Indian Creek Design, Inc., its assigns and/or its distributors.<br />
Notice is hereby given that this manual is part of the article owned in whole by<br />
Indian Creek Design, Inc., its assigns and/or its distributors, known as indicated in this<br />
manual and drawings. All rights of manufacture and reproduction of such articles<br />
or any part thereof are reserved by Indian Creek Design, Inc., its assigns and/or its<br />
distributors. Neither said article nor any part thereof may be manufactured or<br />
reproduced except by written authorization from Indian Creek Design, Inc., its<br />
assigns and/or its distributors. All proprietary rights and information are the sole<br />
property of Indian Creek Design, Inc., its assigns and/or its distributors.<br />
STATEMENT OF LIABILITY<br />
Indian Creek Design, Inc., delivers this marker with the understanding that Indian Creek<br />
Design, Inc., its assigns and/or its distributors, assumes no responsibility for its resale or safe<br />
handling. Serious injury or death may occur if mishandled, abused, or the safety instructions are<br />
ignored. Indian Creek Design, Inc., its assigns and/or its distributors assumes no<br />
responsibility for physical injury or property damage resulting from its use.<br />
Indian Creek Design, Inc., its assigns and/or its distributors, makes no warranties with<br />
respect to this documentation and disclaims any implied warranties of merchantability or fitness<br />
for a particular purpose. The information in this document is subject to change without notice.<br />
Indian Creek Design, Inc., its assigns and/or distributors assumes no responsibility for any<br />
errors that may appear in this document.<br />
WARNING:<br />
This is not a toy. Misuse may cause serious injury or death. Eye protection<br />
designed specifically for paintball use must be worn by the user and any<br />
person within range. Recommend 18 years of age or older to purchase.<br />
Persons under 18 years of age must have adult supervision. Obey all local,<br />
state and federal laws. Follow the rules of safe paintball marker handling.<br />
READ OWNER’S MANUAL BE<strong>FOR</strong>E USING.
5<br />
INDIAN CREEK DESIGN, INC.<br />
LIMITED WARRANTY<br />
Indian Creek Design, Inc., warrants the replacement of any original part due to defect in<br />
materials and/or workmanship of this marker. This warranty will be in effect for twelve (12)<br />
months for parts and twelve (12) months for labor following the original date of purchase for the<br />
original purchaser. Such warranty service will be provided only if the warranty registration card<br />
included with this manual is filled in completely and on file at Indian Creek Design, Inc. All<br />
other service will be duly charged for and returned via UPS C.O.D.<br />
Indian Creek Design, Inc., will replace without charge any original part that is determined by<br />
Indian Creek Design, Inc., to be defective under the terms of this warranty. However, shipping<br />
charges are not covered hereunder. Failure due to an accident, abuse, neglect, modification,<br />
normal wear, operator error, maintenance by other than an authorized Indian Creek Design,<br />
Inc., dealer, or use of parts inconsistent with the use originally intended for the marker as sold, is<br />
not covered by this warranty.<br />
There are no other warranties or guarantees, expressed or implied, made by Indian Creek<br />
Design, Inc., on this marker. The sole and exclusive liability of Indian Creek Design, Inc.,<br />
and/or its authorized dealers, affiliates, or agents pursuant to this warranty will be for repair or<br />
replacement of the defective part; incidental or consequential damages are expressly excluded<br />
hereunder.<br />
Indian Creek Design, Inc., its authorized dealers, affiliates, or agents, will not be liable under<br />
this warranty, nor under any state or federal law, or the common law or otherwise for any<br />
damage or failure, including personal injury, resulting from such use and/or alteration. This<br />
warranty gives you specific legal rights, and you may also have other rights that may vary from<br />
state to state.<br />
For warranty parts, service or information contact:<br />
Indian Creek Design, Inc.<br />
1019 First Street North<br />
Nampa, Idaho 83687<br />
(208) 468-0446
6<br />
FreeStyle Pro OVERVIEW<br />
The FREESTYLE PRO is a quality marking instrument specially designed to meet the needs of<br />
the professional style tournament player. The FREESTYLE PRO is an electronic solenoid<br />
actuated computer controlled marker. The major components of the FREESTYLE PRO are<br />
machined from solid, aircraft-grade aluminum, and then hard anodized per military<br />
specifications. No castings are used in the construction of the FREESTYLE PRO, thereby<br />
providing the end user with a high-quality, precision-engineered marker.<br />
<strong>Paintball</strong> markers get a lot of abuse. Indian Creek Design, Inc., has built the FREESTYLE PRO<br />
with this in mind. All internal parts, wear and contact surfaces have been heat treated or hard<br />
anodized. The toughest and most resilient materials and components have been used in the<br />
design of this product.<br />
The FREESTYLE PRO uses a single standard 9-volt battery for operation. The circuitry is a<br />
microprocessor based digital controller.<br />
The FREESTYLE PRO operates on low-pressure. The main operating pressure is 320-380 PSI<br />
nominally adjusted to visually via the gauge on the primary (input) regulator. The secondary<br />
pressure is factory pre-set and regulated to 105-120 PSI. Gas usage is controlled through these 2<br />
internal regulators. A unique feature of this marker is the regulator adjustment. This allows<br />
precise adjustment for the velocity control of the marker and for optimal gas efficiency.<br />
The FREESTYLE PRO comes with a removable barrel system. This feature allows the user to<br />
select a barrel that is most suitable for the playing conditions. All barrels are honed with straight<br />
and spiral tip porting and stock length is 11".<br />
OPERATION<br />
Read the entire manual before you prepare your FREESTYLE PRO for play. Safety and safe<br />
marker handling are the most important aspects of paintball sports. Please practice each of the<br />
following steps with an unloaded marker before attempting to charge your marker with<br />
compressed air and paintballs. Do not load compressed air and paintballs into your<br />
FREESTYLE PRO until you feel completely confident with your ability to handle your<br />
FREESTYLE PRO safely.<br />
Keep your finger out of the trigger guard and away from the trigger; point the muzzle of the<br />
marker in a safe direction at all times. Keep the marker turned off until ready to operate. The<br />
FREESTYLE PRO uses an on-off switch for one of its safety devices. Always keep your<br />
FREESTYLE PRO pointed in a safe direction. Always use a barrel plug or barrel blocking<br />
device. Remember that the ultimate safety device is you, the operator.
7<br />
Installing the 9 volt Power Source<br />
The FREESTYLE PRO requires a single 9-volt battery as the electronic power source. The use<br />
of long life batteries is recommended.<br />
The 9-volt battery is located in the grip behind the trigger. The battery is accessed through the<br />
grip panel located on the right grip located on the right side of the marker.<br />
Remove the 2 screws that hold the grip panel in place. Slide the Grip Panel out of the way.<br />
Remove the 4 6-32 screws that hold the right clamshell in place. Carefully lift the clamshell up<br />
and away from the marker. Connect the battery to the terminal and place the battery inside the<br />
frame carefully, being sure that the black and red wires to the terminal are toward the top. Make<br />
sure that there are no abrupt kinks and the wires are comfortably placed, do not force them into<br />
place. Replace the right clamshell grip and tighten the 4 screws. Replace the grip panel and 2<br />
screws.<br />
Compressed Air usage<br />
The FREESTYLE PRO comes with a female ¼” Push-In fitting adapter on the input of the<br />
regulator. The FREESTYLE PRO can be set up to use a nitrogen or compressed air system.<br />
Although it may be used, CO2 is not recommended for use as the propellant. Generally the CO2<br />
that we use as an industry is industrial grade CO2. It is dirty, pumped from large tanks full of<br />
contaminates including dirt, rust and metal flakes. CO2 can be used most successfully if used<br />
with anti-siphon systems and filters. Be aware that under the conditions of CO2 the results may<br />
not be as expected. Consult the place where you purchased your FREESTYLE PRO, or a<br />
recognized and competent airsmith, for instruction in the safe handling of compressed-air<br />
cylinders before purchasing or connecting one to your FREESTYLE PRO.<br />
Adjustable regulator compressed air systems:<br />
The input pressure from your compressed air system should be regulated down to 550-600 PSI<br />
output pressure. Use a VERY HIGH FLOW low pressure output tank and regulator set-up for<br />
your best results. The FREESTYLE PRO will work just fine with a pre-set regulated tank or an<br />
adjustable output regulated tank. Note: on MOST systems, there is a large difference between<br />
the setting pressure and the actual output operating pressure. If your compressed air system does<br />
not have an output pressure gauge on its regulator we do not recommend its use.<br />
Fixed output regulated compressed air systems:<br />
The FREESTYLE PRO will work just fine with a pre-set tank. Although, you will get much<br />
better performance from a HIGH FLOW low output pressure tank/regulator than with a high<br />
pressure (750-850) output. VERIFY the output pressure from the regulator. If your compressed<br />
air system does not have an output pressure gauge on its regulator we do not recommend its use.
8<br />
CO2 usage:<br />
Although it may be used, CO2 is not recommended for use as the propellant. Generally the CO2<br />
that we use as an industry is industrial grade CO2. It is dirty, pumped from large tanks full of<br />
contaminates including rust and metal flakes. CO2 can be used most successfully if used with<br />
anti-siphon systems and filters. Be aware that the use of CO2 may result in less than optimal<br />
performance. CO2 use is NOT covered under warranty.<br />
REMEMBER: CO2, compressed air or nitrogen systems can be extremely dangerous if misused<br />
or improperly handled. Use only cylinders meeting D.O.T. specifications. Do not perform any<br />
work to your tank or tank regulator. NEVER disassemble your tank or tank regulator. Only a<br />
qualified and trained technician should perform work to your tank and tank regulator.<br />
Before pressurizing your FREESTYLE PRO, check to make sure that you and anyone within<br />
range are wearing eye protection designed specifically for paintball. Be sure you have a barrel<br />
plug, sock, or barrel-blocking device in place and there are no paintballs in the marker. The onoff<br />
switch should be OFF. Air can now be applied, the marker will become pressurized and the<br />
bolt will slide backwards.<br />
<strong>Paintball</strong> and Loader Usage<br />
The FREESTYLE PRO comes equipped to accept 1.03" OD standard-gravity feed loaders. Fit<br />
the loader directly into the vertical feed tube. Always twist it down in a CLOCKWISE direction.<br />
Always twist it off in a CLOCKWISE direction as well. The FREESTYLE PRO uses .68<br />
caliber, water-soluble paintballs. The paintballs are gravity fed from the loader through the<br />
direct vertical feed nipple and into the breech of the marker.<br />
Modes - Rate of Fire –<br />
The 2005 FREESTYLE PRO features a single mode of fire.<br />
1. The FREESTYLE PRO is set for Semi-auto or single shot per trigger pull mode only.<br />
2. The cycle rate is set extremely fast.<br />
3. The <strong>Paintball</strong> Detection System (PDS) is turned on and off by the trigger when the<br />
marker is first turned on.<br />
Firing the FREESTYLE PRO<br />
Keep your finger out of the trigger guard and away from the trigger; point the muzzle of your<br />
marker in a safe direction at all times during this process. Be sure your goggles are securely in<br />
place. Push the on-off toggle switch into the off position.
9<br />
Always keep your FREESTYLE PRO pointed in a safe direction!<br />
1. Place the empty loader onto the marker. Be sure that it is securely mounted in place.<br />
2. Apply the compressed gas, pressurizing the marker.<br />
3. Put the paintballs into the loader.<br />
4. Remove the barrel plug, sock or barrel blocking device.<br />
5. Aim the marker at the target.<br />
6. Push the on-off switch to the ON position, the LED will light up.<br />
7. Place your finger on the trigger.<br />
8. Pull the trigger with a smooth squeezing motion. BANG. . . .<br />
UNLOADING THE FREESTYLE PRO<br />
Keep your finger out of the trigger guard and away from the trigger; point the muzzle of your<br />
marker in a safe direction during this entire process. Always keep your FREESTYLE PRO<br />
pointed in a safe direction!<br />
1. Push the on-off switch to the off position. The LED will be off.<br />
2. Place the barrel plug, sock or barrel blocking device into the end of the barrel.<br />
3. Remove the pressurized gas from the marker carefully.<br />
4. Tilt the marker so that the loader is lower than the body of the marker.<br />
5. Remove the paintball loader from the direct vertical-feed tube, turning the loader in a<br />
clockwise direction.<br />
6. Inspect the inside of the direct vertical-feed tube to be sure that a ball does not remain inside<br />
the breech.<br />
7. Remove the barrel and make sure there is no ball in the barrel and double-check the breech<br />
area for the presence of a paintball.<br />
8. Remove and discard any paintballs that are found in the barrel or breech.<br />
MAINTENANCE<br />
CAUTION: Before attempting to perform any maintenance operations or any marker<br />
disassembly, make sure that all paintballs and propellant sources have been removed from the<br />
marker. Install a barrel blocking device, push the on-off switch to the OFF position and keep the<br />
marker in this "<strong>SAFE</strong>" mode.<br />
Simple Maintenance<br />
Keep your FREESTYLE PRO clean and lubricated to eliminate the friction that would prevent<br />
reliable operation. Clean and lube the marker before each use, and do not put it away dirty. DO<br />
NOT USE PETROLEUM-BASED PRODUCTS! SuperLube with PTFE (www.super-lube.com)<br />
is the recommended lubricant for the cylinder assembly. Other lubricants may be used for the<br />
cylinder as long as they are silicone or teflon based. Lithium grease is not recommended for the
10<br />
cylinder assembly. Lithium grease such as Dow 33 is recommended for lubricating the<br />
regulators. Be sure it is Lithium Grease and not axel grease.<br />
Cleaning Paint from the Barrel<br />
Unscrew the barrel to remove the barrel for swabbing/cleaning. Keep the barrel clean to insure<br />
the continued accuracy of the FREESTYLE PRO. Gelatin from the paintballs has a tendency to<br />
build up in the barrel. As part of your cleaning ritual, wash out the barrel with hot soapy water<br />
and rinse it well.<br />
PDS (paintball detection system)<br />
The PDS (paintball detection system) is designed to detect whether or not a paintball is seated in<br />
the breach ready to fire. If a paintball is not there, it will not cycle. To dry fire the marker<br />
without the PDS system, hold in the trigger while turning the marker on. If you attempt to dry<br />
fire the marker with the PDS on, the marker will only fire once and then stop firing. Keep the<br />
infrared emitters and detectors clean for your best results.<br />
Removing the Bolt/Cylinder Assembly (Field Stripping)<br />
Remove the paintballs and pressurized gas from the marker. The FreeStyle PRO may<br />
not be field-stripped while pressurized.<br />
1. Remove the snatch grip/link pin from the back of the marker. Pull the bolt/cylinder assembly<br />
out the back of the main body.<br />
Once the bolt assembly is removed, it is possible to clean the entire upper receiver of the marker,<br />
including the breech and feed tube area. You may slightly lubricate the rear section of the bolt<br />
with a light synthetic spray before re-installing the bolt. Do not use petroleum/oil-based<br />
lubricants. The bolt tip is NOT a simple plastic; it is a natural Delrin acetate material, which is a<br />
Dupont 3M material, developed specifically for this type of application. The use of a metal<br />
tipped bolt will void all warranties.<br />
1. Point the barrel downward and slide the bolt/cylinder assembly in until flush with the rear<br />
of the marker and the screw hole lines up in the back. Re-insert the link pin.<br />
STORAGE AND TRANSPORTATION<br />
- Your FREESTYLE PRO must be clear of all paint and propellant when not being used.<br />
- Be sure the on-off switch is off and the LED is not lighted.<br />
- Put the barrel blocking device in its place.<br />
- Make sure the marker is clean.
11<br />
- Store your FREESTYLE PRO in a clean, cool, dry place.<br />
- Keep your FREESTYLE PRO away from unauthorized users.<br />
This is not a toy. Misuse may cause serious injury or death. Eye Protection<br />
designed specifically for paintball must be worn by the user and persons within<br />
range. Recommend 18 years of age or older to purchase. Persons under 18<br />
years of age must have adult supervision.<br />
Your FREESTYLE PRO must be clear of all paint and any source of propellant during<br />
transportation to and from the playing field. Keep your barrel blocking device in place. Keep<br />
the on-off switch in the off position. Protect your FREESTYLE PRO from excessive heat<br />
during transportation. Observe and obey all local, state and federal laws concerning the<br />
transportation of paintball markers. For information concerning any of the laws in your area,<br />
contact your nearby law enforcement agency.<br />
IMPORTANT: Never carry your FREESTYLE PRO uncased when not on a playing field.<br />
The non-playing public and law enforcement personnel may not be able to distinguish<br />
between a paintball marker and firearm. For your own safety and to protect the image of<br />
the sport, always carry your FREESTYLE PRO in a suitable marker case or in the box in<br />
which it was shipped.<br />
If you must ship your FREESTYLE PRO for any reason, the box in which you purchased the<br />
marker is acceptable to all major carriers. Never ship charged CO2 or pressurized gas cylinders.<br />
ADJUSTING THE TRIGGER PULL<br />
You will notice three (3) screws in your trigger. These screws adjust the length of pull, actuation<br />
point and spring tension of the trigger. The bottom screw adjusts your trigger stop point (length<br />
of pull). The middle screw is the contact point for your micro switch or actuation point. The top<br />
screw is the spring tension adjustment screw.<br />
1. Use blue loctite while adjusting the screws. Normal activity can cause the screws to back<br />
out of adjustment. DO NOT glob the loctite on, it can cause damage to the micro switch<br />
if you use too much.<br />
2. Begin by adjusting the bottom screw to your desired pull. Screw it in to lessen the<br />
distance the trigger must travel.<br />
3. Very Carefully screw in the middle screw. Making large adjustments can force the screw<br />
into the micro switch and damage it. You will want to screw it in to the point where it<br />
makes contact with the micro switch but does not permanently rest on it. Continually<br />
check to verify that the LED flashes off and then back on when you pull the trigger. If<br />
you pull the trigger and the LED goes off and stays off, you have adjusted the screw in<br />
too far. Back it out.<br />
4. Adjust the spring tension by turning the top screw in for more tension and out for less
12<br />
tension.<br />
5. Clean up any excess loctite and let it dry for at least an hour before using your<br />
FREESTYLE PRO. This ensures the screws will remain in place.<br />
Main Input pressure regulator Adjustment:<br />
FREESTYLE PRO TUNING GUIDE<br />
The FREESTYLE PRO operates on a proven and innovative system. Take the time to<br />
understand this section. The pressurized gas is regulated internally. The high-pressure air is<br />
used to propel the paintball. The low-pressure air is used to operate the 3-way solenoid valve<br />
located in the rear of the marker. The high-pressure regulator is externally adjustable via the<br />
screw on the bottom of the high-pressure regulator (inline regulator). A 5/32 allen key for this<br />
screw has been provided to adjust this screw. To increase the pressure, turn the screw clockwise.<br />
NOTE: Only slight turns are needed to accomplish changes in the pressure used to shoot the<br />
paintball.<br />
To decrease the pressure shown on the gauge, turn the screw counter-clockwise. You must take<br />
a clearing shot before the change in the decreasing direction can be registered.<br />
A pressure gauge has been installed into the regulator body to indicate the exact operating<br />
pressure of the marker. This gauge is extremely useful. At the factory we set the regulator<br />
gauge to 350-400 PSI with an input pressure of 500 PSI using Compressed air as the base<br />
propellant. Under normal circumstances these settings will produce paintball velocities at<br />
approximately 280-300 fps. The input pressure from your tank should be set at 550-600 PSI.<br />
Higher input pressures will not provide increased performance. There is a specific input side and<br />
output side of the main input regulator. If the gauge and input sides are switched, the outcome<br />
will be total bypassing of the main input regulator.<br />
Low pressure regulator adjustment (Velocity adjustment):<br />
The low-pressure regulator is externally adjustable via the adjustment screw in the front of the<br />
low-pressure regulator. The low-pressure regulator is pre-set at the factory to 105-120 PSI to<br />
operate the 3-way solenoid actuated valve located in the rear of the marker. It may be necessary<br />
to re-adjust the low-pressure regulator from time to time to achieve desired velocities. Bench<br />
adjusting the regulator can be done by pressurizing the marker, be sure the input regulator is set<br />
properly, and then turning the adjustment screw inward (clock-wise) until you hear a leak<br />
coming from the 3-way valve in the grip area. The 3-way valve has an over-pressurization relief<br />
valve that will start to bleed off at approximately 125 PSI, once you hear the leak start then back<br />
off the adjustment screw 1/8 turn and the leak will stop. That will approximate the pressure to<br />
about 115 PSI. The low-pressure regulator is designed to shut down and preserve the integrity of<br />
the low pressure system if it sees an input pressure over approximately 500 PSI coming from the
13<br />
main input regulator.<br />
This marker was designed with safety and safety standards in mind. If you attempt to shoot<br />
paintballs higher than established safety standards, the marker may not function properly.<br />
NOTE 1. If you attempt to operate the marker at extremely high velocities, the<br />
internals will not function properly!<br />
NOTE 2. This gun is not designed to shoot above the safety limits established by<br />
industry standards but under certain conditions it may. It is therefore important to check<br />
the velocity each time before playing with your FREESTYLE PRO.<br />
NOTE 3. Higher pressures DO NOT equate into better performance and higher<br />
velocities. High pressures in this marker can cause problems, showing up in erratic<br />
velocity, extreme gas consumption, leaks, and in general a poor day of play. This marker<br />
was designed to perform at lower pressures. If you keep the gauge on the side of the<br />
marker set at 350-400 and do the rest of your adjustments with the low-pressure regulator,<br />
you will be operating the marker within the range in which it was designed to operate.<br />
Leak related problems<br />
TROUBLE SHOOTING GUIDE<br />
1) The FREESTYLE PRO has a leak down the barrel. Reason: Gas is leaking through or<br />
around the valve pin seal or O-ring area.<br />
a) Can you hear the leak when the gas is removed? Yes? There is no leak. You hear the<br />
ocean.<br />
b) The valve seal is marred, scratched, worn out, or dirty. Try cleaning it with rubbing<br />
alcohol. If this does not work, replace it.<br />
c) Replace the –006 Urethane O-ring around the valve stem.<br />
2) The FREESTYLE PRO has a leak around the low-pressure regulator seam. Reason: the<br />
seal between the regulator body and regulator adaptor body is bad, or the regulator is loose.<br />
a) Tighten the regulator to the body.<br />
b) Replace the –019 O-ring on the low-pressure regulator body.<br />
3) The FREESTYLE PRO has a leak around the high-pressure regulator seam. Reason: the<br />
seal between the regulator body and ASA adaptor is bad, or the regulator is loose.<br />
a) Tighten the regulator to the adaptor<br />
b) Replace the urethane –015 O-ring on the high-pressure regulator body.<br />
4) The FREESTYLE PRO has a leak inside the grip/battery area. Reason: the 3-way valve or<br />
internal hose is leaking.<br />
a) Check for over-pressurization from the low-pressure regulator. Re-adjust the low-
14<br />
pressure regulator per instructions on the previous pages.<br />
b) Tighten the 3-way valve to the manifold. Take care not to over-tighten.<br />
c) Replace the internal hose if it has visible damage.<br />
d) Replace the solenoid valve assembly. NOTE: NEVER DISASSEMBLE THE<br />
SOLENOID VALVE. THIS WILL PERMANENTLY DAMAGE IT BY DISRUPTING<br />
THE MAGNETIC FIELD.<br />
Ball Breakage Problems<br />
1) The balls break in the breech.<br />
a) The balls in you loader can bind, messing up your trigger timing. Always use an agitated<br />
loader and verify the PDS is on.<br />
b) If the ball retention ball does not move freely, the paintballs will crush against it or it may<br />
have stuck in the depressed position, allowing double feeding. Check its tension<br />
regularly and keep this area as clean as possible.<br />
c) If the ball retention is too sloppy, the ball will not be held in the proper position. This<br />
may allow the next ball to enter the path of the bolt, subjecting it to impact cracking or<br />
shearing. Verify the tension.<br />
Regulator Related Problems<br />
1) The gauge reads correctly when charged, but climbs in pressure after a few moments.<br />
Reason: The regulator seal has been contaminated.<br />
a) Disassemble the regulator and clean the seal with a Q-tip and alcohol. If you need<br />
assistance in the disassembly of the regulator, please call (208) 468-0446.<br />
2) The gauge reads correctly when charged, but drops in pressure after a few shots.<br />
a) The regulator may not be adjusted correctly. Remove all pressurized gas and back out<br />
the regulator adjustment screw until it is flush with the body. Pressurize the system and<br />
adjust the pressure back up to the desired pressure.<br />
b) Verify that the on/off valve on your bottom line adaptor is properly adjusted. If the valve<br />
is only partially open, it will restrict airflow into the regulator.<br />
3) The gauge reads correctly when charged, but drops in pressure after a few shots, and is slow<br />
to climb back to normal pressure.<br />
a) The recovery side of the regulator is sluggish and may need cleaning and lubrication.<br />
Clean out any debris and lubricate the urethane O-ring on the outside of the delrin<br />
plunger. If you need assistance in the disassembly of the regulator, please call (208) 468-<br />
0446.<br />
b) The regulator seal needs to be replaced if it has a deep groove in it from the regulator<br />
cup.<br />
Replacing or removing the original regulators voids all warranties.
15<br />
Battery Related Problems<br />
1) LED Functions but the marker does not fire.<br />
2) Alternately missed shots.<br />
3) Velocity drops while firing several shots.<br />
4) Erratic velocities. Jumps of 20 fps or more.<br />
5) Unexplainable paint breakage.<br />
6) Slight leak from the solenoid in the back of the grip.<br />
Change the Battery. The LED only requires 1.5 volts to function. The solenoid requires a<br />
minimum of 5 volts to operate. This means the marker may appear to be getting enough power<br />
when it is not. All batteries are NOT created equal. Performance will vary. Therefore, if you<br />
experience any erratic behavior, always change the battery first.<br />
NOTES: