CABLE FREE WEATHER STATION - Oregon Scientific
CABLE FREE WEATHER STATION - Oregon Scientific
CABLE FREE WEATHER STATION - Oregon Scientific

You also want an ePaper? Increase the reach of your titles
YUMPU automatically turns print PDFs into web optimized ePapers that Google loves.
<strong>CABLE</strong> <strong>FREE</strong> <strong>WEATHER</strong><br />
<strong>STATION</strong><br />
MODEL: WMR928NX<br />
User Manual<br />
SECTION 1 INTRODUCTION<br />
Congratulations on your purchasing the WMR928NX Cable Free<br />
Weather Station. An all-purpose easy-to-use system, the<br />
WMR928NX lets you monitor the following weather elements:<br />
- Air temperature<br />
- Relative humidity<br />
- Barometric pressure<br />
- Wind speed and direction<br />
- Rainfall<br />
The WMR928NX is also equipped with:<br />
- RF calendar clock with daily alarm<br />
- Weather forecast within 32 to 48 km (20- to 30-mile) radius<br />
- Weather alarms<br />
- Memory for maximum and minimum readings<br />
- Simple, touch-screen operation<br />
- RS232 PC connection jack<br />
- backlight<br />
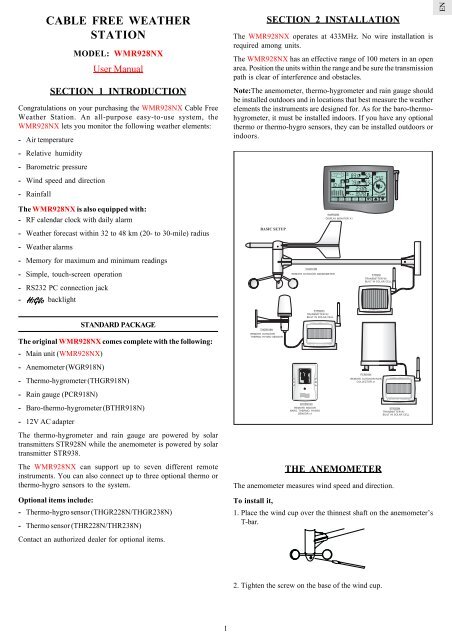
SECTION 2 INSTALLATION<br />
The WMR928NX operates at 433MHz. No wire installation is<br />
required among units.<br />
The WMR928NX has an effective range of 100 meters in an open<br />
area. Position the units within the range and be sure the transmission<br />
path is clear of interference and obstacles.<br />
Note:The anemometer, thermo-hygrometer and rain gauge should<br />
be installed outdoors and in locations that best measure the weather<br />
elements the instruments are designed for. As for the baro-thermohygrometer,<br />
it must be installed indoors. If you have any optional<br />
thermo or thermo-hygro sensors, they can be installed outdoors or<br />
indoors.<br />
EN<br />
STANDARD PACKAGE<br />
The original WMR928NX comes complete with the following:<br />
- Main unit (WMR928NX)<br />
- Anemometer (WGR918N)<br />
- Thermo-hygrometer (THGR918N)<br />
- Rain gauge (PCR918N)<br />
- Baro-thermo-hygrometer (BTHR918N)<br />
- 12V AC adapter<br />
The thermo-hygrometer and rain gauge are powered by solar<br />
transmitters STR928N while the anemometer is powered by solar<br />
transmitter STR938.<br />
The WMR928NX can support up to seven different remote<br />
instruments. You can also connect up to three optional thermo or<br />
thermo-hygro sensors to the system.<br />
Optional items include:<br />
- Thermo-hygro sensor (THGR228N/THGR238N)<br />
- Thermo sensor (THR228N/THR238N)<br />
Contact an authorized dealer for optional items.<br />
THE ANEMOMETER<br />
The anemometer measures wind speed and direction.<br />
To install it,<br />
1.Place the wind cup over the thinnest shaft on the anemometer’s<br />
T-bar.<br />
2.Tighten the screw on the base of the wind cup.<br />
1
EN<br />
3.Align the red markings on the wind vane’s shaft.<br />
3.Mount the rain gauge and its solar transmitter safely in place.<br />
4.Put drops of water on the cross at the base on the rain collector<br />
to check the leveling.<br />
Water stay at<br />
position 1 - 4<br />
means the gauge<br />
is not leveled<br />
4.With the aid of a compass, face the red marking south before<br />
mounting the anemometer.<br />
5.Use metal ring to adjust the leveling of the rain collector if<br />
necessary.<br />
METAL RING<br />
6.Close the cover of the rain collector.<br />
5.Mount the anemometer and its solar transmitter safely in place.<br />
The wind speed and direction window on the main unit should read<br />
180° if the main unit is installed.<br />
THE SOLAR TRANSMITTERS<br />
The solar transmitters make use of solar energy to power the<br />
instruments they are connected to.<br />
Note: It is recommended to insert two UM3 or “AA”-sized super<br />
lithium batteries for sub-zero weather conditions.<br />
For the solar transmitters to function properly, make sure the solar<br />
receptors on the transmitters are exposed to sunlight and the<br />
connectors of the connection cable are securely plugged in.<br />
THE THERMO-HYGROMETER<br />
The thermo-hygrometer measures outdoor temperature and<br />
humidity.<br />
To install it:<br />
Mount the thermo-hygrometer and its solar transmitter safely in<br />
place.<br />
THE BARO-THERMO-HYGROMETER<br />
The baro-thermo-hygrometer measures the atmospheric pressure,<br />
temperature and humidity.<br />
The sensor uses four UM4 or “AAA”-sized batteries.<br />
To install it,<br />
1.Insert alkaline batteries accordingly.<br />
THE RAIN GAUGE<br />
The rain gauge measures the total amount and rate of rainfall.<br />
To install it:<br />
1.Open the cover of the rain collector.<br />
2.Remove the fiber tape from around the bucket assemblies.<br />
2.Mount the unit where you want to monitor the readings.Or you<br />
can make use of its table stand to place it on a flat surface.<br />
2
THE MAIN UNIT<br />
SECTION 3 OPERATION<br />
EN<br />
The main unit gives you all the readings and controls. It should be<br />
placed indoors.<br />
The main unit is powered up by the 12V AC adapter.<br />
To install it,<br />
1.Position the main unit and other units within effective range<br />
(100 meters).<br />
2.Insert four UM3 or “AA”-sized alkaline batteries for backup<br />
purposes.<br />
THE MAIN UNIT<br />
3.Mount the main unit safely in place.Or use its table stand to<br />
place it on a flat surface.<br />
4.Connect the AC power adapter to the main unit and a wall socket.<br />
5.Press the [RESET] button on the main unit to initiate operation.<br />
The main unit will start searching for signals for about four<br />
minutes. Upon successful reception, the readings will be displayed.<br />
The main unit will update the readings at regular intervals.<br />
Note: If the main unit is operating solely on battery power, the EL<br />
backlight and RS232 connection will be disabled. To connect the<br />
main unit to the PC, the AC power adaptor must be connected.<br />
LOW-BATTERY WARNING<br />
There are low-battery indicators [ ] for the main unit, rain<br />
gauge, baro-thermo-hygrometer, thermo-hygrometer and optional<br />
remote thermo and thermo-hygro sensors. Replace the batteries<br />
when the respective indicators light up.<br />
Note: The readings collected from the thermo-hygrometer and any<br />
optional remote thermo and thermo-hygro sensors share the same<br />
display window. The “OUT” and remote channel will share the same<br />
low-battery indicator. When the battery level of the thermohygrometer<br />
is low, the low-battery indicator will turn on. If it is one<br />
of the optional remote sensors, the low-battery indicator will<br />
blink. To locate the channel in question, press the window to scan<br />
through all available devices. The low-battery indicator will stop<br />
blinking if the battery level is low for that one.<br />
A. <strong>WEATHER</strong> FORECAST AND BAROMETRIC READING<br />
WINDOW<br />
B. INDOOR TEMPERATURE WINDOW<br />
C. INDOOR HUMIDITY WINDOW<br />
D. OUTDOOR/CHANNEL TEMPERATURE WINDOW<br />
E. OUTDOOR/CHANNEL HUMIDITY WINDOW<br />
F. RAINFALL WINDOW<br />
G. RF CALENDAR CLOCK AND DAILY ALARM WINDOW<br />
H. WIND SPEED AND DIRECTION WINDOW<br />
I. CHANNEL BUTTON<br />
J. MEMORY BUTTON<br />
K. ALARM BUTTON<br />
L. SET BUTTON<br />
M. UNIT BUTTON<br />
N. ALARM ON/OFF BUTTON<br />
O. [ ] BUTTON<br />
P. [ ] BUTTON<br />
Q. [ RESET] BUTTON<br />
R. RS232 SERIAL PORT<br />
S. DC 12V JACK<br />
3
EN<br />
BACKLIGHT<br />
The main unit, when connected to the AC power, is equipped with<br />
an automatic backlight. Every time you press a window on the main<br />
unit, the backlight will come on for a few seconds. This<br />
function will be disabled for sole battery operation. The<br />
backlight will also come on for a few seconds when the alarm is<br />
triggered.<br />
THE RF CALENDAR CLOCK<br />
The calendar clock is radio-controlled. It automatically<br />
synchronizes its current time and date when it is brought within<br />
range of the radio signal generated from Frankfurt, Germany (DCF77).<br />
You can also set the calendar clock manually.<br />
To do so,<br />
1.Press the RF calendar clock and alarm window.<br />
2.Press and hold [ ] to disable the radio reception function.<br />
3.Press and hold [SET] until the digit flashes.<br />
4.Use [ ] and [ ] to change to the desired setting.<br />
5.Press [SET] for the next item setting.<br />
6.Repeat from Step 4 to finish all the settings for:<br />
- Clock display formats (12hr or 24hr)<br />
- Display language of the day-of-the-week<br />
- Clock<br />
- Calendar display formats (Month-Day, Day-Month)<br />
- Calendar<br />
For the display language, you can choose:<br />
- English (E)<br />
- German (D)<br />
- French (F)<br />
- Italian (I)<br />
- Spanish (S)<br />
7.Press [SET] to confirm.<br />
The calendar clock and alarm window has three displays: clock<br />
with seconds, clock with day-of-the-week and calendar. To change<br />
from one display to another, press the window once.<br />
THE DAILY ALARM<br />
To set the daily alarm,<br />
1.Press the RF calendar clock and alarm window.<br />
2.Press [ALARM] and the indicator will be display to indicate<br />
you are in the alarm mode.<br />
3.Press and hold [SET] till the hour digit flash.<br />
4.Use [ ] and [ ] to change to the desired setting.<br />
5.Press [SET] for minutes setting.<br />
6.Use [ ] and [ ] to change to the desired setting.<br />
7.Press [SET] to confirm.<br />
Note: the window will show “ ” if no alarm is armed.<br />
Once set, the alarm clock will be activated automatically and the<br />
4<br />
alarm indicator will light up. When an alarm goes off, press any<br />
button to stop it. The alarm is still active and will go off again the<br />
next day.<br />
To deactivate the function,<br />
1.Press the RF calendar clock and alarm window.<br />
2.Press [ALARM ON/OFF]. The alarm indicator will disappear.<br />
ABOUT RADIO CONTROLLED CLOCK RECEPTION<br />
Whenever the WMR928NX is brought within range of the radio<br />
signal with its radio reception function activated, it will search for<br />
the clock signal at a predefined time on each day while the manual<br />
calendar clock settings will be overridden.<br />
While receiving the signal the radio reception indicator will blink.<br />
A complete reception generally takes 2 to 10 minutes, depending<br />
on the strength of the radio signal.<br />
The indicator will stop blinking when the reception is complete.<br />
The status of reception will be shown:<br />
- Strong<br />
- Weak<br />
- No signal<br />
- Receiving<br />
To disable the radio reception function:<br />
1.Press the RF calendar clock and alarm window.<br />
2.Press and hold [ ] to disable the function. The radio reception<br />
indicator will disappear.<br />
To enable the function again,<br />
1.Press the RF calendar clock and alarm window.<br />
2.Press and hold [ ] to enable the function. The radio reception<br />
indicator will blink.<br />
<strong>WEATHER</strong> FORECAST<br />
The weather forecast is displayed in the weather forecast and<br />
barometric reading window.<br />
There are four readings for the forecast: sunny, slightly cloudy,<br />
cloudy and rainy.<br />
Indicator<br />
displays on<br />
the unit<br />
Forecast Sunny Slightly Cloudy Cloudy Rainy
EN<br />
INDOOR BAROMETRIC READING<br />
INDOOR HUMIDITY<br />
The atmospheric pressure reading is displayed in the weather<br />
forecast and barometric reading window.<br />
The pressure reading can be displayed in mb (millibars), hPa<br />
(Hecto-Pascal), inHg (inch mercury) or mmHg (millimeter mercury).<br />
To select the display unit,<br />
1.Press the weather forecast and barometric reading window.<br />
2.Press [UNIT] repeatedly for the desired setting.<br />
The pressure history for the past 24 hours is displayed in a sixcolumn<br />
bar chart.<br />
To display the pressure reading for a particular hour within the<br />
past 24 hours,<br />
1.Press the weather forecast and barometric reading window.<br />
2.Press [ ] and [ ] for the desired hour.<br />
To set the sea-level pressure,<br />
1.Press the weather forecast and barometric reading window<br />
repeatedly till the “sea-level” icon is displayed.<br />
2.Press [ ] and [ ] for the current (0 Hr) pressure.<br />
3.Press and hold [SET].<br />
4.Press [ ] and [ ] to change to the desired setting.<br />
5.Press [SET] to confirm.<br />
INDOOR AND DEW POINT TEMPERATURES<br />
The current indoor and dew point temperatures, taken by the indoor<br />
baro-thermo-hygrometer, are displayed on the indoor temperature<br />
window. They can be displayed in degree Centigrade (ºC) or<br />
Fahrenheit (ºF).<br />
To select the display unit,<br />
1.Press the indoor temperature window.<br />
2.Press [UNIT] repeatedly for the desired setting.The selected unit<br />
will apply to all temperature displays in this window.<br />
Note: The unit of all temperature related display will be changed<br />
simultaneously.<br />
To display the dew point temperature, press the indoor temperature<br />
window until the “DEW” indicator is displayed.<br />
To display maximum, minimum temperatures,<br />
1.Press the indoor temperature window or repeately until "DEW"<br />
icon appear.<br />
2.Press [MEMORY] repeatedly for the desired record.The time and<br />
date of the record will also be displayed alternatively with<br />
“STAMP” icon in the clock window.<br />
The display will automatically return to the current temperature or<br />
dew temperature whatever is displayed before if the unit is left<br />
untouched for about one minute.<br />
To clear the memory,<br />
1.Press the indoor temperature window or repeately until "DEW"<br />
icon appear.<br />
2.Press and hold [MEMORY] till the key tone is heard.<br />
3.Press [MEMORY] to check the memory is clear.<br />
The current indoor relative humidity, taken by the indoor barothermo-hygrometer,<br />
is displayed on the indoor hygrometer window.<br />
To display the maximum, minimum and current humidity,<br />
1.Press the indoor humidity window.<br />
2.Press [MEMORY] repeatedly for the desired record.The time and<br />
date of the record will also be displayed alternatively with<br />
“STAMP” icon in the clock window.<br />
To clear the memory,<br />
1.Press the indoor humidity window.<br />
2.Press and hold [MEMORY] till the key tone is heard.<br />
3.Press [MEMORY] to check the memory is clear.<br />
OUTDOOR AND CHANNEL TEMPERATURES<br />
The temperature readings taken by the outdoor thermo-hygrometer<br />
and separate thermo or thermo-hygro sensors are displayed on the<br />
outdoor and channel temperature window.<br />
As this window can display up to four different sets of data, specify<br />
the instrument or channel you want to read.<br />
To do so,<br />
1.Press the outdoor/channel temperature window.<br />
2.Press [CHANNEL] to go from the outdoor reading taken by the<br />
outdoor thermo-hygrometer to those taken by individual sensors<br />
(Channel 1, 2 or 3).<br />
The outdoor thermo-hygrometer is also capable of detecting the<br />
dew point temperature as well as the wind chill reading. To display<br />
such information, press the window repeatedly.<br />
The temperatures can be displayed in degree Centigrade (°C) or<br />
Fahrenheit (°F).<br />
To select the display unit,<br />
1.Press the outdoor/channel temperature window.<br />
2.Press [UNIT] repeatedly for the desired setting.The selected unit<br />
will apply to all temperature displays in this window.<br />
Note: The unit of all temperature related display will be changed<br />
simultaneously.<br />
To display the maximum, minimum temperatures,<br />
1.Press the outdoor/channel temperature window or repeately until<br />
"DEW" icon appear.<br />
2.Press [CHANNEL] for the outdoor thermo-hygrometer or the<br />
desired channel.<br />
3.Press [MEMORY] repeatedly for the desired record.The time and<br />
date of the record will also be displayed alternatively with<br />
“STAMP” icon in the clock window.<br />
To display the dew point temperature for a channel, press the<br />
window again when the channel temperature is located.<br />
To clear the memory,<br />
1.Press the outdoor/channel temperature window or repeately until<br />
"DEW" icon appear.<br />
2.Press [CHANNEL] for the outdoor thermo-hygrometer or the<br />
desired channel.<br />
3.Press and hold [MEMORY] till the key tone is heard.<br />
4.Press [MEMORY] to check the memory is clear.<br />
5
EN<br />
OUTDOOR AND CHANNEL HUMIDITY<br />
The relative humidity readings taken by the outdoor thermohygrometer<br />
and separate thermo-hygro sensors are displayed on<br />
the outdoor/channel humidity window.<br />
As this window can display up to four different sets of data, specify<br />
the instrument or channel you want to read.<br />
To do so,<br />
1.Press the outdoor/channel humidity window.<br />
2.Press [CHANNEL] to go from the outdoor reading taken by the<br />
thermo-hygrometer to those taken by individual sensors<br />
(Channel 1, 2 or 3).<br />
To display the maximum, minimum and current humidity,<br />
1.Press the outdoor/channel humidity window.<br />
2.Press [CHANNEL] for the outdoor thermo-hygrometer or the<br />
desired channel.<br />
3.Press [MEMORY] repeatedly for the desired record.The time and<br />
date of the record will also be displayed alternatively with<br />
“STAMP” icon in the clock window.<br />
To clear the memory,<br />
1.Press the outdoor/channel humidity window.<br />
2.Press [CHANNEL] for the outdoor thermo-hygrometer or the<br />
desired channel.<br />
3.Press and hold [MEMORY] till the key tone is heard.<br />
4.Press [MEMORY] to check the memory is clear.<br />
AUTO SCANNING FUNCTION<br />
The auto scanning function is avalibable for the outdoor/channel<br />
window for both the temperature and humidity.<br />
To use it,<br />
1.Press the outdoor/channel temperature or humidity window.<br />
2.Press and hold [ ] . The main unit will start scanning from the<br />
active temperature and humidity display. Each channel will be<br />
displayed for about 4 seconds.<br />
To exit the auto scanning routine, press any window or control<br />
button.<br />
RAINFALL<br />
The rate of rainfall can be displayed in mm/hr or in/hr.<br />
To select the display unit,<br />
1.Press the rainfall window.<br />
2.Press [UNIT] for the desired setting.<br />
To display the yesterday’s rainfall and the total rainfall from the<br />
last cleared date,<br />
1.Press the rainfall window.<br />
2.Press [MEMORY] for the desired record.Yesterday rainfall will<br />
be displayed with “YESTERDAY” shown in the rainfall window.<br />
Total rainfall will be displayed with "TOTAL" shown in the<br />
rainfall window. The time and date of the record will be displayed<br />
alternatively with “SINCE” icon in the clock window for total<br />
rainfall.<br />
6<br />
Note: Yesterday’s rainfall record will be updated when the real time<br />
clock runs from 11:59:59 pm to 12:00:00 am. And it is counted for<br />
12:00:00 am of one day to 12:00:00 am on the next day.<br />
If the rain sensor detects no rainfall for about two consecutive<br />
hours, the current rate of rainfall will be displayed as zero.<br />
To clear the total rainfall,<br />
1.Press the rainfall window.<br />
2.Press and hold [MEMORY] till the key tone is heard.<br />
The yesterday’s rainfall record will not be affected when you clear<br />
the total rainfall.<br />
WIND SPEED AND DIRECTION<br />
The current wind speed and direction are displayed in the wind<br />
speed and direction window.<br />
To display the average wind speed, press the window till the<br />
“AVERAGE” icon is displayed.<br />
The wind speed can be displayed in m/s, kph, mph or knots.<br />
To select the display unit,<br />
1.Press the wind speed and direction window.<br />
2.Press [UNIT] for the desired setting.<br />
To display the maximum speed and direction for gust wind in<br />
record,<br />
1.Press the wind speed and direction window.<br />
2.Press [MEMORY].The time and date of the record will also be<br />
displayed aternatively with “STAMP” icon in the clock window.<br />
To clear the record,<br />
1.Press the wind speed and direction window.<br />
2.Press and hold [MEMORY].<br />
As for the wind direction, it is displayed in a digital compass with<br />
bearing readouts.<br />
<strong>WEATHER</strong> ALARMS<br />
Weather alarms are used to alert you to certain weather conditions.<br />
Once activated, the alarm will go off when a certain set criterion is<br />
met.<br />
You can set alarms for:<br />
· Indoor, outdoor and channel high temperatures<br />
· Indoor, outdoor and channel low temperatures<br />
· Indoor, outdoor and channel dew point approaching<br />
· Indoor, outdoor and channel high humidity<br />
· Indoor, outdoor and channel low humidity<br />
· High rainfall rate<br />
· Pressure drop<br />
· High gust wind<br />
· Low wind chill<br />
To set a weather alarm,<br />
1.Press the window containing the weather element you want to<br />
set.<br />
2.Press [ALARM].The current alarm setting will be displayed.
3.Press and hold [SET].<br />
4.Press [ ] and [ ] for the desired setting.<br />
5.Press [SET].<br />
For temperatures and humidity, the high and low alarms can be set<br />
in sequence. After entering the value for one alarm, you will be<br />
prompted to enter the value for the other.<br />
A weather alarm is activated once set. When the set criteria is met,<br />
an alarm will go off and the current reading will flash together with<br />
the corresponding indicator.<br />
If that happens in the outdoor/channel temperature or humidity<br />
window, the “OUT” indicator will flash to show that the criteria set<br />
for the outdoor thermo-hygrometer has been met. If it is one of the<br />
separate sensors, the [CHANNEL] indicator will flash. Press the<br />
window repeatedly to locate the channel in question.<br />
When a weather alarm goes off, press any button to stop the alarm.<br />
The alarm is still active until you deactivate the function or the<br />
criteria is no longer met.<br />
To do so,<br />
1.Press the window containing the weather element you want to<br />
set.<br />
2.Press [ALARM].<br />
3.Press [ALARM ON/OFF] to deactivate the function.<br />
To turn on the function again, simply follow the same procedure<br />
and press [ALARM ON/OFF].<br />
DISCONNECTED SIGNALS<br />
If without obvious reason the display for the main unit goes blank<br />
or “ ” are displayed, press and hold [CHANNEL] to enforce an<br />
immediate search.<br />
If that fails, check:<br />
- All weather instruments are still in place.<br />
- The batteries of the main unit and individual weather instruments<br />
are still good. Replace them if necessary. Press and hold<br />
[CHANNEL] to enforce an immediate search afterwards.<br />
- The transmission is within range and path is cleared of obstacles<br />
and interference. Shorten the distance if necessary.<br />
Then press and hold [CHANNEL] again. The main unit will start<br />
searching for all previously locked weather instruments.<br />
If you want to add an new sensor, press the reset button on the new<br />
sensor and then press channel to enforce the main unit to search.<br />
Note: 1. Do not reset the sensors after the main unit has locked<br />
those sensors, otherwise the main unit will no longer<br />
receive the signal from those sensors.<br />
2. If you have disconnected signals, you cannot clear the<br />
memory.<br />
THE RESET BUTTON<br />
MAINTENANCE<br />
When handled properly, this unit is engineered to give you years<br />
of satisfactory service. Here are a few product care instructions:<br />
1.Do not immerse the unit in water.If the unit comes in contact<br />
with water, dry it immediately with a soft lint-free cloth.<br />
2.Do not clean the unit with abrasive or corrosive materials.<br />
Abrasive cleaning agents may scratch the plastic parts and<br />
corrode the electronic circuit.<br />
3.Do not subject the unit to excessive: force, shock, dust,<br />
temperature, or humidity. Such treatment may result in<br />
malfunction, a shorter electronic life span, damaged batteries, or<br />
distorted parts.<br />
4.Do not tamper with the unit’s internal components.Doing so<br />
will terminate the unit’s warranty and may cause damage. The<br />
unit contains no user-serviceable parts.<br />
5.Only use new batteries as specified in this instruction manual.<br />
Do not mix new and old batteries as the old batteries may leak.<br />
6.Read this instruction manual thoroughly before operating the unit.<br />
SPECIFICATIONS<br />
Temperature<br />
Proposed Operating Range : Indoor ..... -5°C to 50°C<br />
( 23°F to 122°F )<br />
: Outoor ..... -20°C to 60°C<br />
( -4°F to 140°F )<br />
Resolution<br />
: 0.1°C (0.2°F)<br />
(indoor and outdoor)<br />
Relative Humidity<br />
Measuring Range<br />
(indoor and outdoor)<br />
Resolution<br />
(indoor and outdoor)<br />
: 2 to 98% RH<br />
: 1% RH<br />
Dew Point Temperature<br />
Measuring Range : Indoor ..... 0°C to 49°C<br />
( 32°F to 120.2°F )<br />
: Outoor ..... -10°C to 60°C<br />
( 14°F to 140°F )<br />
Resolution<br />
: 1°C (2°F)<br />
(indoor and outdoor)<br />
Barometric Pressure / Trend<br />
Measuring Range : 795 to 1050 mb<br />
(23.48 to 31.01 inHg)<br />
Resolution<br />
: 1 mb (0.03 inHg)<br />
Wind Speed<br />
Measuring Range<br />
Resolution<br />
: 0 to 56 m/s (0 to 125.3 mph)<br />
: 0.2 m/s (0.4 mph) (typical)<br />
EN<br />
This button is only used when the system is operating in an<br />
unfavorable way or malfunctioning. Use a blunt stylus to hold<br />
down the button. The main unit will return to all default settings<br />
and start searching for signals again.<br />
Before resetting the main unit, you should do the same for all<br />
weather instruments to ensure correct transmission and reception<br />
of signals. Then press reset on the main unit.<br />
7<br />
Wind Direction<br />
Measuring Range : 0° to 359° (Degrees)<br />
Digital Resolution : 1° (typical)<br />
Graphical Resolution : 10°
EN<br />
Wind Chill Temperature<br />
Measuring Range<br />
Resolution<br />
: -52°C to 60°C (-61.6°F to 140°F)<br />
: 1°C (2°F)<br />
Rainfall<br />
Daily and Cumulative : 0 to 9999 mm (0 to 393.7 in)<br />
Measuring Range<br />
Rainfall Rate<br />
: 0 to 999 mm/hr (0 to 39.37 in/hr)<br />
Measuring Range<br />
Daily and Cumulative : 1 mm (0.04 inch)<br />
Resolution<br />
Rainfall Rate Resolution : 1mm/hr (0.04 m/h) typical<br />
WMR928NX :<br />
Weight<br />
: 505 g<br />
Dimension<br />
: 204 (L) x 139 (W) x 39 (H)<br />
Power<br />
: 12V AC / DV adapter<br />
Power backup<br />
: 4 x UM3 - “AA” size alkaline battery<br />
WGR918N :<br />
Weight<br />
: 430 g<br />
Dimension<br />
: 295 (L) x 116.5 (W) x 550 (H)<br />
Power<br />
: solar cell (STR938)<br />
THGR918N :<br />
Weight<br />
: 111.5 g<br />
Dimension<br />
: 113.5 (L) x 42.5 (W) x 107.5 (H)<br />
Power : Main<br />
: solar cell (STR928N)<br />
PCR918N :<br />
Weight<br />
: 276 g<br />
Dimension : 113.5 x 145 (H)<br />
Power : Main<br />
: sole cell (STR928N)<br />
BTHR918N :<br />
Weight<br />
: 78.4 g<br />
Dimension<br />
: 180 (L) x 70 (W) x 19 (H)<br />
Power<br />
: 4 x UM4 - “AAA” size alkaline battery<br />
STR928N :<br />
Weight<br />
: 266 g<br />
Dimension<br />
: 115 (L) x 81 (W) x 141 (H)<br />
Power back up<br />
: 2 x UM3- “AA” size alkaline battery<br />
(recommend super lithium battery for<br />
weather condition under 0°C)<br />
STR938 :<br />
Weight<br />
: 290 g<br />
Dimension<br />
: 115 (L) x 81 (W) x 138 (H)<br />
Power back up<br />
: 2 x UM3- “AA” size alkaline battery<br />
(recommend super lithium battery for<br />
weather condition under 0°C)<br />
ABOUT OREGON SCIENTIFIC<br />
Visit our website (www.oregonscientific.com) to learn more about<br />
<strong>Oregon</strong> <strong>Scientific</strong> products such as digital cameras; MP3 players;<br />
children's electronic learning products and games; projection<br />
clocks; health and fitness gear; weather stations; and digital and<br />
conference phones. The website also includes contact information<br />
for our customer care department in case you need to reach us, as<br />
well as frequently asked questions and customer downloads.<br />
We hope you will find all the information you need on our website,<br />
however if you'd like to contact the <strong>Oregon</strong> <strong>Scientific</strong> Customer<br />
Care department directly, please visit www2.oregonscientific.com/<br />
service/support or call 949-608-2848 in the US. For international<br />
enquiries, please visit www2.oregonscientific.com/about/<br />
international/default.asp<br />
EC-DECLARATION OF CONFORMITY<br />
This product contains the approved transmitter module that<br />
complies with the essential requirements of Article 3 of the R&TTE<br />
1999 / 5 / EC Directive, if used as intended and the following<br />
standards have been applied:<br />
Safety of information technology equipment<br />
(Article 3.1.a of the R&TTE Directive)<br />
Applied Standard EN 60950-1: 2001<br />
Electromagnetic compatibility<br />
(Article 3.1.b of the R&TTE Directive)<br />
Applied Standards<br />
ETSI EN 301 489-1-3 (Ver.1.4.1) : 2002-08<br />
Efficient use of radio frequency spectrum<br />
(Article 3.2 of the R&TTE Directive)<br />
Applied Standards<br />
ETSI EN 300 220-3 (Ver1.1.1) : 2000-09<br />
Additional information:<br />
The product herewith complies with the requirements of the Low<br />
Voltage Directive 73 / 23 / EC, the EMC Directive 89 / 336 / EC and<br />
carries the CE marking accordingly.<br />
Carmelo Cubito<br />
Agrate Brianza (MI) / Italy January 2004<br />
Manufacturer’s EU R&TTE Representative<br />
CAUTION<br />
— The content of this manual is subject to change without<br />
further notice.<br />
— Due to printing limitation, the displays shown in this<br />
manual may differ from the actual display.<br />
— The contents of this manual may not be reproduced<br />
without the permission of the manufacturer.<br />
COUNTRIES RTTE APPROVAL COMPLIED<br />
All EC countries, Switzerland CH<br />
and Norway N<br />
8