Create successful ePaper yourself
Turn your PDF publications into a flip-book with our unique Google optimized e-Paper software.
<strong>nRF24LU1</strong> <strong>Development</strong> <strong>Kit</strong> <strong>User</strong> <strong>Guide</strong><br />
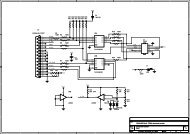
Figure 16 - <strong>nRF24LU1</strong> <strong>Development</strong> kit<br />
11.2 Features of the BFB<br />
11.2.1 Power supply<br />
The <strong>nRF24LU1</strong> <strong>Development</strong> <strong>Kit</strong> BFB has two power supply options:<br />
1. Through the USB cable<br />
2. From the 3x AAA battery pack.<br />
The switch close to the battery pack must be set to “ON” to enable supply from the battery.<br />
If the USB cable is connected, the power will be sourced from the USB even if the battery switch is set<br />
to “ON”.<br />
The <strong>nRF24LU1</strong> <strong>Development</strong> <strong>Kit</strong> BFB has two power supply regulators; none of the regulators are<br />
used to supply the <strong>nRF24LU1</strong> Radio Module. This is done by the internal regulator of the <strong>nRF24LU1</strong>.<br />
The <strong>nRF24LU1</strong> radio module can be supplied with either USB power or from the battery pack by<br />
setting a switch on the Radio Module.<br />
The “ISP Interface” connector that is used for flash programming uses the adjustable regulator as a<br />
reference. For proper logic levels, the blue potentiometer must be set to max.<br />
11.2.2 LED<br />
There are four yellow LEDs on the <strong>nRF24LU1</strong> <strong>Development</strong> <strong>Kit</strong> BFB. Three of the LEDs are<br />
connected to the <strong>nRF24LU1</strong> and can be used to indicate status, depending on the firmware that runs<br />
on the <strong>nRF24LU1</strong>. The green LED on the <strong>nRF24LU1</strong> <strong>Development</strong> <strong>Kit</strong> BFB indicates the state of the<br />
battery switch. If it is lit, the battery switch is on and the batteries are ok.<br />
Revision 1.0 Page 25 of 36