Create successful ePaper yourself
Turn your PDF publications into a flip-book with our unique Google optimized e-Paper software.
<strong>nRF24LU1</strong> <strong>Development</strong> <strong>Kit</strong> <strong>User</strong> <strong>Guide</strong><br />
4.1.2 Advanced setup<br />
Advanced setup gives access to all the different registers in the <strong>nRF24LU1</strong> trough the CES PCapplication.<br />
This setup is used during range test and other tests that require access to all parameters<br />
in the <strong>nRF24LU1</strong>.<br />
Advanced setup requires Microsoft .NET framework v2.0 runtime installed on the PC. It can be<br />
downloaded from Microsoft’s web pages.<br />
To use the CES PC application, follow these steps:<br />
1. Install the <strong>nRF24LU1</strong> CES software on the PC.<br />
2. Connect the Basic Feature Board with the <strong>nRF24LU1</strong> Radio Module in place, as<br />
configured earlier, to a USB connector on the PC.<br />
3. Start the <strong>nRF24LU1</strong> CES application from the “Nordic Semiconductor” folder on the Start<br />
menu.<br />
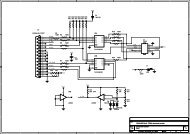
The following screen will appear:<br />
Figure 5 – CES General Settings<br />
The register settings in the bottom part of the screen reflect the settings done in the different tabs in<br />
the upper part. All parameters can be set using either the bottom register part, or by ticking the boxes<br />
in the upper part of the window. Please refer to the <strong>nRF24LU1</strong> Product Specification for details.<br />
On the upper part of the window, two tabs can be selected, Configuration and Link Evaluation<br />
Configuration tab<br />
The “Update Device” button will transfer the settings to the <strong>nRF24LU1</strong>.<br />
The tab “general settings” has the following parameters, see Figure 5.<br />
Power up – sets the radio in standby mode<br />
Revision 1.0 Page 10 of 36