laser-lok 3.0 - BioHorizons
laser-lok 3.0 - BioHorizons
laser-lok 3.0 - BioHorizons

Create successful ePaper yourself
Turn your PDF publications into a flip-book with our unique Google optimized e-Paper software.
strength and restorative<br />
flexibility in narrow spaces<br />
<strong>laser</strong>-<strong>lok</strong> <strong>3.0</strong><br />
dental implant system
Table of Contents<br />
Implants<br />
Surgical Instruments<br />
Abutments<br />
Copings & Accessories<br />
Locator Abutment Components<br />
Surgical Manual Introduction<br />
Implant Placement & Drill Sequence<br />
Implant Spacing<br />
Osteotomy Preparation<br />
Final Bone Preparation<br />
Implant Delivery<br />
Healing Protocols & Provisionalization<br />
Post-operative Instructions & Icon Legend<br />
Ordering & Warranty Information<br />
References<br />
2<br />
3<br />
4-5<br />
6-7<br />
8<br />
9<br />
10<br />
11<br />
12<br />
13<br />
14<br />
15<br />
16<br />
17<br />
17
Laser-Lok <strong>3.0</strong><br />
• Two-piece 3mm design offers restorative flexibility in narrow spaces.<br />
• 3mm threadform shown to be effective when immediately loaded. 1<br />
• Implant design is 17-40% stronger than competitor <strong>3.0</strong> implants when loaded. 2<br />
• Laser-Lok microchannels create a physical connective tissue attachment. 3<br />
<strong>BioHorizons</strong> is the only company that can claim (FDA-cleared) that its implant surface<br />
establishes a physical connective tissue attachment.<br />
This tissue connection is functionally oriented, inhibits epithelial cell downgrowth and<br />
enables crestal bone adjacent to the implant to attach and be retained.<br />
Supported by the broadest array of prosthetics<br />
60<br />
3mm threadform shown to be<br />
effective when immediately loaded. 1<br />
(Image courtesy of Craig Misch, DDS)<br />
Max Load (lbs)<br />
40<br />
20<br />
Laser-Lok <strong>3.0</strong><br />
NobelActive® <strong>3.0</strong><br />
Competitor <strong>3.0</strong><br />
10,000<br />
100,000 1,000,000 5,000,000<br />
Fatigue cycles<br />
Laser-Lok <strong>3.0</strong> is 17-40% stronger than the competitor <strong>3.0</strong> implants. 2<br />
Two-piece 3mm design offers<br />
restorative flexibility in narrow spaces.<br />
(Image courtesy of Cary Shapoff, DDS)
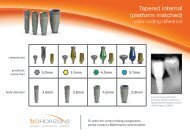
DENTAL IMPLANTS<br />
Laser-Lok <strong>3.0</strong> Implants<br />
Body Diameter<br />
Apical Diameter<br />
Laser-Lok Zone Height<br />
Minimum Ridge Width<br />
<strong>3.0</strong>mm<br />
2.0mm<br />
2.1mm<br />
5.0mm<br />
Laser-Lok zone<br />
Minimum Mesial / Distal Space<br />
6.0mm<br />
Body diameter<br />
Apical diameter<br />
Implants<br />
TP3105L<br />
TP312L<br />
TP315L<br />
Laser-Lok <strong>3.0</strong> Implant, 10.5mm<br />
Laser-Lok <strong>3.0</strong> Implant, 12mm<br />
Laser-Lok <strong>3.0</strong> Implant, 15mm<br />
Laser-Lok collar with Resorbable Blast Texturing (RBT) on implant body.<br />
Packaged with Cover Cap (TP3CC). Titanium Alloy (Ti-6AL-4V).<br />
Cover Caps<br />
TP3CC<br />
Cover Cap<br />
Use during submerged surgical healing. May use as a 1mm Healing Abutment.<br />
Hand-tighten with the .050” (1.25mm) Hex Driver. Titanium Alloy.<br />
A Cover Cap is included with each implant but may also be ordered separately.<br />
Healing Abutments<br />
Regular Emergence<br />
Wide Emergence<br />
3.5 or 4.2mm<br />
3mm height 5mm height 3mm height 5mm height<br />
3 or 5mm<br />
Laser-Lok surface<br />
TP3HA3L*<br />
TP3HA5L*<br />
TP3WHA3L*<br />
TP3WHA5L*<br />
Machined surface<br />
TP3HA3<br />
TP3HA5<br />
TP3WHA3<br />
TP3WHA5<br />
Laser-Lok <strong>3.0</strong> healing abutments are now offered with Laser-Lok microchannels on the margin bevel to inhibit epithelial downgrowth<br />
and establish a biologic soft tissue seal around the abutment. Hand-tighten with the .050” (1.25mm) Hex Driver. Titanium Alloy.<br />
*Call for availability<br />
shop online at www.biohorizons.com<br />
2
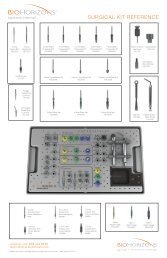
SURGICAL INSTRUMENTS<br />
Laser-Lok <strong>3.0</strong> Surgical Kit<br />
TP3KIT<br />
Laser-Lok <strong>3.0</strong> Surgical Kit (complete)<br />
Includes all instruments shown below.<br />
TP3ST<br />
Laser-Lok <strong>3.0</strong> Surgical Tray with Lid<br />
Without instruments.<br />
Individual Kit Components<br />
122-200<br />
Tissue Punch<br />
122-403<br />
122-425<br />
122-425105<br />
122-42512<br />
122-42515<br />
2.0mm Starter Drill Extended Shank<br />
2.5mm Depth Drill Extended Shank<br />
2.5 x 10.5mm Depth Drill Extended Shank<br />
2.5 x 12mm Depth Drill Extended Shank<br />
2.5 x 15mm Depth Drill Extended Shank<br />
TP3CBD<br />
Crestal Bone Drill<br />
122-900<br />
Bone Tap<br />
TP3IDH<br />
Implant-level Driver,<br />
Handpiece*<br />
TP3IDR<br />
Implant-level Driver,<br />
4mm square*<br />
300-351<br />
.050” (1.25mm) Hex Driver, Long*<br />
144-100<br />
144-200<br />
Straight Parallel Pin<br />
20° Angled Parallel Pin<br />
300-400<br />
Hand Wrench*<br />
130-000<br />
Ratchet<br />
*Instrument o-rings & c-rings wear out over time. If an instrument is no longer held securely by its associated driver, order a replacement ring through Customer Care.<br />
products shown not to scale<br />
3
ABUTMENTS<br />
Abutments are internally threaded<br />
Laser-Lok <strong>3.0</strong> abutments are internally threaded for increased strength.<br />
Delivery to the mouth can be achieved by inserting an .050” (1.25mm) Hex<br />
Driver into the abutment screw that is pre-assembled into the abutment.<br />
PEEK Temporary Abutments<br />
TP3TA<br />
PEEK Temporary Abutment<br />
3mm<br />
8mm<br />
Use for fabrication of cement- or screw-retained provisional restorations (up to 30 days). A<br />
Direct Coping Screw (purchased separately) may be used to maintain the screw access hole<br />
during fabrication of screw-retained provisional prostheses. Pre-assembled with Abutment<br />
Screw (PXAS). PEEK (PolyEtherEtherKetone). Final torque: 30Ncm.<br />
Titanium Temporary Abutments<br />
12mm<br />
TP3TTH<br />
TP3TTN<br />
Titanium Temporary Abutment, Hexed<br />
Titanium Temporary Abutment, Non-hexed<br />
1.5mm<br />
2mm<br />
Use for screw-retained, long-term temporary restorations (>30 days).<br />
Pre-assembled with Abutment Screw (PXAS). Titanium Alloy. Final torque: 30Ncm.<br />
<strong>3.0</strong>mm Two-piece Custom Temporary Abutment<br />
1 or 3mm<br />
collar height<br />
5mm<br />
Laser-Lok<br />
zone<br />
TP3CTA1<br />
TP3CTA3L<br />
TP3CTA3<br />
Two-piece Custom Temporary Abutment, 1mm Height*<br />
Two-piece Custom Temporary Abutment, 3mm Height, Laser-Lok*<br />
Two-piece Custom Temporary Abutment, 3mm Height*<br />
Two-piece Custom Temporary Abutments are offered with Laser-Lok microchannels on the collar to<br />
inhibit epithelial downgrowth and establish a biologic soft tissue seal around the abutment. Use to<br />
create an immediate temporary abutment that sculpts the soft tissue. Use included PEEK sleeve to<br />
support a temporary prosthesis. Final torque: 30Ncm.<br />
Straight Abutments<br />
8mm<br />
TP3SA<br />
Straight Abutment<br />
Use to fabricate cement-retained, single- or multiple-unit prostheses.<br />
Pre-assembled with Abutment Screw (PXAS). Titanium Alloy. Final torque: 30Ncm.<br />
*Call for availability<br />
shop online at www.biohorizons.com<br />
4
ABUTMENTS<br />
Advantages of Laser-Lok abutments<br />
Laser-Lok abutments establish a soft tissue seal intended to protect the bone and maintain the<br />
restoration esthetics over time. Abutments placed at time of surgery can be left in position with<br />
a standard crown & bridge impression taken to avoid disrupting the soft tissue connection. If an<br />
impression coping will be used and the soft tissue seal disrupted, a new Laser-Lok abutment<br />
(healing or final) should be placed after the impression to establish the soft tissue connection.<br />
Angled Esthetic Abutment & Straight Abutments<br />
15°<br />
TP3AEAL<br />
TP3AEA<br />
Angled Esthetic Abutment, Laser-Lok<br />
Angled Esthetic Abutment<br />
Use to fabricate cement-retained, single- or multiple-unit prostheses.<br />
Pre-assembled with Abutment Screw (PXAS). Titanium Alloy. TiN coated.<br />
Final torque: 30Ncm.<br />
1mm<br />
2mm<br />
8mm<br />
Straight Esthetic Abutments<br />
TP3SEAL<br />
Straight Esthetic Abutment, Laser-Lok<br />
TP3SEA<br />
TP3SEA3L<br />
TP3SEA3<br />
Straight Esthetic Abutment<br />
Straight Esthetic Abutment, 3mm Buccal, Laser-Lok<br />
Straight Esthetic Abutment, 3mm Buccal<br />
1mm<br />
2mm<br />
8mm<br />
3mm<br />
5mm<br />
9mm<br />
Use to fabricate cement-retained, single- or multiple-unit prostheses.<br />
Pre-assembled with Abutment Screw (PXAS). Titanium Alloy. TiN coated.<br />
Final torque: 30Ncm.<br />
3mm Buccal<br />
Custom Castable (UCLA) Abutments<br />
TP3CAH<br />
TP3CAN<br />
<strong>3.0</strong>mm Custom Cast Abutment, Hexed<br />
<strong>3.0</strong>mm Custom Cast Abutment, Non-hexed<br />
Use hexed abutments for single-unit screw-retained or custom abutment cementretained<br />
restorations. Use non-hexed abutments for multiple-unit, screw-retained<br />
restorations. Pre-assembled with Abutment Screw (PXAS). Gold Alloy base with<br />
natural acetyl (Delrin® or Pomalux®) sleeve. Final torque: 30Ncm.<br />
10.6mm<br />
3mm<br />
to top of screw<br />
5<br />
shop online at www.biohorizons.com
COPINGS & ACCESSORIES<br />
Indirect Transfer Copings (Closed Tray)<br />
2mm<br />
TP3ISC<br />
<strong>3.0</strong>mm Indirect Scoop Coping<br />
13mm<br />
11mm<br />
Use to make a closed-tray, implant-level, hexed-timed impression. Pre-assembled with a<br />
Coping Screw (PXSS). Titanium Alloy.<br />
Direct Pick-up Copings (Open Tray)<br />
5mm<br />
7mm<br />
9mm<br />
16mm<br />
TP3DC<br />
TP3DCN<br />
Direct Pick-up Coping, Hexed*<br />
Direct Pick-up Coping, Non-hexed*<br />
Use to make an open-tray, implant-level impression. Packaged with the Direct Coping Screw, Shallow Hex<br />
(PXDCSS). Non-hexed version may also be used to fabricate multiple-unit <strong>laser</strong> welded bars; see the Internal<br />
Prosthetic Technique Manual (ref. ML0118) for additional information. Titanium Alloy. Hand-tighten.<br />
Direct Coping Screws<br />
Utilizes the .050” (1.25mm) Hex Driver. Hand-tighten or torque to 30 Ncm depending on application. Titanium Alloy.<br />
PXDCSS<br />
7mm<br />
PXDCS &<br />
PXDCSL<br />
PXDCSS<br />
PXDCS<br />
Direct Coping Screw, Shallow Hex<br />
Packaged with all Direct Pick-up Copings. Short hex depth for easy removal of impression material. May also be<br />
used in place of an Abutment Screw (PXAS) when extra length is needed, or to maintain the screw access hole during<br />
fabrication of a screw-retained provisional prosthesis. Utilizes the .050” (1.25mm) Hex Driver. Hand-tighten or torque<br />
to 30 Ncm depending on application. Titanium Alloy.<br />
Direct Coping Screw<br />
Includes a deeper hex that allows up to 7mm to be removed without losing the hex engagement. Utilizes the .050”<br />
(1.25mm) Hex Driver. Hand-tighten or torque to 30 Ncm depending on application. Titanium Alloy.<br />
PXDCSL Direct Coping Screw, Long<br />
PXDCSL has the same deep hex as the PXDCS and is 5mm longer than the PXDCS and the PXDCSS.<br />
Implant Analogs<br />
TP3IA Implant Analog<br />
Use in the lab to represent the implant in the working cast. Titanium Alloy.<br />
*In December 2010, a running change was made to package all Direct Copings with the PXDCSS<br />
shop online at www.biohorizons.com<br />
6
COPINGS & ACCESSORIES<br />
Bone Profiler<br />
TP3BP<br />
Bone Profiling Bur & Guide<br />
Use at implant uncovery to contour crestal bone for abutments when<br />
the implant is subcrestal. The Profiler’s internal geometry matches the<br />
geometry of the included Profiler Guide. The Guide is screwed into<br />
the implant and then aligns the Profiler for precise removal of tissue<br />
surrounding the platform.<br />
Abutment Prepping Handle<br />
TP3AH<br />
Platform Analog Handle<br />
Use to comfortably hold abutments for chairside or laboratory<br />
preparation, these handles mimic the implant/analog hex<br />
geometry. Abutments are secured to the handle with the<br />
standard Abutment Screw (PXAS).<br />
Surgical Driver<br />
150-000 Surgical Driver<br />
Use to drive implants into the osteotomy, particularly in the<br />
anterior region. The driver interfaces with the .050” (1.25mm)<br />
Hex Driver as well as Bone Tap and the Implant-level Driver,<br />
4mm square.<br />
Elos Adjustable Torque Wrench<br />
EL-C12374<br />
Elos Adjustable Torque Wrench<br />
Lightweight titanium design is easy to use as an adjustable<br />
torque wrench or a ratchet. Quickly disassembles for<br />
cleaning. No calibration required.<br />
ITL Adjustable Torque Wrench<br />
ATW<br />
ITL Precise Adjustable Torque Wrench<br />
Place both implants and abutments with 9 distinct torque settings<br />
(15, 20, 25, 30, 35, 40, 45, 50 and 60 Ncm). A simple twist of the<br />
handle locks in precision-engineered torque values and guarantees<br />
accuracy and repeatability.<br />
7<br />
shop online at www.biohorizons.com
LOCATOR ABUTMENT COMPONENTS<br />
Locator ® Abutments<br />
1 to 6mm<br />
cuff height<br />
3.5mm<br />
1.0mm<br />
1.5mm<br />
5.5mm<br />
TP3LA1<br />
TP3LA2<br />
TP3LA3<br />
TP3LA4<br />
TP3LA5<br />
TP3LA6<br />
Locator Abutment, 1.0mm Cuff Height<br />
Locator Abutment, 2.0mm Cuff Height<br />
Locator Abutment, <strong>3.0</strong>mm Cuff Height<br />
Locator Abutment, 4.0mm Cuff Height<br />
Locator Abutment, 5.0mm Cuff Height<br />
Locator Abutment, 6.0mm Cuff Height<br />
Locator Implant Attachments are designed for use with overdentures or partial dentures retained in whole or in part by<br />
dental implants in the mandible or maxilla. Order by Cuff Height to match the height of the gingival tissue. The abutment<br />
will extend above the tissue by 1.5mm to allow the Locator Male to seat completely. Order one Locator Male Processing<br />
Package for each Locator Abutment (sold in packs of 2 or 10). Locator Abutments are made from Titanium Alloy.<br />
Locator Components<br />
LCT<br />
Core Tool<br />
Multi-purpose tool serves as hand driver for seating Locator Abutments onto<br />
the implants, seating tool for nylon male inserts and insert removal tool.<br />
LMPP-2<br />
LMPP-10<br />
Locator Male Processing Package (2 pack)<br />
Includes: (2) Denture Caps with (2) Black Processing Males;<br />
(2) White Block-out Spacers; (2) Clear, (2) Pink and (2) Blue Nylon Males.<br />
Locator Male Processing Package (10 pack)<br />
Includes: (10) Denture Caps with (10) Black Processing Males;<br />
(10) White Block-out Spacers; (10) Clear, (10) Pink and (10) Blue Nylon Males.<br />
LIC Impression Coping (4 pack) Square Drive Tool<br />
Use with a torque wrench to seat Locator Abutments.<br />
LFA-4MM<br />
Female Analog 4mm (4 pack)<br />
LSDT-15MM<br />
LSDT-21MM<br />
Square Drive Tool (15mm length)<br />
Square Drive Tool (21mm length)<br />
LRM-G<br />
Extended Range Replacement Male (green)<br />
Retention: 4lbs / 1814g, 4 pack<br />
LRM-C<br />
Replacement Male (clear)<br />
Retention: 5lb / 2268g, 4 pack<br />
LRM-O<br />
Extended Range Replacement Male (orange)<br />
Retention: 2lbs / 907g, 4 pack<br />
LRM-P<br />
Light Retention<br />
Replacement Male (pink)<br />
Retention: 3lb / 1361g, 4 pack<br />
LRM-R<br />
Extended Range Extra Light Retention<br />
Replacement Male (red)<br />
Retention: 1.5lbs / 680g, 4 pack<br />
LRM-B<br />
Extra Light Retention<br />
Replacement Male (blue)<br />
Retention: 1.5lb / 680g, 4 pack<br />
LRM-Z<br />
Zero Retention Replacement Male (gray)<br />
Retention: 0lb / 0g, 4 pack<br />
LBPRM<br />
Black Processing Replacement Male<br />
shop online at www.biohorizons.com<br />
8
SURGICAL MANUAL INTRODUCTION<br />
This Surgical Manual serves as a reference for using the Laser-Lok <strong>3.0</strong> implants and surgical instruments. It is intended<br />
solely to provide instructions on the use of <strong>BioHorizons</strong> products. It is not intended to describe the methods or<br />
procedures for diagnosis, treatment planning, or placement of implants, nor does it replace clinical training or a<br />
clinician’s best judgment regarding the needs of each patient. <strong>BioHorizons</strong> strongly recommends appropriate training<br />
as a prerequisite for the placement of implants and associated treatment.<br />
The procedures illustrated and described within this manual reflect idealized patient presentations with adequate<br />
bone and soft tissue to accommodate implant placement. No attempt has been made to cover the wide range of<br />
actual patient conditions that may adversely affect surgical and prosthetic outcomes. Clinician judgment as related<br />
to any specific case must always supersede any recommendations made in this or any <strong>BioHorizons</strong> literature.<br />
Before beginning any implant surgical procedure with <strong>BioHorizons</strong> implants:<br />
• Read and understand the Instructions for Use that accompany the products.<br />
• Clean and sterilize the surgical tray and instruments per Instructions for Use.<br />
• Become thoroughly familiar with all instruments and their uses.<br />
• Study Surgical Kit layout and iconography.<br />
• Design a surgical treatment plan to satisfy the prosthetic requirements of the case.<br />
Small diameter implants and angled abutments are intended for the anterior region of the mouth<br />
and are not intended for the posterior region of the mouth due to possible failure of the implant.<br />
Indications for Use<br />
Laser-Lok <strong>3.0</strong> Implants may be used as an artificial root structure for single tooth replacement of mandibular central and<br />
lateral incisors and maxillary lateral incisors. The implants may be restored immediately:<br />
(1) with a temporary prosthesis that is not in functional occlusion,<br />
(2) when splinted together as an artificial root structure for multiple tooth replacement of mandibular incisors, or<br />
(3) for denture stabilization using multiple implants in the anterior mandible and maxilla.<br />
The implants may be placed in immediate function when good primary stability has been achieved and with appropriate<br />
occlusal loading.<br />
9<br />
shop online at www.biohorizons.com
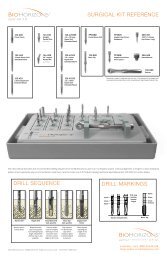
IMPLANT PLACEMENT & DRILL SEQUENCE<br />
Implant Placement<br />
The Laser-Lok zone provides 2.1mm of placement flexibility so<br />
placement depth can be driven primarily by the restorative need.<br />
Placement in Uneven Ridges<br />
When placing the Laser-Lok <strong>3.0</strong> implant in<br />
an uneven ridge, prepare the osteotomy and<br />
place the implant so that the bone/softtissue<br />
junction is within the 2.1mm Laser-Lok<br />
transition zone. If the discrepancy is more than<br />
2.1mm, leveling the ridge can be considered.<br />
Drill Sequence<br />
Starter<br />
Drill<br />
Depth<br />
Drill<br />
Crestal Bone Drill<br />
(site specific)<br />
Bone Tap<br />
(site specific)<br />
Implant-level<br />
Driver<br />
Use to pierce<br />
cortical bone.<br />
Depth Drills with stops<br />
correspond to matching<br />
implant lengths. Depth<br />
Drills without stops are<br />
also available.<br />
Use to widen crest<br />
for implant. Drill stop<br />
is 1mm above the<br />
<strong>laser</strong> mark for uneven<br />
ridges or D1 bone.<br />
Tap required in dense<br />
bone; stop when<br />
resistance gives or desired<br />
depth is reached.<br />
Place implant matching<br />
the length of the<br />
prepared osteotomy.<br />
shop online at www.biohorizons.com<br />
10
IMPLANT SPACING<br />
Spacing considerations for Laser-Lok <strong>3.0</strong> implants<br />
During implant placement, clinicians must apply their best judgment as to the<br />
appropriate spacing for individual patient conditions and restorative requirements.<br />
osteotomy<br />
centerpoint<br />
The osteotomy centerpoint required to maintain<br />
a specific implant-to-tooth spacing is calculated<br />
according to this formula: 1/2 (implant body<br />
diameter) + the desired spacing.<br />
implant-totooth<br />
spacing<br />
osteotomy<br />
center-tocenter<br />
The osteotomy center-to-center<br />
measurement required to maintain a<br />
specific edge-to-edge spacing between<br />
two implants is calculated according to<br />
this formula: 1/2 (sum of 2 implant<br />
body diameters) + the desired spacing.<br />
edgeto-edge<br />
spacing<br />
Important Considerations<br />
• Peri-operative oral rinses with a 0.12% Chlorhexidine Digluconate solution have been shown to significantly lower the<br />
incidence of post-implantation infectious complications. 4 A pre-operative 30-second rinse is recommended, followed by<br />
twice daily rinses for two weeks following surgery.<br />
• Drilling must be done under a constant stream of sterile irrigation. A pumping motion should be employed to prevent<br />
over-heating the bone. Surgical drills and taps should be replaced when they are worn, dull, corroded or in any way<br />
compromised. <strong>BioHorizons</strong> recommends replacing drills after 12 to 20 osteotomies. 5<br />
11<br />
shop online at www.biohorizons.com
OSTEOTOMY PREPARATION<br />
All <strong>BioHorizons</strong> surgical drills are externally irrigated and designed to be used at drill speeds of 850-2500 rpm 6 with sterile<br />
irrigation. Reduced drill speed may be indicated in softer bone or as drill diameter increases. In knife-edge residual alveolar ridges,<br />
a round bur can be used to create a flat starting point for the starter drill.<br />
2.0mm Extended Shank Starter Drill<br />
2.5mm Extended Shank Depth Drills<br />
Purpose: Initiates osteotomy.<br />
Purpose: Sets osteotomy depth following use<br />
of the 2.0mm Extended Shank Starter Drill.<br />
• Chisel-tip design eliminates “skating” on osseous crest<br />
• Initiates osteotomy<br />
• Prepares site for Paralleling Pins<br />
• Efficient cutting drill design collects bone for<br />
autografting<br />
Depth Drills with Stops<br />
• Fixed circular ring acts as a definitive drill stop<br />
15mm<br />
12mm<br />
10mm<br />
Drill stop<br />
matches<br />
implant<br />
length<br />
The 2.0mm and 2.5mm Extended Shank Depth Drills are<br />
designed to increase and/or set the depth of the osteotomy.<br />
Starter & Depth Drills<br />
Parallel Pins<br />
Purpose: Evaluation of osteotomy position and angle.<br />
• Provided straight or with a 20° angle<br />
• Use after 2.0mm Starter Drill and 2.5mm Depth Drills<br />
• 9mm shank for radiographic evaluation of proximity to adjacent anatomy<br />
• Hub diameter is 4.0mm<br />
shop online at www.biohorizons.com<br />
12
FINAL BONE PREPARATION<br />
Crestal Bone Drill<br />
Purpose: Removes cortical bone at ridge crest to<br />
facilitate pressure-free seating of the<br />
implant collar.<br />
• Rounded non-end cutting hub centers drill in osteotomy<br />
• Use following the final drill<br />
• Drill stop is 1mm above the <strong>laser</strong> mark for uneven ridges<br />
or D1 bone<br />
Bone Tap<br />
Purpose: Prepares dense cortical bone for implant threads.<br />
• 30 rpm or less 7<br />
• Final instrument prior to implant placement<br />
• Can be driven with a handpiece or ratchet<br />
Place the tip of the Bone Tap into the osteotomy, apply firm<br />
apical pressure and begin rotating slowly in a clockwise<br />
direction (30 rpm or less is recommended) 7 . When the<br />
threads engage, allow the tap to feed without excessive<br />
pressure. To remove, rotate the Bone Tap in a counterclockwise<br />
direction, allowing it to back out of the osteotomy.<br />
Do not pull on the Bone Tap to remove it from the site.<br />
18mm<br />
15mm<br />
12mm<br />
10.5mm<br />
Bone Tap<br />
13<br />
shop online at www.biohorizons.com
IMPLANT DELIVERY<br />
Implant pick-up<br />
Vial Cap<br />
Implant<br />
Cover Cap<br />
Implant<br />
driver<br />
hex<br />
Vial<br />
Implant<br />
basket<br />
PEEK<br />
snap ring<br />
The Implant Cover Cap for a two-stage<br />
surgical protocol is mounted in the vial cap.<br />
Implant placement<br />
Engage the implant with the PEEK snap ring of the<br />
Implant-level Driver. The hex of the driver has no<br />
retention feature and does not need to be engaged.<br />
Excess pressure can deform the implant<br />
basket and should be avoided.<br />
Place the apex of the implant into the osteotomy and begin rotating slowly. The driver hex will<br />
engage when the driver is slowly rotated under apical pressure. If too much resistance is felt during<br />
insertion, remove the implant and revise the osteotomy with the appropriate Crestal Bone Drill or<br />
Bone Tap as deemed necessary to reduce insertion torque.<br />
Given the mechanical limitations of small diameter implants, do not exceed 70Ncm of<br />
insertion torque. Doing so may damage the implant. Using a torque-limiting handpiece<br />
and adjustable torque wrench is strongly recommended.<br />
Implant orientation<br />
Dimple<br />
When seating the implant, use<br />
the corresponding dimples on<br />
the driver to orient one internal<br />
hex flat facially. Doing so verifies<br />
that an angled abutment will<br />
correct the angulation.<br />
shop online at www.biohorizons.com<br />
14
HEALING PROTOCOLS & PROVISIONALIZATION<br />
Cover Caps for two-stage protocol<br />
Purpose: Protects prosthetic platform in two-stage (submerged) surgical protocols.<br />
• Irrigate implant to remove blood and other debris<br />
• Remove Cover Cap from implant vial cap with .050” (1.25mm) Hex Driver<br />
• Thread clockwise into implant body<br />
• Hand-tighten (10-15 Ncm) utilizing .050” (1.25mm) Hex Driver<br />
An antibacterial paste may be placed on the end of the Cover Cap to help decrease the risk of<br />
bacterial growth within the implant body during the healing phase. Following placement of the<br />
Cover Cap, the surgical site should be irrigated and the soft tissue adapted in a normal surgical<br />
fashion. Take precautions to prevent the Cover Cap from being aspirated by the patient.<br />
Healing Abutments for one-stage protocol<br />
Purpose: Transmucosal element for developing soft tissue emergence.<br />
• Hand-tighten (10-15 Ncm) utilizing .050” (1.25mm) Hex Driver<br />
• Available in two heights: 3mm and 5mm<br />
• Cover Cap that comes with implant can be used as<br />
1mm Healing Abutment<br />
Healing Abutments are placed after uncovery in a two-stage surgical protocol, or in lieu of a Cover Cap in a single-stage (nonsubmerged)<br />
protocol. Prior to seating the Healing Abutment, thoroughly irrigate the inside of the implant to remove blood and<br />
other debris. An antibacterial paste may be placed on the screw portion to decrease the risk of bacterial growth within the<br />
implant body during the healing phase. Following seating, irrigate the surgical site and adapt the soft tissue in normal surgical<br />
fashion. A gingivectomy or apically positioned flap technique may be used to reduce the soft tissue thickness and to decrease<br />
sulcular depth around the implant. The suture groove on the Healing Abutment may be used to apically position the soft<br />
tissue flap. Take precautions to prevent the Healing Abutment from being aspirated by the patient.<br />
Immediate provisionalization<br />
Temporary abutments can be modified for fabrication of a cement or screw-retained provisional restoration. A<br />
Direct Coping Screw (purchased separately) may be used to maintain a screw access hole during the fabrication<br />
of a screw-retained provisional prosthesis.<br />
All Laser-Lok <strong>3.0</strong> abutments are internally threaded for increased strength and come packaged<br />
with the abutment screw pre-assembled in the abutment. Partially insert the abutment into the<br />
implant and tighten the abutment screw with an .050” (1.25mm) Hex Driver to complete the seating.<br />
Laser-Lok <strong>3.0</strong> implants may be restored immediately:<br />
(1) with a temporary prosthesis that is not in functional occlusion,<br />
(2) when splinted together as an artificial root structure for multiple tooth replacement of mandibular incisors, or<br />
(3) for denture stabilization using multiple implants in the anterior mandible and maxilla.<br />
The implants may be placed in immediate function when good primary stability has been achieved and with appropriate occlusal loading.<br />
15<br />
shop online at www.biohorizons.com
POST-OPERATIVE INSTRUCTIONS & ICON LEGEND<br />
Post-operative Instructions<br />
A period of unloaded healing time is often recommended. This is dependent on individual patient healing rates and bone quality<br />
of the implant site. Each case must be independently evaluated. This unloaded healing period allows for integration between the<br />
bone and implant surface.<br />
The patient must be instructed to follow a post-surgical regimen including cold packs for 24 hours post-implantation. The<br />
patient’s diet should consist of soft foods and possibly dietary supplements. Pharmacological therapy should be considered as<br />
the patient’s condition dictates.<br />
If a removable prosthesis is used during the initial healing phase, it is recommended that a soft liner material be used to prevent<br />
pressure on the surgical site. The prosthesis should be relieved over the implant site prior to the soft liner application. The patient<br />
should be checked periodically to monitor healing of the soft tissues and bone using clinical and radiographic evaluations.<br />
Ongoing hygiene for the implant patient is vital. Hygiene recall appointments at three month intervals are suggested. Instruments<br />
designed for implant abutment scaling, such as Implacare instruments from Hu-Friedy® should be utilized. The stainless steel<br />
handles may be fitted with assorted tip designs used for hygiene on natural teeth. The Implacare® scalers contain no glass or<br />
graphite fillers that can scratch titanium implant abutments.<br />
Icon Legend<br />
STERILE R<br />
Use before expiration<br />
date (YYYY-MM)<br />
Manufacture date<br />
(YYYY-MM)<br />
NON-STERILE<br />
Rx Only<br />
Caution: Federal (USA)<br />
law restricts these<br />
devices to the sale,<br />
distribution and use<br />
by, or on the order of,<br />
a dentist or physician.<br />
Artwork label number<br />
Sterile by<br />
gamma irradiation<br />
Non-sterile<br />
<strong>3.0</strong> x 12mm<br />
Laser-Lok <strong>3.0</strong> Implant<br />
Birmingham, AL 35244 USA<br />
REF<br />
LOT<br />
TP312L<br />
Laser-Lok, RBT<br />
<strong>3.0</strong> x 12mm<br />
YYXXXXX<br />
YYYY-MM<br />
expires<br />
YYYY-MM<br />
manufacture date<br />
STERILE R<br />
gamma irradiated<br />
Rx Only<br />
do not re-use<br />
see instructions<br />
for use<br />
LTP312L Rev A 0473<br />
<strong>BioHorizons</strong> Laser-Lok <strong>3.0</strong><br />
REF TP312L LOT YYXXXXX<br />
<strong>3.0</strong> x 12mm<br />
<strong>BioHorizons</strong> Laser-Lok <strong>3.0</strong><br />
REF TP312L LOT YYXXXXX<br />
<strong>3.0</strong> x 12mm<br />
REF<br />
LOT<br />
0473<br />
Reference/article number<br />
Lot/batch number<br />
Single use only<br />
See Instructions for Use<br />
<strong>BioHorizons</strong> products carry<br />
the CE mark and fulfill the<br />
requirements of the Medical<br />
Devices Directive<br />
EU Authorised Representative<br />
QUALITY FIRST INTERNATIONAL<br />
Suites 317/318 Burford Business Centre<br />
11 Burford Road, Stratford<br />
London E15 2ST United Kingdom<br />
Telephone +44-208-221-2361<br />
Telefax +44-208-221-1912<br />
shop online at www.biohorizons.com<br />
16
ORDERING & WARRANTY INFORMATION<br />
<strong>BioHorizons</strong> Lifetime Warranty on Implants and Prosthetics: All <strong>BioHorizons</strong> implants and prosthetic components include a Lifetime Warranty. <strong>BioHorizons</strong><br />
implant or prosthetic components will be replaced if removal of that product is due to failure (excluding normal wear to overdenture attachments).<br />
Additional Warranties: <strong>BioHorizons</strong> warranties instruments, surgical drills, taps, torque wrenches and Virtual Implant Placement (VIP) treatment planning software.<br />
(1) Surgical Drills and Taps: Surgical drills and taps include a warranty period of ninety (90) days from the date of initial invoice. Surgical instruments should be<br />
replaced when they become worn, dull, corroded or in any way compromised. Surgical drills should be replaced after 12 to 20 osteotomies. 6<br />
(2) Instruments: The <strong>BioHorizons</strong> manufactured instrument warranty extends for a period of one (1) year from the date of initial invoice. Instruments include<br />
drivers, sinus lift components, implant site dilators and <strong>BioHorizons</strong> tools used in the placement or restoration of <strong>BioHorizons</strong> implants.<br />
(3) VIP treatment planning software: VIP treatment planning software warranty extends for a period of ninety (90) days from the date of initial invoice. The<br />
warranty requires that VIP be used according to the minimum system requirements.<br />
(4) Compu-Guide surgical templates: Compu-Guide surgical templates are distributed without making any modifications to the submitted Compu-Guide<br />
Prescription Form and VIP treatment plan (“as is”). <strong>BioHorizons</strong> does not make any warranties expressed or implied as it relates to surgical templates.<br />
Return Policy: Product returns require a Return Authorization Form, which can be acquired by contacting Customer Care. The completed Return Authorization<br />
Form should be included with the returned product. For more information, please see the reverse side of the invoice that was shipped with the product.<br />
Disclaimer of Liability: <strong>BioHorizons</strong> products may only be used in conjunction with the associated original components and instruments according to the<br />
Instructions for Use (IFU). Use of any non-<strong>BioHorizons</strong> products in conjunction with <strong>BioHorizons</strong> products will void any warranty or any other obligation, expressed<br />
or implied.<br />
Treatment planning and clinical application of <strong>BioHorizons</strong> products are the responsibility of each individual clinician. <strong>BioHorizons</strong> strongly recommends completion<br />
of postgraduate dental implant education and adherence to the IFU that accompany each product. <strong>BioHorizons</strong> is not responsible for incidental or consequential<br />
damages or liability relating to use of our products alone or in combination with other products other than replacement or repair under our warranties.<br />
Compu-Guide surgical templates are ordered under the control of a Clinician. The Clinician recognizes responsibility for use. Therefore, regardless of the real or<br />
proven damages, the liability to <strong>BioHorizons</strong> is limited to the price of the product directly related to the reason for the claim.<br />
Distributed Products: For information on the manufacturer’s warranty of distributed products, please refer to their product packaging. Distributed products are<br />
subject to price change without notice.<br />
Validity: Upon its release, this literature supersedes all previously published versions.<br />
Availability: Not all products shown or described in this literature are available in all countries. <strong>BioHorizons</strong> continually strives to improve its products and therefore<br />
reserves the right to improve, modify, change specifications or discontinue products at any time.<br />
Any images depicted in this literature are not to scale, nor are all products depicted. Product descriptions have been modified for presentation purposes. For<br />
complete product descriptions and additional information, visit shop.biohorizons.com.<br />
References<br />
1. Initial clinical efficacy of 3-mm implants immediately placed into function in conditions of limited spacing. Reddy MS, O’Neal SJ, Haigh S,<br />
Aponte-Wesson R, Geurs NC. Int J Oral Maxillofac Implants. 2008 Mar-Apr;23(2):281-288.<br />
2. Implant strength & fatigue testing done in accordance with ISO standard 14801.<br />
3. Human Histologic Evidence of a Connective Tissue Attachment to a Dental Implant. M Nevins, ML Nevins, M Camelo, JL Boyesen, DM Kim.<br />
International Journal of Periodontics & Restorative Dentistry. Vol. 28, No. 2, 2008.<br />
4. The influence of 0.12 percent chlorhexidine digluconate rinses on the incidence of infectious complications and implant success. Lambert PM,<br />
Morris HF, Ochi S. J Oral Maxillofac Surg 1997;55(12 supplement 5):25-30.<br />
5. Heat production by 3 implant drill systems after repeated drilling and sterilization. Chacon GE, Bower DL, Larsen PE, McGlumphy EA, Beck FM.<br />
J Oral Maxillofac Surg. 2006 Feb;64(2):265-9.<br />
6. Density of Bone: Effect on Surgical Approach and Healing. CE Misch. Contemporary Implant Dentistry. Second Edition. Mosby: St. Louis, 1999.<br />
371-384.<br />
7. Root Form Surgery in the Edentulous Mandible: Stage I Implant Insertion. CE Misch. Contemporary Implant Dentistry. Second Edition. Mosby:<br />
St. Louis, 1999. 347-369.<br />
17
Direct Offices<br />
<strong>BioHorizons</strong> Canada<br />
866-468-8338<br />
<strong>BioHorizons</strong> USA<br />
888-246-8338 or<br />
205-967-7880<br />
<strong>BioHorizons</strong> Spain<br />
+34 91 713 10 84<br />
<strong>BioHorizons</strong> UK<br />
+44 (0)1344 752560<br />
<strong>BioHorizons</strong> Germany<br />
+49 761-556328-0<br />
<strong>BioHorizons</strong> Australia<br />
+61 2 8399 1520<br />
<strong>BioHorizons</strong> Chile<br />
+56 2 361 9519<br />
Distributors<br />
For contact information in our 85 markets, visit www.biohorizons.com<br />
<strong>BioHorizons</strong>®, Laser-Lok®, MinerOss®, AutoTac® and Mem-Lok® are registered trademarks of <strong>BioHorizons</strong> IPH, Inc.<br />
AlloDerm® and AlloDerm GBR® are registered trademarks of LifeCell Corporation.<br />
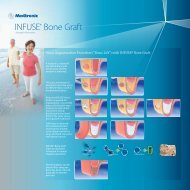
The ARTISAN Space Maintenance System, Grafton® DBM and LADDEC® are registered trademarks of Medtronic, Inc.<br />
INFUSE® Bone Graft, the PROGENIX® Family of Grafts, and the MASTERGRAFT® Family of Products are registered trademarks of Medtronic Sofamor Danek Inc.<br />
Zimmer® is a registered trademark of Zimmer, Inc. NobelActive® is a registered trademark of Nobel Biocare Services AG.<br />
Spiralock® is a registered trademark of Spiralock Corporation. Pomalux® is a registered trademark of Westlake Plastics Co.<br />
Locator is a registered trademark of Zest Anchors, Inc. Delrin® is a registered trademark of E.I. du Pont de Nemours and Company.<br />
MinerOss® Cancellous is processed by DCI Donor Services Tissue Bank. Mem-Lok® is manufactured by Collagen Matrix, Inc.<br />
Not all products shown or described in this literature are available in all countries. As applicable, <strong>BioHorizons</strong> products are cleared for sale in the European Union under<br />
the EU Medical Device Directive 93/42/EEC and the tissues and cells Directive 2004/23/EC. We are proud to be registered to ISO 13485:2003, the international quality<br />
management system standard for medical devices, which supports and maintains our product licences with Health Canada and in other markets around the globe.<br />
Original language is English. © 2012 <strong>BioHorizons</strong> IPH, Inc. All Rights Reserved.<br />
shop online at<br />
www.biohorizons.com<br />
*L01300*<br />
L01300<br />
REV E SEP 2012