Manual - GAMING
Manual - GAMING
Manual - GAMING

Create successful ePaper yourself
Turn your PDF publications into a flip-book with our unique Google optimized e-Paper software.
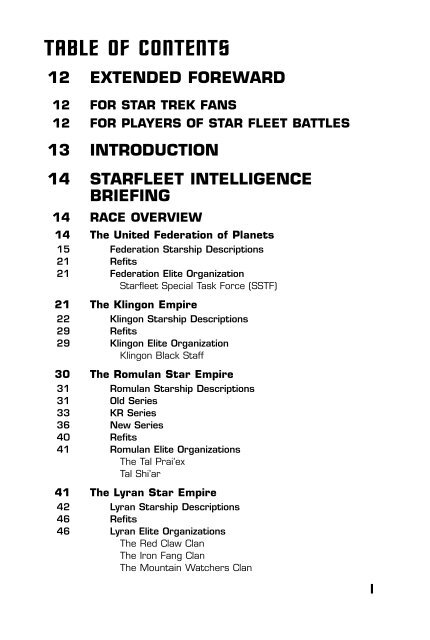
T@BLE OF CONTENTS<br />
12 EXTENDED FOREWARD<br />
12 FOR STAR TREK FANS<br />
12 FOR PLAYERS OF STAR FLEET BATTLES<br />
13 INTRODUCTION<br />
14 STARFLEET INTELLIGENCE<br />
BRIEFING<br />
14 RACE OVERVIEW<br />
14 The United Federation of Planets<br />
15 Federation Starship Descriptions<br />
21 Refits<br />
21 Federation Elite Organization<br />
Starfleet Special Task Force (SSTF)<br />
21 The Klingon Empire<br />
22 Klingon Starship Descriptions<br />
29 Refits<br />
29 Klingon Elite Organization<br />
Klingon Black Staff<br />
30 The Romulan Star Empire<br />
31 Romulan Starship Descriptions<br />
31 Old Series<br />
33 KR Series<br />
36 New Series<br />
40 Refits<br />
41 Romulan Elite Organizations<br />
The Tal Prai’ex<br />
Tal Shi’ar<br />
41 The Lyran Star Empire<br />
42 Lyran Starship Descriptions<br />
46 Refits<br />
46 Lyran Elite Organizations<br />
The Red Claw Clan<br />
The Iron Fang Clan<br />
The Mountain Watchers Clan<br />
1
47 The Hydran Kingdoms<br />
48 Hydran Starships<br />
54 Hydran Fighters<br />
55 Refits<br />
55 Hydran Elite Organizations<br />
The Hydran Keepership<br />
Beast-Hunter Cult (ulazhi)<br />
Sacred Beast Cult (muriyz)<br />
56 The Gorn Confederation<br />
56 Gorn Starships<br />
61 Refits<br />
61 Gorn Elite Organizations<br />
The King’s Fleet Guard<br />
The Defenders of the Egg<br />
The Guardians Errant<br />
62 The Orion Pirate Cartels<br />
63 Orion Pirate Starship Brief<br />
64 INTERFACE REFERENCE MANUAL<br />
64 SELECT YOUR EMPIRE<br />
65 Campaign<br />
65 Skirmish<br />
65 Multiplayer<br />
65 Captain/Commodore/Admiral<br />
65 Film Room<br />
65 Options<br />
66 Credits<br />
66 Exit<br />
66 MULTIPLAYER GAMES<br />
66 Network Setup<br />
66 Player Name<br />
67 Direct TCP/IP<br />
67 Serial Port<br />
68 IPX Local<br />
68 Internet<br />
68 Modem<br />
2
69 Select Game<br />
69 Session Information<br />
70 Password<br />
70 Create Multiplayer Game<br />
70 Game Name<br />
70 Password<br />
70 Scenario<br />
71 Map Type<br />
71 Options<br />
71 Max Number of Players<br />
71 BPV Limit<br />
71 Game Speed Slider<br />
71 Technology/Game Era<br />
72 Announce Game<br />
72 Multiplayer Startup<br />
72 Player Information<br />
72 Ping<br />
72 Ready<br />
73 Type<br />
73 Player Name<br />
73 Rating<br />
73 Team<br />
73 BPV<br />
73 Special Host Commands<br />
74 Chat Modes<br />
74 Your Fleet<br />
74 Host Start Button<br />
75 CHAT MESSAGES IN MULTIPLAYER GAMES<br />
75 SINGLE-PLAYER GAMES<br />
76 DIFFICULTY LEVEL<br />
76 Captain<br />
76 Commodore<br />
76 Admiral<br />
76 SKIRMISH GAMES<br />
76 Select Skirmish Mission<br />
77 Customize Skirmish Mission<br />
78 CAMPAIGN GAMES<br />
3
79 THE MAIN CAMPAIGN MENU<br />
79 The Academy<br />
79 Rank & Medals<br />
79 Recruitment Officer<br />
79 Vessel Library<br />
80 Shipyard<br />
80 Spacedock<br />
80 Galactic News/Map<br />
80 New Mission<br />
80 Save Game<br />
80 Load Game<br />
81 Starbase Tour<br />
81 CAMPAIGN MENU – THE ACADEMY<br />
81 Tutorials<br />
82 Technical Missions<br />
82 CAMPAIGN MENU – RANK & MEDALS<br />
85 CAMPAIGN MENU – RECRUITING OFFICE<br />
85 Weapons<br />
85 Security<br />
85 Science<br />
85 Engineer<br />
85 Helm<br />
85 Rookie<br />
85 Junior<br />
85 Senior<br />
85 Veteran<br />
85 Legendary<br />
86 The Officer Pool<br />
86 Ship List<br />
87 Current Officer Roster<br />
87 Transferring Officers<br />
87 CAMPAIGN MENU – VESSEL LIBRARY<br />
88 Turn Rate<br />
89 Move Cost<br />
89 CAMPAIGN MENU – SHIPYARD<br />
90 REFIT<br />
90 REPAIR<br />
90 TRADE-IN<br />
4
90 SPECIFICATIONS<br />
90 Renaming your ships<br />
90 Ship Availability<br />
91 CAMPAIGN MENU – SPACEDOCK<br />
91 Ship List<br />
91 Consumables<br />
91 HEAVY WEAPONS<br />
92 SHUTTLES<br />
92 FIGHTERS<br />
92 MISSILES<br />
93 MISC<br />
93 Reset, Cancel and Done<br />
94 CAMPAIGN MENU – GALACTIC NEWS/MAP<br />
94 Core<br />
94 Colony<br />
94 Border<br />
94 Unexplored<br />
95 Moving Around the Galaxy<br />
95 Race Information<br />
95 CAMPAIGN MENU – NEW MISSION<br />
95 Briefing Screen<br />
96 Debriefing Screen<br />
96 Play Again<br />
96 View Replay<br />
97 TACTICAL SCREEN OVERVIEW<br />
98 Ending A Mission<br />
98 TACTICAL 3D SPACE<br />
98 Camera Views<br />
98 Chase<br />
98 Overhead<br />
98 Tactical<br />
98 Target View<br />
98 Padlock Toggle<br />
99 Movement<br />
99 Tactical Information<br />
99 Class or Name of unit<br />
99 Speed of unit<br />
99 Range to unit<br />
100 Unit Damage Reports<br />
5
100 Data Displays<br />
100 Your Hull Integrity<br />
100 Phaser Capacitor<br />
100 Target Hull Integrity<br />
100 Mission Timers<br />
101 Speed<br />
101 Energy<br />
101 Alert Indicators<br />
101 Fire All Button<br />
101 TACTICAL OFFICER MFD<br />
102 Tactical Officer MFD – Helm<br />
102 Emergency Deceleration<br />
102 Erratic Maneuvers<br />
103 Orbit Target<br />
103 Intercept Target<br />
103 High Energy Turns<br />
103 HET Chance of Success<br />
103 Normal Maneuvering<br />
104 Tactical Officer MFD – Repair<br />
104 Repairing Damaged Systems<br />
104 Spare Parts<br />
104 Tactical Officer MFD – Science<br />
104 Standard Probes<br />
105 Weapon Probes<br />
105 Deep Scan<br />
105 Self Destruct<br />
105 Tactical Officer MFD – Security/Marines<br />
105 Capturing<br />
106 Hit and Run Raids<br />
107 Tactical Officer MFD – Weapons<br />
107 Mines<br />
107 Destroy/Disable Target<br />
107 Cloaking Device<br />
107 Tactical Officer MFD – Communication<br />
107 Message Filter Buttons<br />
108 Communication Buttons<br />
6
108 Tactical Officer MFD – Defense<br />
108 Emergency Deceleration<br />
109 Toggle Active Point Defense<br />
109 Defensive Tractors<br />
109 Wild Weasels<br />
110 Tactical Officer MFD – Map<br />
110 Tactical Officer MFD – Fleet Control<br />
110 Issue Orders<br />
111 Order Types<br />
111 Attack Target<br />
111 Capture Target<br />
111 Disable Target<br />
111 Go Here<br />
111 Defend Target<br />
111 Defend Command Ship<br />
111 Order Intensity<br />
111 Take Control<br />
112 Tactical Officer MFD – Energy Management<br />
112 Power<br />
112 Systems<br />
112 Movement<br />
112 Weapons<br />
112 Shields<br />
112 Sensors<br />
112 Other Systems<br />
112 Excess Energy<br />
113 Batteries<br />
113 Cloaking Device<br />
113 Running out of Power<br />
113 Tactical Officer MFD – Preferences<br />
113 Briefing<br />
113 End Mission<br />
113 Game Speed Slider<br />
114 Camera Mode<br />
114 Grid Toggle<br />
114 Quicktips Toggle<br />
114 Text Speed Slider<br />
114 Master Volume Slider<br />
114 Music Volume Slider<br />
114 Voice Volume Slider<br />
7
115 TACTICAL SHIP SCHEMATIC & SYSTEM MFD<br />
115 Weapon Icons<br />
115 Selecting Weapons<br />
116 Weapon Firing Status<br />
116 Firing Arc<br />
116 Select All Weapons<br />
116 Shield Indicators<br />
116 System Buttons<br />
117 Disabled Systems<br />
117 Destroyed Systems<br />
117 Tactical System MFD – Shields<br />
117 Raise<br />
117 Lower<br />
118 Normal<br />
118 Reinforcement Slider<br />
118 Reinforce<br />
118 Reinforce All<br />
118 Tactical System MFD – EW (Sensors)<br />
118 ECM<br />
119 Target ECM<br />
119 ECCM<br />
119 Target ECCM<br />
119 Energy Cost<br />
119 Maximum Electronic Warfare<br />
119 ECM vs. ECCM<br />
120 Cloaking Device<br />
120 Tactical System MFD – Transporters<br />
120 Marines<br />
120 Items<br />
120 Transporter Bombs (Mines)<br />
121 Shields and Transporters<br />
121 Energy Cost<br />
121 Tactical System MFD – Tractors<br />
122 Defensive Tractors<br />
122 General Tractors<br />
122 Targeting<br />
122 Beam Strength<br />
123 Hold<br />
123 Repel<br />
8
123 Engage<br />
123 Effects of a Tractor<br />
124 Tactical System MFD – Shuttles<br />
124 Types of shuttles<br />
124 Admin Shuttle<br />
124 Wild Weasel<br />
124 Suicide Shuttle<br />
124 Scatterpack Shuttle<br />
125 The Shuttle Panel<br />
125 Docked<br />
125 Active<br />
126 Target Options<br />
126 Launch<br />
126 Tactical System MFD – Weapons<br />
127 WEAPON SYSTEMS<br />
127 Offline Mode<br />
127 Normal Mode<br />
128 Loading Times<br />
128 Phasers<br />
128 Phaser, Type–1 (ph–1)<br />
128 Phaser, Type–2 (ph–2)<br />
129 Phaser, Type–3 (ph–3)<br />
129 Phaser, Type–4 (ph–4)<br />
129 Phaser, Type–G (ph–G)<br />
129 Phaser Capacitor<br />
130 Photon Torpedoes<br />
130 Normal<br />
130 Overload<br />
130 Proximity<br />
131 Switching Modes<br />
131 Warp Energy Requirement<br />
131 ECM<br />
131 Disruptor Beams<br />
131 Normal<br />
132 Overloaded<br />
132 Switching Modes<br />
132 Plasma Torpedoes<br />
132 Charging<br />
133 Firing Modes<br />
133 Normal<br />
133 Enveloping Plasma Torpedo (EPT) 9
133 Defense (Shotgun)<br />
133 Type–R<br />
134 Type–S<br />
134 Type–G<br />
134 Type–F<br />
134 Pseudo Plasma Torpedoes (PPTs)<br />
135 Plasma Defenses<br />
135 Destroyed Plasma Launchers<br />
135 Fusion Beams<br />
135 Cooling<br />
135 Firing Modes<br />
135 Normal<br />
135 Overload<br />
136 Suicide Overload<br />
136 Hellbore Cannons<br />
136 Firing Modes<br />
136 Normal<br />
136 Overload<br />
137 ESG Interaction<br />
137 Reduced Effects of ECM<br />
137 Expanding Sphere Generator<br />
137 ESG Capacitor<br />
137 Radius<br />
137 Activation<br />
137 Damage<br />
138 Hellbore Interaction<br />
138 Missiles<br />
138 Missile Types<br />
138 Type–I<br />
138 Type–IV<br />
138 Missile Speeds<br />
139 Energy Cost & Reloading<br />
139 Fire One/Fire All<br />
139 Guidance & Control<br />
139 Cloaking Device<br />
139 Operation<br />
140 Cloaked<br />
140 Uncloaking<br />
140 Cloaking<br />
10
140 Energy Cost<br />
141 Cloaking Weaknesses<br />
142 Terrain<br />
142 Asteroids<br />
142 Suns<br />
142 Planets<br />
143 Nebulas<br />
143 Dust Clouds<br />
143 Black Holes<br />
144 TACTICAL ADVICE FOR YOUNG<br />
STARSHIP CAPTAINS<br />
145 CREDITS<br />
149 TECHNICAL SUPPORT<br />
151 LIMITED WARRANTY<br />
153 GLOSSARY OF TERMS AND<br />
ACRONYMS<br />
157 COMPREHENSIVE HOTKEY LIST<br />
160 INTERPLAY WEBSITE<br />
<strong>Manual</strong> by: Chris Taylor<br />
<strong>Manual</strong> Assistance: Gary Graeper<br />
Racial Backgrounds: Nancy Berman & Scott Bennie<br />
Edited by: Beth Wershba<br />
<strong>Manual</strong> Design & Layout: Michael L. Quintos<br />
Thanks to A. Harding & J. Pierce<br />
11
EXTENDED FOREWORD<br />
Thank you for purchasing Star Trek ® : Starfleet Command , co–developed<br />
by 14° East, a division of Interplay Productions, and Quicksilver Software,<br />
Inc. The entire Starfleet Command team hopes you enjoy the game as<br />
much as we enjoyed bringing it to you.<br />
As you may know, Starfleet Command is loosely based on a popular board<br />
game called Star Fleet Battles, from Amarillo Design Bureau.<br />
For Star Trek Fans<br />
You are about to enter a different world, a different galaxy and a different<br />
universe. You are about to encounter strange alien life–forms, new ships,<br />
new technology and empires burning in the fires of conflict. This universe<br />
will be both familiar and different to you. Enjoy the richness and the<br />
chance to explore new worlds.<br />
For Players of Star Fleet Battles<br />
Starfleet Command will be both familiar and different to you as well. The<br />
design team members are long–time SFB fans and players. We have<br />
followed closely the spirit, if not the letter, of the Doomsday ruleset, but<br />
we had to make changes to have a better and workable computer game.<br />
Board games and computer games are obviously different and require a<br />
different mind–set to design and create. We ask that you bear with us,<br />
give us time, play the game, and enjoy what you’ve been waiting over 20<br />
years for: SFB on the computer.<br />
Again, the Starfleet Command team would like to welcome you to the<br />
helm of a starship in what we feel is the first, true Starship simulator set<br />
in the Star Trek universe. The Captain’s chair is yours. Move out,<br />
explore the galaxy, conquer your enemies, and take command...<br />
12
INTRODUCTION<br />
Starfleet Command will give you the opportunity to command starships<br />
from one of six different races, from the Federation to the Hydran<br />
Kingdoms. Your mission will be to utilize all the weapons, systems and<br />
officers at your disposal in order to survive encounters with the enemy<br />
and bring your ship back to base.<br />
Starfleet Command offers multiple ways to play:<br />
First, there are the Skirmish missions. These are simple encounters and<br />
scenarios that will help develop your tactical command skills. Each<br />
mission can stand alone and is complete, with a defined beginning,<br />
middle and end. There are no consequences that must be considered<br />
before you can begin another mission. You will also have the opportunity<br />
to recreate special historical missions.<br />
Starfleet Command also offers you the chance to join one of six empires<br />
as a young starship captain beginning a 30–year career. Gain experience<br />
and prestige as you complete successive missions in a unique,<br />
dynamically generated campaign. Your crew and ship will evolve with you<br />
as you work your way up to the highest possible flag ranks.<br />
In addition, Starfleet Command allows you to challenge up to five of your<br />
friends (and we use that term loosely) in multiplayer battles. A variety of<br />
multiplayer challenges await you, both cooperative and competitive.<br />
To help get you up to speed, there are tutorial missions available through<br />
the campaign menus.<br />
This manual is designed to fully instruct you on the use of the interface,<br />
the ships, the races, the systems and the weapons at your disposal. You<br />
will be responsible for learning how to best use them all to successfully<br />
control your region of space.<br />
There are two major sections in the manual: a race overview and a<br />
reference manual.<br />
The race overview will introduce you to the six playable empires in the<br />
game and the non–player pirate cartels. Each race overview includes<br />
some background information, a listing of their starships and a brief<br />
description of the races’ elite organization.<br />
The reference manual gives detailed information for all of the game<br />
screens and instructs you on how to play the game. We highly suggest<br />
that you try the tutorial missions for either the Federation or the Klingons<br />
if this is your first time playing.<br />
13
ST@RFLEET INTELLIGENCE BRIEFING<br />
R@CE OVERVIEW<br />
THE UNITED FEDER@TION OF PL@NETS<br />
The United Federation of Planets is comprised of hundreds of regional<br />
governments controlling thousands of planets across a large spectrum of<br />
space. The Federation is one of only a few major political units that<br />
include several races (Human, Vulcan, Orion, Andorian, Rigelian,<br />
Alpha–Centaurian, Cygnan, etc.) on the ruling council. Two dozen other<br />
races have been established as affiliate members. Colonies and bases<br />
have been established on around a thousand other planets. Most ships<br />
have a domination of one particular race with about 10% of the crew<br />
being a mixture of other races.<br />
The Humans are the dominant race<br />
in the Federation, as they provide<br />
more than 70% of Star Fleet<br />
personnel and are key players in<br />
every phase of its operations.<br />
Humans are regarded as the most<br />
militaristic, but not the most<br />
warlike, of the member races in the<br />
Federation.<br />
The Federation is probably the most<br />
idealistic of all the empires.<br />
Federation ships never attack<br />
without warning, and while the<br />
Federation has fought wars with all<br />
of the bordering races, it has never<br />
started one. The Federation<br />
eventually negotiated boundaries<br />
with all of its neighbors and has<br />
never sought to expand them<br />
militarily.<br />
Economically, the Federation is the<br />
most aggressive race in known<br />
space. Federation merchant ships<br />
A typical Starfleet Officer in the Federation. are found almost everywhere during<br />
peacetime, and the “Neutral Zones”<br />
between the Federation and its neighbors abound with Federation colonies<br />
that had been set up within the strict letter of the relevant treaties. The<br />
Federation considers “peace” to include free access to the markets and<br />
ports of all other races. Since the Federation has the strongest<br />
economy, it has the most money with which to buy things, the most<br />
production capacity with which to build things, and the Federation tends<br />
to dominate the galactic economy.<br />
14
FEDERATION STARSHIP DESCRIPTIONS<br />
Federation starships are generally well–rounded and designed for more<br />
than just war. They have excellent overall shielding and better science<br />
systems than most ships. However, the power of the photon torpedo<br />
means that even the smallest Federation ship is a dangerous opponent.<br />
You can get detailed information about these and other starships by<br />
using the Vessel Library in the Campaign menu. See page 87.<br />
//screen: fff.psd//<br />
FRIGATE (F–FF)<br />
A contemporary of the cruiser and destroyer designs, the Federation<br />
frigate has good forward firepower but has poor weapon arcs to the<br />
rear, like most Federation ships. The unique long–range ability of the<br />
photon means that the FF can support long–range bombardments, unlike<br />
most frigates of other races. The FF is useful in many patrol and escort<br />
roles, but the design was quickly upgraded to the FFG for wartime use.<br />
IMPROVED FRIGATE (F–FFG)<br />
This is an improved version of the Federation frigate with the plus refit.<br />
The missiles improved its firepower and combat flexibility, and improved<br />
protection from rear attacks.<br />
DRONE FRIGATE (F–FFD)<br />
DRONE FRIGATE: PLUS REFIT (F–FFD+)<br />
Conceived simultaneously with the DDG, this design proved to be<br />
unpopular. The missiles do not make up for the lack of photons.<br />
COMMANDO FRIGATE (F–CFF)<br />
COMMANDO FRIGATE: PLUS REFIT (F–CFF+)<br />
The Federation produced a commando variant of its FFT transport frigate<br />
able to carry an entire Marine battalion. Transporter facilities were<br />
increased to allow faster landings.<br />
BATTLE FRIGATE (F–FFB)<br />
One of the two competing designs for the Federation War Destroyer<br />
project, it was seriously considered because it could be built with frigate<br />
components. The design effectively included the plus refit.<br />
After a fly–off, it was decided that the FFB was too small to<br />
accommodate future developments, and the competing DW was<br />
selected. A few ships besides the prototype were built. They 15<br />
were often used to lead a frigate squadron.
screen: fdd.psd//<br />
WAR DESTROYER (F–DW)<br />
The Federation NCL class had effectively taken over the shipyards that<br />
had originally produced the destroyer class, ending DD production. This<br />
left a gap between the NCL and the FFG, which was covered by the<br />
steadily dwindling force of DDs and CLs. The shortage of these classes<br />
was noticed when variants were needed to support the rest of the fleet.<br />
Recognizing the need for a War Destroyer class, the Federation<br />
commissioned two competing designs, the DW and the FFB. The DW<br />
was eventually selected, as it was larger and more capable than the FFB.<br />
The first prototype, the Humberto Ortega, appeared shortly after.<br />
WAR DRONE DESTROYER (F–DWD)<br />
This is a variant of the DW designed for missile support. It was used in<br />
direct combat and was considered operationally interchangeable with the<br />
standard DW.<br />
COMMANDO WAR DESTROYER (F–CDW)<br />
The CFF, an older design than the CDW, was found increasingly less<br />
capable of operating where interception might be a possibility.<br />
Unfortunately, there were many more missions than there were<br />
commando ships to perform them, resulting in a few serious losses. The<br />
Fleet Marine officer campaigned, successfully, for some of the new War<br />
Destroyer hulls to be diverted to CDWs. Larger, with better shielding,<br />
and faster than the CFF, the CDW would serve for a long period of time.<br />
COMMAND WAR DESTROYER (F–DWC)<br />
This heavier, and more expensive, DW variant was built for duty as a<br />
squadron leader. It never amounted to more than 20% of the total DW<br />
production.<br />
DESTROYER (F–DD)<br />
DESTROYER: PLUS REFIT (F–DD+)<br />
The DD was designed as a smaller and less expensive stablemate to the<br />
CA, but was less successful. While it carries cruiser armament, it lacks<br />
the engine power of a cruiser, making full use of its photon torpedoes<br />
impractical. While this ship lacks maneuverability, its large saucer section<br />
makes it capable of taking considerable punishment without losing<br />
warp power.<br />
16
The Federation destroyer was expected to carry out essentially the same<br />
research and exploration missions as the heavy cruiser class during<br />
peacetime. For this reason, it had the same laboratory facilities.<br />
Several refits were designed in an attempt to improve this class, but<br />
production virtually ceased in favor of the NCL. A new, smaller war<br />
destroyer was built several years later.<br />
GUIDED WEAPONS DESTROYER (F–DDG)<br />
GUIDED WEAPONS DESTROYER: PLUS REFIT (F–DDG+)<br />
Inspired by encounters with the Kzinti, the Federation deployed the first<br />
DDG as a test bed for missile technology. They abandoned the<br />
experiment because the missiles available at the time did not make up for<br />
the loss of the two photons. The prototype remained in service, using<br />
probe missiles as well as serving as a missile–launching platform for<br />
Federation anti–missile training.<br />
When faster missiles became available, more DDs were converted to<br />
guided weapons destroyers. The more effective missiles made the DDG,<br />
a more effective ship than the original DD.<br />
//screen: fncl.psd//<br />
NEW LIGHT CRUISER (F–NCL)<br />
NEW LIGHT CRUISER: PLUS REFIT (F–NCL+)<br />
As wartime began to loom on the horizon, the Federation took a serious<br />
look at their ship building program. It was noted that the excellent<br />
command cruiser took too long to build and that the destroyer design had<br />
serious limitations on its combat capability. Famed designer Ray Olesen<br />
was tasked to produce an improved design. The result was the “new”<br />
light cruiser.<br />
The NCL used the primary hull section of the destroyer, with some<br />
modifications, and it used a pair of more efficient engines. The NCL<br />
replaced destroyers in the production program on a one for one basis.<br />
The design was so successful that the NCL was used as the basis for<br />
many variants.<br />
NEW DRONE CRUISER (F–NCD)<br />
NEW DRONE CRUISER: PLUS REFIT (F–NCD+)<br />
Impressed with the ability of the Klingon missile bombardment<br />
ships to provide an additional concentration of firepower, the<br />
Federation designed this long–range missile bombardment ship 17
using the NCL hull as a basis. Technical problems delayed its introduction<br />
into Starfleet service.<br />
NEW COMMANDO TRANSPORT (F–NCT)<br />
NEW COMMANDO TRANSPORT: PLUS REFIT (F–NCT+)<br />
With the supply of old hulls dwindling rapidly during wartime, the<br />
Federation developed this design to replace the Commando Cruiser.<br />
While it lacks the Commando Cruiser’s ability to land directly on planets<br />
and is not as well armed, it has better shielding, is able to operate with<br />
other NCL hulls, and has a larger shuttle bay.<br />
LIGHT COMMAND CRUISER (F–CLC)<br />
This ship was intended as a substitute for command cruisers. Proven<br />
inadequate in that role, it is used as a command cruiser for NCL<br />
squadrons.<br />
NEW HEAVY CRUISER (F–NCA)<br />
Faced with the shortage of heavy cruiser hulls, the Federation (like many<br />
other races) looked to its war cruiser design and created a “new heavy<br />
cruiser” that could be assembled in shipyards that were building NCLs<br />
(leaving the CA shipyards free to build CBs). The addition of the rear hull<br />
and the small center engine increased power, versatility and range.<br />
NEW HEAVY COMMAND CRUISER (F–NCC)<br />
A variant of the NCA, the NCC added command, communication and<br />
control abilities, and a small increase in firepower. It wasn’t considered a<br />
very successful class, as it was too expensive to produce in meaningful<br />
numbers and it was too easily destroyed in combat.<br />
//screen: fca.tga//<br />
HEAVY CRUISER (F–CA)<br />
HEAVY CRUISER: R–REFIT (F–CAR)<br />
HEAVY CRUISER: PLUS REFIT (F–CA+)<br />
The workhorse of Starfleet, the Federation heavy cruiser (known as the<br />
Constitution class) is probably the most balanced, all–around starship<br />
known. In combat, this ship relies on its toughness and on the flexibility<br />
of its power usage. This ship incorporated several incremental<br />
improvements (i.e., refits) which kept it competitive throughout the long<br />
history of this class.<br />
18
HEAVY DRONE CRUISER (F–CAD)<br />
HEAVY DRONE CRUISER: R–REFIT (F–CADR)<br />
HEAVY DRONE CRUISER: PLUS REFIT (F–CAD+)<br />
Once when a CA was badly damaged in an early battle, its photon bank<br />
was entirely destroyed. Due to the demand of photon tubes for new<br />
construction, it would have taken too long to repair the ship for duty.<br />
Rather than see an otherwise capable ship left in spacedock during the<br />
war, the Federation refitted it with missile racks, replacing the photons.<br />
Missile storage was increased.<br />
COMMAND CRUISER (F–CC)<br />
COMMAND CRUISER: PLUS REFIT (F–CC+)<br />
The command cruiser is an improved variant of the standard heavy<br />
cruiser, noted for its firepower and versatility. During peacetime, the<br />
admiral often commands his fleet from a command cruiser. Command<br />
cruisers are marginally better in firepower and considerably superior in<br />
command, control and communication facilities as compared to normal<br />
heavy cruisers. During wartime, many surviving CAs were converted into<br />
CCs.<br />
HEAVY COMMAND CRUISER (F–CB)<br />
The CB is a highly improved version of the CC. This new design provided<br />
a 20% increase in phasers, a 100% increase in missile capability, a 25%<br />
increase in reserve power, and a 7.5% increase in warp power.<br />
//screen: FBC.psd//<br />
BATTLECRUISER, KIROV–CLASS (F–BCG)<br />
During wartime, it became clear than even the CC would be overtaken by<br />
the rapid competition that the war had engendered. To maintain its<br />
leadership in cruisers, the Federation attempted to design the ultimate<br />
cruiser, the BCG, which could rely on existing technology. While similar<br />
to the CA/CC, the BC was not a modification or refit but a new design.<br />
In an attempt to increase firepower without burdening the engines with<br />
additional photons to charge, the BCG added additional missile racks.<br />
The BCF and NCJ are variants designed to use different types of<br />
weaponry.<br />
BATTLECRUISER, BISMARK–CLASS (F–BCF)<br />
The BCF is a BCG that had been modified to use plasma torpedoes. A<br />
few plasma–F launchers were either made available from the Gorns or<br />
stolen from the Romulans.<br />
19
BATTLECRUISER, NEW JERSEY–CLASS (F–BCJ)<br />
The final version of the Federation heavy battlecruisers, the BCJ is<br />
intended to improve firepower over the BCG for base assaults. Additional<br />
photon torpedoes were installed in place of the additional missile racks of<br />
a BCG. This class proved to have the upper limit of photons that can be<br />
installed on this size hull.<br />
//screen: FDN.PSD//<br />
DREADNOUGHT (F–DN)<br />
DREADNOUGHT: PLUS REFIT (F–DN+)<br />
The original design concept of the Federation dreadnought was to include<br />
more capabilities, but only a minimal increase in firepower over the CC.<br />
This was found to be inadequate after other races began fielding DNs<br />
that reflected an approximate 50% increase in firepower over their<br />
respective heavy cruisers. During wartime, each fleet is commanded by<br />
an admiral in a dreadnought, but during peacetime, it is usually docked at<br />
a starbase because it is too expensive to operate.<br />
IMPROVED DREADNOUGHT (F–DNG)<br />
Having the first dreadnought was both a boon and curse to the<br />
Federation, who found their original DN weaker than those it faced in<br />
opposition. This was an improved design which brought the DN up to<br />
spec with the refitted dreadnoughts of the other races.<br />
HEAVY DREADNOUGHT (F–DNH)<br />
An attempt to add additional firepower to the Federation Improved<br />
Dreadnought, the Heavy DN represented the maximum amount of<br />
weaponry capable of being used on the dreadnought hull.<br />
//screen: FBB.PSD//<br />
20<br />
BATTLESHIP (F–BB)<br />
The largest Federation warship ever designed, the cost of this ship<br />
was equal to a full squadron of heavy cruisers. Only a few were
ever produced, and those were based on an experimental design. It was<br />
decided by Starfleet Command that the cost of the BB was more<br />
expensive than it is worth.<br />
REFITS<br />
Federation starships were improved with various refits.<br />
Plus Refit:<br />
This adds various combinations of additional shielding, power, missile<br />
racks, and extra ph–3s for close–in defense against missiles. Ships<br />
that have had the plus refit are designated with a “+”. Example: CA+.<br />
Rear Phaser Refit:<br />
Some heavy cruisers were refitted with rear–firing phasers. Ships that<br />
have had this refit are designated with an “R”. Example: CAR.<br />
FEDERATION ELITE ORGANIZATION<br />
Starfleet Special Task Force (SSTF)<br />
The SSTF is a special forces branch within Starfleet dedicated to<br />
“safeguarding the Federation against serious internal threats”. When<br />
Federation members violate the Federation charter, or if there are hints<br />
of strife between Federation members, the SSTF is called in to deal with<br />
it, achieving peace through a mix of diplomacy, military force, and<br />
intelligence gathering. SSTF captains are usually intensely loyal to the<br />
Federation and idealistic in the extreme. There is a tradition for SSTF<br />
captains to renounce citizenship on their home planet and proclaim “the<br />
Federation is my home.” This is not legally binding but the oath does<br />
emphasize the impartiality that is one of the most highly valued qualities<br />
of the SSTF.<br />
For the last twenty years, dissension within the Federation has been<br />
extremely rare, and SSTF captains have become indiscernible from the<br />
rest of Starfleet except that they read more reports and do a bit more<br />
paperwork. Nonetheless, selection for the SSTF is considered one of the<br />
highest honors that can be bestowed by Starfleet.<br />
THE KLINGON EMPIRE<br />
Qo’noS (pronounced “chronos”): The capital planet of the Klingon Empire.<br />
Sometimes called “Klinzhai,” it is also frequently referred to as “the<br />
homeworld.” Qo’noS is an M class planet that orbits the star Klingon.<br />
While it is the only world in that five–planet system that is capable of<br />
sustaining life, Qo’noS still requires some degree of technology to make it<br />
habitable.<br />
The Klingon Empire arose on the ruins of a previous empire, of which the<br />
Klingons had been a subject race. The Klingon Empire is relatively poor,<br />
and can only match the Federation in military power at the price of a<br />
harsher standard of living for its people.<br />
Klingons are generally regarded as a brutal warrior race, but this<br />
characterization is not entirely fair. Very few Klingons are actually 21
selected as warriors, but few<br />
outsiders know this. Klingon<br />
warriors tend to be more<br />
aggressive than normal. They do<br />
not hesitate to use force if it is the<br />
most appropriate course of action,<br />
but they do not necessarily think of<br />
force as the first or only alternative.<br />
The Klingon Empire includes at least<br />
12 planets in multiple systems with<br />
native sentient races, all of them<br />
subservient to the Klingons<br />
themselves. Many of these “subject<br />
races” serve as crewmen on<br />
Klingon ships. They are almost<br />
never allowed to navigate the ships<br />
or fire their weapons.<br />
The Klingon military forces include<br />
the Deep Space Fleet (DSF), which<br />
is the regular military Navy, and the<br />
Internal Security Force (ISF). All<br />
ship names (DSF and ISF) are<br />
preceded with “IKV” (Imperial<br />
Klingon Vessel).<br />
A Klingon warrior prepares for battle.<br />
The ISF, which mostly operates<br />
small ships, is a combined police, customs, tariff regulation, border<br />
patrol, search & rescue, and anti–piracy force. It is also assigned the<br />
duty of watching the various subject planets for signs of dissidence. The<br />
ISF is inferior (in military, political and social standing) to the DSF.<br />
The Empire Security Service includes internal security and<br />
counter–espionage branches, but is best known for the security forces<br />
which are on all ships to make certain that the subject races do not<br />
overstep their bounds (and to make certain that the officers do their<br />
duties to the Empire). External intelligence is a function of the Klingon<br />
General Bureau. The DSF and ISF also maintain their own external<br />
intelligence agencies, the DSF external intelligence is the Galactic<br />
Research Unit, and the ISF external intelligence is the Maximum Veracity<br />
Directorate. This leads to the usual duplication of effort and political<br />
infighting.<br />
KLINGON STARSHIP DESCRIPTIONS<br />
An accurate description of the typical Klingon starship would be heavier<br />
forward shielding and weapons, weaker rear shields, excellent turning<br />
rates and good firing arcs. Klingon ships are meant for battle, so they<br />
include fewer un–essential systems. While it is rumored that Klingon<br />
warships are not equipped with lavatories, and this is considered to be a<br />
large source of Klingon anger, it is only a rumor.<br />
22
screen: kff.psd//<br />
ESCORT (K–E4)<br />
ESCORT: B–REFIT (K–E4B)<br />
ESCORT: K–REFIT (K–E4K)<br />
The E4 was the original Klingon frigate design, and it served as a consort<br />
to the D6. Eventually, small frigates, such as the E4, were proving<br />
inadequate and the Klingons increased production of the larger F5 to<br />
take over the frigate role. The E4 was relegated to convoy escort duty<br />
and, to some extent, police and border patrols.<br />
DRONE ESCORT (K–E4D)<br />
This was an attempt to get some service out of the remaining E4s, which<br />
were being relegated to convoy duty. The theory was that with more<br />
speed (having no disruptors to arm) and with the longer–range missile<br />
weapons, the E4Ds (all of which had the B–refit) could maneuver along<br />
the edges of the battle while contributing their firepower. The theory<br />
proved unsuccessful.<br />
COMMANDO ESCORT (K–E4G)<br />
COMMANDO ESCORT: B–REFIT (K–E4GB)<br />
Designed to perform pre–war missions that did not require the attention<br />
of a D6G, the E4G would serve on for years after its basic hull design<br />
was regarded as obsolete. Mostly they reinforce or relieve garrisons<br />
behind the battle lines, but some have been pressed into service on the<br />
front lines, where they do not belong.<br />
CLOAKING ESCORT (K–E4Y)<br />
The E4Y is a modified E4 equipped with a low–power cloaking device. It<br />
was not considered a tactical success, though it did find some favor with<br />
the strategic intelligence branches of the Klingon military.<br />
BATTLE ESCORT (K–E6)<br />
In an effort to get further use out of the surviving E4 escorts, the<br />
Klingons modified several of the last remaining E4s into this heavier<br />
design. The increased power made the ship capable of stronger attacks<br />
at better speeds, but the small size of the hull made the ships unable to<br />
survive in heavy fleet combat. The ships were generally assigned to<br />
patrol duties where they were more likely to encounter and survive<br />
single–ship duels.<br />
23
screen: kdd.tga//<br />
FRIGATE (K–F5)<br />
FRIGATE: B–REFIT (K–F5B)<br />
FRIGATE: K–REFIT (K–F5K)<br />
This class was used for a multitude of patrol and escort duties. While an<br />
outstanding frigate design, the lack of a true destroyer in the Klingon fleet<br />
(the F5L being used as a frigate squadron leader) meant that the F5<br />
frigates were often used in situations too difficult for a ship of their size<br />
but not important enough to warrant the attention of a cruiser. F5s,<br />
however, were very easy to build, and were produced in greater numbers<br />
than any other Klingon ship (and arguably in greater number than any<br />
other ship). The numerous variants produced attests to the strength of<br />
the basic design.<br />
COMMANDO FRIGATE (K–F5G)<br />
COMMANDO FRIGATE: B–REFIT (K–F5GB)<br />
The F5G was designed for use in ground raids, particularly inside the<br />
Empire where its weaker shielding (before the refit) was not a problem.<br />
The small hull meant reduced capabilities, but the F5G was still adequate<br />
for many tasks, and freed larger commando ships for more important<br />
missions. During the pre–war years, F5Gs conducted the bulk of<br />
commando operations.<br />
FRIGATE LEADER (K–F5C)<br />
FRIGATE LEADER: K–REFIT (K–F5L)<br />
Once called a destroyer, the F5C is used by the Klingons as the flagship of<br />
three–ship frigate squadrons. Most—but not all—of these ships were<br />
built originally as F5Cs. While the ship is similar to a standard F5, the<br />
modifications are extensive. The F5L never received the B–refit;<br />
equivalent improvements were already part of the original design.<br />
CLOAKING FRIGATE (K–F5Y)<br />
Developed around the same time as the E4Y, the F5Y was probably the<br />
most successful of the Cloaking Device–equipped Klingon starships. It<br />
was more able to withstand abuse that would cripple the escorts, and it<br />
had a better power curve when cloaked than the later D5Y. Still,<br />
it was not considered tactically practical. Several F5Ys were used<br />
24 as spy ships during the later parts of the war.
BATTLE FRIGATE (K–F6)<br />
This was an interesting attempt to produce a more powerful frigate<br />
leader than the F5L. An excellent design, it is unclear why more than<br />
just a few were not built. Federation officers referred to it as the<br />
“frignaught” class. The ships were individually named for “warrior<br />
colonies” that were established on subject planets to breed additional<br />
warriors for the Klingon Empire. This was largely a propaganda exercise<br />
to make the “colonial Klingons” more enthusiastic about the war effort,<br />
and to make the public point (which almost no one really believed) that<br />
colonials were the social equals of Klingons born on the homeworld of<br />
Klinzhai.<br />
WAR DESTROYER (K–F5W)<br />
WAR DESTROYER: K–REFIT (K–FWK)<br />
This was the ship that the F5 was born to become. F5s were always<br />
caught between the destroyers and frigates of the other races, and were<br />
expected to perform both missions. The F5W was designed for pure<br />
combat, standing in a fleet battle wing, and causing death and<br />
destruction. The defensive wing phasers (able to cover the forward arc<br />
as the original rear phasers could not) made it all but missile– proof, and<br />
allowed it to concentrate its disruptors and main phasers on the enemy.<br />
WAR DESTROYER LEADER (K–FWC)<br />
WAR DESTROYER LEADER: K–REFIT (K–FWL)<br />
This ship was, in some ways, the epitome of the F5 series. The<br />
defensive wing phasers of the F5W gave way to offensive phaser–1s,<br />
making the ship a purely offensive fighting machine.<br />
//screen: kcl.psd//<br />
WAR CRUISER (K–D5)<br />
WAR CRUISER: K–REFIT (K–D5K)<br />
The Klingon Deep Space Fleet commissioned a special study to determine<br />
if the D7 class could be made more efficient by the introduction of new<br />
technology. Of the various proposals, the one from the Kozenko Design<br />
Bureau (known by the designation KDB–1104) was the most interesting<br />
and the most radical.<br />
Smaller and easier to build than the D7, the KDB–1104, also known as<br />
the D5 was ingenious in the manner of the changes made. Frontal<br />
armament was reduced by one phaser, but the improved ph–1s were<br />
used, and the disruptors were given a wider arc. The waist phasers<br />
were considered superfluous and reduced to ph–3s.<br />
25
WAR DRONE CRUISER (K–D5D)<br />
Designed for direct combat with missiles, not for independent long–range<br />
bombardment.<br />
WAR COMMANDO CRUISER (K–D5G)<br />
Designed for use in ground assaults, it became the workhorse of the<br />
Klingon Marines. Good shielding and the copious supply of transporters<br />
made it a dangerous ship for fast raids.<br />
WAR COMMAND CRUISER (K–D5C)<br />
WAR COMMAND CRUISER: K–REFIT (K–D5L)<br />
The D5C was designed as a squadron leader. While its command<br />
facilities are not equal to a D7C, they do not need to be.<br />
WAR CLOAKING CRUISER (K–D5Y)<br />
The D5Y is the largest Klingon vessel equipped with a Cloaking Device.<br />
The original D5 was a very successful hull to base a light cloaking cruiser<br />
on, but it wasn’t designed to carry a cloaking device, and it suffered.<br />
The primary problem with the cloaking device is the high rate of fire of the<br />
Klingon disruptors compared with the slower charging plasma torpedoes<br />
of the Romulans. This causes the Klingon vessel to decloak more often<br />
than the Romulans and come under additional enemy fire.<br />
NEW HEAVY CRUISER (K–D5W)<br />
The Klingon D5W is similar to the Federation NCA: a war cruiser built up<br />
to heavy cruiser size and power. This class shows an increase in overall<br />
engine power.<br />
NEW HEAVY COMMAND CRUISER (K–DWC)<br />
When the Klingon High Council thought that New Heavy Cruisers would<br />
require a squadron flagship, this design was the result, though only a few<br />
were produced. The additional flag command and control equipment was<br />
considered a waste on this war design.<br />
//screen: kca.psd//<br />
BATTLECRUISER (K–D6)<br />
BATTLECRUISER: B–REFIT (K–D6B)<br />
BATTLECRUISER: K–REFIT (K–D6K)<br />
This ship was the original Klingon standard cruiser, until it was<br />
replaced by the more powerful D7. Compared with the D7, the<br />
26 D6 has fewer phasers and the disruptors have a shorter range.
It should be noted, however, that one of the four shipyards building<br />
D6/D7 class ships never converted to D7 production and continued to<br />
produce D6s. They may have been kept in production originally to fill the<br />
“light cruiser” or “destroyer” roles. Most of the additional D6 production<br />
was used for variants. One of the hidden strengths of the Klingon Empire<br />
was the ready availability of cruiser hulls for support variants.<br />
DRONE BATTLECRUISER (K–D6D)<br />
DRONE BATTLECRUISER: B–REFIT (K–D6DB)<br />
The D6D is a conversion of the D6 designed to provide fleet fire support.<br />
The D6D was capable of direct combat, but was designed for long–range<br />
fire support. Ships of these classes should never patrol alone, and they<br />
usually operate as part of a fleet.<br />
COMMANDO CRUISER (K–D6G)<br />
COMMANDO CRUISER: B–REFIT (K–D6GB)<br />
Designed as a heavy assault transport to deliver troops to planetary<br />
combat, this is one of the most effective commando ships in the galaxy.<br />
However, because heavy cruiser hulls were hard to spare, very few of<br />
these were built.<br />
BATTLECRUISER (K–D7)<br />
BATTLECRUISER: B–REFIT (K–D7B)<br />
BATTLECRUISER: K–REFIT (K–D7K)<br />
This is the standard cruiser of the Klingon Deep Space Fleet. Less<br />
expensive than most other heavy cruisers, it lacks the full range of<br />
scientific capabilities and crew living conditions are spartan. In combat,<br />
the D7 is noted for its superior turn class and for its many transporters,<br />
which makes for effective hit and run raids, and boarding party actions.<br />
DRONE BATTLECRUISER (K–D7D)<br />
This ship was not intended as a long–range bombardment platform like<br />
the D6D, but was an experiment to produce a more effective cruiser for<br />
general combat purposes. If the experiment had been completely<br />
successful, many or most of the D7s would have been converted to this<br />
design. The lack of the rear–arc defenses was accepted by the captains<br />
but rejected by the admirals.<br />
COMMAND BATTLECRUISER (K–D7C)<br />
COMMAND BATTLECRUISER: K–REFIT (K–D7L)<br />
These excellent ships represent the command version of the basic D7<br />
design. Shields and weapons were improved. These ships never<br />
received the B–refits. The equivalent improvements had been<br />
incorporated into the original design.<br />
HEAVY COMMAND CRUISER (K–D7W)<br />
The Kareli Design Bureau, exploring further enhancements in the<br />
venerable D7 hull, incorporated several innovative design features into<br />
the D7W. This was the most powerful D7 variant ever produced.<br />
27
HEAVY BATTLECRUISER (K–C7)<br />
During wartime, the races continued to improve their designs. Frigates,<br />
which were too small to survive in fleet battles, had given way to war<br />
destroyers. Cruisers were replaced by command cruisers, then heavy<br />
command cruisers, and finally heavy battlecruisers.<br />
The C7 was a superb example of the BCH type, easily the equal to the<br />
Federation BCG. The improved firing arcs made up for the degraded turn<br />
rate.<br />
//screen: kdn.psd//<br />
DREADNOUGHT (K–C8)<br />
DREADNOUGHT: B–REFIT (K–C8B)<br />
DREADNOUGHT: K–REFIT (K–C8K)<br />
The C8 was intended for use on the Lyran/Kzinti border. The C8 and C9<br />
were designed and put through the prototype stage at the same time.<br />
The C8 was found to be better able to defend itself against missiles and<br />
fighters. This fact eventually made it the standard Klingon dreadnought<br />
design.<br />
The C8 and C9 are 98% similar in design.<br />
DREADNOUGHT (K–C9)<br />
DREADNOUGHT: B–REFIT (K–C9B)<br />
DREADNOUGHT: K–REFIT (K–C9K)<br />
This class along with the very similar C8, was designed for extended<br />
operations. It is much larger than the D7–class Battlecruisers. The C9<br />
was intended for use along the Federation border. Most of the C9s were<br />
later converted to C8s. A few other C9s were instead sold to the<br />
Romulan Star Empire at very favorable terms for the Klingons.<br />
The C8/9s were very maneuverable and durable ships. It seems possible<br />
that most of these ships had their B–refits as part of the original<br />
construction.<br />
HEAVY DREADNOUGHT (K–C10K)<br />
The heavy toll on Klingon dreadnoughts during the War caused the<br />
Klingon Deep Space Fleet to design and build an upgraded version of the<br />
C8. The additional cost of construction was thought to be balanced by<br />
the planned increased survival rate of the C10K.<br />
All of these ships were built with the K–refit installed at the<br />
shipyards.<br />
28
screen: kbb_schematic.psd//<br />
BATTLESHIP (K–B10)<br />
BATTLESHIP: K–REFIT (K–B10K)<br />
The Klingon Empire was the first to build a battleship, and they were the<br />
only empire to deploy multiple battleships at the same time. The cost to<br />
build these ships was so great that it nearly bankrupted the Empire. The<br />
original construction estimate was four to five years to complete. It<br />
eventually took over 15 years to build the first B10. The B–refit was built<br />
into the original construction.<br />
SUPER BATTLESHIP (K–B11K)<br />
In an effort to have the largest battleship in the galaxy while continuing to<br />
drive their bankers crazy, the Klingon navy commissioned and built the<br />
largest warship ever. A slight improvement over the B10 in terms of<br />
weapons and shields, it put an upper limit on the size of starships.<br />
REFITS<br />
Klingon starships were improved with various refits.<br />
“B” Refit:<br />
Most Klingon ships built before the war received the B–refit to correct<br />
various design deficiencies. Some of these refits began before the<br />
Klingons went to war, and virtually all ships had them by the time they<br />
were committed to action in the various theaters. In general, rear<br />
shields were strengthened and other improvements were made.<br />
“K” Refit:<br />
Most Klingon ships were built with phaser–2s. As the technology for<br />
phaser–1s became more affordable, many ships were given a K–refit<br />
that upgraded some of their ph–2s to ph–1s. Those ships that<br />
received this refit are noted by the “K” designator. Command ships<br />
without the K–refit have the suffix C, those with the K–refit have the<br />
suffix L. A ship needing a K–refit must first receive the B–refit.<br />
KLINGON ELITE ORGANIZATION<br />
Klingon Black Staff<br />
The Klingon Defense Forces’ special force is the Black Staff, who<br />
call themselves “midshipmen for the Black Fleet”. (The Black Fleet<br />
is the fleet of Sto–Vo–Kor, the Klingon Afterlife, on which great<br />
Klingon Commanders serve). The Black Staff receives missions of<br />
29
the utmost concern to the Klingon Empire, often dealing with internal<br />
threats from Klingon subject races. They also work with Klingon<br />
intelligence to perform espionage missions.<br />
The Black Staff is greatly feared by other Klingon captains, and also by<br />
bureaucrats belonging to non–Klingon subject races, on whom “the eyes<br />
of the Black Staff rest”. Black Staff commanders are stoics; they often<br />
forego family, friendships and “distracting pleasures” in order to best<br />
serve the empire.<br />
THE ROMUL@N ST@R EMPIRE<br />
Romulans are an offshoot of the<br />
Vulcan race. The exact reason for<br />
the separation of the Romulans and<br />
Vulcans is a mystery that has<br />
troubled historians for many years.<br />
It is not expected to be solved any<br />
time soon.<br />
The Romulans are the most<br />
aggressive of the known empires.<br />
Their territory includes even fewer<br />
inhabitable planets than the Gorns,<br />
and no other sentient species. The<br />
Romulans seem to honestly believe<br />
that they are destined to rule the<br />
galaxy and are constantly working<br />
towards this end.<br />
The Romulan government includes<br />
the Emperor, the Praetor, the<br />
Senate, the Military Command<br />
(which includes the various fleets,<br />
training command, base commands<br />
and military production), and the<br />
Civil Administration (planetary<br />
governors, etc.)<br />
The Emperor is a hereditary<br />
monarch although the lines of succession are not always clear.<br />
Theoretically a new emperor is selected by the members of the ruling<br />
House, but if they cannot agree (of it another House claims to be the<br />
rightful ruling House), the Senate makes the final decision.<br />
The Praetor is a prime minister who is selected by the Senate. The<br />
Emperor may indicate his preference in this selection, and depending on<br />
the relative political power of the Senate and Throne, the Emperor may<br />
succeed in blocking the selection of an enemy or forcing the appointment<br />
of a friend. The Praetor may be a bureaucrat who serves as Chief of<br />
Staff to an active emperor, or may be the actual power.<br />
The Senate consists of the ranking member of the various Houses.<br />
A “House” is an extended family of Romulan nobles. Various family<br />
A Romulan Senator mulls over a difficult decision.<br />
30
members serve in positions within the Military Command and Civil<br />
Administration. A House will attempt to maneuver its members into<br />
positions that enhance the power, prestige and wealth of that House.<br />
By procedures that seem more Machiavellian than parliamentary, Houses<br />
can be divided or merged. New Houses can be declared and existing<br />
Houses can be declared terminated.<br />
ROMULAN STARSHIP DESCRIPTIONS<br />
Romulan ships come in three distinct generations: Old Series, KR and<br />
New Series.<br />
The Old Series ships were all originally sublight designs that had been<br />
modified for warp travel. These were the only ships the Romulans had<br />
for a long period of time, during which they were generally regarded as a<br />
nuisance.<br />
The Klingons provided dozens of older light cruisers and hundreds of<br />
frigates and escorts, which make up the KR series. While these would<br />
have been mothballed by the Klingon Deep Space Fleet due to their age<br />
and cost to refit, the Romulans converted them to use Romulan plasma<br />
and cloaking technology. These ships formed the basis of the Romulan<br />
deep space navy. Newer Klingon construction was eventually sold to the<br />
Romulans at very steep prices.<br />
Eventually, the Romulans were able to build a new generation of starships<br />
— the New Series. These excellent designs formed the basis of a major<br />
military power and a significant threat to peace.<br />
Old Series<br />
//screen: rcl.psd//<br />
SNIPE–A FRIGATE (R–SNA)<br />
SNIPE–A FRIGATE: R–REFIT (R–SNAR)<br />
At the time the Warbird was the standard cruiser of the Romulan navy,<br />
the Snipe was the corresponding frigate. Just as the Warbirds were<br />
updated to a variety of uses, the Snipes were also upgraded.<br />
The Snipe–A is a warp–enhanced version of the Snipe–S sublight frigate.<br />
This ship provided necessary depth to the Romulan fleet in the<br />
early warp era. It was used as a police frigate and convoy escort<br />
in addition to its fleet role. 31
SNIPE–B BATTLE FRIGATE (R–SNB)<br />
Like the King Eagle, the Snipe–B was the ultimate development of the<br />
Snipe design. These ships, being capable of fleet speed, served alongside<br />
newer ships. Some were added to Skyhawk squadrons to provide heavier<br />
torpedoes.<br />
//screen: rdd.psd//<br />
BATTLEHAWK DESTROYER (R–BH)<br />
BATTLEHAWK DESTROYER: R–REFIT (R–BHR)<br />
Like the Snipe and the Warbird, this is an older Romulan ship. The<br />
original Hawk–class was built in competition with the Warbird, but the<br />
Romulans evidently preferred the latter ship as they produced many more<br />
Warbirds than Hawks.<br />
The Battlehawk is a warp–conversion. Originally classified as a<br />
“second–class cruiser”, it was treated as a destroyer.<br />
COMMANDO HAWK (R–COH)<br />
COMMANDO HAWK: R–REFIT (R–COHR)<br />
The consort of the Commando Eagle, the Commando Hawk served well<br />
during the early stages of war. It was particularly popular for its ability to<br />
land directly on its target in order to rapidly offload its troops and<br />
equipment.<br />
//screen:Rfrigate_schematic.psd//<br />
32<br />
WARBIRD: PLUS REFIT (R–WB+)<br />
The Romulan Warbird–class is an upgraded version of the<br />
Warbird. The Warbird was one of the first Romulan warships, a
very old design from the time before warp drive. As such, it is poorly<br />
suited for combat against modern ships. The limited stutter–warp drive<br />
allows it some method of high–speed strategic movement, but must slow<br />
to almost a crawl in oreder to fight. In modern times, the Warbird is<br />
limited to details usually handled by frigates. The power of the Type–R<br />
torpedo helps offset the lack of mobility.<br />
WAR EAGLE CRUISER (R–WE)<br />
WAR EAGLE CRUISER: R–REFIT (R–WER)<br />
With the advent of the warp drive, the Romulans converted some of the<br />
older Warbird–class ships to the War Eagle–class. This was a very<br />
expensive and time–consuming procedure, that required the ship to be<br />
almost completely rebuilt. This is generally an undersized ship compared<br />
to other cruisers. The saving grace is the Type–R Plasma torpedo and<br />
the cloaking device.<br />
COMMANDO EAGLE (R–CE)<br />
This is a modified version of a War Eagle that carried additional boarding<br />
parties. The Commando Eagle was used extensively until the newer<br />
generation of commando ships appeared. At that point, most were<br />
converted back to War Eagles or into Freight Eagles, a cargo ship variant.<br />
KING EAGLE COMMAND CRUISER (R–KE)<br />
As new Klingon technology was assimilated, the Romulans found that<br />
their War Eagle design could be further improved to this class. However,<br />
as the New Series ships were beginning to appear, it was considered a<br />
waste of resources to convert War Eagles to the improved class. When<br />
war became inevitable, the operational problems of integrating different<br />
generations into the same tactical formation became clear, the Romulans<br />
reversed their decision and converted a number of War Eagles to King<br />
Eagles for use as squadron leaders. They were then found to be<br />
extremely useful and more were produced for general combat purposes.<br />
KR Series<br />
//screen: rkff.psd//<br />
KLINGON–TYPE ESCORT (R–K4R)<br />
KLINGON–TYPE ESCORT: B–REFIT (R–K4RB)<br />
The Romulans requested new ships from the Klingons to replace<br />
battle casualties and to expand their limited fleet of warp–capable 33
ships. The Klingons were unwilling, however, to part with any D6 or F5<br />
class ships at the time. After renewed appeals by the Romulans, the<br />
Klingons offered a group of E4 escorts, which the Romulans accepted<br />
and converted to this design.<br />
The Romulans thought that they were to get relatively new ships from<br />
mothball storage, but the Klingons sold them ships worn out from<br />
decades of patrols and used the mothball ships in their own fleet. This<br />
forced the Romulans to spend extra effort refitting the ships, and<br />
modifications were extensive.<br />
//screen: rkdd.psd//<br />
KLINGON–TYPE FRIGATE (R–K5R)<br />
KLINGON–TYPE FRIGATE: B–REFIT (R–K5RB)<br />
When the first Klingon D6 battlecruisers were delivered to the Romulans,<br />
a handful of F5 frigates were also transferred. These were converted<br />
into plasma–armed frigates to support the larger ships. Later, some of<br />
these ships were converted into variants.<br />
KLINGON–TYPE FRIGATE LEADER (R–K5L)<br />
KLINGON–TYPE FRIGATE LEADER: B–REFIT (R–K5LB)<br />
The K5L is a variant of the F5L used to lead frigate squadrons. They had<br />
been converted directly from the Klingon ship or from existing K5Rs. The<br />
Type–G torpedo cannot be upgraded.<br />
KLINGON–TYPE BATTLE FRIGATE (R–KFR)<br />
It is unclear whether or not the Romulans actually acquired a Klingon F6<br />
and converted it to this class. Plans do exist for such a conversion, if a<br />
KFR is ever acquired.<br />
//screen: rkcl.psd//<br />
34<br />
KLINGON–TYPE WAR CRUISER (R–KDR)<br />
Three Romulan SPAs were “detained” in Klingon space. After
negotiations, three Klingon D5s were exchanged for them. Evidence<br />
indicates that the Romulans, while initially annoyed at the exchange,<br />
found the twin Type–S plasma torpedoes on a war cruiser hull to be<br />
useful in base assaults and other situations. Unfortunately, the<br />
Romulans had difficulty maintaining the KDRs (which did not use the<br />
same spare parts as the other KR–types) and did not get any more of them.<br />
//screen:R_heavy_cruise<br />
_schematic.psd//<br />
KLINGON–TYPE BATTLECRUISER (R–KR)<br />
KLINGON–TYPE BATTLECRUISER: B–REFIT (R–KRB)<br />
The Klingons supplied the Romulans with advanced ships and technology.<br />
The most important ships supplied were nine older D6 battlecruisers.<br />
While these were strictly second–rate ships to the Klingons, they were,<br />
at the time, the most powerful ships in Romulan hands. Later, the<br />
Romulans acquired more D6s from the Klingons and, even later,<br />
converted some into variants.<br />
KLINGON–TYPE COMMANDO BATTLECRUISER (R–KRG)<br />
KLINGON–TYPE COMMANDO BATTLECRUISER: B–REFIT (R–KRGB)<br />
The Romulans only converted a few of their KR–class ships to this<br />
Commando variant. It was based on the Klingon D6G cruiser. The<br />
B–refit was almost always added during this conversion.<br />
KLINGON–TYPE BATTLECRUISER (R–K7R)<br />
KLINGON–TYPE BATTLECRUISER: B–REFIT (R–K7RB)<br />
Among the ships transferred by the Klingons were three D7<br />
battlecruisers. These were converted to Romulan technology and<br />
deployed as a single squadron on the Federation border. KRs can not be<br />
converted to the K7R.<br />
KLINGON–TYPE COMMAND BATTLECRUISER (R–KRC)<br />
KLINGON–TYPE BATTLECRUISER: REFITTED (R–KRCS)<br />
This is a conversion of the Klingon D7C command cruiser, three of which<br />
were purchased by the Romulans. It entered service as the KRC with<br />
Type–G torpedoes and was later refitted with the Type–S torpedoes.<br />
KLINGON–TYPE HEAVY BATTLECRUISER (R–KCR)<br />
The KCR is the Romulan conversion of a Klingon C7. This amount<br />
of weaponry aboard was determined to be the maximum amount<br />
that could be placed on a hull of this size. The cost of this ship<br />
was nearly the same as the cost of the K9R, but without that<br />
35
ships improved weaponry or shielding. It is unknown how many C7s the<br />
Romulans can obtain, but probably just a few.<br />
//screen: kdn.psd//<br />
KLINGON–TYPE DREADNOUGHT (R–K9R)<br />
KLINGON–TYPE DREADNOUGHT: B–REFIT (R–K9RB)<br />
When Klingon Ambassador Count Vak Kaleen convinced the Romulans to<br />
attack the Federation, part of the agreement included the delivery of a<br />
new C9 dreadnought. The Romulans named this ship Behemoth and<br />
converted it to their technology. It was the most powerful single unit in<br />
the Romulan Fleet until the advent of the Praetor–class Heavy<br />
Dreadnought.<br />
KLINGON–TYPE HEAVY DREADNOUGHT (R–K9RH)<br />
A further development of the K9R, this version added additional phasers<br />
to increase the plasma defense and the offensive reach of the<br />
dreadnought. It could only be refitted from an existing K9RB, of which<br />
only a few existed in the Romulan fleet.<br />
KLINGON–TYPE BATTLESHIP (R–K10R)<br />
While it is doubtful the Klingons could have spared a B10 battleship hull<br />
for the Romulans to convert, the Romulans developed the conversion<br />
plans. The Klingons did actually sign a contract to deliver a B10 hull, but<br />
it was never fulfilled.<br />
New Series<br />
//screen: rde.psd//<br />
36<br />
SEAHAWK FRIGATE (R–SEA)<br />
The smallest of the third generation of Romulan ships, the<br />
Seahawk entered service long after its larger brethren. This was
acceptable because the Romulan shipbuilding program was very<br />
expensive and a large numbers of older ships (primarily Snipes) were<br />
already available to fill the frigate role.<br />
The SEA was never produced in significant numbers, due to the fact that<br />
frigates were becoming tactically obsolete by that time. Most were<br />
consigned to escort duties and other non–fleet missions.<br />
SEAHAWK–G TROOP TRANSPORT (R–SEG)<br />
The Seahawk–G suffered from all the problems of its consorts. It was<br />
produced too late in order to make a difference. Still, the few ships of<br />
this class that were built found a variety of resupply and relief roles that<br />
they could fulfill.<br />
SEAHAWK–L FRIGATE LEADER (R–SEL)<br />
The SEL was a variant of the Seahawk designed to lead frigate<br />
squadrons. The additional cost to build the command and control<br />
systems did not provide enough of a performance gain to justify a large<br />
purchase order. Only a few SELs were produced, and they were destroyed<br />
early in the war.<br />
SKYHAWK DESTROYER (R–SKA)<br />
A destroyer–class ship, the Skyhawk was designed to be the consort to<br />
the Sparrowhawks. Using a slightly modified F5 boom (which the<br />
Romulans could build) and the same engines as the Sparrowhawk,<br />
construction was highly simplified. A module could be inserted into the<br />
rear of the basic hull in order to change the ship into any of a number of<br />
variants. These changes could be made in a matter of a few days at a<br />
shipyard, starbase or fleet repair dock.<br />
The SKA was the most basic type of Skyhawk and a more than adequate<br />
war destroyer. The SKA was very maneuverable, capable of performing<br />
aggressive tractoring, and could operate at high tactical speeds while<br />
cloaked.<br />
SKYHAWK–G TROOP TRANSPORT (R–SKG)<br />
Intended for raids rather than deliberate ground assaults, the SKG was<br />
often included in fleets where the mission was to capture enemy ships.<br />
SKYHAWK–L DESTROYER LEADER (R–SKL)<br />
The ultimate member of the Skyhawk series, this ship pushed the design<br />
to (and beyond) the absolute limit. The boom section was replaced by an<br />
entirely new design that had sufficient structural strength on which to<br />
mount a Type–G plasma torpedo. The conversion to the design was a<br />
permanent one requiring a shipyard and considerable time. The SKL<br />
loses its module ability in the conversion due to the placement of support<br />
structures.<br />
37
screen: rln.psd//<br />
SPARROWHAWK CRUISER (R–SPA)<br />
SPARROWHAWK CRUISER: PLUS REFIT (R–SPA+)<br />
The Romulan Imperial High Command received a report from the Bureau<br />
of Starships (Romulan Imperial Navy) that had been three years in the<br />
preparation. The result of this report was to commission a class of<br />
starships that was revolutionary in design: the Sparrowhawk modular<br />
cruiser.<br />
The Romulans could not afford the time or the money to build a large<br />
number of specialized cruisers, so they instead built a single cruiser hull<br />
that different specialized modules could be attached to. This wasn’t an<br />
easy process, and required the use of a full shipyard to convert the<br />
modules, but it allowed the Romulans to build a few ships in the time<br />
available.<br />
The Sparrowhawk–A is the basic and most common version of this class.<br />
It is a balanced cruiser design and arguably one of the best light cruisers<br />
in service anywhere. It lacks, however, the staying power of the true<br />
heavy cruiser.<br />
SPARROWHAWK–G TROOP TRANSPORT (R–SPG)<br />
SPARROWHAWK–G TROOP TRANSPORT: PLUS REFIT (R–SPG+)<br />
Carrying the 240 fighting men of an imperial marine battalion, the SPG<br />
was to prove itself, time and again, capable of fighting its way to its<br />
destination.<br />
SPARROWHAWK LIGHT COMMAND CRUISER (R–SPL)<br />
SPARROWHAWK LIGHT COMMAND CRUISER: PLUS REFIT (R–SPL+)<br />
This module was intended to provide a command version of the<br />
Sparrowhawk with increased command facilities at the price of cramped<br />
crew quarters.<br />
SPARROWHAWK–J ASSAULT CRUISER (R–SPJ)<br />
In an attempt to field ships with more plasma firepower, the Romulans<br />
created a limited number of J–modules for their Sparrowhawk–class.<br />
These modules reduced the number of phasers but increased the number<br />
of plasma torpedoes.<br />
The ship was not considered well designed, but was used to<br />
support base assaults. This ship was built only on refitted SPA+<br />
hulls.<br />
38
screen: rbc.psd//<br />
FIREHAWK HEAVY CRUISER (R–FHA)<br />
FIREHAWK–K HEAVY CRUISER (R–FHK)<br />
The Firehawk was the heavy cruiser version of the Sparrowhawk light<br />
cruiser. This ship is not modular. While it could be constructed with<br />
different modules, any given ship carried only a single type of module<br />
through its entire service. A FHA could be refitted with K–modules,<br />
producing the FHK. This was an extensive refit, however.<br />
NOVAHAWK COMMAND CRUISER (R–NHK)<br />
The Novahawk was the heavy command cruiser of the Heavy Hawk<br />
series. The Novahawk carried only K–modules.<br />
REGALHAWK HEAVY CRUISER (R–RGK)<br />
This ship was another Romulan effort to deploy more Type–R torpedoes.<br />
A variant of the Firehawk, it was less expensive and slightly less capable<br />
than the Royalhawk. These ships rarely operated alone, not from<br />
doctrine, but because their heavy torpedoes were in high demand for the<br />
most important attacks.<br />
ROYALHAWK COMMAND CRUISER (R–RHK)<br />
The RHK is a limited–production variant of the Novahawk. It was<br />
designed to field the massive Type–R plasma torpedo in larger numbers<br />
in order to counter the Gorn CS. Like the Novahawk, this ship only<br />
carried K–modules. This ship can be considered a BCH.<br />
KILLERHAWK SUPER HEAVY CRUISER (R–KHK)<br />
The ultimate extension of the Heavy Hawk designs, this was essentially an<br />
attempt to build a pocket dreadnought. The design was not considered<br />
successful since it placed too many weapons on too small of a hull. The<br />
maintenance cost to support this ship was far higher than any other<br />
Hawk design. Only a few were built.<br />
//screen: r_dread_<br />
schematic.psd//<br />
39
CONDOR DREADNOUGHT (R–CON)<br />
CONDOR DREADNOUGHT: PLUS REFIT (R–CON+)<br />
The Condor–class was the first of the larger third generation Romulan<br />
warships. Klingon technology and design influence is obvious. The<br />
Condor is one of the most powerful dreadnoughts in the known galaxy.<br />
The Condor was refitted to the CON+ version, which provided even more<br />
power.<br />
PRAETOR HEAVY DREADNOUGHT (R–PRA)<br />
This is the heaviest, and final variant, of the Condor dreadnought.<br />
//screen: rbb.psd//<br />
KING CONDOR BATTLESHIP (R–KCN)<br />
The Romulans built their battleship based on enlarged Condor–class ship<br />
designs, with a greatly expanded rear hull and a second heavy torpedo<br />
launcher. The warp engines were considered failures. They had to be<br />
overhauled every few months, taking the ship out of service almost as<br />
much as it was in service.<br />
REFITS<br />
Many of the older (first generation) ships and some of the newer ones<br />
were given refits to various extents. Most of these refits incorporated<br />
new technology, such as transporters.<br />
Plus Refit:<br />
Some of the Romulan New Series ships, such as the SparrowHawk,<br />
were upgrades from type–G torpedoes to type–S torpedoes with this<br />
refit. Ships that have had the plus refit are designated with a “+”.<br />
Example: WB+.<br />
“R” Refit:<br />
Early Romulan ships had no rear–firing phasers. This was a problem<br />
that was solved by the R Refit, which added a rear–firing phaser–3 to<br />
each engine. Ships with this refit are designated by an “R” added to<br />
their type. Example: WER.<br />
“B” Refit:<br />
Most of the Klingon–supplied ships receive refits after serving a while in<br />
the Romulan fleet. These refits include changing type–G torpedoes to<br />
type–S and increasing the strength of the rear shields.<br />
KR ships with this refit have a “B” added to their designation.<br />
40 Example: K7RB.
ROMULAN ELITE ORGANIZATIONS<br />
The Tal Prai’ex<br />
The Tal Prai’ex is the Romulan Praetorian Guard, the personal forces of<br />
the Romulan Emperor. While the Tal Prai’ex follow the regular chain of<br />
command of the Romulan Imperial Star Navy, their orders can be<br />
countermanded by any ranking member of the Imperial Household. All<br />
Tal Prai’ex commanders are expected to provide regular intelligence to<br />
the Romulan Praetor. They are the space arm of the Praetorians, the<br />
elite Romulan marines, and just as the Praetorians serve as Romulus’<br />
most capable bodyguards, the Tal Prai’ex often serves as escorts for<br />
prominent Romulan ships.<br />
To be a member of the Tal Prai’ex is one of the highest honors in the<br />
Empire. Tal Prai’ex captains are known for their fairness, honor, ability,<br />
and respect for the common people.<br />
Tal Shi’ar<br />
The most feared secret police in the galaxy is the Tal Shi’ar, the<br />
Romulan’s elite intelligence units. While most Tal Shi’ar operatives are not<br />
ship captains, the Romulan Navy does make itself “available” to the Tal<br />
Shi’ar upon request. A few starships are even under de facto direct Tal<br />
Shi’ar control when their commanders become their operatives.<br />
The Tal Shi’ar are the “Watchers of the Shadows” and are only controlled<br />
and barely by a strong Praetor or by the combined will of the Romulan<br />
Central Committee. The Tal Shi’ar have no love of honor or glory; duty<br />
and stability are their watchwords.<br />
THE LYR@N ST@R EMPIRE<br />
The Lyran government is based on a feudal structure. There are 21<br />
counties, each ruled by a count. Four of the 21 counties are “duchies”<br />
each ruled by a duke, who governs four of the remaining counties in<br />
addition to his duchy. The 21st county is ruled by the King–Emperor.<br />
The duchies include:<br />
Homeworld (Royal–Imperial Province)<br />
Red Claw Duchy<br />
Far Stars Duchy<br />
Black Stripe County<br />
Doom Star County<br />
Pelt Hunter County<br />
Blood Star County<br />
Golden Fang County<br />
Night Star County<br />
Predator County<br />
Dark Storm County<br />
Enemy’s Blood Duchy<br />
Foremost Duchy<br />
White Stripe County<br />
Apex County<br />
Hidden Dagger County<br />
Silver Moon County<br />
Bloody Claw County<br />
Black Claw County<br />
Dark Star<br />
Night Roar County<br />
Each county controls and pays the cost of maintaining a portion of<br />
the fleet. Each station along the border is controlled by the local<br />
county, and the duchies control the starbases. There is a good 41
deal of conflict within the Lyran<br />
Empire, which has kept the race as<br />
a whole from dominating a much<br />
larger area of the galaxy.<br />
The Lyrans (pronounced Lear–<br />
uhns) are superficially similar to<br />
their Kzinti neighbors. Federation<br />
scientists have theorized that<br />
Lyrans and Kzinti are descended<br />
from a common stock, but if this<br />
theory is mentioned in the presence<br />
of a member of either race, the<br />
discussion is likely to become<br />
heated (and bloody). Federation<br />
diplomats attending international<br />
conferences have been advised not<br />
to stand physically between Lyran<br />
and Kzinti diplomats, even when the<br />
discussion is proceeding calmly.<br />
LYRAN STARSHIP<br />
DESCRIPTIONS<br />
Lyran starships use Disruptors as<br />
their primary heavy weapon. They<br />
A Lyran Security officer addresses his troops.<br />
also have the Expanding Sphere<br />
Generator (ESG) that can be used<br />
both defensively and offensively. The Lyrans have excellent ships, they are<br />
well–balanced and well–designed. They are difficult to attack with missiles<br />
or fighters.<br />
Many of the Lyran starships are based heavily on conversions from<br />
smaller hulls. Lyrans use as many common parts and systems as<br />
possible.<br />
//screen: lff.psd//<br />
CHEETAH FRIGATE (L–FF)<br />
CHEETAH FRIGATE: PLUS REFIT (L–FF+)<br />
CHEETAH FRIGATE: P–REFIT (L–FFP)<br />
Used for patrol and police duties, the Cheetah has plenty of firepower for<br />
a ship its size. Its diminutive size, however, rendered it unfit for service in<br />
the heavy battles that followed its introduction. The base hulls were used<br />
to create the Alleycat war destroyer.<br />
42
ALLEYCAT WAR DESTROYER (L–DW)<br />
ALLEYCAT WAR DESTROYER: PLUS REFIT (L–DW+)<br />
ALLEYCAT WAR DESTROYER P–REFIT (L–DWP)<br />
A smaller brother to the Jaguar, the Alleycat was converted up from<br />
smaller frigates. The P–refit was extremely rare on this ship, only a<br />
handful of Alleycats received it.<br />
SNOW LEOPARD WAR DESTROYER LEADER (L–DWL)<br />
SNOW LEOPARD WAR DESTROYER LEADER: P–REFIT (L–DWLP)<br />
The DWL pushed the limits on the already heavily modified DW hull. Like<br />
all “leaders”, it was intended to be the most heavily–armed unit in a<br />
squadron of 2–3 ships.<br />
Most of the refits were standard.<br />
//screen: lcl.psd//<br />
LEOPARD DESTROYER (L–DD)<br />
LEOPARD DESTROYER: PLUS REFIT (L–DD+)<br />
LEOPARD DESTROYER: P–REFIT (L–DDP)<br />
Used primarily to support larger ships in fleet actions, the excellent<br />
Leopard is a fully capable starship. Like the other Lyran ships, the base<br />
hulls of this ship were often used in building larger ships.<br />
COMMANDO DESTROYER (L–DDG)<br />
COMMANDO DESTROYER: PLUS REFIT (L–DDG+)<br />
The Commando Destroyer served in the Lyran Empire for a long period of<br />
time. Most surviving examples were eventually converted into CWGs.<br />
They never received a phaser refit.<br />
JAGUAR WAR CRUISER (L–CW)<br />
JAGUAR WAR CRUISER: PLUS REFIT (L–CW+)<br />
JAGUAR WAR CRUISER: P–REFIT (L–CWP)<br />
A conversion from the Leopard destroyer, eventually the Jaguar became<br />
the most common Lyran cruiser. The amount of firepower was<br />
considered marginal. The original design was grossly inadequate in the<br />
way of power, making it slow and weak, but this was corrected with the<br />
addition of a power–pack in the + and P–refits.<br />
COMMANDO WAR CRUISER (L–CWG)<br />
COMMANDO WAR CRUISER: PLUS REFIT (L–CWG+)<br />
Intended to support planetary assaults, the Commando War<br />
Cruiser was a seldom seen variant. 43
BLACK JAGUAR WAR CRUISER LEADER (L–CWL)<br />
BLACK JAGUAR WAR CRUISER LEADER: P–REFIT (L–CWLP)<br />
This ship was used as a squadron leader, or as a substitute command<br />
cruiser. Few of these ships left their shipyard without the plus pack and +<br />
refit.<br />
KING JAGUAR NEW HEAVY CRUISER (L–NCA)<br />
This ship was intended to alleviate the shortage of heavy cruiser hulls in<br />
the late war years. To simplify production, few changes were made to<br />
the outside of the hull.<br />
All applicable refits were incorporated into the design.<br />
NEW HEAVY CRUISER LEADER (L–NCAL)<br />
Intended to lead squadrons of King Jaguars, the NCAL was only produced<br />
in small numbers. The additional money and time involved in converting a<br />
NCA to a NCAL did not offer enough benefits to increase the production<br />
schedule.<br />
//screen: lca.psd//<br />
PANTHER LIGHT CRUISER (L–CL)<br />
PANTHER LIGHT CRUISER: PLUS REFIT (L–CL+)<br />
PANTHER LIGHT CRUISER: P–REFIT (L–CLP)<br />
An acceptable light cruiser, the Panther was produced in smaller<br />
numbers when the Wildcat battlecruiser was developed. The production<br />
lines used for the Panther were converted to help build the Wildcat.<br />
TIGER CRUISER (L–CA)<br />
TIGER CRUISER: PLUS REFIT (L–CA+)<br />
TIGER CRUISER: P–REFIT (L–CAP)<br />
A superb cruiser designed for patrol and combat duties, the Tiger is quite<br />
able to stand up against any other cruiser class in the area. Lyran<br />
Tiger–class cruisers have a flag bridge, as Tigers were the flagships of<br />
the counts.<br />
BENGAL TIGER COMMAND CRUISER (L–CC)<br />
BENGAL TIGER COMMAND CRUISER: PLUS REFIT (L–CC+)<br />
The flagship of the Dukes prior to the advent of the dreadnoughts, it was<br />
a conversion of the Tiger CA. The Bengal Tiger was used as the basis for<br />
the Java Tiger CCH.<br />
The P–refit was incorporated into the original construction.<br />
44
JAVA TIGER HEAVY COMMAND CRUISER (L–CCH)<br />
Replacing Tigers and Bengal Tigers in production, the Java Tiger had an<br />
enlarged hull with additional power systems, along with a pair of phasers.<br />
The design incorporated all applicable refits.<br />
WILDCAT BATTLECRUISER (L–BC)<br />
WILDCAT BATTLECRUISER: POWER PACK REFIT (L–BCPP)<br />
WILDCAT BATTLECRUISER: PLUS REFIT (L–BCP+)<br />
As work proceeded on the first Lion DN, the Lyrans started to work on a<br />
conversion that would not reduce the production of Lions yet still produce<br />
heavier hulls. The result was the Wildcat–class ship, designated a<br />
battlecruiser. Larger than most competing cruisers but smaller than a<br />
true dreadnought, the Wildcat was an anomaly resulting from the need<br />
to get as many heavy units into service as possible.<br />
The Wildcat is sometimes regarded as a dreadnought, but it is in fact a<br />
cruiser. When compared to late cruiser production, however, the<br />
Wildcat became a dreadnought by default.<br />
HELLCAT HEAVY BATTLECRUISER (L–BCH)<br />
This improved version of the Wildcat was an attempt to remain equal to<br />
the new Kzinti BCH and the Federation Kirov/Bismark. The weapons<br />
were not improved beyond the standard refits, but increased power,<br />
protection, and number of shuttlecraft brought it up to superior<br />
standards.<br />
The Hellcat included all refits.<br />
//screen: ldn.psd//<br />
LION DREADNOUGHT (L–DN)<br />
LION DREADNOUGHT: POWER PACK REFIT (L–DNPP)<br />
LION DREADNOUGHT: PLUS REFIT (L–DNP+)<br />
As other races began to construct dreadnoughts, the Lyrans wasted a<br />
lot of time debating the issue. Opinion was (as is traditional with the<br />
Lyrans) divided along clan lines. As a result, when the first Federation<br />
DN was commissioned, and the first Klingon C8 was preparing to sale<br />
later that year, the Lyrans had not even started construction.<br />
Panic finally produced a consensus and the design that could provide a<br />
DN in the shortest amount of time was selected. Fortunately, this design<br />
proved to be very successful.<br />
45
GIR LION HEAVY DREADNOUGHT (L–DNH)<br />
The Lion DN, even with all the refits, was not considered viable after the<br />
introduction of the other heavy dreadnoughts. The Lyrans were the last<br />
race to introduce a major refit that added additional weaponry and<br />
defenses beyond what was earlier thought possible with the Lion DN hull.<br />
The result was the Gir Lion DNH. It was easily the equal of the other<br />
heavy dreadnoughts.<br />
CAVE LION BATTLESHIP (L–BB)<br />
The same design staff that had designed and built the Lion DN in record<br />
time was commissioned to build a battleship to rival the Klingon B10. It<br />
is unclear if this ship was ever built.<br />
The design is similar to the Lion DN, but larger. Like all things Lyran, clan<br />
politics may have interfered with the actual building of this ship.<br />
No refits are available. The Lyrans would have incorporated all available<br />
technologies into the ship’s design.<br />
REFITS<br />
Ships of the Lyran fleets received the following refits to keep them on par<br />
with warships of the other races.<br />
Plus Refit:<br />
The Lyrans began refitting their ships with the T-refit after minor<br />
conflicts, but before war. The refits consisted of increasing the rear<br />
shields in order to bring them in line with the forward starboard/port<br />
shielding.<br />
“P” Refit:<br />
Some of the larger ships also received a phaser refit. Either a<br />
phaser–2 or phaser–1 replaced one of the side phaser–3s. This<br />
increased firepower with a minimal energy cost increase. It was a<br />
common but informal refit, and many ships of the line did not receive it.<br />
Power Pack Refit:<br />
Some of the larger ships were found to be especially power deficient.<br />
To make up for this shortage, a power pack was designed and fielded<br />
after test runs. These APR power reactors, as well as a battery, were<br />
hard–welded to the hull.<br />
LYRAN ELITE ORGANIZATIONS<br />
The Red Claw Clan<br />
The Red Claw is one of the most honored of Lyra’s clans. They have one<br />
of the most honored and largest Lyran navies, the best trained Stalkers<br />
(Lyran marines/boarding parties), and some of the best technology in the<br />
empire. The Red Claw is also one of the proudest and most arrogant<br />
clans in the empire. Their Duke is obsessed with the clan’s high<br />
position and maintaining their social status.<br />
46
When a Red Claw cadet reaches a certain reputation, they may petition<br />
to join the clan’s special forces. Those who rise to the top of the clan’s<br />
military force will usually become a count after their retirement, although<br />
recently the clan’s engineering corps has eclipsed the military in prestige.<br />
The Iron Fang Clan<br />
The Iron Fang was once one of Lyra’s great clans, but now lingers in<br />
obscurity. Sixty years ago, their leader, Duke Varashar, betrayed Lyra by<br />
giving information to the Enemy Whose Name May Not Be Spoken Aloud,<br />
the perennial enemy of the Lyran Empire. The clan lost nearly all of its<br />
ships and status because of this heinous act, and it has taken two<br />
generations for the rest of Lyra to even look at this disgraced clan —<br />
they’re still pariahs among most of the empire.<br />
Joining the Iron Fang’s military forces will probably be seen as a stigma,<br />
but the most successful commander of this generation is almost certainly<br />
to succeed the current Count of Iron Fang, and clan fortunes and<br />
prestige have been known to change very rapidly.<br />
The Mountain Watchers Clan<br />
This obscure clan has only recently arisen to power, mainly due to their<br />
political skill (though many accuse them of espionage and sabotage<br />
against other clans). They have a great deal of political influence at the<br />
Lyran Court, although other clans are almost unanimous in their loathing<br />
of these obsequious little cats. The Mountain Watchers have also<br />
achieved a reputation for technical excellence.<br />
THE HYDR@N KINGDOMS<br />
The atmosphere of the Hydran homeworld is rich in methane which they<br />
breathe. This would be uncomfortable (or fatal) to most Federation<br />
species.<br />
Hydrans have three arms, three legs and three eyes. Their skin is tough<br />
and leathery. Hydrans have three sexes that are generally referred to as<br />
the Male, Female and Matriarchal. All births result in triplets (one of<br />
each sex), which are cared for by the Matriarchal. Males tend to<br />
dominate the command and technical positions, while females form most<br />
of the labor force, fighter pilots, and ground combat troops. Some<br />
females can hold command positions, or even the throne. Matriarchals<br />
are non–sentient and never hold positions in business or industry.<br />
The Hydrans have a Pantheon of minor gods, some of which are of a<br />
higher order (and the order may change as different political factions<br />
come to power within any given group.) Each household has its own god<br />
or gods, as does each starship, squadron and fleet.<br />
The Hydran government is a Monarchy. The lines of succession are quite<br />
complex since the Hydrans are anything but monogamous. The Royal<br />
Family consists of approximately 30,000 beings, with some 1,200<br />
Princes (both male and female.) Theoretically, any one of the<br />
princes could ascend to the throne. There is an extensive nobility<br />
that involves itself in internal politics and a strong Civil Service that<br />
47
actually runs the day to day<br />
affairs of government.<br />
The Hydrans were once<br />
conquered by the Klingons and<br />
Lyrans and held as a client state<br />
for nearly 50 years. Powerful<br />
merchant guilds setup the “Lost<br />
Colonies” during this time and<br />
eventually developed the<br />
technology and resources to<br />
remove the Klingons and Lyrans<br />
from their space.<br />
HYDRAN STARSHIPS<br />
The starships of the Hydran<br />
Kingdom come in one of three<br />
flavors: fusion and fighter armed<br />
for close combat, hellbore armed<br />
for long–distance support fire and<br />
command ships with both types<br />
of weaponry. The hellbore–armed<br />
ships are less common than the<br />
fusion and fighter armed ships.<br />
This is fitting with the Hydran<br />
A Hydran pilot heads towards his fighter.<br />
fighter doctrine. The smaller<br />
fighters are used to harass and<br />
attack the enemy, giving the fusion armed ship time to close the distance<br />
and reach firing range. Hydran ships are well known for their sturdiness.<br />
They can take a substantial amount of internal damage before losing<br />
critical systems.<br />
//screen: hff.psd//<br />
HUNTER FRIGATE (H–HN)<br />
A frigate–class ship, its hellbore–armed counterpart is the Cuirassier. The<br />
Hunter has been described as a suicide ship, and the combat history of<br />
the ship does much to bolster this reputation. It should be made clear,<br />
however, that this is the result of the aggressive tactics on the part<br />
of some of the crews, and not any fault of the design. An analysis<br />
48<br />
of all major fleet actions in the last censure indicates an overall<br />
tendency for small ships to be lost at a higher rate than cruisers.
COMMANDO HUNTER FRIGATE (H–HNG)<br />
Initially deployed concurrently with the Commando Lancer, Commando<br />
Hunters continued in service for a long period of time. The ships were<br />
too small for general duty at the height of the hostilities, but their ease of<br />
production kept them in service well past their time.<br />
BUFFALO HUNTER WAR DESTROYER (H–DWF)<br />
The Hydran war destroyer design was based on the Hunter frigate. The<br />
first prototypes appeared long before production began due to shipyard<br />
delays. The Hydrans regarded DWs as replacements for their frigates,<br />
but stopped building true DDs.<br />
The Buffalo Hunter carries one squadron of two fighters.<br />
CUIRASSIER FRIGATE (H–CU)<br />
This is the hellbore version of the Hunter. It has significant standoff<br />
firepower.<br />
RHINO HUNTER WAR DESTROYER (H–DWH)<br />
The hellbore–armed companion to the Buffalo Hunter, the Rhino Hunter<br />
was a solid platform for the heaviest weapons and it added substantially<br />
to fleet firepower.<br />
CRUSADER FRIGATE LEADER (H–CRU)<br />
Used to support and command frigate squadrons, the Crusader was a<br />
very powerful frigate. Equipped with both fusion beams, a hellbore and<br />
increased phasers, the ship was used as a flagship for both Hunter and<br />
Cuirassier squadrons.<br />
LION HUNTER DESTROYER LEADER (H–DWL)<br />
The war destroyer hull was large enough to make a mixed weapons ship<br />
practical for command roles.<br />
The Lion Hunter carried one squadron of two fighters.<br />
//screen: hcl.psd//<br />
LANCER DESTROYER (H–LN)<br />
LANCER DESTROYER: PLUS REFIT (H–LN+)<br />
The Lancer is a fusion–armed hybrid warship–carrier. Its hellbore– armed<br />
counterpart is the Knight. The Lancer was, class for class, the most<br />
effective of the fusion–armed ships.<br />
The Lancer carries two squadrons of two fighters each.<br />
49
COMMANDO LANCER (H–LNG)<br />
COMMANDO LANCER: PLUS REFIT (H–LNG+)<br />
This was the first commando ship deployed by the Hydran Kingdom after<br />
its restoration. The Commando Lancer served them well through many<br />
wars following.<br />
COUNT DESTROYER LEADER (H–CNT)<br />
The Count DDL was essentially a Lancer with the addition of a hellbore<br />
and the power to arm and fire it. Increases in batteries and shuttles<br />
were also provided. While no phasers were added, all were upgraded to<br />
phaser–1s.<br />
The Count carries two squadrons of two fighters each.<br />
HORSEMAN WAR CRUISER (H–HR)<br />
HORSEMAN WAR CRUISER: PLUS REFIT (H–HR+)<br />
Designed to be 90% as effective and only 70% as expensive as the<br />
Ranger/Dragoon series, this class of light cruisers came into use around<br />
the same time that other races developed war cruisers. It had fewer<br />
fusion beams than the Ranger did, but with a better firing arc.<br />
The Horseman was a disappointment as a war cruiser and even the<br />
extensive refits did not solve the basic problems.<br />
The Horseman was eventually replaced by the more powerful Mongol, but<br />
remained in production for use as source of variant hulls.<br />
The Horseman carries two squadrons of three fighters each.<br />
CATAPHRACT COMMANDO CRUISER (H–CAT)<br />
Intended to support planetary assaults with landing forces, the Cataphract<br />
carries two squadrons of one fighter each.<br />
MONGOL MEDIUM CRUISER (H–MNG)<br />
Produced in the Old Colonies after the fall of the Hydran capital, this<br />
greatly improved version of the Horseman incorporated substantially<br />
improved firepower. Development began with the Horseman+ design,<br />
which had been refitted extensively.<br />
The hull was stretched slightly, which provided more room for weapons<br />
and systems.<br />
The Mongol carries two squadrons of three fighters each.<br />
COMANCHE MEDIUM COMMAND CRUISER (H–COM)<br />
This is the command version of the Mongol CM. While it has many<br />
different armaments, fusions are clearly preferred.<br />
It carries two squadrons of two fighters each.<br />
MOHAWK NEW HEAVY CRUISER (H–MHK)<br />
The fusion–fighter version of the NCA series was easily the<br />
50<br />
equivalent of the Ranger–class it was intended to supplant, with<br />
nearly equivalent systems and superior firing arcs. The Mohawk
was notable in that it had 20% more battery power than the Iroquois or<br />
Cheyenne.<br />
The Mohawk carries two squadrons of four fighters each.<br />
KNIGHT DESTROYER (H–KN)<br />
KNIGHT DESTROYER: PLUS (H–KN+)<br />
The hellbore–armed variant of the Lancer, this ship provided the needed<br />
depth to hellbore support of a battle fleet. As the largest pre–war Hydran<br />
ship without fighters, it demonstrated that a ship without fighters could<br />
still be effective. The value of this ship as a fire support platform made<br />
fleet admirals reserve it for larger actions, and it was rarely used for solo<br />
patrols.<br />
EARL DESTROYER LEADER (H–ERL)<br />
The Earl DDL was essentially a Knight with two fusion beams and the<br />
power to arm and fire them. As with the Count, the battery and shuttle<br />
facilities were also expanded. While no phasers were added, all present<br />
were upgraded to phaser–1s.<br />
WARRIOR DESTROYER LEADER (H–WAR)<br />
This was designed to provide a leader for destroyer squadrons of either<br />
type (Lancer or Knight.) Like most Hydran command ships, it included<br />
mixed weaponry. This ship was built with all applicable refits.<br />
The Warrior carries two squadrons of one fighter each.<br />
TRAVELER LIGHT CRUISER (H–TR)<br />
TRAVELER LIGHT CRUISER: PLUS REFIT (H–TR+)<br />
Corresponding to the Dragoon as the Horseman did to the Ranger, the<br />
Traveler–class was originally assigned to the Expeditionary Fleet. During<br />
the war, however, most of them served on border fleets.<br />
BARON LIGHT COMMAND CRUISER (H–BAR)<br />
Designed as a replacement squadron leader, it was found more suitable<br />
than a Ranger or Lord Marshal was as leader of Horseman/Traveler<br />
ships because of similar operating characteristics to them. This ship<br />
was built with appropriate refits as standard equipment. The Baron was<br />
eventually replaced by the Comanche and Apache.<br />
The Baron carries two squadrons of three fighters each.<br />
TARTAR MEDIUM CRUISER (H–TAR)<br />
This is the hellbore version of the Mongol. The Tartar carried two<br />
squadrons of three fighters each.<br />
APACHE MEDIUM COMMAND CRUISER (H–APA)<br />
This is the command version of the Tartar CM. While it has mixed<br />
armament, hellbores are clearly favored over fighters and fusion beams.<br />
51
IROQUOIS NEW HEAVY CRUISER (H–IRQ)<br />
The Iroquois is the hellbore–armed Hydran NCA. It appears to have been<br />
a decent replacement for the venerable Dragoon. While there were only<br />
two fighters, the firing arcs were substantially improved.<br />
The Iroquois carries two squadrons of one fighter each.<br />
CHEYENNE NEW HEAVY CRUISER (H–CHY)<br />
The Cheyenne was a singular and “unified” heavy cruise design, and while<br />
rejected in favor of the traditional pair of designs, it was certainly a<br />
capable ship.<br />
The Cheyenne carries two squadrons of three fighters each.<br />
SIOUX NEW COMMAND CRUISER (H–SUI)<br />
The Sioux was a modified Cheyenne with improved phasers. Additional<br />
command facilities greatly improved cruiser squadron coordination.<br />
//screen: hca.psd//<br />
RANGER CRUISER (H–RN)<br />
RANGER CRUISER: PLUS REFIT (H–RN+)<br />
The Ranger, like most Hydran ships, is a hybrid cruiser–carrier, operating<br />
nine fighters for firepower support. The Ranger uses fusion beams and<br />
is designed for close–range combat. Its hellbore–equipped counterpart is<br />
the Dragoon.<br />
When combined with Stinger–H fighters, the Ranger has the best of both<br />
worlds and more than acceptable long–range fire. The nine fighters are<br />
divided into three squadrons of three fighters each.<br />
LORD COMMANDER EARLY COMMAND CRUISER (H–LC)<br />
This was the original Hydran command cruiser design (before the<br />
invention of the hellbores.) Some of the Marshals and Bishops were of<br />
this class. There were no refits.<br />
The Lord Commander carries two squadrons of three fighters each.<br />
LORD MARSHAL COMMAND CRUISER (H–LM)<br />
The flagships of the Hydran fleet until the advent of the Paladin, the Lord<br />
Marshal–class, along with the similar Lord Bishop, were the first<br />
combined technology (hellbore and fusion) ships built. The mixed<br />
52<br />
weaponry was subject to rapid destruction in combat once the<br />
ship started taking damage.
The LM carries two squadrons of three fighters each.<br />
LORD ADMIRAL HEAVY COMMAND CRUISER (H–CHA)<br />
This ship, and the corresponding Lord Cardinal, were built on slightly<br />
stretched command cruiser hulls. The Lord Admiral replaced the Lord<br />
Marshal in production. It retained the fighters of the LM and gained two<br />
360° phasers and the power to operate them.<br />
The Lord Admiral carries two squadrons of three fighters each.<br />
DRAGOON CRUISER (H–DG)<br />
DRAGOON CRUISER: PLUS REFIT (H–DG+)<br />
This is a modified version of the Ranger, with long–range hellbores<br />
instead of short–range fusion beams. The fighter groups are reduced to<br />
one squadron of three fighters in order to make room for the additional<br />
power reactors required in powering the hellbores.<br />
LORD BISHOP COMMAND CRUISER (H–LB)<br />
The LB was the hellbore–armed corollary to the fusion/fighter–armed<br />
Lord Marshal. Ships of this class were in the Lyran Border and<br />
Expeditionary fleets prior to the wars. As the wars continued, ships of<br />
either type could appear in any fleet.<br />
The Lord Bishop carries one squadron of three fighters.<br />
LORD CARDINAL HEAVY COMMAND CRUISER (H–CHC)<br />
Like the Lord Admiral, the Lord Cardinal was built by stretching the Lord<br />
Bishop 7.6 meters. This accommodated two additional phaser–1s and<br />
the power to operate them.<br />
The Lord Cardinal carries one squadron of three fighters.<br />
OVERLORD BATTLECRUISER (H–OV)<br />
Built in the Old Colonies at a rate of about one per year, the Overlord was<br />
the largest of the cruisers and equal in many respects to the<br />
dreadnoughts of an earlier decade. Rather than two parallel designs, the<br />
Hydrans settled on a single mixed–weapon type. The hull was a<br />
stretched Lord Marshal with an additional phaser battery amidships.<br />
The Overlord carries two squadrons of three fighters each.<br />
//screen: hdn.psd//<br />
PALADIN DREADNOUGHT (H–PAL)<br />
PALADIN DREADNOUGHT: PLUS REFIT (H–PAL+)<br />
The Hydran Paladin was built to answer the C8 and C9<br />
dreadnoughts used by the Klingons against the Hydrans.<br />
53
It carries a mixture of fusion and hellbore cannons. Like most Hydran<br />
ships it carries fighters, which comprise a significant part of its combat<br />
power.<br />
The Paladin DN carries two squadrons of six fighters each.<br />
PALADIN HEAVY DREADNOUGHT (H–PAH)<br />
A slightly beefed up version of the PAL+, the PAH was a modest<br />
improvement over the earlier DNs.<br />
The Paladin DNH carries two squadrons of six fighters each.<br />
MONARCH BATTLESHIP (H–MNR)<br />
The Monarch is based on plans for an enlarged Paladin, with a wider<br />
rather than a longer hull. The design incorporates the phaser<br />
improvements given to the Paladin. The hellbores are very unusual,<br />
having more than the normal maximum of four. This is because the<br />
increased mass of the Monarch provides a more stable firing platform.<br />
The Monarch carries three squadrons of six fighters each.<br />
HYDRAN FIGHTERS<br />
The Hydrans were the first race to use warp–powered fighters and<br />
consider them an integral part of fleet operations. They can increase a<br />
ship’s firepower by as much as 300% and they also divert enemy<br />
attention (and weapons) from the ship.<br />
Fighters based on fusion–armed ships tend to operate closer to the ship,<br />
as the ship should be operating close to the target. Fighters on<br />
hellbore–armed ships tend to operate at longer distances as the situation<br />
demands.<br />
//schematic of the hydran fighter//<br />
STINGER–1 (ST–1)<br />
The “Lost Colony” Guilds developed the Stinger–1 fighter to combat the<br />
Klingon and Lyran ships without the Hydrans having to develop an<br />
economy.<br />
These attrition units could be built faster and cheaper than capital ships.<br />
The Stinger–1 is armed with a single phaser–3 and a fusion beam.<br />
STINGER–2 (ST–2)<br />
The Stinger–2 was developed in order to maintain Hydran fighter<br />
superiority. It is a vastly improved version of the basic ST–1 fighter. It<br />
can move faster, take more damage, and cause more destruction.<br />
The Stinger–2 is armed with a phaser–G and a fusion beam.<br />
54
STINGER–H (ST–H)<br />
The Stinger–H is the hellbore–armed variant of the Stinger fighter. It is<br />
based on the Stinger–2 frame and is a very capable long–range attacker.<br />
The Stinger–H is armed with a phaser–G and a hellbore.<br />
REFITS<br />
Hydran ships received few refits.<br />
Plus Refit:<br />
The major fleet refit was known as the plus refit. Each class and<br />
sub–class received various improvements (stronger shields, replaced<br />
some ph–2s with ph–1s, increased warp power, additional equipment,<br />
revised firing arcs, etc.) Ships with this refit are marked with a “+”<br />
after their designation, for example: RN+.<br />
HYDRAN ELITE ORGANIZATIONS<br />
The Hydran Keepership<br />
Of the millions of religious cults of Hydra, some of the most prominent<br />
worship the Star–Beasts, spacefaring creatures that have been called<br />
“space monsters” by some. To allow Hydrans to more effectively worship<br />
these creatures, the Hydrans have built huge force field enclosures called<br />
Preserves to contain the Star–Beasts.<br />
The Keepership is an order of starship captains dedicated to preserving<br />
the Star–Beasts and protecting the Star–Beast cults. They maintain the<br />
preserves, capture young Star–Beasts, and make certain they are held in<br />
livable conditions. Although the Keepership is not a particularly politically<br />
important order, their bravery is unquestioned and has earned them a<br />
place of honor in Hydran society.<br />
Beast–Hunter Cult (ulazhi)<br />
For a few, the hunting of Star–Beasts is considered the ultimate<br />
challenge. The Beast–Hunter cult of the Ulazhi has lately been blessed<br />
with many converts, and some of Hydra’s richest young men and women<br />
have joined this cult, greatly increasing its resource base.<br />
There are a few in the Beast–Hunters who claim that when the Odyssey,<br />
a legendary Star–Beast migration, occurs that the Star– Beast will<br />
transform anyone who captures them into a god. The Beast–Hunters<br />
claim that the Odyssey is near, a belief that drives many of the cult’s<br />
newest recruits.<br />
Sacred Beast Cult (muriyz)<br />
There are many cults that worship the Star–Beasts, but the Sacred<br />
Beast cult is the most fanatical. The muriyz believe that no one is worthy<br />
of touching or manipulating the Star–Gods, a philosophy that has put<br />
them in conflict with the Keepership on numerous occasions.<br />
The muriyz have also been strengthening their forces in recent<br />
years, and are responsible for many acts of terrorism against the<br />
Preserves. They have also used some political influence to 55
convince the Hydran administration to ignore their actions — when the<br />
galaxy’s at war, what does the fate of a few Star–Beasts matter? The<br />
Keepership finds this attitude annoying.<br />
THE GORN CONFEDER@TION<br />
Gorns are reptilian–humanoids with a high degree of intelligence and<br />
personal bravery. They are<br />
physically as large as or even larger<br />
than the Kzinti, and are taller than,<br />
and almost twice the mass of the<br />
average Human.<br />
The Gorn Confederation consists of<br />
three sentient races (all developed<br />
on separate planets, but are so<br />
nearly identical they must have<br />
come from common stock) joined<br />
into a single political unit. Their<br />
area of space includes relatively few<br />
habitable planets and, apparently,<br />
no native sentient races beyond<br />
themselves.<br />
The Gorns first met the Federation<br />
in war, but this was quickly settled<br />
when it became apparent that it<br />
had been a misunderstanding.<br />
During the peace talks, the<br />
Federation discovered that the<br />
Gorns had experienced a continuing<br />
series of armed disagreements with<br />
the Romulans concerning their<br />
An outstanding example of the Gorn race. common border.<br />
GORN STARSHIPS<br />
The Gorn fleet is small compared to that of the Romulans, but of<br />
high–quality ships. In Earlier times, the Gorn ships had relatively few<br />
heavy weapons. This was adequate against the sublight Romulan ships,<br />
but proved inadequate against warp–capable KRs. The Gorns refitted<br />
their ships with more and heavier plasma torpedoes, greatly increasing<br />
their combat power.<br />
All Gorn ships have a Federation reporting name, a sort of “nickname” by<br />
which it could be cited in reports and studies. These names were<br />
dinosaur species from ancient Earth history, a fact that many Gorns found<br />
thoroughly amusing.<br />
56
screen: gff.psd//<br />
DESTROYER (G–DD)<br />
DESTROYER: PLUS REFIT (G–DD+)<br />
DESTROYER: F–REFIT (G–DDF)<br />
The Gorn destroyer was a powerful antagonist when built, carrying the<br />
heavy Type–G plasma torpedo. While the torpedo could not rotate, the<br />
wide arc made this only a minor limitation.<br />
The DD was designed with expansion in mind. The fact that this expansion<br />
was provided for may indicate why the Gorns produced an obviously<br />
inadequate destroyer design. The DD, is in fact, a very good frigate.<br />
DESTROYER COMMANDO TRANSPORT (G–DDG)<br />
DESTROYER COMMANDO TRANSPORT: PLUS REFIT (G–DDG+)<br />
Designed as a consort for the Commando Transport, the DDG retained<br />
its plasma–G torpedo, enabling it to operate as a standard DD in a<br />
squadron.<br />
DESTROYER LEADER (G–DDL)<br />
DESTROYER LEADER: PLUS REFIT (G–DDL+)<br />
This was one of several attempts to improve the underpowered destroyer<br />
and produce a satisfactory ship design for use as a squadron leader.<br />
BATTLE DESTROYER (G–BDD)<br />
BATTLE DESTROYER: PLUS REFIT (G–BDD+)<br />
The Gorns produced two primary “wartime construction” classes, of<br />
which this was the smaller “war destroyer”.<br />
The Gorns were able to save money by converting existing destroyers to<br />
battle destroyers and also by using destroyer production facilities for<br />
BDDs.<br />
COMMANDO BATTLE DESTROYER (G–BDG)<br />
COMMANDO BATTLE DESTROYER: PLUS REFIT (G–BDG+)<br />
Essentially a DDG upgraded to the BDD design, the BDG carried a full<br />
battalion of troops with somewhat improved support. It was not a fully<br />
capable BDD, but was still a formidable design for a commando ship.<br />
BATTLE DESTROYER LEADER (G–BDL)<br />
BATTLE DESTROYER LEADER: PLUS REFIT (G–BDL+)<br />
The BDL was intended to provide a squadron leader for cheaper<br />
than the cost for a Heavy Destroyer. The experiment was not 57
entirely successful from a financial standpoint. HDDs were, in the end,<br />
cheaper to build and more useful in combat than BDLs because the limit<br />
of the BDD design had been reached. The BDL is the maximum possible<br />
conversion of the BDD.<br />
//screen: gcl.psd//<br />
HEAVY DESTROYER (G–HDD)<br />
HEAVY DESTROYER: PLUS REFIT (G–HDD+)<br />
The Gorn version of the ubiquitous “war cruiser”, this ship designated a<br />
“heavy destroyer” to disguise its true power from the Romulans and its<br />
true cost from the budget–minded members of the Gorn government, is<br />
often considered the epitome of the lean–and–mean design concept.<br />
Using Type–F plasma torpedoes and a very well arranged phaser battery<br />
in addition to the single Type–S plasma torpedo, the HDD is a formidable<br />
opponent.<br />
HEAVY COMMANDO DESTROYER (G–HDC)<br />
HEAVY COMMANDO DESTROYER: PLUS REFIT (G–HDC+)<br />
Intended to support planetary assaults with landing forces. The 32<br />
boarding parties provided substantial marine support.<br />
COMMAND DESTROYER (G–CDD)<br />
Designed to replace destroyed heavier ships in the role of squadron<br />
leader. The most significant increase in firepower was the replacement of<br />
the wing phaser–3s with phaser–1s.<br />
MEDIUM CRUISER (G–CM)<br />
Showing surprising insight, the Gorns designed their Heavy Destroyer so<br />
that it could be modified into a heavier ship should the need arise. The<br />
result is fully equivalent to the battlecruiser, but is designated a “medium<br />
cruiser” to avoid confusion. The initial production was limited due to yard<br />
capacity. The CM was a popular design and preferred over the BC due to<br />
the superior firing arcs of the heavy torpedoes.<br />
MEDIUM COMMAND CRUISER (G–MCC)<br />
Unlike the heavy cruisers, the addition of flag facilities was accompanied<br />
by a modest firepower increase. The Gorns were almost unique in<br />
building a command version of their “new heavy cruiser.”<br />
58
STRIKE CRUISER (G–CS)<br />
The CS was a variant of the CM. Produced at a low rate with the<br />
heavier Type–R plasma torpedo, this class was intended for special<br />
missions.<br />
//screen: gca.psd//<br />
LIGHT CRUISER (G–CL)<br />
LIGHT CRUISER: PLUS REFIT (G–CL+)<br />
LIGHT CRUISER: F–REFIT (G–CLF)<br />
The CL was designed by the Gorns to use as many components of the<br />
CA as possible. While this made construction easier, the ship is not<br />
optimally balanced for its missions. Nevertheless, it is a good ship for<br />
most situations.<br />
COMMANDO TRANSPORT (G–COM)<br />
COMMANDO TRANSPORT: PLUS REFIT (G–COM+)<br />
COMMANDO TRANSPORT: F–REFIT (G–COMF)<br />
Three modified CLs were converted to serve as commando transports.<br />
These were used to carry Gorn marines on raids against Romulan<br />
outposts, colonies, and the occasional pirate base. The ships carry a<br />
battalion of 32 boarding parties.<br />
HEAVY CRUISER (G–CA)<br />
HEAVY CRUISER: PLUS REFIT (G–CA+)<br />
This is the standard workhorse of the Gorn battle fleet. It has two<br />
Plasma–G torpedoes, with fixed launch directions angling to either side.<br />
This lack of concentrated firepower made the ship awkward to use in<br />
battle although its powerful phaser suite partially made up for this<br />
problem.<br />
BATTLECRUISER (G–BC)<br />
When a Gorn CA receives both the plus and F refits, it is known as a<br />
Battlecruiser. The improved firing arcs and upgraded plasma fix the<br />
major deficiencies of the CA.<br />
COMMAND CRUISER (G–CC)<br />
COMMAND CRUISER: PLUS REFIT (G–CC+)<br />
COMMAND CRUISER: F–REFIT (G–CCF)<br />
This is a modification of the CA/BC with command facilities. Unlike the<br />
command cruisers of other races, there is no increase in combat power<br />
over the standard battlecruiser.<br />
59
HEAVY COMMAND CRUISER (G–CCH)<br />
The evolution of the CC to BCH is seen in this intermediate hull design,<br />
which entered service during the war. The CCH had all the improvements<br />
and refits of the CCs, but used an expanded front hull to provide for<br />
additional phasers, although there was not enough power available for<br />
their use.<br />
In the final analysis, the CCH was a disappointment, if not a failure. The<br />
increase in combat power was not enough to warrant the increase in<br />
production expense.<br />
HEAVY BATTLECRUISER (G–BCH)<br />
As with other races, the Gorns eventually replaced dreadnought<br />
production with an improved battlecruiser design. The additional torpedo<br />
took the design to the limit. Increased power allowed the class to reach<br />
the full potential of the original CA design.<br />
//screen: gdn.psd//<br />
DREADNOUGHT (G–DN)<br />
DREADNOUGHT: F–REFIT (G–DNF)<br />
Constructed in response to the Romulan Condor, the Gorn DN is one of<br />
the most powerful ships ever launched. Like the Condor, it carries one<br />
Type–R plasma torpedo, as well as two Type–S torpedoes. The addition of<br />
the F–refit greatly improves this ships ability to respond to smaller<br />
targets.<br />
HEAVY DREADNOUGHT (G–DNH)<br />
Further tinkering with the DNF design produced the heavy dreadnought,<br />
the DNH. Like the majority of heavy dreadnoughts, the hull could not<br />
support additional heavy weapons beyond those of the refitted<br />
dreadnought. The additional phasers were welcome, however.<br />
BATTLESHIP (G–BB)<br />
Given the extreme length of the Gorn DN, the Gorn battleship was<br />
designed on a wider hull. Like the Romulans, the Gorns encountered<br />
problems with producing a stable warp engine large enough to propel this<br />
monster ship.<br />
60
REFITS<br />
Gorn ships were improved with the following refits:<br />
Plus Refit<br />
Ships with this refit exchanged their type–G plasma torpedoes for<br />
type–S improved plasma torpedoes. All eligible older ships were<br />
eventually upgraded with this refit, and some ships undergoing a plus<br />
refit received various additional improvements. Many of the newer<br />
ships included this refit during their original construction. Ships with<br />
this refit have a “+” added to their designation. Example: CA+.<br />
“F” Refit<br />
To provide increased protection against smaller units, this refit added<br />
two type–F plasma launchers, as well as a pair of phaser–3s. Ships<br />
with this refit added a “F” to their designation. One notable exception<br />
is the Gorn CA, which was called a BC. Other examples: DDF.<br />
GORN ELITE ORGANIZATIONS<br />
The King’s Fleet Guard<br />
The King’s Fleet Guard is the personal guard of the King of Gihdahr, one<br />
of the three worlds that mark the center of Gorn power. The King is a<br />
constitutional monarch, whose power mostly rests on Gihdahr. His ability<br />
to influence events within the whole Gorn sphere depends on his personal<br />
political ability. The King is assigned a small fleet of personal operatives;<br />
the King’s Fleet Guard, which is a special branch of the Gorn navy. The<br />
Fleet Guard are considered to be among the best pilots in Gorn space.<br />
They’re fiercely loyal to the constitutional order, and pride themselves in<br />
their lineage and knowledge of historic ritual. Some Gorns view them as<br />
pompous twits and an embarrassing anachronism. Their prestige has<br />
declined in recent years, a reflection of the weakness of the current<br />
Gihdahr monarchy.<br />
The Defenders of the Egg<br />
The Defenders of the Egg is the fleet of worshippers of S’Yahazah, “the<br />
Great Egg Bringer” and the Mistress of Fertility, the most important of<br />
Gorn noble religions. According to Gorn mythology, The Mistress of<br />
Fertility and the Gorn Great Father were the two founders of the Gorn<br />
race, but the Great Father attempted to devour the eggs. The Mistress<br />
defeated him and banished him into the cold of space, and no one<br />
worships him.<br />
The Mistress of Fertility takes the eggs of all Gorn Blue–Yellows, a scale<br />
coloration that’s said to mark nobility and spiritual purity among<br />
Gorn–kind, and safeguards them against harm. She also provides certain<br />
fertilization methods that ensure maximum Gorn genetic potential, as a<br />
large clutch of Blue–Yellows, (especially among hereditary Gorn noble<br />
families), is an extremely important symbol of Gorn strength. Of late, the<br />
Mistress has been speaking out against the Gorn Confederate Assembly<br />
and its recent handling of Gorn affairs. People are starting to wonder if<br />
the GCA is planning to abandon its longstanding position of<br />
neutrality on Gorn internal conflicts.<br />
61
The Guardians Errant<br />
The Guardians Errant are an adventurer’s society, part Three Musketeers,<br />
part Conquistador, and all mercenary. The Guardians are a<br />
semi–independent council of wandering Gorn knights, searching for<br />
adventure, frontier, and a place to create a small personal seat. They put<br />
together exploratory expeditions and look for artifacts and other things<br />
that will bring them fortune, power, and glory. Some of the Guardians are<br />
noble defenders of the realm. Others are pure opportunists. They<br />
allegedly represent all that is good and noble in Gorn society: ability,<br />
cunning, an aura of leadership, and personal strength.<br />
The Guardians Errant get their power and authority from the Gorn<br />
Confederate Assembly, and their excesses are held in check by Assembly<br />
Decree. They usually hold themselves at arm’s length from Gorn politics,<br />
which is usually seen as a good thing.<br />
THE ORION PIR@TE C@RTELS<br />
The Orion Pirates are difficult to describe as a political entity. Orion is a<br />
member of the Federation and is one of the most economically aggressive<br />
races, both within and outside Federation territory. Officially (according to<br />
the Orion Government, anyway), the pirates are simply individual<br />
privateers and criminals, many of whom are not even Orions, with no<br />
formal organization.<br />
When the Federation was formed, a large number of the pre–Federation<br />
Orion Navy “disappeared” and formed the core nucleus of the Orion Pirate<br />
cartels.<br />
The Orion Pirates are not a playable empire in Starfleet Command.<br />
They can, however, be encountered almost anywhere in the galaxy.<br />
Although the Orion Colonies are officially neutral towards the pirates,<br />
there is definitely encouragement, however informal and unofficial, behind<br />
the scenes for privateer actions. The government employs a variety of<br />
covert branches including intelligence and undercover ops.<br />
Official Orion policy does not permit government interference with the<br />
normal business of loyal privateers. As for the criminal element, the<br />
government has stated repeatedly that it has no knowledge of true Orions<br />
conducting illegal business, so it must be the work of outside races<br />
masquerading as Orions. At one time in the very distant past, Orion<br />
apparently supported a normally–structured military, but due to the<br />
demands of galactic economics, it seemed to be more profitable for the<br />
officers and crew to pursue personal interests throughout the Galaxy.<br />
Some vestige of organization remains, for the pirates are divided into<br />
well–defined “operating zones” controlled by cartels which have exclusive<br />
right to “harvest resources” within their own area. Zones are guarded by<br />
enforcer ships, and several ships are maintained within the territory for<br />
smuggling. The older, stronger cartels can support their own cadre of<br />
ships. However, it is estimated that almost 2/3 of Orion ships<br />
function as independents which must lease ships, and sometimes<br />
62 territory, from a cartel lord. These independent ships must also
ely on the lessor cartel’s facilities for supplies, ship maintenance, and<br />
weapons.<br />
Orions designate ship types with names indicative of their particular<br />
brand of commerce, like “Marauder,” “Privateer,” and “Raider.”<br />
ORION PIRATE STARSHIP BRIEF<br />
Not much is known about Orion starships. They tend to self–destruct<br />
instead of letting themselves be captured. One fact is always true: No<br />
two Orion ships are the same. All of their ships are customized to some<br />
degree. There are many different types of weapons that Orions may<br />
mount on their ships, depending on how successful their cartel is, and<br />
where they are located.<br />
The following are the most common types of Orion Pirate starships.<br />
Remember that each Orion ship you encounter, even if they are of the<br />
same type, may have a different weapons package.<br />
PRIVATEER–LIGHT RAIDER (O–LR)<br />
The Orion Light Raider was the standard pirate ship for commerce<br />
raiding before large–scale war broke out. There are three option<br />
mounts, one in the bow and one in each wing. The Light Raider is not a<br />
viable warship, but does well against lightly armed freighters.<br />
RAIDER–LIGHT CRUISER (O–CR)<br />
The Raider–class light cruiser was the early backbone of the Orion Pirate<br />
forces. It is the equivalent to the light cruiser of most fleets in firepower<br />
although it quickly becomes combat ineffective when damaged. It is an<br />
excellent ship for its purpose: attacking cargo ships. While most pirates<br />
prefer to prey on unprotected ships, this vessel can defeat or disable<br />
most small escorts.<br />
ASSASSIN–BATTLE RAIDER (O–BR)<br />
The large number of warships operated by the galactic powers, along<br />
with the pre–emption of civilian convoys by the military, resulted in the<br />
disruption of normal pirate activities. The Battle Raider was designed to<br />
replace the standard Raider as the heavy raiding vessel of choice. It was<br />
substantially larger than the CR and could, if necessary, stand in combat<br />
with a warship, providing cover for the ever—present light raiders.<br />
MARAUDER–HEAVY CRUISER (O–CA)<br />
Each Orion cartel operates at least one heavy unit as an “enforcer.”<br />
These ships, being much more powerful than the Raider, can outrun and<br />
outfight any other pirate ship. This gives each cartel overlord the<br />
capability to deal with rebellious ship captains.<br />
Heavy cruisers are also used for specific pirate missions where a ship of<br />
their considerable firepower is necessary.<br />
Larger Orion ships are known, but details are limited.<br />
63
INTERF@CE REFERENCE M@NU@L<br />
SELECT YOUR EMPIRE<br />
After you start the game and watch the introductory movie, the first<br />
screen you see will be a view of the galaxy. You can press the ESC key to<br />
bypass the movie.<br />
Click on one of the<br />
empire emblems to<br />
select that empire. If you<br />
hold the mouse cursor<br />
over the emblem, the<br />
name of the empire will<br />
be displayed for you.<br />
For beginning players, we<br />
highly suggest selecting<br />
the United Federation of<br />
Planets or the Klingon<br />
Empire as your starting<br />
race.<br />
Once you select a race,<br />
you will see the main<br />
menu for your race. The<br />
screenshots we will be<br />
using are from the<br />
Federation Empire. All empires have unique looking screens, but all of<br />
them have the same functionality.<br />
64<br />
An overview of the available galactic empires.<br />
This is where you select your empire.<br />
We will be using<br />
Federation screens for<br />
screenshots in this<br />
manual. All of the<br />
screens have the same<br />
functionality. However,<br />
the screens for the other<br />
empires may have the<br />
buttons moved around.<br />
The text of the manual<br />
will also assume that you<br />
are looking at the<br />
Federation screen when<br />
describing the location of<br />
a button or a region on<br />
the screen.<br />
As a note, all of the<br />
icons are the same,<br />
regardless of the empire’s screen you are looking at. Learn one<br />
and you will learn them all.<br />
The Main Menu – the start of everything good.
From the main menu, you can select the following options:<br />
Campaign<br />
This will start a new single–player campaign. See page 78 for more<br />
information. Once you have started a single–player campaign, you can<br />
continue your game by selecting this option.<br />
Skirmish<br />
Select this option to play a single–player stand–alone mission. You will be<br />
able to select from a variety of missions that can be customized at your<br />
discretion. See page 76.<br />
Multiplayer<br />
Select this option to play multiplayer games over the Internet, LANs, or<br />
via modem or serial cable. More details about multiplayer missions can<br />
be found on page 66.<br />
Captain/Commodore/Admiral<br />
These are radio buttons; only one button can be selected at a time.<br />
These buttons control the game difficulty level for single–player games<br />
(either Campaign or Skirmish missions). See page 76 for more<br />
information.<br />
Film Room<br />
View previously saved<br />
gameplay films. As you play<br />
the game, Starfleet Command<br />
will save film footage of your<br />
tactical combats. Going to the<br />
Film Room will allow you to<br />
replay these films at a later<br />
date.<br />
The list on the left shows all<br />
the films saved on your<br />
computer. Click on a film<br />
name to highlight it. This will<br />
show details in the small<br />
window.<br />
Click PLAY to show the highlighted film.<br />
Click SAVE AS to save that film under a new name.<br />
Click DELETE to delete the highlighted film.<br />
The Film Room will automatically save the last five missions played for<br />
future play back. You can turn this feature off by turning Automatic<br />
Filming OFF.<br />
Options<br />
Change keyboard settings.<br />
65
Credits<br />
This will allow you to see who developed Starfleet Command.<br />
Exit<br />
Returns you to your operating<br />
system. There is no confirmation.<br />
If you press this button, Starfleet<br />
Command will immediately quit.<br />
Select the back arrow to return<br />
to the galactic overview map in<br />
order to select a new empire.<br />
MULTIPL@YER G@MES<br />
To start a Multiplayer game of Starfleet Command, click on the<br />
MULTIPLAYER button from the main menu. Your race is determined by<br />
what empire you select at the very start.<br />
The Network Setup screen will then be displayed.<br />
NETWORK SETUP<br />
You can have up to five different types of multiplayer gaming to choose<br />
from, depending on your system setup. Buttons that are dimmed are not<br />
available on your system.<br />
This screen allows you to select the type of<br />
multiplayer connection you will be using.<br />
Player Name<br />
This is used to set your player name; the name that all other players will<br />
see. To change the name, click in the box, delete the old text and type<br />
the new name.<br />
66
Direct TCP/IP<br />
This requires an installed<br />
TCP/IP protocol. If you are<br />
using a modem to connect to<br />
an Internet Service Provider<br />
that supports TCP/IP<br />
connections, you need to run<br />
Dial–Up Networking before you<br />
start Starfleet Command.<br />
You will be required to enter<br />
the IP address of the host<br />
machine if you are playing<br />
over a modem TCP/IP<br />
account. You can use CTRL–V<br />
to paste a copied IP address<br />
into the address box.<br />
You can run WINIPCFG from a DOS box or from the Start/Run menu to<br />
find your IP address. Starfleet Command uses DirectPlay 6.1a and<br />
UDP. TCP/IP ports used are 47624 for enumerations and port range<br />
2300–2400 for inbound and outbound traffic.<br />
If you are playing over a LAN (Local Area Network) configured for TCP/IP,<br />
you do not need to enter the IP address of the host. Starfleet Command<br />
will search a LAN for all valid IP addresses.<br />
If you have both LAN and ISP connections, it is suggested that you<br />
disable your ISP account while playing over the LAN.<br />
Direct TCP/IP games can support up to six players.<br />
The host of the game should click on the HOST button. The guest<br />
players should select the proper TCP/IP address and then click START.<br />
Serial Port<br />
You need two computers with<br />
a serial cable hooked up to<br />
both machines. Starfleet<br />
Command will show you the<br />
available COM ports. Select<br />
the valid COM port for your<br />
connection. Both machines<br />
must select the same speed<br />
setting (baud rate).<br />
One player will be the host and<br />
the other player is the guest.<br />
The host is in charge of<br />
selecting the scenario. The<br />
guest joins the host once the<br />
scenario is selected.<br />
The host will want to click the CREATE button to go to the<br />
Customized Multiplayer Screen, see page 70. 67
The guest will want to click the JOIN button once the game session is<br />
ready. A maximum of two players may play using a serial port connection.<br />
IPX Local<br />
If you are running on an IPX–based local area network (LAN), you can<br />
choose this type of multiplayer setup. The IPX protocol must be installed.<br />
If you select this type of network setup, Starfleet Command will search<br />
the LAN for hosted games.<br />
If you are having problems seeing other IPX games, you should check<br />
your IPX Frame Type property. Open the NETWORK control panel.<br />
Select the IPX protocol under the Configuration menu and click the<br />
Properties button. Select the Advanced tab, then click on Frame Type.<br />
Set the value to: ETHERNET 802.3. All Starfleet Command players<br />
should have this identical setting.<br />
IPX games can support up to six players.<br />
Internet<br />
You can also play Starfleet Command using the Internet matching service.<br />
See the enclosed Multiplayer/Internet sheet for more information.<br />
Modem<br />
You need a modem and a working phone line. 28.8k is considered the<br />
minimum modem speed, but depending on your line conditions you may<br />
need a faster connection.<br />
One player will be the host and<br />
the other player is the guest.<br />
The host is in charge of<br />
selecting the scenario. The<br />
guest joins the host once the<br />
scenario is selected.<br />
The host clicks on the CREATE<br />
button to prepare the game.<br />
Once the game is prepared and<br />
the host clicks on the<br />
ANNOUNCE GAME button, his<br />
modem will be ready to answer<br />
the guest.<br />
Once the game is prepared and the host is ready, the guest selects<br />
MODEM. He then selects the host from the phone book and clicks on<br />
JOIN. Once you click on the JOIN button, the CANCEL button will appear.<br />
If you wish to stop the dialing, click CANCEL.<br />
If you are disconnected from a modem game, you will appear back at the<br />
Network Setup screen.<br />
Modem games support two players only.<br />
68
SELECT GAME<br />
If you are playing a<br />
TCP/IP or IPX<br />
multiplayer game, the<br />
next screen you will see<br />
is the Select Session<br />
screen. Since multiple<br />
games may be running<br />
on the same network,<br />
you will have to choose<br />
which game session to<br />
join.<br />
If you want to host a<br />
new session, click on<br />
the CREATE button.<br />
Session Information<br />
This screen allows you to view and select from the<br />
different multiplayer games that are available.<br />
At the top of the screen<br />
is a list of the currently available games. Some basic information is<br />
shown about each game. Left–click on a game to select it and view<br />
more game info.<br />
Game Name<br />
This is the name of the game session. The host will set this.<br />
Scenario<br />
The type of multiplayer mission actually being played. The scenario will<br />
determine the game rules and victory conditions.<br />
Max Players<br />
The maximum number of players allowed in the game. This is shown as<br />
two numbers separated by a slash. Example: 2/6. The first number is<br />
the current number of players in the game and the second number is the<br />
maximum number of players. You cannot join a game that is full.<br />
Speed<br />
The host will determine the game speed slider setting. Once the game<br />
starts, the game speed slider cannot be adjusted in multiplayer games.<br />
The lower the setting, the slower the game will play. The higher the<br />
setting, the faster the game will play. Game speeds default to 6.<br />
Game Info<br />
When you select a game session, more detailed game information will be<br />
shown in the lower left hand corner of the screen.<br />
Tactical Map<br />
The map that will be used by the current session is shown in this<br />
box. This will give you an idea of the terrain. Keep this in mind<br />
when you are picking your ships. 69
Password<br />
If the game is password protected, you will need to type the password.<br />
Once you have selected the game session you wish to play, click on the<br />
JOIN button.<br />
Click the back arrow to return to the Network Setup screen.<br />
CREATE MULTIPLAYER GAME<br />
A host will see this screen after clicking on the CREATE button. This<br />
screen allows the host to set the initial parameters of a multiplayer game.<br />
Game Name<br />
Type the name of your game in this box.<br />
The name of your multiplayer game session must be unique. If you pick<br />
the same name as an already announced session, you will see an error<br />
message. You must select a new name before you can announce your<br />
game.<br />
Password<br />
If you want to restrict players from entering your game, you may set a<br />
password. A player that wants to join must type the password on the<br />
Select Session screen. If the player does not type the proper password,<br />
they cannot join your session.<br />
You can use programs such as ICQ to send passwords to players you<br />
wish to invite.<br />
Scenario<br />
This lists the available multiplayer scenarios that you can choose from.<br />
Click on a scenario name to select it. A description of the scenario and<br />
the rules will appear in the lower right hand corner.<br />
Select the desired scenario before choosing the following settings:<br />
70<br />
This screen allows the host to customize the game session.
Map Type<br />
Once you select a scenario, you can select the map that the scenario will<br />
be played on. As you click on the map names, the tactical map will show<br />
the map layout.<br />
Options<br />
You can further customize your game session by selecting from the<br />
following options:<br />
Max Number of Players<br />
You can set the maximum number of players that can play in your<br />
session. The host counts as one player. Some scenarios only support a<br />
certain number of players.<br />
Modem and Serial games only support a maximum of two players: the<br />
host and the guest.<br />
BPV Limit<br />
This sets the default number of points for all players. You will have a<br />
chance to override the individual values once you announce the game.<br />
BPV<br />
BPV stands for Basic Point Value, a method for determining the relative<br />
combat value between two or more ships. In general, the higher the<br />
BPV of a ship, the more powerful it is. This allows the host to set a<br />
maximum number of points that a player can use to purchase his ships.<br />
Frigates cost around 60–70 points. Heavy Cruisers cost around<br />
120–130 points. Dreadnoughts cost around 225–250 points.<br />
Game Speed Slider<br />
This sets the default game speed for your session. This value cannot be<br />
adjusted once you announce the game. The higher the number, the<br />
faster the game.<br />
Technology/Game Era<br />
This sets the game era, which will determine what ships and technologies<br />
are available.<br />
Early<br />
If you want a smaller selection of ships with fewer refits, select this<br />
era. Ships from this era are generally underpowered, with fewer<br />
weapons. This can make for an interesting game.<br />
Middle<br />
This is the default era. A wide variety of ships are available.<br />
Late<br />
This is the era of the most advanced ships and technologies.<br />
The widest variety of ships is available.<br />
71
Announce Game<br />
Once you have customized the game to your desire, click on the<br />
ANNOUNCE GAME button to display the game session to the other<br />
players. This will take you to the Multiplayer Startup screen.<br />
Click on the back arrow to return to the Select Session menu.<br />
MULTIPLAYER STARTUP<br />
Once you have joined an<br />
announced session, you<br />
will see this screen.<br />
The top line shows the<br />
game session synopsis<br />
from the Select Session<br />
menu.<br />
Depending on the<br />
multiplayer scenario,<br />
some of the following<br />
buttons and options may<br />
be darkened. In this<br />
case, they are not<br />
selectable.<br />
You can choose your ships from this screen and chat<br />
with your fellow players before the game begins.<br />
Player Information<br />
This section of the screen shows information that is available to all<br />
players.<br />
Ping<br />
This value shows the amount of time it takes network messages to reach<br />
this player from your machine.<br />
Ping Times<br />
The ping times are reported in milliseconds. The higher the number, the<br />
worse the connection is, which increases the possibility of erratic<br />
gameplay. In general, you should try and play with other players whose<br />
ping times are good. This will improve gameplay. Good ping times for<br />
LANs are around 50. Good ping times for Internet games are around<br />
200–250. Starfleet Command still plays well with pings approaching<br />
1000 (one second), but for best play with the greatest number of<br />
players, find players with low ping times.<br />
Ready<br />
If the ready box is checked, that player is ready to play. You can click on<br />
your own ready box to toggle your checkmark.<br />
The host will have to click the ready box for any AI players.<br />
72
Type<br />
This shows if the player is Human, AI or if there will be no player. Human<br />
players are obviously other human players. The computer controls the AI<br />
players. No One means there is no player for that team.<br />
In some scenarios, you can have multiple AI players. The host can use<br />
the Team setting to place AI players on the appropriate teams.<br />
The host can click on the type button to toggle between No One and AI.<br />
Player Name<br />
This shows the name of the player.<br />
Rating<br />
This is the rating of the player. This is only available in Internet games<br />
using the Internet matching service.<br />
Team<br />
There are up to six teams in a multiplayer game. Teams are lettered A,<br />
B, C, D, E, and F. Each human player can click their own button to cycle<br />
through the available teams. The host can also click on the team<br />
buttons of AI players.<br />
Members of the same team share victory conditions. Team members<br />
cannot shoot at each other.<br />
BPV<br />
This column shows two numbers. The first number is the current total<br />
BPV of that player’s fleet. The second column shows the maximum<br />
amount of BPV for that player.<br />
The host can edit the maximum BPV for each player.<br />
Special Host Commands<br />
There are also a few special commands available just to the host player:<br />
FLEET, BOOT and CONFIRM.<br />
FLEET<br />
This button toggles the “Your Fleet” panel to the selected AI player.<br />
This allows the host player to set up the ships for the AI player. If the<br />
host wants to see his ships again, or select a new fleet, he must click<br />
on the FLEET button next to his name.<br />
BOOT<br />
This allows the host to kick a human player out of the current game.<br />
Once a player has been booted, he cannot see this game session and<br />
will be unable to rejoin this session. Clicking the BOOT button will not<br />
automatically kick the player out.<br />
CONFIRM<br />
When a BOOT button has been clicked, it will turn into a<br />
CONFIRM button. Click the CONFIRM button to actually boot<br />
the player from the current session.<br />
73
Chat Modes<br />
There are two chat modes: ALL and TEAM. Click the MODE button to<br />
toggle between them.<br />
All<br />
This sends your chat messages to all players in the session.<br />
Team<br />
This sends your chat messages to only the other players on your team.<br />
You type your messages in the chat edit box, and read all messages sent<br />
to you in the chat area.<br />
Your Fleet<br />
This box is used to select the ships in your fleet. You must have at least<br />
one ship, and depending on the scenario and the amount of BPV you have<br />
been given, you can select up to three ships.<br />
There is one line for each ship. Each line shows the same amount of data.<br />
Checkbox<br />
This checkbox toggles the use of this ship. If you pick multiple ships,<br />
but later decide not to use them all, you can use the checkbox to<br />
remove the extra ones from your fleet (and BPV point total). If you<br />
later decide you do want to use them, simply click the checkbox again<br />
to toggle them back into your fleet.<br />
Ship Type<br />
This box shows the type of ship you have selected. This is an acronym<br />
of the full ship class type. Example: A Federation Heavy Cruiser, with<br />
no refits, is a F–CA. A Klingon D7 Command Cruiser is a K–D7C.<br />
Ship Name<br />
This is the name of the ship. Ship names are pulled from the registry<br />
for that ship type. You can edit the ship name by clicking on the edit<br />
box and typing the new name.<br />
SELECT button<br />
Click this button to enter the “Choose Hull” screen (see page 88) to<br />
select the hull variant that you want to use. This button will allow you<br />
to change the type of ship as well.<br />
SPACEDOCK<br />
Click this button to take your current fleet of ships to the Spacedock<br />
(see page 91). Here you can select shuttles, missiles, marines and<br />
mines. At a cost of BPV points, of course.<br />
Host Start Button<br />
Once the host clicks his ready button, a START button will appear.<br />
The host may click this button to start the game.<br />
74
If the host clicks the START button, any player that has not clicked the<br />
READY button will get a warning message. The START button will<br />
change to a CONFIRM button for the host. If the host clicks the<br />
CONFIRM button, all non–ready players are booted out of the game.<br />
After ten seconds, or when all players are ready, the CONFIRM button<br />
will change back to the START button.<br />
If the START button is pressed and all players are ready, the game will<br />
begin. Click on the back arrow to return to the previous screen.<br />
CHAT MESSAGES IN MULTIPLAYER GAMES<br />
During a multiplayer game, you can send chat messages to the other<br />
players. Press ENTER to display the chat box. Type your message and<br />
press ENTER again to send the message.<br />
Press CTRL–ENTER to send a message just to your teammates.<br />
When typing, you can press ESC to cancel the current message.<br />
SINGLE–PLAYER GAMES<br />
There are two types of single–player games: Skirmish and Campaign<br />
games.<br />
Skirmish games are single games that have no consequences beyond<br />
that single scenario. They can be simple types of games against the<br />
computer just for fun, to help you train for multiplayer gaming, or they<br />
can be historical missions based on events in the Star Fleet Universe.<br />
Campaign games are similar in that they are single–player games played<br />
against or with the computer, but from there, they are different. You will<br />
start as a young captain, in charge of a lowly frigate and work your way<br />
up through the ranks of command. Eventually, you will be able to control<br />
larger ships, and the size of your fleet will grow. The computer will<br />
handle assigning missions for you to complete, and you will be<br />
responsible for outfitting your ships and maintaining your crew. Effects<br />
from one mission will carry over into future missions, so you must not<br />
only be making choices for your current mission, but you must also<br />
consider what will happen to your ship and crew over the long haul.<br />
What is Dynaverse?<br />
Dynaverse is the dynamic universe generator that controls the single–<br />
player campaign game. It determines the relationships between the<br />
various races, what happens in the galaxy, and provides appropriate<br />
missions for you, the player. Your actions will influence Dynaverse in<br />
turn. Depending on how you play, Dynaverse may make a different<br />
decisions based on your gameplay, and will create a completely unique<br />
outcome.<br />
This means that every campaign game of Starfleet Command will be<br />
different.<br />
The official Star Trek universe, as defined by the original TV show and<br />
the movies, and the Star Fleet Universe, the background for<br />
Star Fleet Battles, are just two of the possible outcomes of<br />
Dynaverse but your game could be completely different.<br />
75
DIFFICULTY LEVEL<br />
You can select the difficulty of single–player missions from the main menu.<br />
Starfleet Command defaults to Captain level games. As your skill<br />
increases, you can increase the challenge of the game to keep pace.<br />
Captain<br />
Computer officers are less skilled and the computer AI itself is reduced in<br />
ability and intelligence.<br />
Commodore<br />
The AI has access to better computer officers and can use more<br />
systems.<br />
Admiral<br />
Admiral games do not increase the number of points for computer<br />
opponents, but the computer is allowed better officers and can fully use<br />
all of the systems it has available.<br />
You can switch the difficulty level at any time you are at the main menu<br />
and it will affect your current campaign game or skirmish mission. The<br />
difficulty level has no effect on multiplayer games.<br />
SKIRMISH GAMES<br />
Once you select SKIRMISH from the main menu, you will be able to select<br />
a skirmish mission to play. You can also customize the mission before<br />
playing, if you desire.<br />
Select Skirmish Mission<br />
Regardless of which<br />
empire you are<br />
playing, when you<br />
select “Skirmish<br />
Mission” from the<br />
main menu, you will<br />
see the following<br />
screen:<br />
In the mission type<br />
area, you can select<br />
from the list of<br />
available skirmish<br />
missions. Some<br />
missions will not be<br />
available for the<br />
empire you are<br />
currently playing. If<br />
The Select Skirmish Mission screen<br />
additional skirmish<br />
missions are available, you may need to scroll the list by using the<br />
scrollbar on the right side of the mission type area. Left–click on a<br />
mission name to select it.<br />
The standard tactical map of the selected mission will be displayed<br />
76 to the right of the mission type area.
Below the mission type and tactical map areas is the mission summary.<br />
This will give you a textual description of the currently selected mission.<br />
You can click on the PLAY button to immediately play the mission with the<br />
default settings.<br />
Click on the CUSTOMIZE button to change the mission settings.<br />
Click on the MAIN MENU button to return to the main menu.<br />
Customize Skirmish Mission<br />
You can also customize skirmish missions. Select the CUSTOMIZE button<br />
from the select skirmish mission screen to display the following screen:<br />
The exact customized<br />
changes you can make<br />
are dependent on the<br />
scenario type you have<br />
chosen. Some skirmish<br />
scenarios will allow you<br />
to make more changes<br />
than others.<br />
At the very top of the<br />
screen you can select<br />
the Map Type. If there<br />
is more than one type of<br />
map available in the<br />
scenario, you can select<br />
Random which will<br />
randomly determine one<br />
of the maps available<br />
when you start the<br />
mission. If you want to<br />
The Customize Skirmish Mission screen,<br />
use this to change skirmish mission parameters.<br />
see the map, click on SELECT MAP to go back to the Select Skirmish<br />
screen. You can go back and forth between the Customize and Select<br />
screen without interfering with the settings.<br />
You can select from one to three ships, with the exact number of ships<br />
available depending on the mission type. Click on the SELECT SHIP<br />
button to select the ship. If the checkbox is checked, you will use the<br />
selected ship.<br />
Under that you can select the starting position. You have two choices:<br />
Default and Random. Not all missions allow random starting positions.<br />
The default position is consistent — you will always start in the same<br />
place on the selected map if you keep with the default setting. The exact<br />
number of positions that you can randomly start at also depends on the<br />
specific mission.<br />
There are three different game eras: Early, Middle and Late. The<br />
selected era will determine the type of starships available. Generally, the<br />
later the era you choose to play, the more advanced and powerful the<br />
ships you will have to work with.<br />
77
You will have the opportunity to select the number of computer opponent<br />
teams. There will always be at least one computer opponent in a<br />
skirmish mission. You can have up to five computer opponents,<br />
depending on the mission type.<br />
To change the settings of your computer opponent, first click on an AI<br />
button to select the computer opponent team you wish to modify.<br />
You can set the TEAM that you want to the AI to belong to. You are<br />
considered to be on Team A. The AI opponents can be set to any team<br />
from A to F. Team–members on the same team are allied with each<br />
other and hostile to all other teams.<br />
You must then select the race of the opponent. If you select None, that<br />
team will not be used.<br />
You can select the number of ships. Custom computer opponent teams<br />
can have between one and three ships. Regardless of the amount of<br />
points the computer has to spend, he will start with this number of ships.<br />
You then select the smallest and largest hulls the computer can choose<br />
from. This will determine a range of hulls that the computer will attempt<br />
to purchase ships from using the number of points based on your ship<br />
decisions.<br />
Finally, you can modify the amount of BPV points the computer has to<br />
spend. You have four options: Low, Med(ium), High and Max(imum). The<br />
computer will first count the amount of points you spent on your selected<br />
ships. Low is 50% of your points, Medium is equal to your points, High is<br />
150% of your points and Maximum is an unlimited number of points.<br />
The computer will use the available number of BPV points to purchase<br />
ships. It was always attempt to purchase the largest ships available<br />
first. It will then work it’s way down the range of legal hull types until it<br />
can purchase a random ship of that hull size. If it runs out of BPV<br />
points to spend, but still hasn’t purchased enough ships, it will buy the<br />
smallest and cheapest ships available.<br />
Once you have configured the skirmish mission, you can select PLAY to<br />
start the mission or SELECT SKIRMISH to return to that menu.<br />
C@MP@IGN G@MES<br />
When you select the Campaign button from the main menu, you will be<br />
taken to this screen:<br />
CONTINUE CAMPAIGN<br />
If you are continuing a previously started campaign, press the CONTINUE<br />
CAMPAIGN button. You will then be taken to the LOAD GAME menu.<br />
ENTER NAME<br />
If you are starting a new campaign, you can enter the name of<br />
your Captain here. Click in the box and edit the previous name.<br />
Press ENTER on your keyboard when you are done.<br />
78
CHOOSE TECHNOLOGY LEVEL<br />
Select from one of three different<br />
starting eras: Early, Middle and Late.<br />
The era controls what technology<br />
(ships, missiles and shuttles) are<br />
available. The later the era, the more<br />
powerful the technology you are able to<br />
use. Regardless of the chosen era,<br />
your campaign will run the same<br />
amount of time.<br />
BEGIN NEW CAMPAIGN<br />
When you have entered your captain’s<br />
name and selected the appropriate<br />
era, click this button to start a new<br />
campaign as a young frigate captain.<br />
Use this panel to start a new campaign<br />
or continue an existing campaign.<br />
THE M@IN C@MP@IGN MENU<br />
Once you have either started a new campaign or selected a previous<br />
campaign to continue, you will be presented with the Main Campaign<br />
Menu. From this screen, you can select the following options.<br />
The Academy<br />
Tutorial missions will<br />
teach you the basics of<br />
the game or give you<br />
training in race–specific<br />
special systems.<br />
Technical missions will<br />
test your skills.<br />
Rank & Medals<br />
See the current<br />
progress of your<br />
campaign alter ego.<br />
Recruitment Office<br />
From here, you can use<br />
your prestige to select<br />
new officers for your<br />
ships.<br />
The main campaign menu is used to select<br />
all of the campaign screens.<br />
Vessel Library<br />
From this screen you can view information about what ships are currently<br />
available in the campaign, as well as view information on known ships of<br />
the other empires.<br />
79
Shipyard<br />
Repair, refit and purchase new ships at the Shipyard.<br />
Spacedock<br />
Outfit your ships with optional equipment and replace used munitions or<br />
repair weapons.<br />
Galactic News/Map<br />
See the current status of the galaxy and request a transfer to a different<br />
sector.<br />
New Mission<br />
This will send you to the mission briefing screen for your next mission.<br />
You should only select this after you have used all the options you wanted<br />
to use on the Main Campaign Menu, as you cannot return once you start<br />
the mission briefing.<br />
Not all of the options will be available<br />
at all times. Any options that are<br />
not available will be dimmed out.<br />
Save Game<br />
Click on this button to bring up the<br />
save game screen.<br />
To save your current progress, you<br />
will need to use a slot to hold the<br />
game you wish to save. Each race<br />
has ten different savegame slots<br />
associated with it. Click on the<br />
desired slot. If you want, type the<br />
name of your new save. Click the<br />
OKAY button.<br />
CANCEL will return you to the main<br />
campaign menu without saving the<br />
current game.<br />
Save your games here!<br />
Load Game<br />
To return to a previously saved<br />
game, use this button.<br />
Click on the desired save game slot<br />
to load and click the OKAY button.<br />
Your current game will be lost.<br />
The CANCEL button will return you to<br />
the main campaign menu without<br />
loading the save game. Your current<br />
game will not be lost.<br />
80<br />
When you want to return to your previously<br />
saved position, this is the menu you will use.
Starbase Tour<br />
If you need help at the main campaign<br />
menu, click the STARBASE TOUR<br />
button. This will bring up a help<br />
screen.<br />
When you are done with the tour, click<br />
the button again.<br />
C@MP@IGN MENU - @C@DEMY<br />
The Academy is where you can access the tutorial missions, in order to<br />
learn the game in a “safe” environment. Once you feel up to the<br />
challenge, you can try the technical missions.<br />
The academy can train you in a safe and sane environment, quite unlike a real school.<br />
TUTORIALS<br />
Each empire has a different set of tutorial missions. The tutorial<br />
missions for the Federation and Klingon empires are more fully featured<br />
and intended to help beginners. Tutorial missions are “safe”, that is they<br />
do not affect the rest of the campaign game. You can “die” in a tutorial<br />
and your character in the campaign game will be embarrassed but still<br />
alive and able to continue playing.<br />
It is suggested that you start with the first tutorial and play them in<br />
order. That’s the way it was intended, but you are not required to play<br />
the tutorial missions in any particular sequence.<br />
There are fewer tutorial missions for empires other than the<br />
Klingons and the Federation. They will only discuss the unique 81<br />
aspects of that empire.
TECHNICAL MISSIONS<br />
Technical missions will test your command skills. There are six different<br />
technical missions. Each technical is based on a size of ship, ranging<br />
from the smallest, the Frigate, to the largest, the Dreadnoughts.<br />
Technical missions have two parts: a technical challenge and a combat<br />
simulation. You must pass the technical challenge before entering the<br />
combat simulation.<br />
The technical challenge is different depending on the technical mission<br />
chosen. The challenge is based on the size of the ship. The technical<br />
mission briefing will give you orders. Pay attention and carry out your<br />
orders carefully in order to pass the challenge test. All of these technical<br />
missions are challenging. Some missions are more challenging than<br />
others.<br />
The individual technical challenge is the same in each technical mission<br />
for each empire.<br />
Once you pass the challenge test, you will fight a never–ending stream of<br />
comparable enemy ships. Fortunately for you, they will attack one at a<br />
time. Unfortunately, your ship is not repaired or rearmed between<br />
battles.<br />
You are scored for your ability to pass the technical challenge and the<br />
number of enemy ships you can defeat in the combat simulation. The<br />
more ships you destroy, the higher your score. Earn a score of 5 or<br />
higher and you will gain a medal.<br />
Once you complete the challenge test successfully, the next time you<br />
attempt that technical challenge, you will immediately start the combat<br />
simulation. There is no need to redo the challenge test once you<br />
complete it successfully.<br />
C@MP@IGN MENU - R@NK & MED@LS<br />
This screen allows you to view the current progress of your campaign<br />
character. As your campaign progresses, check back here to see how<br />
your character increases in rank and prestige.<br />
At the top of your screen, you can see your name — just to make sure<br />
that you are looking at who you think you’re looking at. Your current rank<br />
is also shown. Next to your current rank is your current lifetime prestige<br />
total. The next rank available to your character is also shown, along with<br />
the amount of lifetime prestige required to achieve that rank.<br />
Gaining Ranks<br />
Achieving a new rank requires a certain amount of prestige that you will<br />
earn throughout your career. You spend prestige points to “purchase”<br />
new ships, officers, and equipment. However, the amount you spend<br />
does not subtract from your total lifetime prestige earned. In other<br />
words (and much more simply put), making repairs and<br />
requisitions does not slow down or prevent your character from<br />
achieving higher ranks.<br />
82
This screen is used to track the progress of your campaign alter–ego: The Captain.<br />
When your current lifetime prestige amount equals or exceeds the<br />
required level for promotion, your character will be promoted in rank.<br />
Rank promotions reduce the prestige cost of requisitioning starships.<br />
Rank promotions happen automatically at the end of a mission where<br />
your lifetime prestige first exceeds the required level.<br />
Federation Ranks<br />
Gorn Ranks<br />
Lt. Commander<br />
Jr. Commander<br />
Commander<br />
Sr. Commander<br />
Captain<br />
Jr. Captain<br />
Commodore<br />
Sr. Captain<br />
Rear Admiral<br />
Commodore<br />
Klingon Ranks<br />
Lyran Ranks<br />
Lt. Commander<br />
Lt. Commander<br />
Commander<br />
Commander<br />
Captain<br />
Captain<br />
Commodore<br />
Commodore<br />
Rear Admiral<br />
Sr. Commodore<br />
Romulan Ranks<br />
Hydran Ranks<br />
Ante–Tribune<br />
Sub Commander<br />
Tribune<br />
Commander<br />
Sub–Commander<br />
Captain<br />
Commander<br />
Commodore<br />
Sub–Admiral<br />
Third Admiral<br />
The different races have different names for their ranks. Regardless of<br />
the name, each rank promotion confers the same abilities.<br />
Below your rank on the Medals screen is the elite organizations your<br />
character may have access to. You only gain access to elite<br />
organizations after your character has earned a minimum amount<br />
of lifetime prestige. You do not have to join the elite organization(s), 83
it is your decision. If you do decide to join the elite forces, your character<br />
will be sent on special missions.<br />
You will be informed when you can join an elite organization. You have a<br />
limited amount of time to join an elite organization once the position is<br />
offered. You will be warned just before you can no longer join an elite<br />
organization.<br />
Some races have multiple elite organizations. You can only belong to one<br />
elite organization at a time. Once you join an elite organization, there is<br />
no way to quit.<br />
Federation Elite: Federation Special Task Force<br />
Klingon Elite: Klingon Black Staff<br />
Romulan Elite: Tal’Praiex and the Tal’Shiar<br />
Lyran Elite: Red Claw Clan and the Iron Fang Clan<br />
Gorn Elite: King’s Guard, Defenders of the Egg and the Guardians<br />
Errant<br />
Hydran Elite: The Keepership<br />
Your military accomplishments will also be shown at the bottom of this<br />
screen. Here, you can see just how many ships your character has<br />
destroyed, captured, crippled and defended from enemy destruction.<br />
Your current “bank” of prestige is displayed. As you make repairs,<br />
resupply your ship and requisition new ships and officers, your current<br />
bank of prestige will decrease. Complete missions and your bank of<br />
prestige will increase. There is no penalty for having a current prestige of<br />
0, except that you cannot call in any favors requisition new ships or<br />
convince the dockmaster to repair your ship.<br />
Prestige<br />
Starfleet Command uses prestige as a resource that limits how much<br />
your character can buy and repair. It may seem strange that a starship<br />
captain in a navy has to “buy” anything. But in reality, even a navy<br />
captain (maybe even especially a navy captain) would have a problem<br />
requisitioning all the equipment desired. In SFC, prestige is different for<br />
each race. In the Federation, it may be exactly that, the prestige of<br />
your character. When you requisition a new DD, you may actually be<br />
calling in a favor with the ship command board or you have been<br />
recognized for your past deeds. In the Klingon Empire, it might be your<br />
fame. For Romulans, it may be how much blackmail material you have<br />
managed to acquire. It should not be taken literally as whipping out a<br />
checkbook and signing your name on the dotted line. Unless you are an<br />
Orion...<br />
Also on this screen is a display of your medals. You earn medals for your<br />
rank, completing tutorials, successfully earning a score of 5 or more on<br />
the technicals, and completing special missions.<br />
Click the DONE button to return to the main campaign menu.<br />
84
C@MP@IGN MENU - RECRUITING OFFICE<br />
The Recruiting Office is used to manage your ship’s officers. Not only<br />
can you “enlist” new officers by spending prestige, but you can also<br />
transfer officers between your ships.<br />
There are five different types of officers:<br />
Weapons<br />
This officer controls the effectiveness of your weapons.<br />
Security<br />
This officer is in control of your ship’s marines and boarding parties.<br />
Science<br />
Your science officer operates your ship’s sensors and is useful when<br />
encountering strange new life.<br />
Engineer<br />
Your engineering officer is responsible for maintaining your ship and is<br />
in charge of repairs.<br />
Helm<br />
This officer controls the movement of your ship. You give the<br />
movement orders and the helm officer carries them out.<br />
There are five different ranks an officer can be:<br />
Rookie<br />
The least experienced of the officers. Ensigns can actually cause your<br />
ship to perform worse than normal.<br />
Junior<br />
These are officers with some experience. While not as bad as<br />
Rookies, they can also have some problems with their performance.<br />
Senior<br />
The Lieutenant is standard officer rank. These officers perform aptly<br />
but do not excel.<br />
Veteran<br />
These are outstanding officers. They often improve the performance<br />
of your ship.<br />
Legendary<br />
These are the rarest officers available. They are so outstanding that<br />
they can literally make your ship perform beyond design specs. A<br />
legendary officer is so special that normal officers cannot be trained to<br />
Legendary status. Their talent is extremely rare.<br />
As time goes by, and based on your mission results, officers will<br />
85<br />
improve with experience and increase in rank and ability.
It’s not a job, it’s an adventure.<br />
The screen is comprised of three main areas: the current officer roster<br />
of the currently selected ship, the officer pool, and your ship list.<br />
The officers are divided by rows. Each row is labeled with the officer type.<br />
The Officer Pool<br />
The most important part of this screen is the officer pool. These are<br />
new officers that are available or where old officers go when they’ve been<br />
transferred off of your ships.<br />
Each officer has a name, rank, and proficiency level, as well as a cost.<br />
The cost is in prestige points.<br />
The screenshot shows a typical recruiting officer. Your actual screen, and<br />
choice of officers will vary. The sector you are currently located in will<br />
dramatically influence officer choice.<br />
Core sectors have the widest selection, but officers there are often the<br />
least experienced.<br />
Colony sectors have a smaller selection, but their officers are very<br />
consistent.<br />
Border sectors have the smallest selection, and their officers range in<br />
quality. Both the highest quality and lowest quality officers can be found<br />
here.<br />
The unexplored sector has no officer pool, but you can still use this<br />
screen to transfer officers between ships.<br />
Ship List<br />
All of your ships are shown on the right of this screen. At the beginning<br />
of a campaign game, you will have only one ship. Once you play for a<br />
while, you will be offered the opportunity to purchase additional<br />
ships. You may eventually control up to three ships.<br />
86
You may switch officer rosters by left–clicking on another ship. The<br />
currently selected ship will be highlighted.<br />
Current Officer Roster<br />
The officer roster for the currently selected ship is shown on the right<br />
side of the screen. You get the same information as the officer pool:<br />
name, rank, proficiency level, and a value. The value is how much<br />
prestige the officer is worth to you.<br />
Part of being a captain is maintaining the quality and reputation of the<br />
officers and crew under your command. As those officers gain<br />
experience and increase in rank, you are awarded by an increase in<br />
prestige. You can only earn that prestige if you transfer that officer back<br />
to the officer pool and replace them with an officer of lesser value.<br />
Transferring Officers<br />
You may transfer officers, swapping them with officers in the pool or<br />
swapping them with officers on another ship in your fleet.<br />
To transfer an officer from the pool to your currently selected ship, click<br />
on the officer in the pool. The officer on your ship will be transferred to<br />
the pool. Your prestige will change based on the cost of the officer from<br />
the pool and the value of the officer in your ship’s roster.<br />
To swap an officer from one ship with another, click on the TRANSFER TO<br />
SHIP button for that officer. This will swap the officer of that type on the<br />
current ship with the officer of that identical type on the selected ship.<br />
There can be up to two TRANSFER TO SHIP buttons, depending on the<br />
number of ships in your fleet. There is no prestige cost for transferring<br />
officers between ships of your fleet.<br />
C@MP@IGN MENU - VESSEL LIBR@RY<br />
The Vessel Library is used to examine the statistics of known and<br />
available starships. For your own empire, you can see all starships that<br />
are currently available.<br />
For enemy or allied<br />
empires, you can only<br />
see starships that are<br />
known and that have<br />
been encountered in<br />
missions.<br />
After you click on the<br />
VESSEL LIBRARY<br />
button on the main<br />
campaign menu, you<br />
will see this screen.<br />
Click on the empire<br />
emblem that<br />
you wish to<br />
view. Races<br />
87<br />
This screen is used to select the empire that you wish to view. that you have
not encountered or know nothing about will be dimmed and are not<br />
selectable.<br />
Then pick the hull for the ship you wish to examine.<br />
Once you have picked a race to view, you must pick a hull category to<br />
view. Click on the hull to examine the variant selection screen.<br />
This screen contains data about a starship.<br />
The schematic screen will show you a ship’s weapons, defenses, and<br />
systems.<br />
You can use the LEFT and RIGHT arrows to view different ships.<br />
TURN RATE<br />
The turn rate determines how fast this starship can make a complete a<br />
180 degree turn. The lower the number, the faster the ship can<br />
turn.<br />
88
MOVE COST<br />
This shows how much energy it takes to move the ship. The lower the<br />
number, the less energy required. The amount of energy required to<br />
move is based on this move cost and on your desired speed.<br />
C@MP@IGN MENU - SHIPY@RD<br />
The Shipyard is used to manage your fleet. From here you can trade in<br />
older ships, requisition new ships, repair ships that are damaged or refit<br />
ships and improve their abilities.<br />
Remember, when you spend prestige to requisition a starship, it’s not<br />
actually your name on the pink slip. You are simply renowned enough<br />
that you have been transferred to that ship (maybe you even pulled a<br />
few strings with the personnel department), or have had that ship<br />
transferred to your control.<br />
We will use the term requisition, since it’s much easier to write than<br />
“have transferred to your control since you are such a good captain.”<br />
The Shipyard allows you to control what ships appear in your fleet,<br />
in addition to being able to repair or refit your starships.<br />
The Shipyard is divided into two parts: the ships that are currently under<br />
your control, and the ships that are available for you to take control of.<br />
There are four hull types at the top of the screen. Under each hull type<br />
there can be up to three different ships available for purchase. You will<br />
see the name of the ship, the class of the ship, how much prestige it will<br />
cost you to requisition the ship, and a PURCHASE button to actually<br />
acquire the ship.<br />
If you cannot requisition a ship, either because you do not have enough<br />
prestige in your bank, or if you are not of high enough rank to<br />
control multiple ships or ships of a large enough size class, the<br />
purchase button will be dimmed.<br />
89
Since you can have a maximum of three ships under your personal<br />
control, there is only room for three ships at the bottom of the screen.<br />
Here you will see the name of the ship and four buttons:<br />
REFIT<br />
Clicking this button will refit that ship to the class listed next to the refit<br />
button. The cost of the refit, in prestige, is also shown. If you cannot<br />
afford the refit, this button will be dimmed.<br />
Since you are having major work done on your ship, the cost of refitting<br />
automatically includes the cost to repair.<br />
REPAIR<br />
If a ship is damaged, clicking on it’s repair button will fix the damage –<br />
but at a cost of prestige. The cost to repair the ship is shown. The<br />
cost of repair is based on the percentage of damage your ship has<br />
taken. The more damaged it is, the more expensive the repair will be.<br />
This cost is modified by the quality of your engineering officer. Better<br />
officers can make do with less equipment and will therefore cost you<br />
less in prestige points to repair the same amount of damage than a<br />
lesser officer will.<br />
TRADE–IN<br />
If you no longer desire to control this ship, you can trade it in and get a<br />
new one. The value of the trade–in, showing the amount of prestige<br />
that will be restored to your prestige bank, is listed. You cannot<br />
trade–in a ship if the additional prestige plus what is currently in your<br />
bank will not allow you to purchase and control at least one ship.<br />
SPECIFICATIONS<br />
Finally, this button will take you to the ship database, so you can see<br />
the statistics of your new ship.<br />
Press the DONE button to return to the main campaign menu.<br />
RENAMING YOUR SHIPS<br />
You can rename your ship whenever you wish. Simply click within the<br />
name box of a ship under your control and edit the name.<br />
SHIP AVAILABILITY<br />
Not all ships will be available at all times. There are two things that<br />
determine ship availability: sector type and campaign date.<br />
The closer you are to the core sector, the better selection of ships you<br />
will have, since that’s where the actual shipyards are located.<br />
New ships will also become available as time passes during the campaign.<br />
There are just a few ship class types available during the earlier years,<br />
and more ships available in the later years. Each ship can have a<br />
different year of availability, and that year will be consistent from<br />
campaign game to campaign game.<br />
90
C@MP@IGN MENU - SP@CEDOCK<br />
If the shipyard allows<br />
you to control the ships<br />
in your fleet, the<br />
Spacedock gives you<br />
control over what is<br />
actually aboard your<br />
ships.<br />
The screen is divided<br />
into three sections: the<br />
type of consumables you<br />
are working on, the<br />
actual consumables and<br />
a list of ships.<br />
Ship List<br />
The left of the screen<br />
displays the ships in<br />
your current fleet. The<br />
highlighted ship is the<br />
Spacedock is used to replenish your store of consumable items,<br />
such as weapons, missiles, shuttles and marines.<br />
ship you are currently working on. Left–click on a ship icon to highlight<br />
and select it.<br />
The dock cost under each ship shows how much prestige you are<br />
spending on it during this visit to Spacedock.<br />
Consumables<br />
To the right of the screen is a list of buttons. These can be:<br />
Heavy Weapons<br />
Missiles<br />
Shuttles<br />
Misc<br />
Fighters<br />
The exact buttons that will show up depend on your ship. If you ship<br />
cannot carry missiles, for example, you will not see the missile button.<br />
HEAVY WEAPONS<br />
This allows you to replenish your stock of heavy weapon ammo, parts,<br />
coils, plasma goo – whatever it takes to make the weapon fire. Each<br />
heavy weapon hardpoint on the current ship is displayed, along with the<br />
name of the weapon, the firing arc of that weapon, the current status<br />
level of the weapon, the cost to repair the weapon and REPAIR button.<br />
Clicking the repair button will restore that weapon to 100% efficiency,<br />
either by repairing the weapon itself (replacing burnt coils and other<br />
easily damageable parts) or reloading it with new ammo (photon<br />
torpedoes, for example). Your prestige in the bank will be reduced by the<br />
cost to repair.<br />
There is a REPAIR ALL button at the bottom of the heavy weapons<br />
sub–screen. Clicking this will repair all weapons to 100% and<br />
subtract the repair all cost from your current prestige. 91
SHUTTLES<br />
This sub–screen allows you to purchase replacement shuttles. There are<br />
four different types of shuttles: Administrative, Wild Weasel, Scatterpack,<br />
and Suicide Shuttles. The current number of shuttles on your ship for<br />
that type is shown next to the shuttle types.<br />
You can purchase shuttles in packages. The exact number of shuttles in<br />
the package depends on the<br />
size of your ship and the total<br />
number of shuttles it can hold<br />
in it’s shuttle bay.<br />
The cost for the shuttle<br />
package is listed beneath the<br />
shuttle package button. Click<br />
on the button to purchase that<br />
shuttle package. Your prestige<br />
will be modified by the cost. If<br />
you trade down to a smaller<br />
package than what you<br />
currently have on your ship, you<br />
will gain extra prestige.<br />
FIGHTERS<br />
Fighters are small attack craft. Unlike Shuttles, which are purchased in<br />
groups but tracked individually, fighters operate in squadrons. A carrier<br />
can have up to four groups of fighters.<br />
There are three different kinds of fighters: fighters, space superiority<br />
fighters and assault fighters. Fighters are the first generation. Most<br />
fighters are simply shuttlecraft with improved engines and slightly bigger<br />
weapons. Space superiority fighters are the next generation of combat<br />
shuttlecraft. They are designed from the ground up for space combat.<br />
Space superiority fighters are designed to dogfight other fighters. Assault<br />
fighters carry heavier weapons and are designed to attack starships and<br />
bases.<br />
Patrol flights are composed of the cheaper first generation fighters.<br />
Intercept flights are composed of space superiority fighters.<br />
Heavy flights are composed of purely of assault fighters.<br />
Assault flights contain assault fighters. In addition, they are escorted by<br />
regular fighters.<br />
In Starfleet Command, only the Hydran race has fighters. It is believed<br />
that the other races are experimenting with them. The standard<br />
Hydran fighter is the Stinger–1. The Stinger–2 is a space superiority<br />
fighter. The Stinger–H is a hellbore–armed fighter designed to attack<br />
heavily shielded targets.<br />
92<br />
MISSILES<br />
Those races that use missiles will also have another consumable<br />
available, if the selected ship is equipped to handle them.
This panel is used to selected<br />
what type of missiles will be on<br />
the selected ship. All missiles<br />
on a particular ship must be of<br />
the same type.<br />
There are two different sizes<br />
of missiles: Type–I and Type–IV.<br />
There are three different<br />
speeds: Slow, Medium, and<br />
Fast. Depending on the era,<br />
the two fastest speeds may<br />
not be available.<br />
A ship can also hold a number<br />
of reloads. This will affect the number of missiles on the ship. The more<br />
reloads onboard, the more missiles available. The current number of<br />
missiles onboard the ship is shown, as well as the standard number of<br />
missiles. Additional reloads may be available, depending on the time<br />
frame.<br />
The total cost of all missiles is shown at the bottom of the screen.<br />
MISC<br />
This is where you equip your<br />
starships with marines and<br />
mines.<br />
Marines, also known as<br />
boarding parties, can be used<br />
to capture enemy ships or go<br />
on hit and run raids to destroy<br />
critical pieces of equipment.<br />
Mines can be dropped out of<br />
the hatch to dissuade a<br />
pursuer from following. They<br />
can also be beamed out into<br />
space with transporters (they are known as t–bombs in this mode.)<br />
These are small mines. Larger mines are known, but the Organian<br />
Treaty stops them from being used in Starfleet Command.<br />
Reset, Cancel and Done<br />
If you click RESET, all the settings will be restored to what they were<br />
when you first entered this screen.<br />
Clicking CANCEL will return you the main campaign menu without making<br />
any changes to the ships.<br />
Clicking DONE will return you the main campaign menu with the desired<br />
changes. At this point, it is too late to go back and make any changes<br />
without spending more prestige.<br />
93
C@MP@IGN MENU - G@L@CTIC NEWS/M@P<br />
Your location in the galaxy is marked on this map. You can get current<br />
information about known empires (the news). You can also use some<br />
prestige to request transfers to other sectors of the galaxy.<br />
Each empire is marked<br />
on the map. Empires<br />
are divided into different<br />
areas, known as sectors.<br />
There are four types of<br />
sectors:<br />
Core<br />
This is the most<br />
developed sector of an<br />
empire. This is where<br />
the homeworld is located<br />
as well as where all the<br />
major industrial worlds<br />
are. It is the center of<br />
commerce and<br />
This is a map of the Galaxy. You are here.<br />
government, and the<br />
most powerful navies will<br />
be stationed here. Unless it is during times of extreme war, no enemies<br />
will be found here. A starship captain in the core sector will only have to<br />
worry about the occasional pirate raid.<br />
Colony<br />
Colony sectors are adjacent to the core sector but still some distance<br />
from the borders. These sectors are a little less developed than the core<br />
sector.<br />
Border<br />
Border sectors are adjacent to the neutral zones that separate empires.<br />
These are barely colonized sectors, with plenty of things for a starship<br />
captain to do. Pirates, enemies and monsters can be found here. These<br />
are the most explosive sectors, requiring the highest degree of excellence<br />
from starship captains. Unfortunately, many of the empires send their<br />
politically liable officers and crews this far out.<br />
Unexplored<br />
Away from all the other empires lies the unexplored sector. This is new<br />
space. This sector is where all the “explore strange new world” missions<br />
take place. Pirates have been known to be found here, as it is far from<br />
the colonized worlds, and they are more easily able to escape detection.<br />
Occasionally enemy ships will wander far off–course (so they say) and will<br />
need to be intercepted.<br />
Sectors will determine the available starships and officers.<br />
Your current location is marked on the map with an icon.<br />
94
MOVING AROUND THE GALAXY<br />
It is possible to expend some prestige to request a transfer to another<br />
sector.<br />
Click on SET COURSE. Click on any adjacent sector to the one you are<br />
currently located in. This will set a course marker to that sector. You<br />
may then click on any adjacent sector of that sector. If you decide to<br />
change your mind, click on the sector again.<br />
You can move up to two sectors. The prestige cost, and amount of time<br />
it takes to travel, increases with the number of sectors you move away<br />
from your present location.<br />
RACE INFORMATION<br />
You can also get information about a race and it’s empire. Click on the<br />
RACE INFO button and then left–click on any sector of an empire. You<br />
will get a picture of a typical member of the dominant species and some<br />
background of the race.<br />
When you are done, click on the information window to close it.<br />
C@MP@IGN MENU - NEW MISSION<br />
Once you have made any changes to your ship(s), including new officers,<br />
repairs, and replenished stores, then you are ready for a new mission.<br />
Once you click on the NEW MISSION button from the main campaign<br />
menu, there is no going back. Some missions will allow you to access<br />
some parts of the space station (the Shipyard or Spacedock, for<br />
example), but you will not know this until you actually start the mission.<br />
Be prepared.<br />
BRIEFING SCREEN<br />
The New Mission button<br />
will take you to the<br />
mission briefing screen.<br />
Missions that do not<br />
require your immediate<br />
departure from the<br />
space station may allow<br />
you to visit Spacedock<br />
and the Recruiting<br />
Office. When you are<br />
done with the briefing<br />
screen, you will play the<br />
mission. Once the<br />
mission is over, you will<br />
go to the debriefing<br />
screen.<br />
The briefing screen gives you the name of the mission.<br />
The briefing screen. Campaign players will see it often.<br />
95
The briefing will give you your orders and other information about the<br />
mission. Your orders will determine what you must accomplish to<br />
successfully complete the mission.<br />
There is a map section. It defaults to the tactical map, which will show<br />
the location of any known objects. Your ship, some asteroids, and known<br />
enemy ships are examples of what may be shown on the tactical map.<br />
You can also switch to the strategic map, which will show you where you<br />
are located in the galaxy.<br />
DEBRIEFING SCREEN<br />
The debriefing screen gives you the results of your mission. Your<br />
superior officers will give you an idea of their satisfaction with your<br />
mission performance. Here you can see some important statistics about<br />
the recent mission.<br />
The Debriefing screen – successful campaign players<br />
will hopefully see “Mission Success” on this screen.<br />
Play Again<br />
It’s not often that people get a chance to go back in time and correct a<br />
mistake. This button let’s you do it after every mission. Click on this<br />
button and you can replay the mission. The mission statistics (level of<br />
victory, amount of damage, prestige earned) are not actually final until you<br />
click the DONE button on this screen.<br />
View Replay<br />
Your actions are recorded for posterity. Click on this button to review<br />
these actions and the results of the previous mission. Movies are<br />
temporarily stored. If you want to save a movie in a more permanent<br />
fashion, visit the FILM ROOM on the main menu. The five most recent<br />
movies are stored. The Film Room allows you to copy those movies and<br />
back them up.<br />
96
T@CTIC@L SCREEN<br />
OVERVIEW<br />
The tactical screen is<br />
where all the action<br />
takes place. No matter<br />
what kind of mission,<br />
campaign, skirmish or<br />
multiplayer, you will<br />
eventually end up here.<br />
Understanding the<br />
tactical screen will be<br />
one of your keys to<br />
victory.<br />
The tactical screen is<br />
divided into three main<br />
components: the 3–D<br />
A typical tactical view.<br />
space view, the upper<br />
and lower data displays, and the interface bar.<br />
The 3–D space view is your view into the space near your starship. This<br />
is a 3rd person point of view; an external view of your starship will be<br />
visible on the screen. As you near other<br />
starships, they will appear on this part of the<br />
screen, as longs as the screen view is pointing<br />
towards them.<br />
The upper and lower data displays contain vital<br />
information that is always visible.<br />
The interface bar gives you in–depth control of<br />
your starship and provides the most amount of<br />
information. It is very information and control<br />
dense. It is not necessary for play at all times,<br />
so it is capable of being slid off the screen until<br />
you need it.<br />
The interface bar is also divided into four<br />
sections: officer multi–function display (MFD),<br />
ship schematic display, system MFD and target<br />
schematic display. If your monitor’s resolution is<br />
640x480 mode, the ship and target schematics<br />
use the same area of the screen, and you need<br />
to use the Toggle Schematic button to toggle<br />
between the two modes.<br />
The Interface Bar.<br />
This button will slide<br />
the interface bar on<br />
and off the screen.<br />
97
ENDING A MISSION<br />
You can exit a mission at any time by pressing ESC on the keyboard. You<br />
will see the End Mission menu displayed.<br />
Use this dialogue box to end a mission.<br />
T@CTIC@L 3D SP@CE<br />
This is an external view of your ship and all other objects in space. You<br />
can adjust the camera view using the Preferences panel, see page 114.<br />
Camera Views<br />
There are multiple camera views that can be used to change the view of<br />
the tactical 3–D space.<br />
Chase<br />
This places the camera directly behind your ship. It will give you a good<br />
idea of the area of space in front of your ship. You cannot rotate the<br />
camera view, but you can zoom in and out and adjust the camera angle.<br />
Overhead<br />
The camera is placed above the horizontal plane. You cannot adjust the<br />
camera angle, but you can zoom in and out and rotate the camera.<br />
Tactical<br />
The camera is placed on a 3/4 perspective. You can rotate, zoom and<br />
adjust the angle of the camera in this view.<br />
Target View<br />
This will display the viewpoint from the targeted ship, if the target is close<br />
enough to your ship. This is otherwise identical to the Tactical view.<br />
Padlock Toggle<br />
You can also toggle between padlock on and off. If the padlock is on, the<br />
tactical display will attempt to keep you and your target on screen at all<br />
times – rotating the camera as necessary to do so.<br />
98
MOVEMENT<br />
The primary use of this view is to give your ship a new heading (to turn<br />
it), to target enemy ships and to see the movement and actions of units<br />
in the game.<br />
Left–click to set a new course heading. Your ship will turn to face the<br />
new heading. Depending on your HUD information level, you will see a<br />
heading indicator appear under your ship. This shows the desired<br />
heading and the color gives you a rough idea for how long it will take to<br />
complete the turn. The color will change as the ship completes the turn.<br />
Red: Slow – this may take a while.<br />
Yellow: Moderate – getting closer.<br />
Green: Fast – almost there.<br />
The turn rate and current speed of your ship will determine how long it<br />
will take to turn.<br />
TACTICAL INFORMATION<br />
Right–click on a unit or a unit tag to target. Depending on your HUD<br />
information level, a target reticle will appear on the target and the target<br />
schematic will update.<br />
Typical information about a target.<br />
Some information is displayed about units in the 3–D view. Depending on<br />
the level of tactical intelligence acquired (which is determined by how<br />
close you are to a unit), you can see some of the following information:<br />
Class or Name of unit<br />
Until you get close enough to identify the specific ship, the class of the<br />
unit is displayed.<br />
Speed of unit<br />
The speed of the unit is given in a multiple of 10,000 km. This is the<br />
distance traveled during the amount of time equal to the game speed<br />
slider setting.<br />
Range to unit<br />
The range to the unit is displayed in units of 10,000 km.<br />
99
Unit Damage Reports<br />
When you fire at a nearby unit, you can see a numeric count of the<br />
damage. This number is per volley. The displayed number is in damage<br />
points.<br />
All of this information is only displayed if you have normal or maximum<br />
HUD information displayed. Normal HUD info shows targeting information<br />
for just your target. Maximum HUD info shows targeting information for<br />
all ships.<br />
D@T@ DISPL@YS<br />
There are two data displays on the tactical screen that are always shown.<br />
The top of the tactical interface shows the following information:<br />
Your Hull Integrity<br />
The top data display.<br />
The hull integrity of the starship you are currently controlling. Your ship is<br />
in danger of being destroyed when this bar is almost gone. The bar does<br />
not have to be completely gone before your ship can explode.<br />
Phaser Capacitor<br />
The phaser capacitor stores energy for all the phasers on your ship. You<br />
can click on the phaser capacitor to set the recharge rate of the<br />
capacitor bar. If the marker is moved to the center of the capacitor bar,<br />
the phaser capacitor will only draw half as much energy and it will<br />
recharge half normal speed. The capacitor will draw enough energy equal<br />
to firing the phasers one time until it is charged. You may want to do this<br />
if you are not planning on using all of your phasers within a short period<br />
of time and would rather use that energy elsewhere.<br />
Target Hull Integrity<br />
This displays the hull integrity of your current target. Like your ship, it is<br />
a rough gauge of how much damage the target can take before being<br />
destroyed.<br />
Mission Timers<br />
There are two mission timers. The first timer is how long it has been<br />
since the start of the mission. The second timer is used when there is a<br />
critical event that is taking place within the mission.<br />
100
The bottom of the tactical interface shows the following information:<br />
Speed<br />
This information is on the bottom of the screen.<br />
Your speed, both numerically and in a bar format. The numeric value is<br />
your specific current speed. The speed bar shows your current speed<br />
and your desired speed. The desired speed is shown with a marker. You<br />
can adjust the marker by clicking on the speed bar or using the keyboard<br />
commands.<br />
Energy<br />
Your current energy output and total use. The Power bar<br />
shows your current energy output both numerically and<br />
graphically. This bar shows the total amount of energy your<br />
starship is producing from warp engines, impulse engines,<br />
and auxiliary reactors. Next to it is the Systems bar which<br />
shows the total amount of energy your starship is currently<br />
using. Both the Power and Systems bars are on the same<br />
scale. If the Systems bar is longer than the Power bar you<br />
are attempting to use more energy than your ship is<br />
producing and something is suffering for it.<br />
See page 112 for important information on Energy Allocation.<br />
Alert Indicators<br />
The alert indicator shows your current alert status. The<br />
GREEN ALERT, YELLOW ALERT and RED ALERT buttons can<br />
be used to set your alert level. It is highly suggested that you<br />
go to Yellow Alert in unknown dangerous situations and Red<br />
Alert before entering combat.<br />
RED ALERT will change all weapons and raise shields.<br />
YELLOW ALERT will raise shields.<br />
Fire All Button<br />
Finally, there is also a FIRE ALL button that will fire all<br />
selected weapons within the arc and range to your current<br />
target. This will only fire one weapon off of each hardpoint.<br />
You would need to click this button up to four times to fire all<br />
weapons.<br />
T@CTIC@L OFFICER MFD<br />
The Tactical Officer Multi–Function Display (MFD) allows you to<br />
give orders to various officers on your ship to other ships in<br />
your fleet, and to change the display to monitor the results of<br />
those orders.<br />
The Various<br />
Officer MFD<br />
Icons.<br />
101
Since this is an MFD, you can change what the display actually shows.<br />
This is done through the use of the officer icon strip on the right side of<br />
the MFD. From top to bottom, these are the various officers and<br />
displays available:<br />
1. Helm 7. Defense<br />
2. Repair 8. Tactical Map<br />
3. Science 9. Fleet Orders<br />
4. Security/Marines 10. Energy Management<br />
5. Weapons 11. Preferences<br />
6. Communication<br />
The currently selected officer/display will have their icon highlighted,<br />
simply left–click on an icon to select it. Only one screen can be displayed<br />
at a time.<br />
The Helm Officer MFD display.<br />
TACTICAL OFFICER MFD – HELM<br />
This panel controls special movement<br />
commands. For normal movement<br />
commands, use the 3–D tactical space<br />
(for normal turns) and the speed bar at<br />
the bottom of the screen (to set the<br />
speed).<br />
Emergency Deceleration<br />
The Emergency Declaration uses the<br />
warp engines to stop as quickly as<br />
possible. This can be a little stressful on<br />
the ship, but sometimes less stressful<br />
than being hit by 100 points of plasma<br />
damage. You will stop as quickly as<br />
possible, but there will be a delay before<br />
you can begin moving again.<br />
Erratic Maneuvers<br />
By making small, swift course changes, you make yourself harder to hit.<br />
This generates four points of natural ECM (see page 118) to protect your<br />
ship. These ECM points also apply to any direct–fire from your ship (in<br />
other words, your own weapons are harder to use).<br />
Using erratic maneuvers also causes the following restrictions to be<br />
placed on your ship:<br />
• No launching of shuttles, fighters, missiles, or plasma torpedoes.<br />
• No laying of mines or use of transporters or tractor beams.<br />
• It is more difficult to turn. The turn rate of your ship degraded by<br />
one.<br />
• It is more difficult to make High Energy Turns. The chance of failure<br />
is slightly increased (by about 17%).<br />
102<br />
The cost to use erratic maneuvering is six points of movement<br />
energy.
Orbit Target<br />
The helm officer will attempt to place the ship in orbit around the current<br />
target.<br />
Intercept Target<br />
This puts the helm officer in control of your ship. He will attempt to<br />
intercept the current target.<br />
High Energy Turns (HETs)<br />
By using additional energy, the ship can be made to turn at a much<br />
higher rate than usual. This is known as a High Energy Turn or HET.<br />
This allows a ship to make up to a 180° turn nearly instantaneously. As<br />
you might expect, this is not good on the ship. The hull, systems, and<br />
crew take a tremendous strain. Eventually this strain will result in a<br />
breakdown. Some ships are better at making HETs without having a<br />
breakdown. Smaller ships, ships with a better turn rate (see page 88),<br />
and ships with superior helm officers can make more HETs without<br />
suffering a breakdown.<br />
There are six types of HET buttons: five preset HETs and one HET that<br />
allows you to set the exact angle.<br />
HET Left<br />
Your ship will make a HET 90° to the left of its current course.<br />
HET Right<br />
Your ship will make a HET 90° to the right of its current course.<br />
HET Hard Left<br />
Your ship will make a 135° HET to the left.<br />
HET Hard Right<br />
Your ship will make a 135° HET to the right.<br />
HET 180°<br />
Your ship will make a HET of 180°. This is an incredibly sharp turn.<br />
HET Free Angle<br />
You can set the exact HET angle. When you left–click on this button,<br />
the cursor will change to the Set HET Angle mode. Left–click again in<br />
the 3–D space, as if you were making a normal turn, to set the HET<br />
angle. A right–click or clicking on another button before setting the<br />
angle will cancel this action. Firing your weapons will halt the High<br />
Energy Turn.<br />
HET Chance of Success<br />
Ships have different chances of succeeding at this difficult maneuver.<br />
Your ships current percentage chance to successfully pull of a HET is<br />
displayed here as well. When you HET, your ship is stressed. You must<br />
wait for a period of time before your HET chance recovers.<br />
Normal Maneuvering<br />
This cancels all previous helm orders and returns the ship to its<br />
normal maneuvering mode.<br />
103
TACTICAL OFFICER MFD – REPAIR<br />
The Repair display shows any systems that are currently damaged. The<br />
Engineering officer is in charge of all repairs.<br />
This an example of the Repair officer MFD,<br />
the exact screen will depend on your ship<br />
and what systems are damaged.<br />
Repairing Damaged Systems<br />
In the center of the MFD is a schematic<br />
of your ship. Only systems that are<br />
damaged are shown in this area.<br />
Left–click on a damaged system to add it<br />
to the repair queue. The first item in the<br />
queue is the active repair item. A<br />
progress bar next to the active repair<br />
item shows how close it is to being<br />
completely fixed. Additional items in the<br />
repair queue are shown above the active<br />
repair item. Left–click on an item in the<br />
queue to remove it from the queue.<br />
Your damage control parties, lead by<br />
your Engineering officer, will only work on<br />
one item at a time. Darn 24th century<br />
unions.<br />
Spare Parts<br />
Each ship has a limited number of spare parts to repair most major<br />
systems. Larger ships tend to have more spare parts. The number of<br />
spare parts remaining is shown next to your ship.<br />
One unit of spare parts is used every time your damage control team<br />
repairs a damaged system. It is important to note that the spare part is<br />
used immediately as soon as the repair starts on the system. Until the<br />
system reaches the front of the queue, you can cancel the repair<br />
command without losing spare parts. The moment the repair starts, the<br />
spare parts are used up even if you decide later to cancel.<br />
TACTICAL OFFICER MFD – SCIENCE<br />
The Science officer is in charge of probes, deep scanning, and self–<br />
destruction.<br />
Probes can be used in one of two modes: standard and weapon. Left–<br />
click the probe mode button to toggle between the two modes. Each use<br />
of a probe will reduce the number of probes on a ship by one, regardless<br />
of mode used. The number of probes remaining is displayed on this<br />
screen, as well as a progress bar showing you when a probe is ready for<br />
launch.<br />
Standard Probes<br />
Probes used in their normal mode will increase the sensor ability of a<br />
ship. When you fire a standard probe, it will be launched towards<br />
the current target. You will then get more detailed information, if<br />
104<br />
available, about the target – almost as if your ship were next to<br />
the target.
If you are not targeting, or you stop<br />
targeting by pressing the End Targeting<br />
hotkey (the default is “ \ ”), then the<br />
probe will fire in the direction the ship is<br />
pointing.<br />
Standard probes have a range of around<br />
100 and take no energy to prepare,<br />
only time. They have a 360° degree arc<br />
of fire.<br />
Weapon Probes<br />
Probes can also be used as makeshift<br />
weapons, but with some severe<br />
limitations.<br />
While arming, they draw two points of<br />
energy. They can only be fired to the<br />
This is the Science officer panel.<br />
front of the ship, in a narrow arc, and<br />
they have a poor chance of actually hitting their target. Their chance to<br />
hit is based on the range. Only at extremely close range do they hit<br />
consistently. They have a max range of six.<br />
To fire the weapon probe, you must have a target.<br />
Deep Scan<br />
Your Science officer can put more energy into the sensors to increase<br />
their range. For 3 points of power, your tactical intelligence range is<br />
increased by 33%. This will let you locate ships before they see you and<br />
it will give you more information about them at farther distances.<br />
Self Destruct<br />
Clicking this button will destroy your ship after a brief period of time.<br />
Click the button again to cancel.<br />
TACTICAL OFFICER MFD – SECURITY/MARINES<br />
The Security officer controls your attempts to board and capture enemy<br />
ships, and also controls the use of marines for hit and run raids.<br />
There are two subpanels in the Security display. One for capturing and<br />
one for hit and run raids. Use the buttons to toggle between the two<br />
subpanels.<br />
On both panels, the number of available transporters is shown. As<br />
transporters cycle and prepare for the next transporter action, they will<br />
fill in with progress bars. Each transporter requires 0.2 power per<br />
marine action.<br />
Boarding parties and marines are synonymous terms.<br />
Capturing<br />
You can send boarding parties over in an attempt to capture the<br />
targeted enemy ship. They will storm the ship, searching for 105
The Capture and Hit and Run panels<br />
of the Security officer MFD.<br />
pockets of resistance and attempting to<br />
take over the bridge and other vital<br />
systems. The marines on the target ship<br />
will resist them, and the defender always<br />
has an advantage. You must overwhelm<br />
the defender with boarding parties in<br />
order to be successful.<br />
Click on the CAPTURE button to toggle to<br />
this panel.<br />
Your boarding parties are sent by<br />
transporter. The target ship must have<br />
a downed facing shield, as well as active<br />
transporters. The use of your<br />
transporters in this manner will also drop<br />
your facing shield.<br />
Click on the ALL MARINES button to<br />
send as many marines as possible. You<br />
can also click on a single marine icon to<br />
just transport that marine.<br />
The number of marines that can be sent are equal to the number of<br />
active and available transporters your ship has. The number of marines<br />
remaining on your ship is also shown on this screen.<br />
As your boarding parties and the enemy marines fight for control of the<br />
target ship, a progress bar will update you on their progress. When you<br />
have taken control of more than 50% of the ship, you will eventually win<br />
control under most circumstances.<br />
The empire icon shows the owner of the ship. When you capture the<br />
ship, the emblem will change to your icon.<br />
Hit and Run Raids<br />
You can also send marines over to destroy specific systems on the target<br />
ship. This is known as a hit and run raid (H&R).<br />
Click on the HIT AND RUN button to toggle to this subpanel.<br />
Target known systems by left–clicking on them to add them to the H&R<br />
order queue. As long as you are within transporter range, have enough<br />
power to activate your transporters, and enough marines to send, your<br />
security officer will beam armed boarding parties across to destroy that<br />
system.<br />
If the enemy is guarding that system, chances are that your boarding<br />
party will fail to destroy the system, fail to return, or both. Hit and Run<br />
raids are a dangerous business.<br />
If the enemy is not actively guarding that system, chances of a successful<br />
H&R raid increase.<br />
In either case, your security officer will continue to send marines<br />
until the desired systems in the order queue are destroyed.<br />
106
Left–click on a system in the order queue in order to remove it from the<br />
queue.<br />
TACTICAL OFFICER MFD – WEAPONS<br />
Use your weapons officer to keep track<br />
of your ship’s entire weapons layout.<br />
The weapons panel can also be used to<br />
drop mines, track the remaining mine<br />
inventory, and set weapons to destroy<br />
or to disable.<br />
The weapons panel details your ship’s<br />
weapon layout. You can see your<br />
weapons by category: phaser or heavy<br />
weapon. You can also see a list of all<br />
weapons using the DISPLAY ALL<br />
WEAPONS button.<br />
Mines<br />
You can drop a mine from a hatch by<br />
This is the Weapons officer panel.<br />
clicking the DEPLOY button. The mine<br />
must have been readied previously. Mines dropped in this way do not<br />
lower your shields and are armed when you move 20,000 km away from<br />
you.<br />
Destroy/Disable Target<br />
You have two options when firing<br />
your weapons. You can fire them in<br />
destroy mode, when you are just<br />
trying to do as much damage as<br />
possible, and in disable mode, which<br />
specifically targets weapon and<br />
power systems. Disable mode is a<br />
form of non–violent combat.<br />
Targeting to disable is more difficult and is less likely overall to do<br />
damage. You can switch between the two modes at anytime by clicking<br />
on the toggle button.<br />
Cloaking Device<br />
If your ship is equipped with a Cloaking Device, this button will be<br />
available. It is a toggle that will turn the Cloaking Device on and off.<br />
Cloaking Devices are explained on page 139.<br />
TACTICAL OFFICER MFD – COMMUNICATION<br />
The communication panel allows you to talk to other ships and keep a<br />
record of all important messages.<br />
Message Filter Buttons<br />
At the top of the panel are four buttons. These buttons are<br />
message filters that can be toggled off and on.<br />
107
The Communication panel.<br />
Please deposit $.25 for the<br />
first three minutes and $.10 for<br />
each additional minute.<br />
ENGINEERING REPORTS<br />
Toggles messages from your Engineering<br />
officer.<br />
MISSION MESSAGES<br />
Toggles general messages relating to the<br />
mission.<br />
SCIENCE REPORTS<br />
Toggles messages from your Science<br />
officer.<br />
FLEET MESSAGES<br />
Toggles messages from other ships in<br />
your fleet.<br />
If a message filter is toggled off,<br />
messages of that type will not be<br />
displayed.<br />
The display area shows the desired text.<br />
The most recent messages are at the bottom. You can use the<br />
scrollbars to scroll through the message text.<br />
Communication Buttons<br />
The communication panel also serves to send messages to other ships.<br />
Target the ship you wish to communicate with. At the bottom of the<br />
panel you will see between zero and two buttons.<br />
This type of communication is used when you are playing single–player<br />
campaign and skirmish games. When communicating with other<br />
humans in multiplayer games, use the multiplayer comm system. See<br />
page 75.<br />
Each button will have a brief description of the type of message you can<br />
send. Sending some messages will cause the other button to no longer<br />
apply, and the button for that message will be removed. An entire<br />
conversation can happen by you clicking on a message to send, the target<br />
responding, and then you clicking on a new button to respond to the<br />
response.<br />
The exact message available will depend on the mission, the target and<br />
the situation.<br />
TACTICAL OFFICER MFD – DEFENSE<br />
The Defense panel controls the use of your defensive systems. From<br />
here you can set tractor beams to defensive mode, launch Wild Weasel<br />
sensor decoy shuttles, use Emergency Decelerate, or set phasers to<br />
active point defense.<br />
Emergency Deceleration<br />
The Emergency Decel (ED) button does the same thing as the ED<br />
button on the Helm panel. It’s duplicated here since it is very<br />
108 useful to use ED in conjunction with a Wild Weasel.
Toggle Active Point Defense<br />
This button defaults to off. Toggle it on<br />
with a left–click. All the phasers on your<br />
ship will be set to point defense mode<br />
(see page XX). Toggle it off again to<br />
restore the phasers to their previous<br />
setting. This overrides the Weapons<br />
panel settings.<br />
Defensive Tractors<br />
You can toggle the use of tractors as<br />
defensive beams with these buttons.<br />
When in defensive mode, tractor beams<br />
can “grab” a single missile for each<br />
active defensive tractor. Missiles<br />
grabbed this way will be held at a<br />
distance until they run out of fuel and<br />
self–destruct, until they are destroyed by<br />
The Defense panel is used<br />
to keep your ship in good shape.<br />
weapons fire, or until the tractor is turned off or destroyed. Each tractor<br />
beam set to defensive mode will drain one point of energy.<br />
Set the total number of tractors to be used defensively by clicking on the<br />
desired number button. If the button is dark, the tractor either does not<br />
exist on your ship or it has been destroyed. Each tractor pre–allocated in<br />
this manner will stop one missile.<br />
Wild Weasels (Sensor Decoy Shuttles)<br />
A starship is a big hunk of metal. But space is even bigger and all<br />
starships have to use sophisticated sensors to track enemy starships.<br />
The use of a Wild Weasel shuttle can confuse those tracking sensors<br />
and protect your ship from harm.<br />
Wild Weasels (WW) are special shuttles that are outfitted with special<br />
EW gear that is designed to simulate the sensor returns of your ship.<br />
They must be purchased ahead of time, at the starbase’s Spacedock<br />
and prepared in advance.<br />
Wild Weasels only operate for their launching ship. They are too<br />
specialized to protect any generic ship without lots of preparation.<br />
Wild Weasels offer two benefits: ECM and Seeking Weapon protection.<br />
A Wild Weasel will provide additional ECM that will help against enemy<br />
direct fire weapons. Seeking weapons targeted on the launching ship will<br />
change targets and head for the WW. Any additional seeking weapons<br />
launched during this time will also target the WW instead of the ship<br />
that they are protecting.<br />
To be successfully used, the Wild Weasels owner must disable all active<br />
fire–control emissions. This means that the starship wishing to use a<br />
WW cannot fire weapons during this time.<br />
Any use of weapons will immediately cause the WW to be voided.<br />
A voided weasel offers no protection. All seeking weapons<br />
targeted on the WW will reacquire the ship. 109
Since the WW is a simple shuttle, it can easily be destroyed. When it is<br />
destroyed via incoming seeking weapons or by enemy direct fire, it will<br />
continue to provide protection for a brief period of time. If the ship that<br />
launched the WW is too close to the exploding shuttle, it will take<br />
damage.<br />
TACTICAL OFFICER MFD – MAP<br />
This panel displays the area of space around your ship. It will attempt to<br />
identify known objects.<br />
The map is very simple to operate.<br />
There are two zoom buttons. Clicking<br />
the + ZOOM decreases the size of the<br />
map, but makes it more accurate.<br />
Clicking the – ZOOM button increases the<br />
size of the map, but at the loss of<br />
accuracy.<br />
Your ship is the dot near the center of<br />
the map. The map is centered on your<br />
ship.<br />
Other objects that will be displayed are:<br />
All of your ships<br />
All allied ships<br />
All known enemy ships<br />
The tactical map. Use it to keep track of<br />
enemies outside of visual range.<br />
Planets, Asteroids, and other pieces of<br />
space terrain<br />
TACTICAL OFFICER MFD – FLEET CONTROL<br />
Not only do you command your ship by<br />
giving orders to officers and crew, but<br />
you can also give orders to other ships in<br />
your fleet that are also under your<br />
command. To do so, you will need to<br />
use the Fleet Control panel.<br />
Issue Orders<br />
Each ship in your fleet, including your<br />
current ship, is listed on this screen.<br />
Any ships that are captured will also be<br />
displayed. You can issue different orders<br />
to any ship. You can issue orders to<br />
your ship, but it will not follow them until<br />
you transfer control (see below.)<br />
The Fleet Control panel is used to issue<br />
orders to other ships in your fleet.<br />
110<br />
To issue an order, you need to select the<br />
ship that will carry out that order. Left–<br />
click on the ship name to select the ship.<br />
Left–click on an order type and an order intensity, if desired.
Order Types<br />
Ships can be issued one of six basic orders:<br />
Attack Target<br />
Attack the current target with the intention of destroying it. After<br />
destroying the current target, the ship will hunt down the closest legal<br />
enemy.<br />
Capture Target<br />
Attack the current target with the intention of capturing it. After<br />
capturing the current target, the ship will return to the command ship<br />
with the captured ship in tow.<br />
Disable Target<br />
Attack the current target with the intention of disabling it. After<br />
disabling the current target, the ship will remain next to it until a new<br />
order is issued.<br />
Go Here<br />
Clicking on this order button will change the cursor to a Set Go Here<br />
mode. Left–click in the 3–D space to set the destination point for the<br />
ship you are issuing orders to. Right–click to cancel this operation.<br />
Defend Target<br />
Move to the current target and defend it from enemy attack.<br />
Defend Command Ship<br />
Defend the ship that the orders are currently being issued from.<br />
In any case, starships will always defend themselves from attack and<br />
fire on any enemy ships that approach too close.<br />
Order Intensity<br />
In addition to issuing an order, you can also set the intensity at which<br />
that order will be carried out. There are three settings that range<br />
from Aggressive to Normal to Cautious.<br />
The intensity determines how likely the ship is to carry out your orders<br />
in the face of enemy opposition.<br />
Take Control<br />
You can also “jump” into the command chair of a ship in your fleet.<br />
This basically allows you to switch control from your current ship to<br />
another ship.<br />
Left–click on the transfer control checkbox. Your previous ship will<br />
follow any orders previously set. If no orders are set, it will default to<br />
attacking the closest enemy ship.<br />
111
TACTICAL OFFICER MFD – ENERGY MANAGEMENT<br />
The Energy Management display shows<br />
the current output of energy and what<br />
systems are drawing on that energy.<br />
The Energy Management panel allows you<br />
to manage your energy output and usage.<br />
Energy in Starfleet Command can come<br />
from one of three locations: warp<br />
engines, impulse engines and auxiliary<br />
power reactors.<br />
Power<br />
This shows the total amount of energy<br />
being produced by your ship. Energy is<br />
produced by warp engines, impulse<br />
engines, auxiliary power reactors (APR),<br />
and auxiliary warp reactors (AWR).<br />
Systems<br />
This is the total amount of energy your<br />
ship is currently using. How fast you are<br />
moving and what weapons you are charging are the primary uses of<br />
energy. Other systems can also use energy.<br />
Movement<br />
To move requires energy. The larger your ship, the more energy used to<br />
move. This bar shows the total amount of energy being used just to get<br />
you from point A to point B.<br />
Weapons<br />
This shows how much energy is being used to prepare heavy weapons<br />
and charge phasers.<br />
Shields<br />
How much energy is being used to raise and reinforce shields. You can<br />
add additional reinforcement energy by using the slider bar.<br />
Sensors<br />
This bar displays the total energy cost of your ECM and ECCM systems.<br />
Other Systems<br />
This shows how much energy is being used by all other systems on your<br />
starship. This includes basic shields, life support, tractor beams, deep<br />
scanning and transporters.<br />
Excess Energy<br />
If you are not currently using more energy then you are producing, the<br />
left over energy is called Excess Energy. This display bar shows the total<br />
amount of excess energy being produced but not used.<br />
112 A wise captain would say that having too much excess energy is<br />
just as dangerous in combat as not having enough.
Batteries<br />
Batteries hold a small amount of energy for a limited time. This bar<br />
shows the total amount of energy in your battery system. If you use<br />
more energy than what is being produced, your ship will start drawing<br />
from the batteries. When the batteries are drained, your Engineering<br />
officer will have to shut down some systems or reduce the amount of<br />
power going to those systems. Once your ship produces more energy<br />
than it is using, the batteries will be recharged. The net effect is to<br />
provide a short period of time where you can use more power than you<br />
are actually producing.<br />
Cloaking Device<br />
If your ship has a Cloaking Device installed, this display bar will show how<br />
much energy is being used to cloak the ship. The cloaking icon is also a<br />
button that can be used to toggle the Cloaking Device on and off.<br />
Cloaking Devices are explained on page 139.<br />
Running out of Power<br />
If you start to run out of power, and you have exhausted your batteries,<br />
your Engineering officer will have no choice but to start shutting down<br />
systems in order to compensate.<br />
The fastest way to adjust power is to adjust the speed of your ship.<br />
Slow down and you gain more power. Speed up and you use more<br />
power.<br />
If this happens, the Science Officer will use the following order of priority<br />
to determine what gets shut down and when:<br />
1. Life Support 7. Heavy Weapons<br />
2. Fire Support 8. Sensors<br />
3. Cloak 9. Transporters<br />
4. Shields 10. Tractors<br />
5. Speed 11. Shield Reinforcement<br />
6. Phasers 12. Batteries<br />
TACTICAL OFFICER MFD – PREFERENCES<br />
The Preferences panel isn’t used by an officer. Instead, it let’s you<br />
change certain settings in the game to your liking.<br />
Briefing<br />
Click this button to display the current mission briefing.<br />
End Mission<br />
If you click this button, the End Mission dialogue box will appear. In<br />
multiplayer missions, if you are the host and click this button a new host<br />
will be selected.<br />
Game Speed Slider<br />
Use this to adjust the speed of the game. Moving the slider to<br />
113
the right will increase the speed at which the game plays. Moving the<br />
slider to the left will slow down the gameplay. The numeric value shows<br />
the game speed. The higher the<br />
number, the faster the game will play.<br />
The default value is 6.<br />
Get your preferences here!<br />
Starfleet Command is based on Star<br />
Fleet Battles, a turn–based board game.<br />
The game speed slider adjusts how long<br />
the turn will be played out in SFC.<br />
If you are just starting out, try moving<br />
the game speed slider to 3. Adjust it up<br />
or down based on your experience.<br />
Camera Mode<br />
You can use this to toggle between the<br />
different camera modes in the 3–D<br />
tactical view.<br />
Grid Toggle<br />
This button toggles the grid display on and off.<br />
Quicktips Toggle<br />
Click this button to toggle the Quicktips help on and<br />
off. If on, Quicktips will appear if you hold the<br />
mouse over a button for a short period of time.<br />
This is a sample Quicktip.<br />
Text Speed Slider<br />
This slider adjusts how fast the text is scrolled off the screen. Adjust it<br />
to better match your reading speed.<br />
Master Volume Slider<br />
This slider controls the overall volume of the audio. If you want to adjust<br />
how loud or quiet the sound effects are, use this slider and then adjust<br />
the other two audio sliders.<br />
Music Volume Slider<br />
This slider controls the sound volume of the music. If you slide it all the<br />
way to the left, the music will be turned off.<br />
Voice Volume Slider<br />
If you find the in–game voices to be too loud or too quiet, you can use this<br />
slider to adjust the volume.<br />
114
TACTICAL SHIP SCHEMATIC & SYSTEM MFD<br />
The status of your ship is displayed in this section of the interface bar.<br />
This is your ship. Use it wisely.<br />
The exact schematic displayed will depend on your ship and its current<br />
status.<br />
Normally, there are two ship schematics, one for you and one for your<br />
current target. In 640x480 resolution mode, you will only see your<br />
ship schematic. Click the schematic toggle button to switch between<br />
your ship and your target.<br />
Weapon Icons<br />
Displayed on top of the schematic are your ship’s weapon hardpoint<br />
icons. These icons show the current status of the weapon hardpoints,<br />
and are also used to select weapons.<br />
If a weapon is black, it has been destroyed. If it is flashing yellow, it is<br />
temporarily stunned from damage caused by an attack.<br />
The weapon icon is broken down into three parts: weapon sub–type,<br />
weapon type, and number of weapons. Each icon represents a<br />
hardpoint. Each hardpoint can contain up to four identical weapons with<br />
the same firing arc.<br />
The weapon type tells you if the weapon is a phaser or heavy weapon. If it’s<br />
a heavy weapon, the icon will also tell you what type of heavy weapon it is.<br />
The number of dots on the right of the icon shows the number of<br />
weapons at that hardpoint. Each dot represents one weapon.<br />
The weapon sub–type is used for phasers and plasma torpedoes. See<br />
those weapons for specific descriptions.<br />
Selecting Weapons<br />
Left–click on a weapon to select it. Shift–left–click to add or delete the<br />
weapon from the currently selected group of weapons.<br />
You can group weapons via the Weapon Officer panel. You can<br />
also press CTRL–1 through CTRL–4 to store the current weapon<br />
group. Press 1 through 4 to activate the stored group.<br />
115
Selecting a weapon will also change the Tactical System MFD to the<br />
control panel for that weapon type.<br />
Weapon Firing Status<br />
If at least one weapon at that hardpoint is ready to fire, the icon will be a<br />
dark color. If all weapons are discharged, the color will be light. As the<br />
weapon is charging, you will see the light color will be filled in by the dark<br />
color. This is a progress bar.<br />
Firing Arc<br />
Weapons that can fire on the target ship are marked with a highlight box<br />
around the weapon icon. If you want to see the firing arcs for all<br />
weapons at the same time, you can use the Firing Arc Toggle button.<br />
This button toggles the firing arc display on the weapon icons.<br />
Select All Weapons<br />
This button can be used to select all weapons into one big group.<br />
Shield Indicators<br />
Around your schematic, you will see six shield indicators, one for each<br />
shield arc. These icons will show if a shield is currently up, damaged,<br />
reinforced or down.<br />
There is a highlight that runs around your ship. This highlight shows the<br />
current shield arc that is facing your target.<br />
System Buttons<br />
On the side of the schematic, you will see five buttons. These buttons<br />
control additional systems on your ship.<br />
1. Shields 4. Tractors<br />
2. Electronic Warfare (Sensors) 5. Shuttles<br />
3. Transporters<br />
Left–clicking one of these buttons will change the Tactical System<br />
MFD to display that control panel. From that control panel you<br />
116<br />
can control that system.
Disabled Systems<br />
If your ship takes damage, there is a chance that some systems will be<br />
temporarily disabled. This is represented by a flashing yellow icon on the<br />
affected systems. When the system stops flashing, it is restored to use.<br />
Disabled systems will automatically repair themselves if at all possible. If<br />
not possible, then the system is destroyed.<br />
Destroyed Systems<br />
If a system is turned black, it has been destroyed. You can repair some<br />
systems using the Repair Officer MFD (see page 104). Destroyed<br />
systems cannot be used until repaired.<br />
TACTICAL SYSTEM MFD – SHIELDS<br />
This panel controls how much energy is going into your shields for<br />
reinforcement, which shields are being reinforced and it also allows you<br />
to control which shields are raised.<br />
The shield control panel on the Tactical System MFD.<br />
Going to red or yellow alert will raise shields. Going to green alert will<br />
lower them.<br />
Unless otherwise directed, it is a good idea to go to red alert when<br />
encountering hostile units. When encountering units of an unknown<br />
nature, yellow alert is the preferred mode.<br />
The large display shows the six shield arcs. Left–click on an individual<br />
shield arc to toggle selection. Left–click in the center area to select all<br />
shield arcs.<br />
Raise<br />
This button raises the selected shield arcs. Shields take time to be<br />
raised. If a shield arc is dropped and then you immediately try to raise it<br />
again, it will still take time. Take this into account when you plan your<br />
shield activities.<br />
Lower<br />
This button lowers the selected shield arcs. You probably won’t<br />
be using this button too often. Systems that require shields to be 117
lowered (hit and run raids, transporter bombs) will do so automatically<br />
when you order that action, and they will be raised as soon as possible<br />
after the action has been completed.<br />
Normal<br />
This disables all current shield reinforcement and returns the amount of<br />
energy flowing to the shields back to their normal amount.<br />
Reinforcement Slider<br />
This adjusts the amount of reinforcement energy desired. After setting<br />
this level, you should use the REINFORCE button.<br />
Reinforce<br />
This reinforces the currently selected shield arcs with the desired amount<br />
of reinforcement energy. The more shields you reinforce, the less<br />
effective the reinforcement will be.<br />
Reinforce All<br />
This reinforces all shield arcs with the desired amount of reinforcement<br />
energy.<br />
TACTICAL SYSTEM MFD – EW (SENSORS)<br />
Your sensors panel at work.<br />
Your sensors can be used to broadcast Electronic Countermeasure (ECM)<br />
signals in an attempt to diminish the enemies’ ability to fire accurately at<br />
your ship, or you can use the sensors to broadcast Electronic Counter–<br />
Countermeasures (ECCM). You can refine the signals that your sensors<br />
receive, in an attempt to defeat an enemy ECM signal. This is collectively<br />
known as Electronic Warfare, since ECM and ECCM often fight it out.<br />
ECM<br />
These signals attempt to jam the enemy targeting computers. If<br />
successful, your ship will gain a small amount of protection from<br />
direct–fire and seeking weapons. You can set the desired ECM<br />
from 0 (no ECM) to 6 (maximum ECM). The maximum ECM may<br />
118<br />
be adjusted by damage to your sensors.
Target ECCM<br />
This display shows how much energy the current target is using on<br />
ECCM.<br />
ECCM<br />
This attempts to either overpower enemy ECM signals or spend more<br />
processing time decoding and filtering the jamming information. In any<br />
case, ECCM reduces the effectiveness of the target’s ECM. You can set<br />
the desired ECCM from 0 (no ECCM) to 6 (maximum ECCM). The<br />
maximum ECCM may be adjusted by damage to your sensors.<br />
Target ECM<br />
This display shows how much energy the current target is using on ECM.<br />
Energy Cost<br />
Each point of ECM or ECCM costs one point of energy to create. Your<br />
total electronic warfare energy cost is equal to the total number of ECM<br />
and ECCM points you are generating.<br />
Maximum Electronic Warfare<br />
Your sensors can only generate a total number of ECM and ECCM points<br />
equal to your ship’s current sensor rating. This is usually six. If you<br />
attempt to set one form of EW above the maximum, your Science officer<br />
will automatically adjust the other type to counterbalance.<br />
To recap, generated ECM plus ECCM from sensors cannot exceed your<br />
ship’s sensor rating (usually six or less).<br />
Some terrain can add to your ECM. This terrain modifier can be in<br />
addition to any generated EW.<br />
Plasma Torpedoes have three points of ECCM automatically.<br />
ECM vs. ECCM<br />
Each point of ECCM reduces the target’s ECM by one. If ECM is reduced<br />
to zero, there is no effect of Electronic Warfare.<br />
However, if a positive ECM still exists, it will modify the damage from all<br />
weapons. This is known as the Net ECM Shift. The larger the Net ECM<br />
Shift, the better protected you are if you are being shot at.<br />
Exactly how is the Net ECM Shift calculated and how does it work?<br />
ECM – ECCM<br />
Net ECM Shift<br />
1–3 1<br />
4–6 2<br />
9–15 3<br />
To continue past 15, take the square root and drop all fractions.<br />
The Net ECM Shift is a modifier that reduces both the To–Hit<br />
chance of a weapon and the amount of damage a weapon<br />
causes. 119
Cloaking Device<br />
If your ship is equipped with a Cloaking Device, this button will be<br />
available. It is a toggle that will turn the Cloaking Device on and off. The<br />
button toggles between CLOAKING and UNCLOAKING. Cloaking Devices<br />
are explained on page 139.<br />
TACTICAL SYSTEM MFD – TRANSPORTERS<br />
Transporters are devices that can move objects from one point to<br />
another without having to cross the points in between. Transporters<br />
have three major functions in Starfleet Command: they can transport<br />
marines, items, or transporter bombs.<br />
Transporter ready, Captain!<br />
Marines<br />
Transporters can move marines/boarding parties around for hit & run<br />
raids and to capture enemy ships. See the Security Officer MFD on page<br />
105 for more information.<br />
Items<br />
You can move items around with a transporter. This can range from a<br />
case of Romulan Ale, spare parts for the damage control teams, to a<br />
vital diplomat or spy.<br />
There are two sections on the transporter panel for items: Beam Out and<br />
Beam In. Beam Out is an inventory of what you are currently carrying<br />
that would be of any interest to transport. You could transport your dirty<br />
laundry, but why? Beam In is what is available on the target unit to<br />
transport.<br />
To transport an item, click on the icon to highlight it. You can use<br />
Quicktips (see page 114) to get the name of the item in question. Then<br />
click the ENGAGE button. Each transporter action will send one unit of<br />
the item and use one transporter.<br />
Transporter Bombs (Mines)<br />
These are the same mines that can be dropped out the back of<br />
your ship. Since they are small mines, they can be rigged for<br />
120 transportation. You may beam them up to range 5.
Mines transported in this fashion are known as transporter bombs or<br />
t–bombs. They will explode after a short delay, as soon as any unit,<br />
including you, enters their detection range. Ships moving very slowly may<br />
fail to be detected.<br />
T–bombs do 10 points of damage to all units within a range of 2.<br />
A few Romulan ships also have a Nuclear Space Mine (NSM). They do<br />
35 points of damage but can only be dropped out the back hatch.<br />
Press SHIFT–M to drop a Romulan NSM.<br />
The only other difference between t–bombs and laying mines is that<br />
t–bombs require a shield to drop.<br />
See page 107 for mine laying.<br />
When using the B hotkey to lay t–bombs, you can hold down SHIFT and<br />
lay multiple t–bombs. Each click of the mouse will transport one<br />
t–bomb as long as you hold down SHIFT, have t–bombs or transporters<br />
to deliver them.<br />
Shields and Transporters<br />
Transporters cannot transport through shields, except under really<br />
bizarre situations that you will never encounter in Starfleet Command. To<br />
use a transporter, one of the shield arcs must be dropped. Fortunately,<br />
your transporter operator is smart enough to communicate with your<br />
Weapons officer and only drop the shield at the proper moment and<br />
bring it up again as soon as possible. This will happen automatically<br />
when you order a transporter to perform an action.<br />
This also means that the shields on your target must be down, if you are<br />
transporting items or marines. Bombs make their own hole, if<br />
necessary, and are never transported onto an enemy ship – just into<br />
space.<br />
Energy Cost<br />
It costs .2 points of energy to use a transporter for any action.<br />
Remember that during marine activity, multiple transporters may be used<br />
at the same time. The .2 energy is for each transporter. Use five<br />
transporters, and it will cost you 1 point of energy.<br />
It also takes time to recharge the transporter coils and grid. There is a<br />
one turn delay between transporter actions. The only exception to this is<br />
the Hit & Run teams – they may transport across and return<br />
immediately, since the transporter has a continuous lock on to the away<br />
team.<br />
TACTICAL SYSTEM MFD – TRACTORS<br />
Tractor beams are useful pieces of equipment. They can be used to<br />
tractor other units, like enemy starships, or incoming missiles or<br />
shuttles.<br />
Tractors use directed force beams to “grab” an object and<br />
manipulate its movement. 121
Defensive Tractors<br />
The primary purpose of defensive tractors is to stop incoming missiles<br />
and keep them from impacting on your shields or hull. The secondary<br />
purpose is to do the same to shuttles and fighters. These must be<br />
pre–allocated before they need to be used.<br />
Defensive tractors are controlled on the Defensive Officer MFD panel, see<br />
page 109.<br />
General Tractors<br />
You can also direct the use of your main tractor system against ships and<br />
other units. This is most often used to “anchor” an opponent, to make<br />
sure that he cannot flee from you. It can also be used to drag a<br />
wounded ally out of harm’s way.<br />
The Tractor panel controls your main tractor system.<br />
Targeting<br />
The tractor will target the unit that is the current target when the<br />
ENGAGE button is pressed. If you switch targets before the tractor beam<br />
is engaged, the tractor beam will attempt to tractor your new target.<br />
The main tractor system can only target one unit at a time. If you target<br />
another unit, the first unit will no longer be a valid target.<br />
Beam Strength<br />
The beam strength is how much energy is being diverted to the tractor<br />
system. The more powerful the beam strength the easier it is to grab a<br />
unit with the tractor or defend yourself from being tractored.<br />
Click on the desired power level of beam strength. The tractor beam<br />
system takes time to charge and build the beam strength. Plan your<br />
beam strength before engaging the target. The beam strength will not<br />
start to build or draw energy until you click the ENGAGE button.<br />
Power Level 1 2 3 4 5<br />
Beam Strength 1 2 4 8 16<br />
122<br />
Once the beam strength is set, you need to determine how to use<br />
it: HOLD or REPEL. You can only use one mode at a time.
Hold<br />
If you want to grab another ship, use this mode. It will hold the target as<br />
soon as the beam strength is filled and the target is within range.<br />
Repel<br />
If you want to protect yourself from being held by a tractor beam, use<br />
this mode. Repelling a tractor beam is easier than tractoring a unit. As<br />
long as your repel energy matches or exceeds the amount of hold<br />
energy, you cannot be held in a tractor beam.<br />
Engage<br />
Once you click this button, the main tractor beam will draw energy equal<br />
to the beam strength and the beam strength bar will start to fill. Once<br />
the beam strength bar has completely filled, a hold tractor will engage as<br />
soon as the enemy is around the range 2 to 2.5.<br />
The tractor beam in action.<br />
You must have a sensor lock–on in order to lock a tractor beam on to a<br />
unit. Click the ENGAGE button again to disengage the tractor beam and<br />
release the target.<br />
Effects of a Tractor<br />
Until the tractoring ship disengages the tractor beam, or the tractored<br />
unit can build enough repel beam strength, the two units are linked. The<br />
movement vector (direction and speed) and size of each ship will affect<br />
the other ship. The range between the two ships will remain constant.<br />
Ships can continue to rotate on their own, bringing a different shield or<br />
weapon hardpoint to bear. Ships can also adjust their speed up or down<br />
(within the limits of their energy and available warp/impulse drives).<br />
If either ship is destroyed, or if the tractor beam itself is destroyed, the<br />
tractor is released.<br />
123
TACTICAL SYSTEM MFD – SHUTTLES<br />
The shuttlecraft control panel is used to issue orders to shuttles and<br />
fighters. From here you can set your orders and launch individual<br />
shuttles or fighter groups.<br />
Fighters are specialized shuttlecraft outfitted with higher performance<br />
impulse engines, improved fire–control, and targeting computers, not to<br />
mention the improved weapon load–outs. Fighters are also designed for<br />
higher stress tolerances.<br />
It’s important to note that fighters operate in groups. The size of the<br />
group depends on the size of the carrier. Larger carriers can operate<br />
larger groups of fighters. You are limited to maximum of four fighter<br />
groups.<br />
Only one set of orders can be issued to a fighter group at a time, and<br />
all fighters follow the same orders.<br />
It’s also important to note that in Starfleet Command, only the Hydran<br />
race has access to fighters.<br />
Types of Shuttles<br />
There are four types of shuttlecraft: Admin, Wild Weasel, Suicide or<br />
Scatterpack.<br />
Admin Shuttle<br />
This is a manned shuttle. An admin shuttle is armed with a single 360°<br />
arc ph–3. It can accept all target options. They are primarily used for<br />
additional missile defense or to distract your foe. The most common<br />
order for Admin shuttles is Defend Me.<br />
Wild Weasel (Sensor Decoy Shuttle)<br />
Wild Weasels cannot be given orders. They will automatically start<br />
generating the powerful sensor decoy signals necessary to fool enemy<br />
targeting systems.<br />
Once launched, Wild Weasels will protect your ship from seeking weapons<br />
until the WW is destroyed or until you void the protection by moving<br />
faster than speed four or by firing weapons. Wild Weasels also provide<br />
protection against direct fire weapons, like phasers and disruptors.<br />
Suicide Shuttle<br />
Suicide shuttles cannot be given orders. They will automatically attack the<br />
current target.<br />
Suicide shuttles are armed with powerful anti–matter bombs. They will<br />
explode on contact with the target ship. They do 18 points of damage.<br />
Scatterpack Shuttle<br />
Scatterpacks cannot be given orders. They will automatically attack the<br />
current target.<br />
124 Scatterpack shuttles are armed with six missiles. They are set to<br />
launch all missiles after a short period of time (as they calibrate
their arming sensors and fire–control). This is one of the fastest ways of<br />
getting a large number of missiles in the “air”. The use of scatterpacks<br />
can easily overwhelm the ability of your ship to control missiles in flight.<br />
This could result in the loss of previously launched missiles. See Missiles<br />
on page 138 for more information.<br />
The Shuttle Panel<br />
There are four parts to the shuttlecraft panel.<br />
The Shuttlecraft control panel.<br />
Docked<br />
These are the individual shuttles or fighter groups that are still on board<br />
the carrier. Left–click on a shuttle or group to highlight and select it. All<br />
future orders are carried out by the selected unit(s).<br />
Active<br />
These are admin shuttles (shuttles under human control) or fighter<br />
groups that are currently in space. If you want to change the current<br />
orders of an active unit, left–click on it to select and highlight the unit.<br />
The Hydran Shuttle control panel, showing fighters.<br />
125
Target Options<br />
Left–click on one of these options to set the orders for the selected units:<br />
Attack<br />
This orders the shuttle or the fighter group to attack the target. They<br />
will close and attempt to do maximum damage to the enemy.<br />
Harass<br />
This tells the shuttle or fighter group to stand off and fire weapons<br />
from a distance. This provides maximum protection to the fighter<br />
group but decreases the amount of damage dealt to the enemy ship.<br />
Defend<br />
The shuttle or fighter group will fly to the current target and defend it.<br />
If enemy units approach too closely, the defending unit(s) will break off<br />
and attack. If the enemy units flee, the defenders will follow for just a<br />
short period of time and then return to their charge.<br />
Defend Me<br />
If you want your shuttlecraft or fighters to defend their carrier, select<br />
this option. It is the same as Defend, but with the defended target<br />
being the current ship.<br />
Return<br />
Tells the active shuttle or fighter group to return to the carrier and<br />
dock as soon as possible. For example, you can use this to rearm<br />
assault fighters, for example.<br />
Launch<br />
Once the shuttle has been selected, and an order given if necessary,<br />
click the LAUNCH button to throw the selected shuttle or fighter group<br />
into the vacuum of space.<br />
TACTICAL SYSTEM MFD – WEAPONS<br />
If you select one weapon, the<br />
tactical system MFD panel will<br />
switch to the control panel for that<br />
weapon.<br />
These are typical weapon panels.<br />
They have buttons for controlling<br />
the weapon settings, and they<br />
show the weapon name, charging<br />
status, and firing arcs. If there<br />
are multiple weapons of that type<br />
at that hardpoint, there will be multiple charging status bars. All<br />
weapons at that hardpoint share the same firing arc, which is pointing in<br />
the same direction as the schematic for your ship. The right side of the<br />
firing arc circle is the front (or bow) of your ship. The light color<br />
shows the valid firing arc for the weapon.<br />
126<br />
The darker color means that weapon cannot fire in that arc.
You can use this panel to change the<br />
settings for the selected hardpoint.<br />
Only that hardpoint will be affected.<br />
All other weapons of that type will<br />
keep their current settings.<br />
See the individual weapon section for<br />
details on each of the weapon types.<br />
If you select multiple weapons, you<br />
will see this panel:<br />
This panel shows the common firing<br />
arc for all weapon hardpoints that<br />
are selected. It has three buttons:<br />
OFFLINE, NORMAL and OVERLOAD.<br />
Clicking one of these buttons will<br />
change all selected weapon<br />
hardpoints to that setting. Weapons<br />
that do not have an overloaded setting (phasers) will be set to normal if<br />
you click on the OVERLOAD button.<br />
The charging bar for multiple weapons shows the charging status of the<br />
weapon that will be available in the shortest amount of time. In other<br />
words, if even only one weapon is charged and ready to fire, the charging<br />
bar will show full.<br />
WE@PON SYSTEMS<br />
Starships are equipped with a variety of weapon systems for both<br />
offensive and defensive purposes. Most of these weapons operate under<br />
one of two principles: direct–fire weapons and seeking weapons.<br />
Most weapons take time and energy to prepare for use.<br />
Each of the races specialize in their weapon systems. Their tactics are<br />
defined by what weapons their ships have and how they are best utilized.<br />
Weapons have different modes that they can be placed in. All weapons<br />
have an offline and normal mode. Some weapons have an additional<br />
mode (like overload). Modes are set on the system MFD when you<br />
select a weapon.<br />
Offline Mode<br />
This turns the weapon hardpoint off, and no energy will be supplied to<br />
this weapon. All energy currently in the weapon is lost and the weapon<br />
cannot fire. It can be damaged or destroyed by enemy fire.<br />
Normal Mode<br />
This is the standard firing mode of a weapon. It uses the normal<br />
amount of energy and does the normal amount of damage. As<br />
127
long as the weapon is in this mode it will automatically start charging<br />
again as soon as it fired. See the specific weapon notes for more<br />
detailed information.<br />
Loading Times<br />
In the following descriptions, the term “turn” will be used. This is equal to<br />
the game speed slider. It is a convenient way of saying “standard loading<br />
time equal to the game speed slider” without having to use all those<br />
words.<br />
PHASERS<br />
Phasers are probably the most useful<br />
of the weapon systems and are also<br />
the most applicable for defensive<br />
purposes. There are multiple types<br />
of phasers, ranging from offensive,<br />
defensive, to large starbase sized<br />
phasers.<br />
Each phaser must wait one turn after<br />
firing, with the notable exception of<br />
the ph–G. There must be enough<br />
energy in the phaser capacitor to fire the phaser after it has cooled down.<br />
Phaser, Type–1 (ph–1)<br />
This is a high–quality offensive phaser. It is capable of doing the most<br />
damage for a ship–based phaser. It takes one point of energy to fire<br />
a ph–1.<br />
Damage Table<br />
Range 0 1 2 3 4 5 6-8 9-15 16-25 26-50 51-75<br />
Min 4 4 3 3 2 2 0 0 0 0 0<br />
Max 9 8 7 6 5 5 4 3 2 1 1<br />
Avg 6.5 5.3 4.8 4.3 3.8 3.5 2.2 1 .5 .3 .1<br />
Phaser, Type–2 (ph–2)<br />
This is the same basic phaser as a ph–1, but it lacks the sophisticated<br />
targeting systems required for the most efficient use. It also takes a<br />
single point of energy to fire a ph–2.<br />
Damage Table<br />
Range 0 1 2 3 4-8 9-15 16-30 31-50<br />
Min 5 3 3 3 0 0 0 0<br />
Max 6 5 5 4 3 2 1 1<br />
Avg 5.5 4.2 3.8 3.5 1.2 .7 .3 .1<br />
128
Phaser, Type–3 (ph–3)<br />
This is a smaller defensive phaser. It is primarily for missile defense or<br />
against smaller targets, like shuttles and fighters. It only takes 1 / 2<br />
point of energy to fire a ph–3.<br />
Damage Table<br />
Range 0 1 2 3 4-8 9-15<br />
Min 3 3 1 0 0 0<br />
Max 4 4 4 3 1 1<br />
Avg 3.8 3.7 3 1 .3 .2<br />
Phaser, Type–4 (ph–4)<br />
This is a large phaser that can only be mounted on larger units, such<br />
as bases or planets. The required use of positional stabilizers for fire<br />
control means this phaser can never be used on a mobile ship. It<br />
takes 2 points of energy to fire a ph–4.<br />
Damage Table<br />
Range 0–3 4–5 6 7 8 9 10 11-13 14-17 18-25 26-40 41-70 71-100<br />
Min 15 10 9 8 7 6 5 3 1 0 0 0 0<br />
Max 20 20 20 15 12 10 8 6 5 4 3 2 1<br />
Avg 18.3 15.3 12.8 9.5 8.2 6.5 5.5 4.5 3.2 2.2 1 .5 .1<br />
Phaser, Type–G (ph–G)<br />
The Hydrans were the first to develop the dreaded Gatling phaser. It is<br />
functionally equivalent to four type–3 defensive phasers. It can fire up<br />
to four times during the same time period as a single ph–3, with all<br />
shots having identical damage and range as a ph–3. It takes 1 point of<br />
energy to fire a ph–G four times.<br />
Almost all ships and units are equipped with some sort of phaser. Their<br />
ability to target missiles, plasma torpedoes, ships and shuttles, along<br />
with their high energy to damage ratio makes them one of the best and<br />
most versatile weapons available.<br />
Unlike all other weapons, phasers can only be damaged on your ship if<br />
the attack came from a direction the phaser can fire in.<br />
Phaser Capacitor<br />
All phasers on a ship draw their energy from a common phaser<br />
capacitor. The amount of energy the phaser capacitor can hold is<br />
equal to the cost of firing all phasers once. When a phaser is fired,<br />
the energy to fire it will come from the capacitor at the moment of<br />
firing. You can adjust the recharge rate of phaser capacitors, see<br />
page 100. Phasers cannot be overloaded.<br />
129
PHOTON TORPEDOES<br />
Photon Torpedoes are the main heavy weapons of the Federation.<br />
Photon Torpedoes do a fixed amount<br />
of damage, but have a chance to hit<br />
or miss based on range. In general,<br />
the closer your ship is to the target,<br />
the closer your photon torpedo launch<br />
tubes are. This is good for your<br />
photons and bad for your target.<br />
Photons can be used in three<br />
different modes: normal, overload and<br />
proximity.<br />
Normal<br />
This is the standard photon. It has a max range of 30, but the chances<br />
of it actually hitting drop off quite dramatically after range 8. It takes 2<br />
points of energy for two turns to charge and 1 point of energy to hold an<br />
armed photon. This cost is per tube. A photon hardpoint with two<br />
weapons, and a game speed slider of 30 seconds, would require 4 points<br />
of energy for one whole minute to charge. After that, they would be held<br />
for 2 points of energy until fired. These photons do 8 points of damage.<br />
Range 0-1 2 3-4 5-8 9-12 13-30<br />
To–Hit % Special 83% 67% 50% 33% 17%<br />
Warning: Normal photons fired at a range of less than 2 will cause minor<br />
feedback damage. Feedback damage strikes the shield facing your<br />
target. Normal photons fired at this range also do less damage than<br />
normal.<br />
Overload<br />
By stuffing additional energy into the photon, it is possible to overload it.<br />
This will make the photon unstable, which dramatically lowers its<br />
maximum range to 8. It takes 4 points of energy for two turns to charge<br />
an overloaded photon. Overloaded photons can be held at a cost of 2<br />
points of energy per tube. Each overloaded photon does 16 points of<br />
damage.<br />
Range 0-1 2 3-4 5-8<br />
To–Hit % 100% 83% 67% 50%<br />
Warning: Overloaded photons cause feedback damage if fired at range 0<br />
or 1. This feedback damage will damage the shield facing your target.<br />
Proximity<br />
By setting the photon to explode by proximity warhead, the successful<br />
chance of doing damage at longer ranges can be increased.<br />
Instead of striking the target and exploding, the proximity–fused<br />
photons will explode a short distance from its target. Damage is<br />
130
educed to 4 points per torpedo. Since the fuse doesn’t arm until the<br />
torp has traveled some distance, these weapons cannot be used at a<br />
range of 8 or closer. Normal energy cost.<br />
Range 0-8 9-12 13-30 31-55<br />
To–Hit % NA 67% 50% 33%<br />
Switching Modes<br />
You can switch modes until you give the order to fire. You can switch<br />
between normal and proximity without a problem.<br />
Switching between overload and the others is handled a little differently.<br />
If you are switching to overload, it will take what energy is available in the<br />
photon and apply it to the overload. Switching from overload may cause<br />
excess energy to be discarded.<br />
Warp Energy Requirement<br />
Photon torpedoes must be charged with warp energy. Your engineer will<br />
handle this for you as long as you have warp energy available.<br />
ECM<br />
Photon torpedoes are vulnerable to Electronic Counter Measures. Use<br />
ECCM to help ensure that your photons hit your target.<br />
DISRUPTOR BEAMS<br />
Disruptors are the primary heavy<br />
weapons of the Klingon and Lyran<br />
empires. They do damage based on<br />
a disruptive energy principle. In<br />
general, they do half as much<br />
damage as a Photon, but they can<br />
be fired twice as often.<br />
Since a large part of the Disruptor<br />
effect requires a stable firing platform, smaller ships have Disruptors<br />
with a shorter range than larger ships.<br />
Disruptors have two firing modes: normal and overloaded.<br />
The chance to hit and the amount of damage done by a disruptor is<br />
based on the range to the target.<br />
Normal<br />
Each Disruptor costs 2 points of energy to arm. It takes one turn to<br />
arm a Disruptor. It costs 2 points of energy to hold a normal Disruptor<br />
until you fire it. A Disruptor has a better than average or average<br />
chance to hit all the way out to range 30. The amount of damage done<br />
by a Disruptor beam depends on the range to the target.<br />
Range 0 1 2 3-4 5-15 16-22 23-30 31-40<br />
To–Hit % 100% 83% 83% 67% 67% 67% 50% 33%<br />
Damage 5 5 4 4 3 2 2 1<br />
131
Overloaded<br />
By increasing the amount of energy used to arm the Disruptor, it is<br />
possible to increase the damage potential. It costs 4 points of energy for<br />
one turn to arm, and 4 points of energy to hold. Overloading doubles the<br />
amount of damage. Overloads can only be fired at range 8 or less.<br />
Range 0 1 2-4 5-8<br />
To–Hit% 100% 83% 83% 83%<br />
Damage 10 10 8 6<br />
Warning: Disruptors cause feedback damage if fired at range 0.<br />
Switching Modes<br />
It is possible to switch modes between normal and overloaded. Switching<br />
from normal to overloaded will cause all energy in the disruptor to be<br />
applied towards the overload energy requirement. Switching from<br />
overload to normal may cause excess energy to be discarded.<br />
The Disruptor is so successful in part because of two Klingon<br />
technologies: UIM and DERFACS. Ubitron Interface Modules improve<br />
Disruptor fire at medium range and when firing overloads. The<br />
Disruptor Extended–Range Fire Attenuation Control System improves<br />
medium to long range fire. Both of these systems were created by the<br />
Klingons, and quickly copied by the Lyrans and the Orions.<br />
It was once thought that UIM modules could burn out and be destroyed<br />
with use, but it was later discovered that this was either a Federation<br />
misunderstanding or just propaganda.<br />
PLASMA TORPEDOES<br />
Plasma Torpedoes are balls of plasma<br />
(matter on the verge of completely<br />
becoming energy). They are the<br />
heaviest of the heavy weapons in the<br />
known Galaxy. They are the primary<br />
weapons of the Romulans and the<br />
Gorns.<br />
The damage of a plasma torp is<br />
based on the size of the torpedo and<br />
the distance traveled after launch.<br />
Plasma torpedoes do a large amount of damage if they travel a short<br />
distance before they hit their target. The farther they have to travel, the<br />
less damage they do.<br />
Charging<br />
All plasma torpedoes require a substantial amount of time and energy to<br />
charge. The larger the torpedo, the more energy it requires. Torpedoes<br />
take three turns to fully charge. The only exception is if you charge a<br />
Type–F torpedo in a Type–R, S or G launcher, which takes only two<br />
turns.<br />
132
Torpedoes cannot be overloaded, but they are capable of using some<br />
special firing modes.<br />
Firing Modes<br />
Plasma can be fired in three different modes: normal, enveloping and<br />
defensive. The Type–F torpedo can only be fired in normal mode.<br />
Normal<br />
This is the standard plasma torpedo.<br />
Enveloping Plasma Torpedo (EPT)<br />
Additional energy is applied to the<br />
torpedo in order to increase the size<br />
of the torp and to the change the<br />
field that holds the torp together.<br />
The magnetic field is modified to<br />
envelop the target on impact and cause damage to all shield arcs. The<br />
amount of damage caused is twice what is normal, but it is spread<br />
across all six shields.<br />
Defensive (Shotgun)<br />
The plasma torpedo has a problem when attacking smaller units. A<br />
single plasma torp is usually overkill for a shuttle, for example.<br />
Fortunately (well, not for the shuttle), a single large plasma torp can be<br />
divided into several smaller Type–F torpedoes. Each torpedo must have a<br />
different valid target. At least one torpedo will be fired at your current<br />
target. The remaining torpedoes will pick legal targets within the firing<br />
arc of the launcher, one shotgun torp per target. Excess torpedoes are<br />
lost.<br />
There are four types of plasma torpedoes: Type–R, Type–S, Type–G and<br />
Type–F. A launcher can only create certain size torpedoes. The<br />
maximum size of the launcher is shown in the ship schematic. A<br />
launcher can create a torpedo of the size displayed or smaller. Click on<br />
the torpedo type button on the plasma torpedo panel to set the size.<br />
Type–R<br />
The largest plasma torpedo known, it is more common in the Romulan<br />
navy than the Gorn navy. It can cause up to 50 points of damage within<br />
a range of 10, and it has a maximum range of 30. The torpedo<br />
preparation chamber and launching mechanism are so large that it can<br />
only be mounted on a handful of hulls. Any small hull ship that has a<br />
Type–R is literally built around this massive weapon.<br />
A Type–R torpedo costs 9 energy points over three turns for a normal<br />
charge, and costs 3 points per turn to hold until fired. An EPT or<br />
defensive can be charged for a total of 14, and costs 4 to hold. It can<br />
create five Type–F torpedoes when fired in Shotgun mode.<br />
Range 0-10 11-15 16-20 21-25 26-28 29 30<br />
Damage 50 35 25 20 10 5 1<br />
133
Type–S<br />
An improved version of the Type–G torpedo, this is the standard medium<br />
plasma for most ships in the middle and late eras.<br />
A Type–S torpedo costs 8 energy points over three turns to arm and 2<br />
points per turn to hold. A Type–S EPT/Shotgun costs 12 to arm and 3<br />
to hold. In Shotgun mode, a single Type–S creates three Type–F torps.<br />
Range 0-10 11-15 16-20 21-23 24 25<br />
Damage 30 22 15 10 5 1<br />
Type–G<br />
This is the original Gorn plasma torpedo. Historically only a few ships<br />
carried it once the Type–S became available. During the early era, it was<br />
commonly found on Gorn ships.<br />
A Type–S torpedo costs 7 energy points over three turns to arm and 1<br />
point per turn to hold. A Type–S EPT/Shotgun costs 10 to arm and 2 to<br />
hold. In Shotgun mode, a single Type–S creates two Type–F torps.<br />
Range 0-10 11-15 16-18 19 20<br />
Damage 20 15 10 5 1<br />
Type–F<br />
This is the smallest of the plasma torpedoes available. It is carried by the<br />
smallest ships, or as additional heavy weapons on larger ships to back up<br />
a larger tube.<br />
The Type–F torpedo costs 5 energy points over three turns to arm. If<br />
charged in a true Type–F launcher, plasma torpedoes cost no energy to<br />
hold. If charged in a Type–R, S, or G launcher, they only take two turns to<br />
charge and cost 1 point of energy per turn to hold. Type–F torpedoes<br />
cannot be fired in either enveloping or shotgun modes.<br />
Range 0-5 6-10 11-12 13-14 15<br />
Damage 20 15 10 5 1<br />
Pseudo Plasma Torpedoes (PPTs)<br />
The long delay between the times that you can fire, means that the<br />
Plasma torpedo is a difficult weapon to use effectively in combat. The<br />
Pseudo Plasma Torp (PPT) is designed to help alleviate one problem: your<br />
opponents ability to determine when you are recharging your plasmas and<br />
vulnerable to attack.<br />
In each plasma torpedo control panel there is a button marked PSEUDO.<br />
Clicking this button will launch one PPT at your current target. The<br />
charging bar next to the Pseudo button shows when the next pseudo<br />
torpedo will be ready. PPTs take no energy to prepare but they do<br />
require a long period of time before they can be used again.<br />
PPTs act as a normal plasma until impact, and they cause no<br />
134 damage. A PPT is merely a shell of a plasma torpedo designed to<br />
look like a real torp when scanned.
Plasma Defenses<br />
Plasma Torpedoes can be weakened, even destroyed, by phaser fire.<br />
Every 2 points of phaser damage done to a plasma torp reduces the<br />
plasma damage by 1. Certain types of terrain can also weaken plasma<br />
torpedoes. See page 143.<br />
Destroyed Plasma Launchers<br />
If a plasma launcher with a completed plasma torpedo is destroyed, the<br />
torpedo will remain stable for a brief period of time, during which it can<br />
be fired. After this short delay, if the torpedo is not launched, it<br />
degenerates and is lost.<br />
FUSION BEAMS<br />
One of the two heavy weapons used by the Hydran navy, fusion beams<br />
are short–range weapons capable of a very powerful burst of energy. Its<br />
power is derived from a stream of excited tritium and deuterium nuclei<br />
that are projected to the target. The nuclei are then fused into helium,<br />
releasing tremendous energy at the moment of contact.<br />
Cooling<br />
After the fusion beam is fired, it<br />
requires one turn to cool the weapon<br />
before it can be charged to fire<br />
again.<br />
Firing Modes<br />
Fusion Beams can be fired in any one<br />
of three different modes: normal,<br />
overload and suicide overload.<br />
Normal<br />
Fusion beams fired in this mode have a maximum range of 24. It costs<br />
2 points of energy for one turn to arm each fusion cannon.<br />
Range 0 1 2 3-10 11-15 16-24<br />
Min 8 4 2 0 0 0<br />
Max 13 8 6 4 3 2<br />
Avg 9.8 6.3 3.8 1.8 1.2 .2<br />
Overload<br />
This increases the amount of energy used to create the fusion beam.<br />
This increases the amount of damage potential, but reduces the range to<br />
8. It costs 4 points of energy. Damage is increased 50% over the<br />
normal firing mode.<br />
Range 0 1 2 3-8<br />
Min 12 6 3 0<br />
Max 19 12 9 6<br />
Avg 14.5 9.3 5.5 2.5<br />
135
Suicide Overload<br />
This costs 7 points of energy to charge and has a range of 8. It will<br />
substantially increase the amount of damage done to the target, but the<br />
fusion beam is destroyed in the process of firing. A small amount of<br />
additional damage is also done to the firing vessel. Damage done by a<br />
suicide overload quadruples the normal damage.<br />
Range 0 1 2 3-8<br />
Min 32 16 8 0<br />
Max 52 32 24 16<br />
Avg 39.33 25.33 15.33 7.33<br />
HELLBORE CANNONS<br />
This is the other heavy weapon in<br />
common use on Hydran warships. A<br />
Hellbore cannon fires a high–velocity<br />
fusion bomb that contains a special<br />
magnetic field. This magnetic field<br />
causes the fusion explosion to wrap<br />
around the entire ship and then<br />
implode. Due to the nature of<br />
shields, this will cause the most<br />
damage to the weakest shield.<br />
Firing Modes<br />
Hellbores can be fired in one of two modes: normal and overload.<br />
Normal<br />
They cost 3 points of energy for 2 turns to arm, and they cost 3 points<br />
of energy to keep ready until fired. The maximum range of a Hellbore is<br />
40, but the chance to hit is no greater than 50% past range 15. The<br />
maximum amount of damage is 20, divided across six shields, but this is<br />
also reduced by range. The greatest percentage of damage will be done<br />
to the weakest shield(s) on the target. The remainder of the damage is<br />
spread across the other shields.<br />
Range 0 1 2 3-4 5-8 9-15 16-22 23-40<br />
To–Hit% 97% 92% 83% 75% 67% 58% 50% 42%<br />
Damage 20 20 17 15 13 10 8 4<br />
Overload<br />
This increases damage dealt at the cost of its range. It also increases<br />
the energy cost to 6. Overloaded Hellbores can be fired at a range of<br />
less than 1, but this will cause some minor feedback damage to the firing<br />
ship.<br />
Range 0-1 2 3-4 5-8<br />
136<br />
To–Hit% 92% 83% 75% 67%<br />
Damage 30 25 22 19
ESG Interaction<br />
Hellbores and ESG interact in a bizarre manner. Any Hellbore that<br />
crosses the path of an ESG, even if targeting another ship, will<br />
immediately damage the ESG field. Excess damage will strike the ship<br />
generating the ESG.<br />
Reduced Effects of ECM<br />
Hellbore cannons are not as affected by ECM as some other weapons<br />
can be.<br />
EXPANDING SPHERE GENERATOR<br />
The Expanding Sphere Generator<br />
(ESG) is used by the Lyran Star<br />
Empire as an offensive as well as a<br />
defensive weapon. It creates a field<br />
of energy around the generating<br />
ship. This field can be used to<br />
protect against missiles, destroy<br />
smaller units like shuttles and<br />
fighters, or it can even be used to<br />
“ram” an enemy ship.<br />
ESG Capacitor<br />
All ships equipped with ESGs are also equipped with an ESG capacitor.<br />
This capacitor, very similar to the phaser capacitor, is used to hold<br />
energy for all the ESGs on the ship. The maximum size of the capacitor<br />
is 7 points of energy for each ESG on the ship. You can adjust the<br />
recharge rate of the capacitor by moving the slider.<br />
Radius<br />
The radius of the ESG can be set on the ESG panel. This determines the<br />
size of the sphere. The larger the sphere, the less powerful the field.<br />
The radius must be set prior to activating the field and cannot be<br />
changed once activation has occurred. Prior to activation, only the player<br />
wielding the ESG will know the eventual size of the sphere.<br />
Activation<br />
Click the FIRE button to activate the ESG. The field takes a small amount<br />
of time to completely activate. During this activation period, everyone<br />
can see the field start to take shape. Once the field is complete, it will<br />
damage any unit that contacts the sphere. The amount of damage the<br />
sphere is capable of causing is based on the amount of energy in the<br />
capacitor and the radius of the sphere. The maximum amount of energy<br />
capable of being used is 5 points of power. This energy comes from the<br />
ESG capacitor.<br />
Damage<br />
The total amount of damage the ESG field can project is based on<br />
the amount of energy used and the radius of the field.<br />
137
Cross–reference the radius of the field with the amount of energy used<br />
(usually 5 points) on the following table:<br />
Radius Energy 1 pt 2 pts 3 pts 4 pts 5 pts<br />
0 4 8 12 16 20<br />
1 4 7 11 15 18<br />
2 3 7 10 13 17<br />
3 3 6 9 12 15<br />
Hellbore Interaction<br />
ESG fields and Hellbores interact in peculiar manner. See page 137 for<br />
details.<br />
MISSILES<br />
Missiles are used as secondary<br />
weapons on Klingon and Federation<br />
ships. Few ships are armed<br />
exclusively with missiles, with the<br />
notable exception of an enemy of the<br />
Lyrans thought to be lurking to the<br />
galactic north of the Lyran Star<br />
Empire.<br />
Missiles, unless used in large<br />
numbers that can overwhelm<br />
defenses, are primarily used to soak up phasers that would otherwise be<br />
shooting at you.<br />
Missile Types<br />
There are two basic types of missiles used by the galactic powers: the<br />
Type–I and the Type–IV warhead.<br />
Type–I<br />
This is the smallest offensive missile. It takes 4 points of damage to<br />
destroy a Type–I missile. If it hits, it will cause 12 points of damage.<br />
Type–IV<br />
This is a larger missile. It takes 8 points of damage to destroy and does<br />
24 points of damage on impact.<br />
Missile Speeds<br />
Missiles were originally developed with small warp engines. As time<br />
progressed, these engines were made more and more powerful and<br />
missiles became faster. Faster missiles are more expensive, but more<br />
likely to catch their target.<br />
Slow: Speed 16.<br />
Medium: Speed 24.<br />
138<br />
Fast: Speed 32.
In all games, the game era will determine what speed missiles are<br />
available.<br />
Energy Cost & Reloading<br />
Missiles require no energy to fire or reload. It takes one turn to cycle<br />
the reloading mechanism and prepare a rack to fire again.<br />
Fire One/Fire All<br />
Missiles can be set to fire one missile at a time with each click of the<br />
FIRE button. Click the FIRE ONE button and it will toggle to the FIRE ALL<br />
button. In this mode, all ready missiles will be fired with a click of the<br />
FIRE button.<br />
Guidance & Control<br />
Missiles are guided to their target by launching ships. Computers<br />
onboard the missiles are too small to avoid being “spoofed” by enemy<br />
counter–electronics. The high–speed warp engines used by missiles also<br />
interfere with their ability to track their own targets.<br />
Most ships can only control a number of missiles equal to their sensor<br />
ability. This starts at six. If six missiles are in flight and a seventh<br />
missile is launched, then one of the first six missiles will self–destruct.<br />
Some ships have the ability to control twice the normal number of<br />
missiles. This would normally be twelve and is called “Double Missile<br />
Control.” Ships that have four or more missile launchers at the start of<br />
a mission have Double Missile Control. This ability is expensive and<br />
limited mostly to starships specifically designed to carry missiles.<br />
Missiles launched from a scatterpack shuttle (see page 124) count<br />
against the total number of missiles controllable at any one time. Since<br />
scatterpacks carry six missiles, this is usually the maximum number of<br />
missiles a ship can control unless it has Double Missile Control.<br />
CLOAKING DEVICE<br />
Most Romulan ships (and some Orion and Klingon ships) are equipped<br />
with this device, which makes detection of the ship almost impossible.<br />
However, while the ship itself cannot be seen, the effect of its cloaking<br />
field can be seen by the distortion of light from the background of stars<br />
and will give at least a general idea of where the ship is. This invisibility<br />
comes at a price: the ship cannot fire weapons while cloaked. While<br />
uncloaking, the ship is extremely vulnerable.<br />
Operation<br />
If a ship is equipped with a Cloaking Device, it can be activated in one of<br />
three places on the interface: Weapons Officer MFD, Energy<br />
Management Officer MFD, or the Sensors System MFD.<br />
The ship can either be uncloaked (not using the Cloaking Device), cloaked<br />
(invisible) or in the process of cloaking or uncloaking.<br />
139
Cloaked<br />
The ship is nearly invisible, making it very difficult to see. All weapon fire<br />
at the cloaked ship suffers a penalty in terms of both to–hit chance and<br />
damage. The closer the firing ship, the more likely damage will occur.<br />
The cloaked ship cannot use fire control and cannot fire any weapons. It<br />
also cannot use transporters or tractor beams. It can, however, drop<br />
mines out of the shuttle bay hatches (very useful). The cloaked ship can<br />
launch Wild Weasel shuttles, but not other types of shuttlecraft. A ship<br />
cannot use Erratic Maneuvering and a Cloaking Device at the same time.<br />
Cloaking works against both direct–fire and seeking weapons.<br />
Uncloaking<br />
This is a dangerous time for the cloaking ship. It cannot use its weapons<br />
and slowly loses the benefits of the Cloaking Device. When completely<br />
uncloaked, the fire control will automatically come back up and the ship<br />
may once again fire weapons and use all of its systems.<br />
Cloaking<br />
As soon as the Cloaking Device is activated, the ship loses fire control<br />
and cannot fire weapons. The tractor and transporter systems cannot<br />
be used. The cloaking ship does not immediately get the full effect of the<br />
cloak until a few moments have passed.<br />
Energy Cost<br />
The energy cost to maintain a cloaking field is substantial. The exact<br />
amount of energy depends on the type of ship. Some ships are easier to<br />
cloak than others are, and will cost less energy to cloak. The amount of<br />
energy required to cloak is displayed on the SPECIFICATIONS screen in the<br />
Vessel Library.<br />
140<br />
The Romulan Cloaking Device in action.
Cloaking Weaknesses<br />
The cloaked ship must move slower than it normally would. Moving too<br />
quickly will allow enemy ships to gain a lock–on and fire regardless of the<br />
Cloaking Device.<br />
Cloaked ships are also vulnerable to the explosions (t–bombs, mines and<br />
other exploding ships). These explosions can “flash” the cloaked ship and<br />
make it temporarily visible on enemy scanners.<br />
The Lyran ESG is very effective against the Cloaking Device. Since the<br />
ESG applies damage to an area of space, it doesn’t matter if a ship is<br />
cloaked or not. It will take damage from the ESG field and it will become<br />
exposed temporarily to enemy fire control lock–ons.<br />
Normally, ships cannot tractor a cloaked ship since that requires very<br />
sensitive control. If a cloaked ship is exposed by an explosion, an ESG or<br />
by moving too fast, it may be tractored. This is bad for the cloaked ship.<br />
141
TERR@IN<br />
Space is vast. The majority of space<br />
is just that – open space. However,<br />
combat in Starfleet Command usually<br />
revolves around something of<br />
importance. This is usually in an area<br />
of space that is not completely open.<br />
This is called terrain.<br />
Asteroids<br />
Probably the most common of all<br />
space terrain, asteroids have three<br />
simple rules:<br />
1. Don’t run into them.<br />
2. They are often surrounded by smaller particles, these are known as<br />
Dust Clouds. See below.<br />
3. They block line of sight. If a ship moves behind an asteroid, you will<br />
lose tracking and will not be able to fire at it. Asteroids block<br />
weapons fire. It is impossible to destroy an asteroid.<br />
Suns<br />
A sun is a gaseous body. There is a nuclear reaction happening in a sun<br />
that generates light, heat, and radiation. Do not approach a sun too<br />
closely, or your ship will take heat and radiation damage.<br />
Suns start to damage ships and units at range 60. They do moderate<br />
damage at range 30. If you get within range 20, it will most likely be<br />
fatal.<br />
Planets<br />
Planets are large. Like asteroids,<br />
they also have fairly simple rules:<br />
1. Don’t run into them, either. It<br />
won’t do you or the planet any<br />
good.<br />
2. Planets also block line of sight,<br />
just like asteroids. Except<br />
planets are bigger and they have<br />
more lines to block. Planets<br />
also block weapons fire. You<br />
may target and fire on planets.<br />
Most races will consider this a bad thing to do, especially if the<br />
planet is inhabited.<br />
3. Inhabited planets may have defenses. It is not uncommon to see<br />
defensive weapon batteries on the planetary surface and/or<br />
defensive satellites in orbit. Some planets are even orbited by a<br />
base.<br />
142
Nebulas<br />
A Nebula is a large gas cloud; perhaps the very earliest version of a<br />
proto–star will come out of a Nebula. These areas are highly charged<br />
with electrical power that interferes with a ship’s sensors.<br />
1. All units have 9 points of natural ECM, in addition to any other<br />
source of ECM.<br />
2. Shields operate at minimal levels only. Shield reinforcement is a<br />
maximum 5 points total.<br />
3. Fighters and shuttles are destroyed if launched.<br />
4. Wild Weasels are destroyed before they begin to function.<br />
5. Missiles take damage as they fly towards their target.<br />
6. Plasma Torpedoes also take damage and lose some of their<br />
effectiveness.<br />
7. These systems are disabled:<br />
a. Tractor Beams<br />
b. Transporters<br />
c. Cloaking Devices<br />
d. ESGs<br />
e. Mines<br />
f. Probes<br />
8. Normal tac intel range is reduced to 50%.<br />
9. The effect of Deep Scan is halved.<br />
Dust Clouds<br />
Even if space is open, it is not truly empty. There may only be one<br />
particle of matter for every cubic meter. A dust cloud region has many<br />
hundreds of thousands of times of that amount of material. There is<br />
enough dust and debris that even mighty starships, with their deflection<br />
screens, can still be damaged by the smallest of particles.<br />
The faster a ship is going when it enters a dust cloud, the more likely it<br />
is to take damage. As long as the ship is moving through a dust cloud at<br />
high speeds, it is potentially vulnerable to this.<br />
Black Holes<br />
Black Holes are the most unusual of the space terrain. A Black Hole,<br />
also known as a singularity or a hypermass, is an incredibly dense body.<br />
It is so dense that even light cannot escape its gravitational pull, thus the<br />
term Black Hole. Black Holes do one thing, but they do it very well:<br />
anything that gets close to a Black Hole is attracted to the singularity.<br />
The closer you get to the Black Hole, the more powerful the attraction.<br />
If a ship gets too close to a Black Hole, it will be destroyed.<br />
Black Holes affect seeking weapons as well. The area of space around a<br />
Black Hole is stressed and can have a negative effect on other<br />
systems.<br />
143
T@CTIC@L @DVICE FOR<br />
YOUNG ST@RSHIP C@PT@INS<br />
Being a starship’s Captain is not an easy profession. It will take<br />
experience and skill to master the Captain’s chair.<br />
When you start a mission, you should go to Red Alert. This will power<br />
your weapons and raise your shields. Without exception, it is better to<br />
be ready for danger than surprised by it. If you are playing a multiplayer<br />
game with respawning ships, don’t forget this tip after the first respawn...<br />
A successful Captain will learn the power curve of his starship: how fast<br />
can he go while charging weapons and how to use necessary systems.<br />
Power management will be your most difficult task to learn and it is best<br />
to start mastering this skill early. You can adjust the phaser capacitor<br />
recharge rate to decrease the energy draw of the phasers. The single<br />
largest energy charge will be either your movement or the weapons. You<br />
will often have to balance the need to go faster with the need to shoot<br />
something when you approach your destination.<br />
The tricky systems that must be learned are: mines and t–bombs,<br />
electronic warfare (ECM and ECCM), and the High Energy Turn. All of<br />
these systems have both defensive and offensive uses. All of them<br />
require proper timing.<br />
Remember to use your auxiliary systems: transporters, tractors, and<br />
shuttles. The little details can make a big difference.<br />
Each race has different tactics which are primarily determined through<br />
their available weapons. Examine the weapon range brackets for their<br />
average to–hit chance and average damage caused. Fight from a range<br />
to your target that will benefit your race. Learn the other races’ assets<br />
and limitations so you can fight outside their effective range or know to<br />
close the distance when required. Besides their weaponry, the different<br />
races have different shielding and internal systems.<br />
Concentration of fire is important, try and cause as much damage to a<br />
single shield as possible. In return, spreading the enemy’s return fire<br />
around as many of your shields as possible is important as well. The first<br />
person to do internal damage will hold the advantage. Holding your fire to<br />
get through a downed shield requires patience.<br />
One last thing: speed is life.<br />
144
CREDITS<br />
INTERPL@Y PRODUCTIONS<br />
Lead Designer<br />
Erik Bethke<br />
Senior Designer<br />
Chris Taylor<br />
Art Director<br />
Scott Bieser<br />
Lead Artist<br />
Adam Rote<br />
AI Programming<br />
Zachary Drummond<br />
Scripting Engine<br />
Dave Boulanger<br />
Special Effects<br />
Sean Dumas<br />
Mission Scripting<br />
Lance Watanabe<br />
Campaign Mission Design<br />
Scott Bennie<br />
Senior Artist<br />
David Potter<br />
Artists<br />
Michael Blumenthol<br />
Tim Kuder<br />
Marc Bergo<br />
Kelly Wine<br />
Mike McCarthy<br />
“3”<br />
Mike Harris<br />
3–D Ship Models<br />
Perry Scalf<br />
Regalado Christopher<br />
Salazar Manuel<br />
Arlene Somers<br />
QUICKSILVER SOFTW@RE, INC.<br />
Lead Programmer<br />
Marc Hertogh<br />
Senior Technical Lead<br />
Michael Donovan Mandap<br />
Networking Programmer<br />
Tung Mei "Rita" Liu<br />
Interface Programmers<br />
Stephen Roney<br />
Tung Mei "Rita" Liu<br />
Sound Programmer<br />
Otmar Schlunk<br />
Game Design<br />
Marc Hertogh<br />
Tom Hughes<br />
Additional Design<br />
Otmar Schlunk<br />
Gary Graeper<br />
William Fisher<br />
SFB Consultant<br />
Tom Hughes<br />
Engine Programmers<br />
George Shackelford<br />
Rob Barris<br />
Greg Marsters<br />
Special Tools<br />
Brian MacDonald<br />
Technical Writer<br />
Nancy Berman<br />
Animated Quicksilver Logo<br />
Rantz A. Hoseley<br />
Quicksilver Web Site<br />
Debra Hilton 145
INTERPL@Y PRODUCTIONS<br />
Web<br />
Patrick D’Arcy<br />
Press Manager<br />
Heather McLaughlin<br />
Marketing Manager<br />
Debbie Howell<br />
Traffic Manager<br />
Paul Naftalis<br />
Line Producer<br />
Warren Schultz<br />
QUICKSILVER SOFTW@RE, INC.<br />
Technical Consultant<br />
David Steffen<br />
Production Assistant<br />
Sarah McKinley Oakes<br />
Star Trek Consultant<br />
Ralph Miller<br />
Producer<br />
Gary Graeper<br />
President<br />
William Fisher<br />
Producer<br />
Erik Bethke<br />
Division Director<br />
Brian Christian<br />
Executive Producer<br />
Trish Wright<br />
CEO<br />
Brian Fargo<br />
Lead Sound Designer<br />
Adam Levenson<br />
Sound Design<br />
Tim Walston (EFX)<br />
Charles Deenen<br />
Shannon Mills<br />
Jeff Witchers (EFX)<br />
INTERPL@Y @UDIO<br />
VO Talent<br />
George Takei<br />
Kevin Michael Richerdson<br />
Michael Bell<br />
Wayne Grace<br />
Music by<br />
Ron Jones Productions<br />
Mastering by<br />
Craig Duman<br />
Voice Editing by<br />
Stephen Miller<br />
146<br />
VO Direction/Supervision<br />
Chris Borders<br />
Music Supervision<br />
Sean Dumas<br />
Rick Jackson<br />
Audio Administrator<br />
Gloria Soto
Re–Recording Mixer &<br />
Audio Director<br />
Charles Deenen<br />
Mixed in<br />
at Interplay<br />
Video Services<br />
Dan Williams<br />
Dave Cravens<br />
Bill Stoudt<br />
INTERPL@Y QU@LITY<br />
@SSUR@NCE<br />
Admiral<br />
Jeremy S. Barnes<br />
Vice Admiral<br />
Mikey "Ghibli" Motoda<br />
Rear Admiral<br />
Greg "Moose" Baumeister<br />
Commodore<br />
Monica Vallejo<br />
Captain<br />
David "Tiberius" Simon<br />
Chief Steward<br />
Dubs<br />
Communications Officer<br />
Larry "EQHura" Smith<br />
Helmsman<br />
Danny "Sancho" Martinez<br />
Chief Medical Officer<br />
Dr. Charlie "Bones" Gale<br />
Science Officer<br />
Gary "Home Brew" Tesdall<br />
®<br />
Weapons Officer<br />
Rafael "Tribble Trainer" Lopez<br />
Green Orion Animal Woman<br />
Shanna Takayama<br />
Chief Engineer<br />
Darrel "I Don't Care" Jones<br />
Lieutenants<br />
Cory "Faerl" Nelson<br />
Jeremy "RayZor" Ray<br />
Doug "Thor" Finch<br />
Lieutenants, Junior Grade<br />
Ed Hyland<br />
Rob "Sassypants" Giampa<br />
Amy "Schlamma" Presnell<br />
Ensigns<br />
John "Psy" Kirkland<br />
Kevin "Daulton" Osburn<br />
Jay "Pancake" Nielsen<br />
Asher "Tattoo" Luisi<br />
John "Diablo" Palmero<br />
Eric "Dev Button" Chung<br />
Dan "The Humongous" Levin<br />
Ed "Berserker" Kang<br />
Ishmael "Ishtar" Quijano<br />
Tony "Wardog" Piccoli<br />
GJ "Mofs" Ramirez<br />
Tim "Cthulhu" Anderson<br />
Harold "Dragonball" Kim<br />
Mark "Noodles" Holtzclaw<br />
Amy Avery<br />
Sean "Darkman" Johnson<br />
Brad "Bushwhacker" Dutton<br />
Cadets<br />
John Parker<br />
David Parkyn<br />
Derek Gibbs<br />
Josh Walters<br />
147
MONDO MEDI@<br />
Philo Northrup – Producer<br />
Mark Giambruno – Art Director<br />
Liz Stuart – Producer<br />
Richard Fong – Lead Artist<br />
Leila Noorani – modeling, mapping,<br />
design<br />
Johannes Huber – modeling,<br />
mapping<br />
Cody Chancellor – mapping, design<br />
Luis Castro – mapping<br />
Johnny Harrup – design<br />
Eric Ronay – modeling, mapping<br />
P@R@MOUNT PICTURES<br />
Juliet Dutton – Director, Interactive<br />
Product Development<br />
Harry Lang – Manager, Interactive<br />
Product Development<br />
Dan Curry –<br />
Box Cover Art Direction<br />
Brandon MacDougall –<br />
Box Cover Art<br />
@DB, INC.<br />
Stephen V. Cole, PE – Star Fleet<br />
Battles Game Design<br />
Steven P. Petrick – Star Fleet<br />
Battles Executive Developer<br />
MPL@YER.COM<br />
Joshua “Jinxx” Morris – Internet<br />
Gaming Consultant<br />
Edmond L. Meinfelder III – Mplayer<br />
software engineer<br />
Rich Rice – Content Engineer<br />
Adam Schricker – Service Engineer<br />
SPECI@L TH@NKS TO<br />
Beth Wershba – Editor<br />
The SFC Beta Testers<br />
Bradley Barr<br />
Mark Mean<br />
YnrohKeeg<br />
Matt Reynolds<br />
Geoff Conn<br />
Brian Downer<br />
Jim Pierce<br />
Jason Bowman<br />
Merlin<br />
Chris Goff<br />
Lee Contini<br />
Russ Khater<br />
Fletch<br />
Bradley B Upson II<br />
Bill Moore<br />
Andrew Harding<br />
Commodore Rook<br />
John Kim<br />
And to all the other beta testers<br />
and posters on the Starfleet<br />
Command forum<br />
In memory of DeForest Kelley &<br />
Robert Berzins<br />
@DDITION@L ST@R FLEET<br />
B@TTLES CREDITS<br />
Jim Curtis – Lyran Creator<br />
Andrew Robinson – Hydran<br />
Creator<br />
148
TECHNIC@L SUPPORT<br />
TROUBLESHOOTING DOCUMENTS ONLINE!<br />
Interplay Productions Technical Support now offers troubleshooting guides<br />
with complete installation and setup instructions as well as information<br />
that will help you overcome the most common difficulties. If you have<br />
access to the World Wide Web, you can find these at<br />
www.interplay.com/support/<br />
Here you will find troubleshooting information on as well as information<br />
on regular system maintenance and performance.<br />
DirectX<br />
www.interplay.com/support/directx/<br />
Joysticks<br />
www.interplay.com/support/joystick/<br />
Modems and Networks<br />
www.interplay.com/support/modem/<br />
(For game–specific information and additional troubleshooting, visit our<br />
main page at www.interplay.com)<br />
If you have questions about the program, our Technical Support<br />
Department can help. Our web site contains up–to–date information on<br />
the most common difficulties with our products, and this information is<br />
the same as that used by our product support technicians. We keep the<br />
product support pages updated on a regular basis, so please check here<br />
first for no–wait solutions:<br />
www.interplay.com/support/<br />
If you are unable to find the information you need on our web site, please<br />
feel free to contact Technical Support via e–mail, phone, fax, or letter.<br />
Please be sure to include the following information in your e–mail<br />
message, fax, or letter:<br />
• Title of Game<br />
• Computer manufacturer<br />
• Operating system (Windows 95, DOS 6.22, etc.)<br />
• CPU type and speed in MHz<br />
• Amount of RAM<br />
• Sound card type and settings (address, IRQ, DMA)<br />
• Video card<br />
• CD–ROM<br />
• Mouse driver and version<br />
• Joystick and game card (if any)<br />
• A copy of the CONFIG.SYS and AUTOEXEC.BAT files from<br />
your hard drive<br />
149<br />
• A description of the problem you're having
If you need to talk to someone immediately, call us at (949) 553–6678<br />
Monday through Friday between 8:00AM–5: 45PM, Pacific Standard<br />
Time with 24 hours, 7 days a week support available through the use of<br />
our automated wizard. Please have the above information ready when<br />
you call. This will help us answer your question in the shortest possible<br />
time. When you call you will initially be connected with our automated<br />
wizard. For information pertaining to your specific title, press "1" on the<br />
main menu and listen carefully to all prompts. All titles are listed<br />
alphabetically. After you have selected your title, the most common<br />
difficulties will be listed. If the difficulty you are having is not listed or you<br />
need additional assistance, you may press "0" on your games main menu,<br />
and you will be transferred to a Technical Support Representative. No<br />
hints or codes are available from this line. You must call Interplay’s HINT<br />
Line for hints, tips, or codes at 1–900–370–PLAY (1–900–451–6869<br />
$1.25 in Canada only). You must be 18 years +, have a touch–tone<br />
phone, and the cost is $0.95 per minute.<br />
Interplay Productions Support Fax: (949) 252–2820<br />
Interplay Productions Technical Support<br />
16815 Von Karman Avenue • Irvine, CA • 92606<br />
HOW TO REACH US ONLINE<br />
INTERNET E–MAIL: support@interplay.com<br />
WORLD WIDE WEB: www.interplay.com<br />
FTP: ftp.interplay.com<br />
HINT LINE<br />
Stumped?!?! Frustrated?? Stuck?? Or do you just want<br />
to know the latest codes and tricks for this and many<br />
other Interplay titles?? Well, look no further because<br />
the solution for all these problems is just a phone call<br />
away. Pick up the phone and call the Interplay Hintline<br />
at 1.900.370.PLAY.<br />
You can call this line 24 hours a day, 7 days a week.<br />
And best of all, it only costs 95¢ a minute, with all long<br />
distance charges included in that price…. you can’t beat that for a great<br />
deal. Remember, you must be over 18 or have your parent’s permission<br />
to call the hintline. You must have a touch–tone phone. This service is<br />
only available in the U.S. Charges and information are subject to change<br />
without notice.<br />
150
LIMITED W@RR@NTY<br />
INTERPLAY LIMITED 90–DAY WARRANTY<br />
Interplay warrants to the original purchaser of this Interplay<br />
Productions product that the compact disc or floppy disk(s) on which<br />
the software programs are recorded will be free from defects in material<br />
and workmanship for 90 days from the date of purchase. If the compact<br />
disc or floppy disk(s) is found defective within 90 days of original<br />
purchase, Interplay agrees to replace, free of charge, any product<br />
discovered to be defective within such period upon receipt at its factory<br />
service center of the product, postage paid, with proof of the date of<br />
purchase. This warranty is limited to the compact disc or floppy disk(s)<br />
containing the software program originally provided by Interplay and is not<br />
applicable to normal wear and tear. This shall be void if the defect has<br />
arisen through abuse, mistreatment, or neglect. Any implied warranties<br />
applicable to this product, including warranties of merchantability and<br />
fitness for a particular purpose are disclaimed. Interplay disclaims all<br />
responsibility for incidental or consequential damages.<br />
Some states do not allow limitations as to how long an implied warranty<br />
lasts and/or exclusions or limitations of incidental or consequential<br />
damages so the above limitations and/or exclusions or liability may not<br />
apply to you. This warranty gives you specific rights, and you may also<br />
have other rights which vary from state to state.<br />
LIMITED WARRANTY<br />
If the compact disc or floppy disk(s) should fail after the original 90–day<br />
warranty period has expired, you may return the software program to<br />
Interplay at the address noted below with a check or money order for<br />
$ 5.00 (U.S. currency), which includes postage and handling, and<br />
Interplay will mail a replacement to you. To receive a replacement, you<br />
need to enclose the original defective compact disc or floppy disk(s) in<br />
protective packaging accompanied by: (1) a $ 5.00 check or money<br />
order, (2) a brief statement describing the defect, and (3) your return<br />
address. If you have a problem with your software, you may wish to call<br />
us first at (949) 553–6678. If your compact disc is defective and a<br />
replacement is necessary, U.P.S. or registered mail is recommended for<br />
returns. Please send the defective disc(s) only (not the box) with a<br />
description of the problem and $ 5.00 to:<br />
Warranty Replacements<br />
Interplay Productions • 16815 Von Karman Avenue • Irvine, CA 92606<br />
COPYING PROHIBITED<br />
This software product and the manual are copyrighted and all rights are<br />
reserved by Interplay Productions and are protected by the copyright<br />
laws that pertain to computer software. You may not copy the software.<br />
You may not loan, sell, rent, lease, give, sub license, or otherwise<br />
transfer the software (or any copy). You may not modify, adapt,<br />
translate, create derivative works, decompile, disassemble, or<br />
otherwise reverse engineer or derive source code from all or any 151
portion of the software or anything incorporated therein or permit or<br />
encourage any third party to do so.<br />
Notice: Interplay reserves the right to make modifications or<br />
improvements to the product described in the manual at any time and<br />
without notice.<br />
SOFTWARE USE LIMITATIONS AND LIMITED LICENSE<br />
This copy of STARFLEET COMMAND (the Software) is intended solely for<br />
your personal noncommercial home entertainment use. You may not<br />
decompile, reverse engineer, or disassemble the Software, except as<br />
permitted by law. Interplay Productions retains all right, title and interest<br />
in the Software including all intellectual property rights embodied therein<br />
and derivatives thereof. The Software, including, without limitation, all<br />
code, data structures, characters, images, sounds, text, screens, game<br />
play, derivative works and all other elements of the Software may not be<br />
copied, resold, rented, leased, distributed (electronically or otherwise),<br />
used on pay–per–play, coin–op or other for–charge basis, or for any<br />
commercial purpose. Any permissions granted herein are provided on a<br />
temporary basis and can be withdrawn by Interplay Productions at any<br />
time. All rights not expressly granted are reserved.<br />
Modem and Network Play: If the Software contains modem or network<br />
play, you may play the Software via modem transmission with another<br />
person or persons directly without transmission through a third party<br />
service or indirectly through a third party service only if such service is an<br />
authorized licensee of Interplay. For the purposes of this license, a third<br />
party service refers to any third party service which provides a connection<br />
between two or more users of the Software, manages, organizes, or<br />
facilitates game play, translates protocols, or otherwise provides a service<br />
which commercially exploits the Software, but does not include a third<br />
party service which merely provides a telephonic connection (and nothing<br />
more) for modem or network play. Authorized licensee services are listed<br />
on the Interplay Productions World Wide Web Site located at<br />
http://www.interplay.com. This limited right to transmit the Software<br />
expressly excludes any transmission of the Software or any data streams<br />
thereof on a commercial basis, including, without limitation, transmitting<br />
the Software by way of a commercial service (excepting those specific<br />
commercial services licensed by Interplay) which translates the protocols<br />
or manages or organizes game play sessions. If you would like information<br />
about obtaining a pay–for–play or commercial license to the Software,<br />
please call Interplay Productions in the US at (949) 553–6655.<br />
Acceptance of License Terms: By acquiring and retaining this Software,<br />
you assent to the terms and restrictions of this limited license. If you do<br />
not accept the terms of this limited license, you must return the Software<br />
together with all packaging, manuals and other material contained therein<br />
to the store where you acquired the Software for a full refund.<br />
152
GLOSS@RY OF TERMS @ND @CRONYMS<br />
The following is a list of common terms and acronyms found in Starfleet<br />
Command.<br />
ADB<br />
Alpha Strike<br />
Anchor<br />
APR<br />
AWR<br />
BB<br />
BC<br />
BCH<br />
BPV<br />
Breakdown<br />
CA<br />
CL<br />
DD<br />
Dis<br />
Amarillo Design Bureau: The company that designs and<br />
produces SFB.<br />
Firing all weapons in one big burst. The most likely<br />
attack to break a shield and cause internal damage.<br />
Using tractor beams to hold a target. Usually<br />
combined with “crunch” weapons, like Plasma, Missiles<br />
or Photons.<br />
Auxiliary Power Reactor: A nuclear reactor that<br />
provides power to the ship’s systems. After warp and<br />
impulse engines, APR provide most of the ship’s power.<br />
Auxiliary Warp Reactor: An improved nuclear reactor<br />
that provides warp energy.<br />
Battleship: The largest warships ever built. They are<br />
extremely rare.<br />
Battlecruisers: Ships between heavy cruisers and<br />
dreadnoughts. Cheaper to build than a dreadnought<br />
and nearly as powerful.<br />
Heavy Battlecruiser: An improved and more powerful<br />
version of the battlecruiser.<br />
Basic Point Value: a number that is used to numerically<br />
compare the worth of various objects against each<br />
other. Starships have a BPV that helps you determine<br />
how powerful they are.<br />
A sudden crash or other calamitous event for a<br />
starship that temporarily disables the ship.<br />
Heavy Cruiser: The mainstay of the naval forces. The<br />
heavy cruiser can perform any of the tasks assigned,<br />
but is usually a serious commitment in time and money<br />
to build.<br />
Light Cruiser: A less powerful cruiser, they are often<br />
found in fleet situations. They take nearly as long to<br />
build as a heavy cruiser.<br />
Destroyer: A ship with abilities between that of frigates<br />
and light cruisers. Often elements of fleets. They are<br />
not powerful enough to defend themselves against the<br />
most common solitary warships, but too expensive to<br />
be used in the role of a frigate.<br />
Disruptor: A heavy weapon used by Klingons and<br />
Lyrans.<br />
153
DN<br />
DW<br />
ECCM<br />
ECM<br />
ED<br />
EM<br />
Empire<br />
ESG<br />
EW<br />
FF<br />
Fus<br />
H&R<br />
HB<br />
HET<br />
HUD<br />
MFD<br />
154<br />
Dreadnought: The most common of the very large ships.<br />
These are not designed for anything except fleet combat,<br />
and are usually mothballed during times of peace.<br />
War Destroyer: Destroyers built with improved weapons<br />
and defenses.They are not available in an early campaign.<br />
Electronic Counter–countermeasures: Software and<br />
more powerful targeting signals to reduce the effect of<br />
ECM.<br />
Electronic Countermeasures: The use of jamming<br />
signals and computer noise to fool enemy targeting<br />
computers.<br />
Emergency Deceleration: Using the ships warp engines<br />
to come to a sudden halt.<br />
Erratic Maneuvers: Small, high–speed course changes<br />
designed to throw off enemy fire at the cost of weapon<br />
accuracy and movement energy.<br />
One of the six playable empires in the game: United<br />
Federation of Planets, The Klingon Empire, The Romulan<br />
Star Empire, The Gorn Confederation, the Lyran Star<br />
Empire and the Hydran Kingdoms.<br />
Expanding Sphere Generator: A Lyran heavy weapon.<br />
Electronic Warfare: The use of ECM and ECCM.<br />
Frigate: the smallest warships commonly available. A<br />
smaller type of warship, the police ship, is not simulated<br />
in SFC.<br />
Fusion: A Hydran heavy weapon. The fusion beam is<br />
short–ranged, very powerful but very, very short–ranged.<br />
Hit and Run Raid: Marine parties that quickly beam over<br />
to an enemy ship to destroy a targeted system and<br />
then return just as quickly.<br />
Hellbore: A Hydran heavy weapon. The hellbore causes<br />
damage to all shields but concentrates damage on the<br />
weakest shield.<br />
High Energy Turn: A type of turn that uses extra energy<br />
to turn the ship far faster than it normally could. This<br />
is very stressful and multiple HETs increase the chance<br />
of a breakdown.<br />
Heads Up Display: Information displayed where you can<br />
easily see it – in the middle of the tactical screen.<br />
Multi–Function Display: An area of the screen that can<br />
be changed to show different information or controls.<br />
In Starfleet Command, there are two MFDs of note: the<br />
Officer MFD and the System MFD.
Mizia Using short bursts of weapon fire over a longer period<br />
of time. The opposite of an Alpha Strike. Mizia attacks<br />
cause more damage to weapons and critical systems,<br />
but take longer to achieve. To Mizia, you fire one<br />
weapon, wait 1/20 of a turn, fire another weapon and<br />
repeat.<br />
Move Cost How much energy it takes to move a starship 10,000<br />
km per turn. Small ships have move costs from .25<br />
and up. Heavy Cruisers usually have a move cost of 1<br />
point of energy per 10,000 km per turn. Dreadnoughts<br />
usually have a move cost of 1.5.<br />
NCA<br />
NCL<br />
Orions<br />
Ph–1<br />
Ph–2<br />
Ph–3<br />
Ph–4<br />
Ph–G<br />
Pl–F<br />
Pl–G<br />
Pl–R<br />
Pl–S<br />
PPT<br />
Prestige<br />
Race<br />
New Heavy Cruiser: A ship nearly as capable as a<br />
heavy cruiser, but with a cost and build time similar to<br />
a light cruiser.<br />
New Light Cruiser: The next generation of light<br />
cruisers. The Federation NCL matches the firepower<br />
of the heavy cruiser and is in many ways a superior ship.<br />
Orion Pirates: A loose collection of pirate cartels that<br />
plague each of the empires in the game.<br />
Phaser, Type–1: An offensive phaser.<br />
Phaser, Type–2: An offensive/defensive phaser.<br />
Phaser, Type–3: A defensive phaser.<br />
Phaser, Type–4: A large phaser found only on bases.<br />
The most powerful phaser in the game.<br />
Phaser, Gatling: A Hydran weapon that can fire four<br />
ph–3 shots.<br />
Plasma, Type–F: The smallest plasma torpedo.<br />
Plasma, Type–G: An early medium plasma torpedo.<br />
Plasma, Type–R: The largest plasma torpedo.<br />
Plasma, Type–S: An improved version of the Type–G<br />
plasma torpedoes. Not as large as the Type–R.<br />
Pseudo Plasma Torpedo: A decoy plasma torp that can<br />
be used to fool the enemy into thinking that you are<br />
recharging your plasmas.<br />
A representation of how well the player’s character is<br />
doing. Prestige can be reputation, honor, or any<br />
number of different characteristics. The higher the<br />
prestige, the more the player’s character can do.<br />
Prestige can be spent to requisition ships, repairs,<br />
refits, and more. The lifetime prestige, the total amount<br />
of prestige earned, ignoring your purchases, is used to<br />
determine your captain’s rank.<br />
In this game (and in this manual), it is<br />
sometimes used as another word for empire. 155
Range<br />
Rank<br />
RSE<br />
SFB<br />
SFC<br />
Ship<br />
SP<br />
Speed<br />
SS<br />
ST–1<br />
ST–2<br />
ST–H<br />
Turn<br />
Turn Class<br />
UFP<br />
Unit<br />
WW<br />
156<br />
The distance from one unit to another, in 10,000 km<br />
increments. This matches the range in hexes in SFB.<br />
1.0 – 1.9 = 1 hex.<br />
Rank is the officer level. Higher ranked officers<br />
command larger ships but have more responsibility. In<br />
SFC, higher ranks allow the player more ships as well<br />
as larger ships to control.<br />
Romulan Star Empire<br />
Star Fleet Battles: A board game of starship combat<br />
set in the Star Trek universe.<br />
Starfleet Command: A computer game of tactical<br />
starship combat set in the Star Trek universe.<br />
Starship: A type of unit in the game Starfleet Command.<br />
Usually outfitted with weapons, shields, systems and<br />
engines. They don’t maneuver like fighters.<br />
Scatterpack Shuttle<br />
The distance a starship travels in one turn, in<br />
10,000 km increments. All combat in SFC takes place<br />
at sub–light speeds.<br />
Suicide Shuttle: A shuttlecraft loaded with anti–matter<br />
and they target enemies like a seeking weapon.<br />
Stinger–1 Fighter: The basic Hydran fighter.<br />
Stinger–2 Fighter: The Hydran space superiority fighter.<br />
Stinger–H Fighter: The Hellbore–armed variant of the<br />
Stinger fighter.<br />
A period of time equal to the setting of the game speed<br />
slider in the preferences panel. One turn is the<br />
standard amount of time between actions (firing a<br />
phaser, use of a transporter). Some actions can take<br />
more time (charging a plasma torpedo...) or less time<br />
(the delay before you can move again after an<br />
emergency deceleration...).<br />
A statistic that describes how good a starship is at<br />
making turns. AA is the best (fastest turns), F is the<br />
worst (the slowest turns). The faster a ship is going,<br />
the more turn class will affect the turn rate of that<br />
ship.<br />
United Federation of Planets<br />
Either a ship, shuttle, fighter, or base.<br />
Wild Weasel: A shuttlecraft modified to emit the same<br />
sensor return as the ship that launches it. It is a<br />
defensive item that will attract seeking weapons<br />
launched at the ship that the WW is pretending to be.
COMPREHENSIVE HOTKEY LIST<br />
This is a list of the default game key bindings:<br />
ESC<br />
End Mission<br />
F1<br />
Overhead Camera<br />
F2<br />
Chase Camera<br />
F3<br />
Follow Camera (Default)<br />
F4<br />
Enemy Camera<br />
F5<br />
Toggle Target Padlock<br />
F6 Jump to ship #1<br />
F7 Jump to ship #2<br />
F8 Jump to ship #3<br />
F9<br />
HUD Minimal Information<br />
F10<br />
HUD Normal Information<br />
F11<br />
HUD Maximum Information<br />
`<br />
Target Nearest Enemy<br />
1 – 4 Select Weapon Group #<br />
CTRL+ 1 – 4 Set Weapon Group #<br />
5 – 8 Select Target from Memory<br />
CTRL+ 5 – 8 Set Target to Memory<br />
9 Fleet Control Panel<br />
0 Communications Panel<br />
– Zoom In<br />
+ Zoom Out<br />
BACKSPACE Quickjump to Target Player Ship<br />
TAB<br />
Tactical Map Panel<br />
Q<br />
Launch Suicide Shuttle<br />
W<br />
Launch Wild Weasel<br />
E<br />
Launch Scatterpack<br />
R<br />
Red Alert!<br />
T<br />
Target (cycles)<br />
SHIFT – T Target (reverse order)<br />
Y<br />
Target Enemy (cycles)<br />
SHIFT – Y Target Enemy (reverse order)<br />
I<br />
Toggle Deep Scan<br />
157
O<br />
Switch Schematic Displays<br />
P<br />
Fire Probe<br />
[ Game Speed Slower<br />
] Game Speed Faster<br />
\ Deselect Target<br />
A<br />
Slow Down<br />
S<br />
Speed Up<br />
D<br />
Slide Interface Bar<br />
F<br />
Max ECM<br />
G<br />
Max ECCM<br />
H<br />
Sensors Panel (ECM and ECCM)<br />
J<br />
Tractor Panel<br />
K<br />
Shield Panel<br />
L<br />
Defense Panel<br />
; Repair Panel<br />
‘ Helm Panel<br />
ENTER Chat Toggle<br />
CTRL – ENTER Chat Toggle (Team Message)<br />
Z<br />
Fire (Fire one weapon on each hardpoint)<br />
SHIFT – Z Alpha Strike! (Fire all)<br />
X<br />
Toggle Cloak<br />
C<br />
Max Defensive Tractor<br />
V<br />
Max Point Defense<br />
B<br />
Transporter Bomb<br />
N<br />
Transport Panel<br />
M<br />
Drop Mine<br />
SHIFT – M Drop NSM (Romulans only)<br />
, Shuttle Panel<br />
. Energy Panel<br />
/ Preferences Panel<br />
SPACE Target Nearest Hostile Seeking Weapon<br />
PAUSE Pause & Issue Orders (single–player only)<br />
HOME Move Camera Right<br />
END<br />
Move Camera Left<br />
158
PGUP<br />
PGDN<br />
Tilt Camera Up<br />
Tilt Camera Down<br />
Number Pad<br />
1 Reinforce Aft Left Shield<br />
2 Reinforce Aft Shield<br />
3 Reinforce Aft Right Shield<br />
4 Reinforce Left Shield<br />
5 Start HET<br />
6 Reinforce Right Shield<br />
7 Reinforce Forward Left Shield<br />
8 Reinforce Forward Shield<br />
9 Reinforce Forward Right Shield<br />
0 Emergency Deceleration<br />
– Orbit Target<br />
/ Erratic Maneuvers<br />
* Follow Target<br />
Use the Options screen on the main menu to change the hotkey bindings.<br />
159
INTERPL@Y<br />
WEBSITE<br />
Welcome to the Interplay Web! As a<br />
company dedicated to providing<br />
innovative, high–quality interactive<br />
entertainment software, we are<br />
always striving to stay as close as<br />
possible to the leading edge of<br />
technology. This Web site is the<br />
latest example of our ongoing effort<br />
to provide a wealth of information<br />
and opportunities to you.<br />
As a company of fanatic gamers, we<br />
love the idea of gamers all over the<br />
world tapping into cyberspace to<br />
see, touch and feel our latest<br />
games. No hype, no marketing campaign; just great games. To make it<br />
work, our goal is to keep this site fresh and new, to make it a place<br />
where you can tell US what you like about our games... and what you<br />
don’t like about them. So use the feedback options on these pages and<br />
sound off.<br />
Enjoy your visit in our Web site, explore all the different areas we have to<br />
offer, and come back soon. Check us out in the weeks and months ahead;<br />
we will be introducing new and exciting areas for you to experience.<br />
Once again, welcome.<br />
HOW TO GET THERE<br />
Brian Fargo<br />
C.E.O.<br />
From your Internet account,<br />
point your favorite browser to:<br />
www.interplay.com<br />
Interplay’s World Wide Web site is an Internet service designed to give you the latest<br />
information about Interplay and our products. This site features our demos, upgrades,<br />
product information and ordering information.<br />
This website is not intended for technical support, but to offer new machines and the latest<br />
product information. For technical support, please contact Interplay as described in the<br />
Customer Support section.<br />
INTERPLAY WEB STORE<br />
Looking for a quick, easy way to get your favorite Interplay games? Well<br />
look no further……you can now order directly from Interplay. Just turn on<br />
your computer and go to www.interplay–store.com.<br />
This is your one–stop shop for everything Interplay. Buy the hottest new<br />
releases or maybe get a copy of that hard–to–find game that you’ve been<br />
looking for. Purchase some ultra–cool merchandise; or make a bid on a<br />
unique collectible in the Online Auction. All this, seasonal specials<br />
and much more. So don’t delay…… go to<br />
www.interplay–store.com and get shopping!!<br />
160
Ready<br />
to Take<br />
the Helm?<br />
Reach for<br />
Star Trek ® :<br />
Starfleet<br />
Command <br />
Official<br />
Strategies<br />
& Secrets <br />
from Sybex<br />
ISBN: 0-7821-2601-4<br />
SRP: $19.99<br />
This in-depth, fully authorized guide features:<br />
◆ Comprehensive walkthroughs for all campaign and<br />
skirmish missions<br />
◆ In-depth battle strategies for outmaneuvering opponents<br />
◆ Hardcore multiplayer tactics for crushing the<br />
competition<br />
◆ Detailed stats for every ship in the game<br />
Whether you’re a proud member of the<br />
Federation or a Klingon warrior, this is<br />
the one guide you’ll need to emerge<br />
victorious!<br />
www.sybex.com ®<br />
Available at<br />
bookstores, software<br />
stores, and online<br />
www.interplay.com