42-Table Saw Safety3.indd - Woodcraft Magazine
42-Table Saw Safety3.indd - Woodcraft Magazine
42-Table Saw Safety3.indd - Woodcraft Magazine

You also want an ePaper? Increase the reach of your titles
YUMPU automatically turns print PDFs into web optimized ePapers that Google loves.
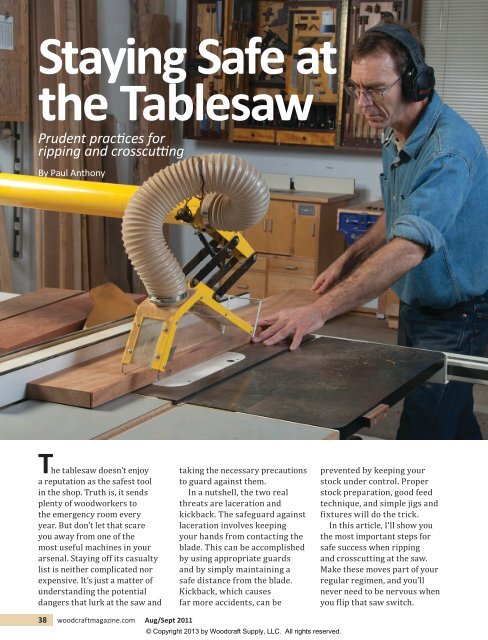
Staying Safe at<br />
the <strong>Table</strong>saw<br />
Prudent practices for<br />
ripping and crosscutting<br />
By Paul Anthony<br />
The tablesaw doesn’t enjoy<br />
a reputation as the safest tool<br />
in the shop. Truth is, it sends<br />
plenty of woodworkers to<br />
the emergency room every<br />
year. But don’t let that scare<br />
you away from one of the<br />
most useful machines in your<br />
arsenal. Staying off its casualty<br />
list is neither complicated nor<br />
expensive. It’s just a matter of<br />
understanding the potential<br />
dangers that lurk at the saw and<br />
taking the necessary precautions<br />
to guard against them.<br />
In a nutshell, the two real<br />
threats are laceration and<br />
kickback. The safeguard against<br />
laceration involves keeping<br />
your hands from contacting the<br />
blade. This can be accomplished<br />
by using appropriate guards<br />
and by simply maintaining a<br />
safe distance from the blade.<br />
Kickback, which causes<br />
far more accidents, can be<br />
prevented by keeping your<br />
stock under control. Proper<br />
stock preparation, good feed<br />
technique, and simple jigs and<br />
fixtures will do the trick.<br />
In this article, I’ll show you<br />
the most important steps for<br />
safe success when ripping<br />
and crosscutting at the saw.<br />
Make these moves part of your<br />
regular regimen, and you’ll<br />
never need to be nervous when<br />
you flip that saw switch.<br />
38 woodcraftmagazine.com Aug/Sept 2011
A<br />
Measure to the fence from a<br />
marked tooth, first at the front<br />
of the saw, and then at the rear.<br />
Prepare your saw<br />
In order for your saw to perform<br />
safely, the blade and fence must<br />
be properly aligned. <strong>Table</strong>saw<br />
tune-up is a story unto itself, but<br />
you can do a basic setup quickly<br />
and easily. First, align your rip<br />
fence to the blade. To check the<br />
alignment, raise the blade to<br />
full height and measure over to<br />
the fence from a marked tooth<br />
rotated forward (Photo A).<br />
Next, rotate the same tooth to<br />
the rear of the saw and measure<br />
again; then adjust your fence<br />
Riving Knives and Splitters<br />
to equalize the measurements.<br />
(Referencing from a single<br />
tooth removes any blade warp<br />
from the equation.) Some<br />
woodworkers angle the rear<br />
end of the fence away 1 ⁄ 32" or so<br />
for an extra margin of safety.<br />
Next, align your splitter or<br />
riving knife to the blade. With<br />
the blade still at full height, place<br />
an accurate straightedge against<br />
the right-hand side of the teeth<br />
(not the plate). Adjust the splitter<br />
or knife to align perfectly to the<br />
straightedge (Photo B).<br />
A riving knife or splitter is crucial for preventing kickback when<br />
ripping. Most new saws come equipped with a convenient riving<br />
knife, which rises, falls,<br />
and tilts with the blade<br />
and removes easily if<br />
necessary. Most older<br />
saws came equipped with<br />
a troublesome splitter/<br />
guard assembly that was<br />
often discarded by the<br />
user. If your saw is in the<br />
latter camp, get a splitter.<br />
A variety of aftermarket<br />
splitters are available for<br />
retrofitting to most saws (I<br />
A zero-clearance throat plate can<br />
easily be outfitted with a shop-made<br />
splitter of wood or aluminum angle.<br />
B<br />
Using a straightedge, align the<br />
splitter (or riving knife) to the righthand<br />
sides of the blade teeth.<br />
use the Biesemeyer model).<br />
Alternatively, you can make<br />
your own, fitting it to a<br />
zero-clearance throat plate.<br />
Cardinal<br />
Safety Rules<br />
If you read nothing else, read<br />
this. Some rules can be bent,<br />
others are made to be broken,<br />
but disobeying one of these<br />
may earn you a trip to the ER.<br />
• Do not wear loose clothing<br />
or jewelry at the saw,<br />
and tie back long hair.<br />
• Always wear eye and<br />
ear protection.<br />
• Never put your body<br />
or hands in front of the<br />
blade or behind it.<br />
• Don’t saw when drunk,<br />
drugged, tired or even<br />
distracted at the saw.<br />
• For general sawing, adjust<br />
the blade to project no<br />
more than about 3 ⁄8"<br />
above the workpiece.<br />
• When ripping, use a<br />
pushstick to keep your<br />
hands a safe distance<br />
from the blade.<br />
• Do not rip without using<br />
a riving knife, splitter,<br />
featherboard, or other<br />
device to keep the<br />
workpiece against the<br />
fence throughout the cut.<br />
• Never cut freehand<br />
without a fence, miter<br />
gauge, or other guide,<br />
and never grab the offcut<br />
while it’s being sawn.<br />
• If you suspect that a<br />
particular operation may<br />
be unsafe, it probably is. If<br />
you can’t provide for safety<br />
measures at the tablesaw,<br />
use a different tool.<br />
Photos: Paul Anthony Aug/Sept 2011 woodcraftmagazine.com 39
9"<br />
5"<br />
3"<br />
C<br />
Rip the sole straight before shaping<br />
the pushstick. Complete the cut at<br />
the heel using a jigsaw or bandsaw.<br />
This ensures that stock is<br />
held to the fence when ripping<br />
and eliminates the chance<br />
of kickback once the board<br />
contacts the splitter or knife.<br />
Make sure your blade guard is<br />
in place and operating smoothly.<br />
Yes, I know a guard can get in<br />
the way when cutting narrow or<br />
small pieces, so you’re going to<br />
remove it at times. Nonetheless,<br />
use it whenever you possibly<br />
can. If you’ve “lost” your original<br />
guard, various aftermarket<br />
models can be retrofitted to most<br />
saws (see the opening photo).<br />
D<br />
When ripping, stand to the<br />
left of the blade with your legs<br />
splayed for good footing.<br />
Prepare your stock<br />
Trying to guide a crooked edge<br />
against the rip fence invites<br />
kickback. Similarly, struggling<br />
to hold a crooked edge against<br />
a miter gauge or crosscut sled<br />
fence can cause a workpiece<br />
to jump when it hits the blade.<br />
To prevent this, joint and plane<br />
stock straight and flat before<br />
bringing it to the saw. Also<br />
inspect your stock for solidity<br />
before sawing. Don’t cut through<br />
loose knots or deep cracks, which<br />
can cause parts of a board to<br />
suddenly break free mid-cut.<br />
Safe ripping basics<br />
Safe ripping requires a suitable<br />
pushstick, sure-footed balance,<br />
and a smooth, deliberate feed<br />
technique. For best control, use a<br />
“shoe-style” pushstick (Photo C).<br />
Its long sole helps hold a<br />
workpiece against the table, while<br />
its heel pushes the work forward.<br />
I make my own pushsticks from<br />
1⁄ 2"- and 1 ⁄ 4"-thick plywood, using<br />
the latter for ripping narrow<br />
stock. Make sure the sole is<br />
dead-straight for good contact<br />
with the workpiece. (Attaching<br />
a strip of 150-grit sandpaper<br />
helps for applying sideways<br />
pressure against the fence.) When<br />
sawing, keep the pushstick at<br />
the ready for easy retrieval.<br />
Make sure to use an outfeed<br />
table or other support to prevent<br />
workpieces from tipping up at<br />
the trailing end and/or crashing<br />
to the floor as you complete the<br />
cut. If using a friend as a receiver,<br />
have him support the board<br />
palms-up only, never pulling on it.<br />
To rip, stand to the left of the<br />
blade with your legs splayed<br />
roughly parallel to it and your<br />
torso facing the fence (Photo D).<br />
Turn on the saw, and lay the board<br />
Understanding Kickback<br />
So what causes kickback? It’s<br />
really pretty simple: It’s the<br />
rising rear saw teeth grabbing<br />
the edge of the board and<br />
hurling it upward and backward<br />
at fierce speeds. When ripping,<br />
the feed force encounters<br />
diagonal resistance from the<br />
blade, causing the board to<br />
rotate toward the rear teeth,<br />
instigating the problem. The<br />
fix? Use a properly aligned<br />
splitter or riving knife to keep<br />
the stock against the fence and<br />
away from the rear teeth.<br />
The<br />
Principle:<br />
Pushing<br />
against<br />
opposing<br />
corners<br />
causes<br />
board to<br />
rotate.<br />
Spinning<br />
blade<br />
Resistance<br />
from blade<br />
Kickback<br />
Rotational force<br />
drives board<br />
against rising<br />
rear teeth,<br />
which lift and<br />
throw board.<br />
40 woodcraftmagazine.com Aug/Sept 2011<br />
Feed force
on the table against the fence<br />
with its leading edge a few<br />
inches from the blade. Make<br />
sure the leading edge is flat on<br />
the table to prevent the blade<br />
from slapping it downward.<br />
With your left hand pressing<br />
the board against the fence<br />
and downward onto the table,<br />
put your right hand against<br />
the trailing end. (With a long<br />
board, grab the right-hand edge<br />
of the board instead, reaching<br />
as far back as you comfortably<br />
can.) Feed the board steadily<br />
forward into the spinning blade<br />
(Photo E). When the trailing end<br />
of the board is completely on<br />
the table, bring your pushstick<br />
into play while maintaining<br />
sideways pressure with your<br />
left hand (Photo F). As the<br />
cut nears completion, retract<br />
your left hand and continue<br />
feeding until the pushstick is<br />
past the splitter (Photo G).<br />
Featherboards<br />
A featherboard can be used<br />
instead of your hand to hold<br />
stock against the fence. Its<br />
flexible fingers are set at about a<br />
30° angle to allow easy feeding<br />
Featherboards<br />
Safe Ripping<br />
E<br />
G<br />
while impeding rearward<br />
motion. A featherboard is<br />
pretty good insurance against<br />
kickback but it’s no substitute<br />
for a properly aligned splitter<br />
or riving knife. That’s because<br />
F<br />
With your pushstick at the ready<br />
and the board flat on the table,<br />
feed with steady, even force<br />
while maintaining downward and<br />
sideways pressure with your left<br />
hand. When the trailing end of<br />
the board is on the table, switch<br />
to the pushstick for feeding,<br />
while keeping your left hand a<br />
safe distance from the blade.<br />
a featherboard can’t be located<br />
aft of the blade where it would<br />
pinch against the kerf. A<br />
featherboard can be mounted<br />
in the table slots (Photo H) or<br />
clamped to the table (Photo I).<br />
H<br />
When setting up a featherboard, press it firmly against<br />
the stock in front of the blade, and lock or clamp<br />
it in place. A slot-mounted unit is easiest to set.<br />
I<br />
Illustrations: Heather Lambert<br />
Aug/Sept 2011 woodcraftmagazine.com 41
J<br />
A miter gauge fence that reaches to the blade allows<br />
easy cutline setup with the end of the fence.<br />
K<br />
A crosscut sled handles long boards and panels that<br />
would teeter dangerously against a small miter gauge.<br />
Safe crosscutting basics<br />
Crosscutting isn’t as potentially<br />
dicey as ripping, but offcuts<br />
can still be kicked back at you<br />
and a workpiece can be twisted<br />
out of your hands if you aren’t<br />
careful. The best precautions<br />
you can take are to maintain<br />
firm control of the workpiece,<br />
keep your hands out of the path<br />
of the blade, and avoid pinching<br />
the offcut between the blade<br />
and a stop of any sort. As with<br />
ripping, it’s crucial that a piece<br />
to be crosscut is first dressed<br />
straight and flat. Finally, don’t<br />
allow offcuts to build up on the<br />
saw table. Vibration can cause<br />
them to wander into the spinning<br />
Crosscutting Panels<br />
Using the Rip Fence<br />
In general, it’s a bad idea to<br />
crosscut a panel that’s wider<br />
than it is long. A wide panel<br />
can accidentally tip into the<br />
blade, inviting kickback. If you<br />
must do it, make sure to use<br />
a splitter, and carefully feed<br />
both sections forward from<br />
their centers at a consistent<br />
feed rate while standing<br />
to the left of the blade.<br />
blade, hurling them at you. But<br />
don’t try to clear them away with<br />
the saw running. You don’t want<br />
to catch your hand, pushstick, or<br />
bench brush on a spinning blade.<br />
Crosscutting with<br />
a miter gauge<br />
<strong>Table</strong>saws come with a miter<br />
gauge for crosscutting, but most<br />
models are just a suggestion<br />
of what they ought to be. The<br />
unadorned gauge handles<br />
relatively small workpieces<br />
fine, but that’s about it. You can<br />
increase its effectiveness by<br />
attaching an auxiliary fence to<br />
increase the gauge’s bearing<br />
surface (Photo J.) Adhering 220-<br />
Tipping here levers<br />
panel into blade,<br />
inviting kickback.<br />
grit sandpaper to the fence face<br />
increases safety and accuracy<br />
by preventing workpieces from<br />
sliding during the cut. However,<br />
even with an auxiliary fence,<br />
you can’t expect a miter gauge to<br />
safely handle large boards. For<br />
that you need a crosscut sled.<br />
Using a crosscut sled<br />
The typical tablesaw is not<br />
equipped for crosscutting large<br />
boards or panels. However, it’s<br />
not hard to build a crosscut sled<br />
for the job (Photo K). A well<br />
designed and built sled carries<br />
both large and small workpieces<br />
past the blade with complete<br />
control that offers both safety<br />
Rip fence<br />
Panel<br />
<strong>42</strong> woodcraftmagazine.com Aug/Sept 2011<br />
Apply feed pressure at<br />
center of each section.
and accuracy. (Looking for<br />
a sled plan? Refer to Issue<br />
#34 [April/May 2010], or<br />
go to woodcraftmagazine.<br />
com/onlineextras.)<br />
Crosscutting Multiples<br />
Avoiding<br />
crosscut kickback<br />
The two most common<br />
causes of crosscut kickback<br />
are crosscutting panels<br />
using the rip fence, and<br />
pinching the offcut between<br />
the blade and a stop when<br />
cutting multiples to length.<br />
To be honest, the first<br />
is a procedure commonly<br />
performed by professionals<br />
because of its efficiency. It’s<br />
effective, as long as the fencebearing<br />
edge is long enough to<br />
provide stability, but it must be<br />
done with care, as explained in<br />
the sidebar (page <strong>42</strong>). Better<br />
yet, use a crosscut sled.<br />
Cutting multiples to length<br />
using the rip fence as a stop<br />
pinches the offcut between the<br />
blade and rip fence, resulting in<br />
kickback almost every time. To<br />
prevent this, use a “standoff”<br />
stopblock clamped to the fence,<br />
as shown in Photos L and M.<br />
L<br />
Register the end of a workpiece<br />
against a standoff block clamped to<br />
the rip fence forward of the blade.<br />
Clamp the standoff block to the<br />
fence far enough in front of the<br />
blade to allow the workpiece<br />
to clear it before it contacts the<br />
blade. With the work pressed<br />
against the block, position<br />
the fence to align the cut with<br />
the blade. You can then safely<br />
saw without kickback.<br />
Crosscutting small pieces<br />
Most of us have small pieces<br />
of precious wood that we<br />
sometimes need to cut to make<br />
pulls and accents. To keep your<br />
M<br />
Holding the work firmly, make<br />
the cut. The untrapped offcut<br />
can now fall away safely.<br />
fingers out of harm’s way, you<br />
can create a hold-down by<br />
“bridging over” from a piece of<br />
scrap of similar thickness, as<br />
shown in Photos N and O. n<br />
About Our Author<br />
Paul Anthony, <strong>Woodcraft</strong><br />
<strong>Magazine</strong> senior editor<br />
and author of Taunton’s<br />
Complete Illustrated Guide<br />
to <strong>Table</strong>saws, can still count<br />
to ten using his fingers.<br />
Crosscutting Small Workpieces<br />
N<br />
Small pieces can be held safely against a miter<br />
gauge (above) or a crosscut sled (right) by “bridging<br />
over” from a piece of scrap of the same thickness.<br />
O<br />
Glue fine sandpaper<br />
to bridge for<br />
best control.<br />
Aug/Sept 2011 woodcraftmagazine.com 43