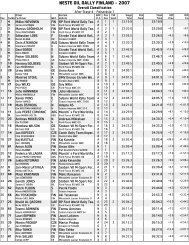
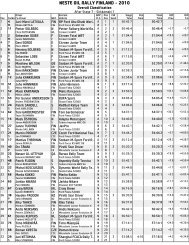
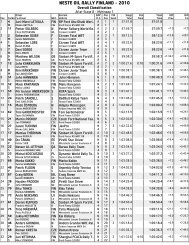
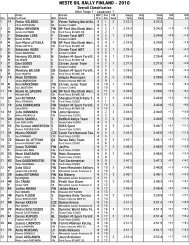
FIA Safety Tracking System Installation Guide - Neste Oil Rally Finland
FIA Safety Tracking System Installation Guide - Neste Oil Rally Finland
FIA Safety Tracking System Installation Guide - Neste Oil Rally Finland

Create successful ePaper yourself
Turn your PDF publications into a flip-book with our unique Google optimized e-Paper software.
Appendix 5 <strong>Installation</strong> and operation instructions<br />
5.1 <strong>FIA</strong> <strong>Safety</strong> <strong>Tracking</strong> <strong>System</strong> <strong>Installation</strong> <strong>Guide</strong> 138<br />
5.2 <strong>FIA</strong> <strong>Safety</strong> <strong>Tracking</strong> <strong>System</strong> Operation <strong>Guide</strong> 146<br />
5.3 Sealing wire installation 149<br />
Liite 5<br />
Asennus- ja käyttöohjeita<br />
5.1 <strong>FIA</strong> turvaseurantalaitteiston asennusohje 138<br />
5.2 <strong>FIA</strong> turvaseurantalaitteiston käyttöohje 146<br />
5.3 Sinetöintilangan asentaminen 149<br />
© AKK Sports Ltd<br />
137
<strong>FIA</strong> <strong>Safety</strong> <strong>Tracking</strong> <strong>System</strong> <strong>Installation</strong> <strong>Guide</strong><br />
DSCP <strong>Tracking</strong> Unit<br />
INSTALLATION INSTRUCTIONS<br />
The DSCP <strong>Tracking</strong> Uni it t is a system to improve the safety of competitors taking part in WRC events.<br />
The aim of this system is to allow the Clerk of the Course and Event <strong>Safety</strong> Officers to track the location of all<br />
competitors in the rally, as well as various other vehicles such as ambulances, <strong>FIA</strong> observer cars, <strong>FIA</strong> helicopters<br />
and other emergency vehicles.<br />
The DSCP <strong>Tracking</strong> unit requires equipment to be installed in all competitors’ cars,which must be fitted and<br />
connected before arrival at scrutineering.<br />
It is VERY important that the kit is easy to reach and remove. If there are any problems with any part of the<br />
tracking kit, they have to be dealt with during the 10 minute service. You will have many other things to work on<br />
during that time so it is very important for you and us that the kit is accessible and that items are easy to<br />
replace or remove.<br />
The DSCP <strong>Tracking</strong> unit must be used together with the DSCP Tracker Base. This allows the quick fitting and<br />
removal of the unit.<br />
DSCP <strong>Tracking</strong> Unit<br />
Appendix 5.1<br />
1. The DSCP <strong>Tracking</strong> unit & base should be flat on the floor of the car.<br />
2. Avoid locating the DSCP <strong>Tracking</strong> unit & base close to very hot areas in the car.<br />
3. Position the unit so that it is easy to reach.<br />
4. Make sure you can see the LED’s from the outside of the car.<br />
5. Leave enough room for the cables to be easily connected (see drawings on page 6).<br />
IMPORTANT<br />
1. The DSCP <strong>Tracking</strong> unit must be accessible and easy to remove from the base during the 10 minute service.<br />
2. DO NOT fix the unit where it will be difficult to reach i.e. under a seat.<br />
3. The DSCP <strong>Tracking</strong> unit & base must be very secure.<br />
4. When fitting the rubber straps, do not use pliers or grips to pull on the metal ring.<br />
© AKK Sports Ltd<br />
138
<strong>FIA</strong> EMERGENGY CONSOLE<br />
The Emergency Console must be fitted between the driver and the co-driver.<br />
1. You can use size M4 fasteners (but should not be difficult to undo)<br />
2. When connecting the cable please ensure that the slot on the cable plug is aligned with the guide on the<br />
console socket as shown in the photo.<br />
3. Insert the connector into the plug and twist the end of the connector that has the grip, so that the locating collar<br />
is attached securely.<br />
4. Leave enough room for the connector to be easily connected (at least 65mm).<br />
IMPORTANT<br />
1. The Emergency console must be easily accessible by BOTH the driver and co-driver.<br />
CONSOLE CABLE<br />
Approx length –3900mm<br />
1. Connects to the largest connector on the DSCP <strong>Tracking</strong> unit.<br />
2. Do not bend the cable especially near the connector.<br />
POWER CABLE<br />
Approx length – 3000mm<br />
1. You should make suitable provision for power to the DSCP <strong>Tracking</strong> unit via the ignition switch (or master<br />
switch) at 12V DC, protected by a fuse or circuit breaker rated at 5A continuous.<br />
2. DO NOT cut or shorten the cable.<br />
3. Do not bend the cable especially near the connector.<br />
© AKK Sports Ltd<br />
139
UHF ANTENNA<br />
Approx length – 5250mm<br />
1. Place the antenna on the roof of the car.<br />
2. It should be near the back of the roof away from the edges & at least 300mm from the GPS antenna.<br />
GPS ANTENNA<br />
Approx length – 4950mm<br />
1. Place the antenna on the roof of the car.<br />
2. It should be near the back of the roof away from the edges & at least 300mm from the UHF<br />
antenna.<br />
Note<br />
1. Holes can be made that take 20mm cable grommets to pass both the UHF and GPS antenna cables through.<br />
2. You can secure the antenna cables with tape if necessary. DO NOT cover the antenna head with tape.<br />
3. Make sure there is no danger that the antenna cables will be cut when passing through doors and boot lids.<br />
DSCP Base Technical Information<br />
Dimensions<br />
DSCP Tracker Base external dimensions: W:165mm, H:30mm, L:222mm<br />
Weight: 0.310kgs<br />
DSCP Base Technical Information<br />
Front View<br />
© AKK Sports Ltd<br />
140
Side View<br />
Note 01: All dimensions in mm.<br />
Top View<br />
Note 01: Only one ‘Side Clearance’ is required to be kept clear for mounting purpose.<br />
Note 02: The Orientation of the base if possible facing to nearest door, easy to be reached within an arm’ length.<br />
LEDs on the DSCP tracker have to be visible easily from the outside of the car.<br />
Note 03: The mounting pressing has been designed to accommodate a M6 Hex CAP Head screw or<br />
M6 Hexagon Head bolt.<br />
© AKK Sports Ltd<br />
141
DSCP Tracker Base<br />
DSCP Tracker Base and Unit<br />
© AKK Sports Ltd<br />
142
Fitting the DSCP Tracker to the base plate using the rubber straps<br />
Pull the strap with one hand, while your thumb from the<br />
other hand is holding the strap in place. See diagram.<br />
With the strap fully stretched place your thumb on the top<br />
of the strap.<br />
Place the ring of the strap over the lip of the tray<br />
© AKK Sports Ltd<br />
143
When fitting the rubber straps DO NOT do the following<br />
Do not pull the strap at an angle, it will damage the<br />
metal ring<br />
Do not use pliers to install or remove the strap, it will<br />
damage the strap & metal ring<br />
Remember that any breakages will ahve to be paid for<br />
© AKK Sports Ltd<br />
144
IMPORTANT<br />
• The DSCP <strong>Tracking</strong> unit must be fitted and connected before arrival at scrutineering. It will be checked at scrutineering by<br />
ISC-T engineers.<br />
• If you retire from the rally you MUST return all loaned equipment to ISC-T at the Service Park or Headquarters as it was given<br />
to you.<br />
• The DSCP <strong>Tracking</strong> unit and all loaned equipment must be returned to ISC-T within 30 minutes of the results being declared<br />
final.<br />
© AKK Sports Ltd<br />
145
Appendix 5.2<br />
<strong>FIA</strong> <strong>Safety</strong> <strong>Tracking</strong> <strong>System</strong> Operation <strong>Guide</strong><br />
The system has 2 modes - Liason and Stage<br />
© AKK Sports Ltd<br />
146
Liaison Mode<br />
At the start of each leg when the system has been off overnight it will be in LIASION MODE. (No LED’s lit)<br />
Stage Start<br />
Stage Stop<br />
© AKK Sports Ltd<br />
147
EMERGENCY USE<br />
In an EMERGENCY lift the red cap and flick the switch.<br />
The RED LED light will flash<br />
In an EMERGENCY when you cannot flick the red switch an alarm will come on<br />
automatically after 60 seconds<br />
If you flick the red switch by accident<br />
Put the red cap back down<br />
Contact your team or a rally official as soon as possible to report the incident.<br />
© AKK Sports Ltd<br />
148
Appendix 5.3<br />
Sealing wire installation<br />
Before entering the scrutineering all cars must have seal wires in visible place as defined:<br />
Engine block: Drilled or casted hole and wire loop through a visible solid part of the block<br />
Chassis: Wire loop around a visible front strut support bar of the rollcage, or if it's not<br />
existing, some other tube of the rollcage (both ends welded to another member)<br />
Gearbox and transmission: Through all seams where the unit can be opened<br />
Turbochargers: As described in Appendix J<br />
Spares: As the parts mounted in the car<br />
The sealing wire must be wrapped no more than 20mm from the hole and must have at least<br />
20cm loose ends to set the tag and seal. Please see photo below.<br />
Note: Car will not be allowed to enter scrutineering if sealing wires are not installed beforehand!<br />
© AKK Sports Ltd<br />
149