Inventory Process - Spiceworks Community
Inventory Process - Spiceworks Community
Inventory Process - Spiceworks Community

You also want an ePaper? Increase the reach of your titles
YUMPU automatically turns print PDFs into web optimized ePapers that Google loves.
<strong>Inventory</strong> <strong>Process</strong><br />
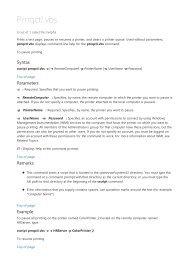
This will detail how to add devices to inventory in <strong>Spiceworks</strong>.<br />
Formatting:<br />
• Bold - important term for the Step or title of a window<br />
• Italics - something of importance in the Picture<br />
• Bold & Italics - click on this<br />
• "Bold & Italics" - in quotes means that this is a label for a button to click on<br />
1. Print Labels<br />
First make sure that you have the appropriate labels. Currently we print our own labels on the<br />
Zebra GX430t but we could easily order labels in the future (for security or environmental<br />
concerns). We currently have a pile of labels printed in singles, duplicates and rows of 5 for<br />
various devices.<br />
Currently we label power adapters for devices with the matching Asset ID so laptops get 5 ID<br />
labels (one inside, one outside and one on the power adapter). We also hide labels inside<br />
cases and so forth so that if someone removed the visible label there would still be one inside<br />
the device (if practical). It is common practice to throw away two labels (of the five) rather than<br />
miss a label on something by only using a paired number.<br />
We also use the UPC code for the Asset ID and <strong>Spiceworks</strong> offers us the alternative to import a<br />
QR Code as well which would open right to the device's inventory page. We will look at moving to<br />
this label in the future.<br />
<strong>Inventory</strong> <strong>Process</strong> - 1
2. Label Device (if the box is sealed go to Step #3)<br />
If the Box is sealed and not being deployed or allocated, save the time and skip to Step #3.<br />
If the device is already unpacked you should apply labels as per the department policy. Currently<br />
we label any device worth over $100 (many exceptions) and all pieces that can support a label<br />
and would need to be ordered special to replace (ie. laptop power adapters). As in Step #1, there<br />
are standards being rolled out for various devices and label quantity and locations.<br />
3. Label Box<br />
The labels get skid into one of the shipping label bags with the sticky backs and attached to the<br />
box. Typically we place this bag close to the UPC codes or shipping label on the box. The picture<br />
includes an empty bag as well as a box with a label on it.<br />
<strong>Inventory</strong> <strong>Process</strong> - 2
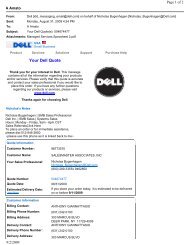
4. Add New Purchase (if you used the RFQ process go to Step #7... if your purchase details<br />
have already been edited go to Step #12)<br />
If you purchased a device without using the <strong>Spiceworks</strong> RFQ process you will have to add the<br />
device to the purchasing list manually. To get to the Purchase List mouse over the Purchasing<br />
link in the top bar and click on Purchase List on the far left menu.<br />
Once on the Purchase List screen click on the "New Purchase" button in the top right.<br />
5. Add More Details<br />
When the Create a new purchase window opens, click on the "Add More Details" button to open<br />
the details of the purchase.<br />
<strong>Inventory</strong> <strong>Process</strong> - 3
6. After Edit<br />
After editing the details of the purchase, click on the "Save" button to save the details and move<br />
back to the Purchase List.<br />
7. Mark Received & Edit Details<br />
In the far left column (Status) click on the third arrow (picture) to mark the device Received. If you<br />
had used the RFQ <strong>Process</strong> you would already have the first two arrows green (Approved and<br />
Purchased) and most of the details would be populated.<br />
Then click on the second column (Item) with the Item Name to highlight the Purchase. Once<br />
highlighted, click on the small "Edit Details" tab open at the bottom of the center of the Purchase.<br />
<strong>Inventory</strong> <strong>Process</strong> - 4
8. Additional Documentation<br />
If you did not use the Ticketing system to start your Quote in the RFQ tool you can add a Ticket #<br />
to the purchase by entering a Ticket # in the "Ticket" box. Once in the details window you can edit<br />
and add details as well as documents. Click on the "Attach a File" button with the paperclip to<br />
add an invoice or document important to this purchase.<br />
9. Attach Documents<br />
Type a note about the attachment you are adding like "Invoice" if you are attaching an invoice to the<br />
Purchase. Then click on "Choose File"<br />
10. Save Attachments<br />
After selecting a file by browsing and double-clicking on a file or selecting it and clicking on<br />
"Open", you will be brought back to the Attach a Document window where you will click on<br />
"Save" to save the attachment and return to the Purchase Details.<br />
<strong>Inventory</strong> <strong>Process</strong> - 5
11. Save Purchase<br />
Click on the "Save" button<br />
12. Add New Asset<br />
With the Purchase still highlighted, click on the pull-down arrow at the far Right of the row and<br />
select "New Asset"<br />
<strong>Inventory</strong> <strong>Process</strong> - 6
13. New Asset Summary<br />
Enter any details for the new asset that are not imported from the Purchase and hit "Save". For<br />
inputting of Serial Number or MAC Address, if you use the scanner and scan the numbers off<br />
packaging, ensure that if there are preceding characters that you remove them after scanning.<br />
14. <strong>Inventory</strong> Details<br />
Select "Edit" from the top right to edit the details of the device.<br />
<strong>Inventory</strong> <strong>Process</strong> - 7
15. Save <strong>Inventory</strong><br />
Some of the important details we document are:<br />
1. Owner: if the device is assigned to an individual, ensure they have details correctly applied<br />
with extension<br />
2. Asset Tag: do not scan or enter this in until the labels are attached to a box or device<br />
3. Location or Site: home location for this device<br />
4. OS License Type: if applicable, assign SA license here<br />
5. OS Licensed: if applicable, enter the OEM license purchased with this device if not covered<br />
by SA<br />
6. Monitors: This is a new detail we are tracking to show both how many monitors a device<br />
was assigned and how many is is capable of supporting<br />
When done, click on "Save" in the top right to save details to the inventory.<br />
<strong>Inventory</strong> <strong>Process</strong> - 8
16. Add Notes<br />
Click on the "Notes" tab to enter notes about the device.<br />
17. Edit Notes<br />
On the far Right from the Tabs, or under the Notes tab, click on the "Edit" link to add comments to<br />
this device. These comments will be tracked by date so if you enter two notes on the same day<br />
they will appear as one entry when complete.<br />
<strong>Inventory</strong> <strong>Process</strong> - 9
18. Save New Notes<br />
An example of a common Note we enter here is the wireless MAC and physical MAC of all<br />
laptops. Be default the device will have one MAC that it sees all the time. This gives us a quick<br />
access to both MACs in one screen without digging. This is also where we document some of<br />
the usernames/passwords for HTTP devices like FXOs.<br />
When done entering data, click on the "Save" link to save the notes to the device.<br />
19. Documents<br />
Select the "Documents" tab to add documents and attachments to the device.<br />
20. Add Documents<br />
Click on the "Choose File" button. After selecting the file you want to attach, select the "Attach"<br />
button.<br />
<strong>Inventory</strong> <strong>Process</strong> - 10
21. Select Invoice (or other documents for this device)<br />
Double-click the file you want to add then hit "Attach". For our purposes we are attaching<br />
Invoices from the server ( ### ) as well as any documentation we may need at a future date.<br />
22. Back To General Tab<br />
Click on the "General Info" tab to return to the main details page of the device.<br />
<strong>Inventory</strong> <strong>Process</strong> - 11
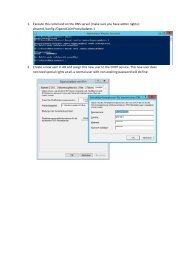
23. How to Add a Warranty<br />
On the right side in the top device header you will see the pencil, plus sign and wrench. If you<br />
click on the Plus Sign or the word "Add" that appears beside it a pop down menu will appear.<br />
24. Add Warranty<br />
Click on the "Add Warranty" button.<br />
25. Warranty Details<br />
Enter the details to create a new warranty and then hit "Save"<br />
<strong>Inventory</strong> <strong>Process</strong> - 12