Operating And Installation Instructions - AJ Madison
Operating And Installation Instructions - AJ Madison
Operating And Installation Instructions - AJ Madison

You also want an ePaper? Increase the reach of your titles
YUMPU automatically turns print PDFs into web optimized ePapers that Google loves.
<strong>Operating</strong> and <strong>Installation</strong><br />
<strong>Instructions</strong><br />
Coffee System<br />
CVA 4070<br />
To prevent accidents<br />
and machine damage<br />
read these instructions<br />
before<br />
installation or use.<br />
UV<br />
M.-Nr. 06 911 520
Contents<br />
IMPORTANT SAFETY INSTRUCTIONS . . . . . . . . . . . . . . . . . . . . . . . . . . . . . . . . . 5<br />
Guide to the machine. . . . . . . . . . . . . . . . . . . . . . . . . . . . . . . . . . . . . . . . . . . . . . . 8<br />
First steps to use . . . . . . . . . . . . . . . . . . . . . . . . . . . . . . . . . . . . . . . . . . . . . . . . . 10<br />
Filling water, beans or ground coffee. . . . . . . . . . . . . . . . . . . . . . . . . . . . . . . . . 11<br />
Filling the water tank . . . . . . . . . . . . . . . . . . . . . . . . . . . . . . . . . . . . . . . . . . . . . . . 11<br />
Filling the beans container. . . . . . . . . . . . . . . . . . . . . . . . . . . . . . . . . . . . . . . . . . . 12<br />
Filling ground coffee . . . . . . . . . . . . . . . . . . . . . . . . . . . . . . . . . . . . . . . . . . . . . . . 12<br />
Making coffee . . . . . . . . . . . . . . . . . . . . . . . . . . . . . . . . . . . . . . . . . . . . . . . . . . . . 13<br />
Turning on . . . . . . . . . . . . . . . . . . . . . . . . . . . . . . . . . . . . . . . . . . . . . . . . . . . . . . . 13<br />
Prewarming cups. . . . . . . . . . . . . . . . . . . . . . . . . . . . . . . . . . . . . . . . . . . . . . . . . . 14<br />
Adjust the dispenser height. . . . . . . . . . . . . . . . . . . . . . . . . . . . . . . . . . . . . . . . . . 14<br />
Espresso and coffee made from coffee beans . . . . . . . . . . . . . . . . . . . . . . . . . . . 15<br />
Espresso and coffee made from ground coffee . . . . . . . . . . . . . . . . . . . . . . . . . . 16<br />
Cappuccino and milk froth. . . . . . . . . . . . . . . . . . . . . . . . . . . . . . . . . . . . . . . . . . . 17<br />
Adjusting the coffee grinder . . . . . . . . . . . . . . . . . . . . . . . . . . . . . . . . . . . . . . . . 19<br />
Settings. . . . . . . . . . . . . . . . . . . . . . . . . . . . . . . . . . . . . . . . . . . . . . . . . . . . . . . . . 20<br />
Language. . . . . . . . . . . . . . . . . . . . . . . . . . . . . . . . . . . . . . . . . . . . . . . . . . . . . . . . 20<br />
Clock . . . . . . . . . . . . . . . . . . . . . . . . . . . . . . . . . . . . . . . . . . . . . . . . . . . . . . . . . . . 21<br />
Timer . . . . . . . . . . . . . . . . . . . . . . . . . . . . . . . . . . . . . . . . . . . . . . . . . . . . . . . . . . . 22<br />
Grind amount . . . . . . . . . . . . . . . . . . . . . . . . . . . . . . . . . . . . . . . . . . . . . . . . . . . . . 25<br />
Pre-brewing . . . . . . . . . . . . . . . . . . . . . . . . . . . . . . . . . . . . . . . . . . . . . . . . . . . . . . 25<br />
Temperature. . . . . . . . . . . . . . . . . . . . . . . . . . . . . . . . . . . . . . . . . . . . . . . . . . . . . . 26<br />
Rinse automatic . . . . . . . . . . . . . . . . . . . . . . . . . . . . . . . . . . . . . . . . . . . . . . . . . . . 26<br />
Steam system . . . . . . . . . . . . . . . . . . . . . . . . . . . . . . . . . . . . . . . . . . . . . . . . . . . . 27<br />
Lighting . . . . . . . . . . . . . . . . . . . . . . . . . . . . . . . . . . . . . . . . . . . . . . . . . . . . . . . . . 27<br />
Total no. coffees. . . . . . . . . . . . . . . . . . . . . . . . . . . . . . . . . . . . . . . . . . . . . . . . . . . 28<br />
System Lock . . . . . . . . . . . . . . . . . . . . . . . . . . . . . . . . . . . . . . . . . . . . . . . . . . . . . 28<br />
Water hardness . . . . . . . . . . . . . . . . . . . . . . . . . . . . . . . . . . . . . . . . . . . . . . . . . . . 29<br />
User profiles. . . . . . . . . . . . . . . . . . . . . . . . . . . . . . . . . . . . . . . . . . . . . . . . . . . . . . 30<br />
Display . . . . . . . . . . . . . . . . . . . . . . . . . . . . . . . . . . . . . . . . . . . . . . . . . . . . . . . . . . 32<br />
Tone options. . . . . . . . . . . . . . . . . . . . . . . . . . . . . . . . . . . . . . . . . . . . . . . . . . . . . . 32<br />
Reset . . . . . . . . . . . . . . . . . . . . . . . . . . . . . . . . . . . . . . . . . . . . . . . . . . . . . . . . . . . 33<br />
3
Contents<br />
Setting the serving sizes. . . . . . . . . . . . . . . . . . . . . . . . . . . . . . . . . . . . . . . . . . . 34<br />
Cleaning and Care . . . . . . . . . . . . . . . . . . . . . . . . . . . . . . . . . . . . . . . . . . . . . . . . 35<br />
Descaling the appliance . . . . . . . . . . . . . . . . . . . . . . . . . . . . . . . . . . . . . . . . . . . 45<br />
Frequently asked questions . . . . . . . . . . . . . . . . . . . . . . . . . . . . . . . . . . . . . . . . 47<br />
After sales service . . . . . . . . . . . . . . . . . . . . . . . . . . . . . . . . . . . . . . . . . . . . . . . . 54<br />
<strong>Installation</strong> instructions . . . . . . . . . . . . . . . . . . . . . . . . . . . . . . . . . . . . . . . . . . . 55<br />
Caring for the environment . . . . . . . . . . . . . . . . . . . . . . . . . . . . . . . . . . . . . . . . . 56<br />
Electrical connection. . . . . . . . . . . . . . . . . . . . . . . . . . . . . . . . . . . . . . . . . . . . . . 57<br />
<strong>Installation</strong> . . . . . . . . . . . . . . . . . . . . . . . . . . . . . . . . . . . . . . . . . . . . . . . . . . . . . . 58<br />
Adjusting the door hinges . . . . . . . . . . . . . . . . . . . . . . . . . . . . . . . . . . . . . . . . . . . 60<br />
4
IMPORTANT SAFETY INSTRUCTIONS<br />
When using electrical appliances basic safety precautions should always be<br />
followed, including the following:<br />
Read all instructions before installation or use of the coffee system.<br />
Please read these instructions<br />
carefully to prevent accidents and<br />
machine damage.<br />
This appliance complies with current<br />
safety requirements. Improper use of<br />
the appliance can cause personal<br />
injury and material damage.<br />
This appliance is for household use<br />
only, to prepare espresso,<br />
cappuccino and coffee.<br />
Do not use appliance other than for<br />
its intended use. Any other use<br />
could be dangerous.<br />
The manufacturer cannot be held<br />
responsible for damage caused by<br />
improper use of the appliance.<br />
Electrical safety<br />
Before connecting the appliance to<br />
the electrical supply make sure<br />
that the voltage and frequency listed on<br />
the data plate correspond with the<br />
household electrical supply. If in doubt,<br />
consult a qualified technician.<br />
The appliance must be properly<br />
installed before operation to ensure<br />
that no electrical components are<br />
accessible. Ensure that power is not<br />
supplied to the appliance while<br />
installation work, repairs or<br />
maintenance is performed.<br />
Be certain your appliance is<br />
properly installed and grounded by<br />
a qualified technician. To guarantee the<br />
electrical safety of this appliance,<br />
continuity must exist between the<br />
appliance and an effective grounding<br />
system. It is imperative that this basic<br />
safety requirement be met. If there is<br />
any doubt, have the electrical system of<br />
the house checked by a qualified<br />
electrician. The manufacturer cannot be<br />
held responsible for damages caused<br />
by the lack, or inadequacy, of an<br />
effective grounding system.<br />
Do not use an extension cord to<br />
connect the appliance to electricity.<br />
Extension cords do not guarantee the<br />
required safety of the appliance<br />
(danger of overheating).<br />
Before service or maintenance<br />
disconnect the power supply by<br />
either removing the fuse, “tripping” the<br />
circuit breaker or unplugging the unit.<br />
Install or locate this appliance only<br />
in accordance with the provided<br />
installation instructions.<br />
5
IMPORTANT SAFETY INSTRUCTIONS<br />
<strong>Installation</strong> work and repairs should<br />
only be performed by a trained<br />
technician in accordance with national<br />
and local safety regulations. Repairs<br />
and other work by unauthorized<br />
persons could be dangerous.<br />
Never open the outer casing of the<br />
appliance. Tampering with<br />
electrical connections or components<br />
and mechanical parts is dangerous and<br />
may cause machine damage.<br />
If the machine is installed in<br />
combination with other appliances,<br />
a protective base should be installed<br />
between the appliance and the unit.<br />
Do not install or use outdoors even<br />
if installed in the display cabinet.<br />
To protect against fire, electric<br />
shock and injury to persons do not<br />
submerge the cord or plugs in water or<br />
other liquids.<br />
Do not let the cord hang over the<br />
edge of a table or counter, or touch<br />
hot surfaces.<br />
Do not operate any appliance with<br />
a damaged cord or plug, or after<br />
the appliance malfunctions or has been<br />
damaged in any manner. Contact<br />
Miele.<br />
Always attach the cord to the<br />
appliance first, then plug it into the<br />
wall outlet. To disconnect, turn the<br />
machine off, then remove the plug from<br />
the wall outlet.<br />
Use<br />
The coffee system must be<br />
maintained daily to prevent the<br />
growth of harmful bacteria and<br />
mold. Please read the “Cleaning and<br />
care” section of this booklet. All<br />
parts are dishwasher safe except<br />
the brew unit and bean container.<br />
Caution! Do not look directly or with<br />
an optical instrument into the<br />
lighting - laser radiation.<br />
Caution! Risk of burns when<br />
dispensing hot beverages, they are<br />
extremely hot.<br />
Persons which lack physical,<br />
sensory or mental abilities or<br />
experience with the machine should not<br />
use it without supervision or instruction<br />
by a responsible person.<br />
Close supervision is necessary<br />
when any appliance is used by or<br />
near children.<br />
Do not touch hot surfaces. Use<br />
handles or knobs.<br />
Rinse the lines and the froth<br />
dispenser, and clean the unit<br />
before the first use.<br />
To avoid injuries allow the coffee<br />
system to cool before cleaning or<br />
putting on and taking off parts. Turn the<br />
machine off at the main switch when<br />
not in use and before cleaning.<br />
6
IMPORTANT SAFETY INSTRUCTIONS<br />
Only fill the water tank with cold,<br />
fresh tap water. Warm or hot water,<br />
or any other liquids may damage the<br />
machine. The water should be changed<br />
daily to prevent bacteria or mold<br />
growth.<br />
Do not use mineral water. Mineral<br />
water leads to heavy calcium<br />
buildup in the machine that can<br />
damage the unit.<br />
Do not put anything but coffee<br />
beans into the beans container. Do<br />
not put ground coffee in the beans<br />
container, it will damage the grinding<br />
unit.<br />
Do not fill anything but ground<br />
coffee or a cleaning tablet (for the<br />
brew unit) in the funnel for ground<br />
coffee, otherwise it will get damaged.<br />
Sugar can damage the appliance!<br />
Caramelized or otherwise<br />
pre-treated coffee beans or other sugar<br />
containing beverages must not be put<br />
in the machine.<br />
Never place a cup with an<br />
alcohol-coffee mixture underneath<br />
the coffee dispenser. Plastic parts of<br />
the unit could catch fire!<br />
The hot water and steam<br />
dispensed could cause scalding.<br />
These functions must be used carefully.<br />
Never hold any parts of the body under<br />
the steam nozzle or the hot water<br />
dispenser. The machine must never be<br />
used to clean objects.<br />
Do not use the machine when the<br />
froth dispenser is removed. Danger<br />
of scalding with hot steam!<br />
Never use a steam cleaner to clean<br />
the appliance. Pressurized steam<br />
could damage electrical components<br />
and cause a short circuit.<br />
The appliance must be descaled<br />
regularly with the supplied<br />
descaling tablets. In areas with very<br />
hard water the machine may need to be<br />
descaled more often. The manufacturer<br />
cannot be held responsible for<br />
damages resulting from insufficient<br />
descaling.<br />
Only use the descaling tablets<br />
provided by Miele. Take care to<br />
use the correct mixture of water and<br />
descaler, otherwise it may cause<br />
damage.<br />
Depending on the fat content of the<br />
coffee, the brew unit may clog.<br />
Clean the brew unit every 200 cups<br />
with a cleaning tablet. The display<br />
shows a respective request.<br />
Dispose of the coffee waste in a<br />
trash can, not in the sink. The sink<br />
could get clogged.<br />
Do not hang, lean, sit or place<br />
heavy items on the door. The<br />
machine could be damaged.<br />
The use of accessory attachments<br />
not recommended by the<br />
appliance manufacturer may result in<br />
fire, electric shock or injury to persons.<br />
SAVE THESE<br />
INSTRUCTIONS<br />
7
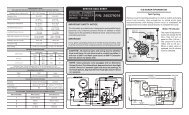
Guide to the machine<br />
Front view<br />
a Touch controls<br />
(lowest control "On/Off" button)<br />
b Display<br />
c Touch controls<br />
(lowest control "Clear" button)<br />
d Top lighting<br />
e Door grip<br />
f Hot water spout<br />
g Bottom lighting<br />
h Plastic drip tray<br />
i Metal drip tray<br />
j Coffee dispenser<br />
(height adjustable)<br />
k Froth dispenser<br />
(removable for better cleaning)<br />
l Intake hose<br />
(removable together with dispenser)<br />
8
Guide to the machine<br />
Interior view<br />
a Main switch<br />
b Cover for ground coffee funnel<br />
c Funnel for ground coffee<br />
d Grind control lever<br />
e Coffee bean container<br />
f Drip tray with no-spill grid for transport<br />
g Water tank<br />
h Brew unit<br />
i Waste unit<br />
9
First steps to use<br />
Touch controls<br />
Select a touch control with your<br />
fingertip to use the machine.<br />
Display<br />
To select a menu, select the touch<br />
control next to the respective menu<br />
point.<br />
If more features can be selected under<br />
one menu point, the menu has three<br />
dots (e.g. "Settings...").<br />
"more" / "back": If there are more<br />
menus which are not immediately<br />
shown, select "more" or "back" to see<br />
further options.<br />
"Clear": to go back to the previous<br />
screen.<br />
"Stop": to cancel coffee preparation.<br />
"OK": to save a setting.<br />
Before the first use<br />
The appliance must be correctly<br />
installed and connected before the<br />
first use.<br />
Clean the appliance and remove<br />
protective foils before the first use.<br />
Turning on<br />
^ Select "On/Off" to turn the coffee<br />
system on.<br />
The display shows the clock. See<br />
"Settings - Clock - Setting the time of<br />
day" to set the time.<br />
During the very first use, you will be<br />
prompted to select a language.<br />
^ Select the desired language touch<br />
control and then "OK".<br />
The J symbol indicates the "Language"<br />
setting. If you accidentally select an<br />
unfamiliar language, simply look for the<br />
J symbol. Touch the control next to the<br />
flag symbol and select your language<br />
of choice.<br />
^ Customize the coffee system to your<br />
desired settings.<br />
Prepare two cups of coffee and<br />
dispose of them, this will clean any<br />
coffee residues from the brew unit<br />
left from the quality control tests at<br />
the factory.<br />
Turning off<br />
^ Select "On/Off".<br />
The display shows the time of day. After<br />
60 seconds the display turns off<br />
(depending on the setting). See<br />
"Settings - Clock".<br />
If the rinse automatic feature is<br />
turned on the machine will begin<br />
rinsing if a coffee was prepared that<br />
day.<br />
10
Filling water, beans or ground coffee<br />
Before using the coffee system for<br />
the first time, clean the appliance.<br />
See "Cleaning and Care".<br />
Filling the water tank<br />
The beans and the water quality is<br />
important for a good espresso or<br />
coffee. The water tank must be washed<br />
and filled with fresh cold drinking water<br />
before each day of use. The unit<br />
displays a reminder when turned on.<br />
^ Open the appliance door by<br />
grasping the recess next to the hot<br />
water spout and pulling the door<br />
towards you.<br />
Never add hot water or any other<br />
liquids except cold water to the<br />
water tank.<br />
Do not use mineral water. Mineral<br />
water leads to heavy calcium<br />
built-up in the machine that can<br />
damage the unit.<br />
^ Pull the water tank out.<br />
^ Fill the container with fresh, cold tap<br />
water to the "Max." mark.<br />
A valve at the front of the tank prevents<br />
leaks.<br />
^ Close the lid and push the water tank<br />
into the unit until it clicks into place.<br />
The water tank must be positioned<br />
correctly or the valve will leak. If the<br />
water tank has not clicked into<br />
place, pull the tank out, check and<br />
clean the niche.<br />
11
Filling water, beans or ground coffee<br />
Filling the beans container<br />
Only fill espresso or coffee beans in<br />
the beans container. Anything else -<br />
including ground coffee - will<br />
damage the grinding unit.<br />
Caramelized or otherwise<br />
pre-treated beans or sugar<br />
containing beverages must not be<br />
filled into the appliance. It will<br />
damage the coffee system.<br />
Filling ground coffee<br />
A funnel for ground coffee is provided<br />
in case you would like to prepare a<br />
different coffee type, e.g. decaffeinated<br />
coffee.<br />
^ Pull the bean container out.<br />
^ Push the lid back and fill the<br />
container with roasted coffee beans.<br />
^ Push the lid back into place and put<br />
the beans container back into the<br />
appliance.<br />
^ Close the door.<br />
^ Pull the cover for the ground coffee<br />
funnel out of the appliance and lift the<br />
funnel lid, a.<br />
^ Place one spoonful of ground coffee<br />
into the funnel, b, (using the<br />
supplied spoon) and close the lid.<br />
^ Push the cover into the appliance<br />
and close the door.<br />
See "Making Coffee - Espresso and<br />
coffee made from ground coffee".<br />
12
Making coffee<br />
The lines must be rinsed daily before<br />
the first use. This will happen<br />
automatically if "Rinse automatic" is<br />
set to "On" (see "Settings - Rinse<br />
Automatic") and the machine is cold.<br />
After heating, hot water runs out of<br />
the two spouts into the drip tray. If<br />
"Rinse automatic" was set to "Off",<br />
use "Care" to rinse the lines. See<br />
"Cleaning and Care - Rinse".<br />
Turning on<br />
^ Select the "On/Off" touch control.<br />
A reminder to fill the water tank with<br />
fresh water is displayed.<br />
i<br />
Please fill and reinsert<br />
the water tank<br />
Then the upper line in the display<br />
shows:<br />
+ DESCALING<br />
Preheating<br />
+ USER PROFILE: STANDARD<br />
+ SETTINGS F ...<br />
If "Rinse automatic" is set to "On"<br />
(default), the machine rinses after the<br />
heating phase and the main menu is<br />
displayed.<br />
13
Making coffee<br />
Prewarming cups<br />
All beverages should be made in a<br />
warm cup, to develop the aroma. The<br />
smaller the amount of coffee or<br />
espresso and the thicker the cups, the<br />
more important it is to prewarm the<br />
cups.<br />
^ Set the cup under the hot water<br />
spout.<br />
Adjust the dispenser height<br />
Depending on the cup height, the<br />
coffee dispensers can be adjusted so<br />
that the coffee and espresso have a<br />
shorter distance to the cup, do not cool<br />
and have a better crema.<br />
+ ESPRESSO HOT WATER ~<br />
+ COFFEE MILK FROTH ~<br />
+ CAPPUCCINO more ~<br />
^ Select "Hot water" from the main<br />
menu.<br />
^ Hot water is dispensed. Select "Stop"<br />
to stop the flow.<br />
^ Let the hot water sit for a moment to<br />
prewarm the cup, then empty the<br />
cup.<br />
^ Pull the coffee dispenser slowly up or<br />
down.<br />
14
Making coffee<br />
Espresso and coffee made<br />
from coffee beans<br />
Preparing two cups at the same time<br />
^ Set a cup under the coffee dispenser.<br />
The drink is dispensed through both<br />
dispensers at the same time.<br />
^ Select "Espresso" or "Coffee".<br />
The machine grinds the beans and<br />
pre-brews the coffee (if "On" is selected<br />
under "Pre-brewing"). The selected<br />
beverage is dispensed.<br />
Do not open the door during<br />
brewing. The machine will be<br />
damaged.<br />
^ Set a cup under each coffee<br />
dispenser.<br />
^ Select "Espresso" or "Coffee".<br />
^ Select "2 portions" when displayed.<br />
The coffee system makes two portions<br />
of espresso or coffee with a few<br />
seconds in between.<br />
Keep the cups under the dispenser<br />
until the main menu shows in the<br />
display.<br />
Cancelling<br />
^ Select "Stop" to cancel the process.<br />
The portion sizes for espresso, coffee<br />
and cappuccino can be set individually.<br />
See "Setting the serving sizes".<br />
15
Making coffee<br />
Espresso and coffee made<br />
from ground coffee<br />
After filling the funnel with ground<br />
coffee (see "Filling water, beans or<br />
ground coffee - Filling ground coffee"),<br />
the display shows:<br />
Preparing two cups at the same time<br />
When using ground coffee, only one<br />
portion at a time can be prepared. The<br />
unit uses the whole portion of ground<br />
coffee which was filled in the funnel to<br />
prepare one drink.<br />
i<br />
Did you fill ground coffee and<br />
do you want to prepare it?<br />
+ No Yes ~<br />
^ Select "Yes".<br />
Select "No" if no ground coffee is filled<br />
in the funnel. Otherwise the coffee<br />
system assumes that ground coffee is<br />
in the machine and dispenses only<br />
water next time coffee is made.<br />
^ Set a cup under the coffee dispenser.<br />
The drink is dispensed through both<br />
dispensers at the same time.<br />
^ Select "Espresso" or "Coffee".<br />
The coffee system brews the espresso<br />
or coffee and the drink is dispensed.<br />
Do not open the door during the<br />
brewing process. It will damage the<br />
machine. The unit will switch<br />
automatically back to brewing with<br />
beans after preparation.<br />
Cancelling<br />
^ Select "Stop" to cancel the process.<br />
16
Making coffee<br />
Cappuccino and milk froth<br />
When using for the first time or using<br />
after descaling<br />
The lines were completely drained<br />
before the unit left the factory. They will<br />
also be drained when the machine is<br />
descaled. Before preparing<br />
cappuccino or froth, the lines must be<br />
filled with water.<br />
^ Set a cup under the cappuccino<br />
dispenser.<br />
^ Select the "Milk froth" touch control.<br />
The intake hose takes in water from the<br />
tank and fills the lines with water. A<br />
small amount of water runs from of the<br />
froth dispenser.<br />
Prompts to clean the froth dispenser<br />
appear in the display.<br />
^ Confirm by selecting "OK".<br />
^ Once the machine stops, select "Milk<br />
froth" again.<br />
The froth dispenser dispenses steam<br />
and the lines are filled with water.<br />
^ Select "Clear" to get back to the main<br />
menu.<br />
The coffee system is ready to use.<br />
17
Making coffee<br />
Cappuccino<br />
To prepare a cappuccino you need a<br />
large ceramic or porcelain cup and a<br />
small mug (supplied) of milk.<br />
The best milk froth is achieved with<br />
cold skim milk.<br />
Only one cup of cappuccino can be<br />
prepared at a time because of the<br />
milk frothing process.<br />
^ Set the mug of milk under the intake<br />
hose and the cup under the froth<br />
dispenser.<br />
^ Select "Cappuccino".<br />
The milk is frothed into the cup. At the<br />
same time the beans are ground.<br />
Select "Stop" to cancel the milk frothing.<br />
^ Once the milk is frothed, set the<br />
cappuccino cup under both<br />
dispensers and select "OK".<br />
The cappuccino will be prepared.<br />
Milk froth<br />
If you need additional milk froth,<br />
prepare cold skim milk in a stainless<br />
steel mug which narrows towards the<br />
top.<br />
^ Set the supplied glass mug with milk<br />
under the intake hose and the<br />
stainless steel mug under the froth<br />
dispenser.<br />
^ Select the "Milk froth" touch control.<br />
The milk is frothed into the stainless<br />
steel mug.<br />
^ Select "Stop" to cancel the milk<br />
frothing.<br />
After preparing milk froth and<br />
cappuccino<br />
Clean the froth dispenser and intake<br />
hose immediately after use. If the milk is<br />
allowed to dry, the parts may get<br />
clogged and difficult to clean. See<br />
"Cleaning and Care".<br />
18
Adjusting the coffee grinder<br />
The amount of ground coffee<br />
determines the strength of the coffee<br />
and the quality of the crema.<br />
The amount of ground coffee can be<br />
adjusted in the main menu. See<br />
"Settings - Grind amount".<br />
To adjust the grinder setting<br />
To prevent machine damage adjust<br />
the coffee grinder one notch at a<br />
time and let the beans grind before<br />
adjusting another notch. Otherwise<br />
the machine will be damaged.<br />
The grinder should be adjusted:<br />
– If the espresso flows too quickly into<br />
the cup, the pressure cannot be built<br />
up because the beans have been<br />
ground too coarsely. The grinder<br />
should be adjusted to a finer setting.<br />
– If the espresso only trickles into the<br />
cup, the beans have been ground<br />
too fine and the coffee will be bitter.<br />
The grinder should be adjusted to a<br />
coarser setting.<br />
– If the crema is evenly colored but<br />
pale, the ground coffee is too coarse.<br />
– If the crema is very dark brown on<br />
one side, graduating almost to white<br />
on the other, the ground coffee is too<br />
fine.<br />
^ Push the slide control to the left for a<br />
finer grind or to the right for a coarser<br />
grind.<br />
You should be able to feel the notches<br />
when moving the slide control.<br />
If the slide control will not move:<br />
^ Close the machine and dispense a<br />
cup of coffee.<br />
Then try to move the slide control<br />
again.<br />
19
Settings<br />
The coffee system can be customized<br />
to suit individual preferences.<br />
Language<br />
To show the displays in the desired<br />
language, select the language before<br />
the first use.<br />
+ DESCALING<br />
Preheating<br />
+ USER PROFILES: STANDARD<br />
+ SETTINGS F ...<br />
^ Select "Settings" from the main menu<br />
during the pre-heating phase or,<br />
+ back SETTINGS F ... ~<br />
+ CARE ...<br />
+ USER PROFILES<br />
^ in the main menu.<br />
SETTINGS<br />
+ LANGUAGE F ... GRIND AMOUNT ... ~<br />
+ CLOCK PRE-BREWING ~<br />
+ TIMER ... more ~<br />
^ Select "Language".<br />
LANGUAGE english<br />
+ english français ~<br />
+ deutsch more ~<br />
+ español OK ~<br />
^ Select the desired language.<br />
To see more language options, select<br />
"more".<br />
The language options are:<br />
English, German, Español, Français,<br />
Italiano, Polski and Portugués.<br />
^ Select "OK" to save the selection.<br />
All displays are shown in the selected<br />
language.<br />
^ To go back to the main menu, select<br />
"Clear".<br />
20
Settings<br />
Clock<br />
+ back SETTINGS F ... ~<br />
+ CARE ...<br />
+ USER PROFILES<br />
^ Select "Settings".<br />
SETTINGS<br />
+ LANGUAGE F ... GRIND AMOUNT ... ~<br />
+ CLOCK PRE-BREWING ~<br />
+ TIMER ... more ~<br />
^ Select "Clock".<br />
Setting the time of day<br />
^ Select "Enter Time".<br />
^ Select "+" or "-" with the right touch<br />
controls to select the hours.<br />
^ Set the minutes by selecting<br />
"Minutes".<br />
^ Select "+" or "-" with the right touch<br />
controls to select the minutes.<br />
^ Select "OK".<br />
The time of day is saved.<br />
Clock display size<br />
The size of the clock display can be<br />
adjusted. The options are "normal" or<br />
"large".<br />
^ Select the "Size" touch control.<br />
The selected size is highlighted in the<br />
display.<br />
^ Select the "Size" touch control until<br />
the desired size is highlighted.<br />
^ Select "OK" to save the selection.<br />
12 or 24 hour clock<br />
The clock display can be set to the 12<br />
or 24 hour clock.<br />
^ Select the respective touch control.<br />
The selected display is highlighted.<br />
^ Select "OK" to save the selection.<br />
Clock display on/off<br />
The clock can be displayed or turned<br />
off.<br />
If the display is turned on, the time of<br />
day is displayed when the machine is<br />
turned off.<br />
If the option is set to off, the display<br />
turns off after 60 seconds.<br />
^ Select "Clock display".<br />
The selected display is highlighted.<br />
^ Select "OK" to save the selection.<br />
21
Settings<br />
Timer<br />
Setting a timer<br />
+ back SETTINGS F ... ~<br />
+ CARE ...<br />
+ USER PROFILES<br />
^ Select "Settings".<br />
SETTINGS<br />
+ LANGUAGE F ... GRIND AMOUNT ... ~<br />
+ CLOCK PRE-BREWING ~<br />
+ TIMER ... more ~<br />
^ Select "Timer".<br />
^ Select "Setting".<br />
Turn on at<br />
A specific time of day can be set to turn<br />
the machine on, e.g. for breakfast.<br />
^ Select "Turning on at".<br />
^ Set the hours to when the appliance<br />
should turn on by selecting "+" or "–".<br />
^ Switch to "Minutes" and repeat.<br />
^ Select "OK".<br />
The machine will turn on every day at<br />
the selected time.<br />
If the "Rinse" function was set to<br />
"On", the lines will be rinsed when<br />
the machine is turned on.<br />
If the machine is turned on<br />
automatically three times and no<br />
beverages were dispensed, the<br />
machine will no longer turn on<br />
automatically. The programmed<br />
times stay saved and will be<br />
activated again when the machine is<br />
manually turned on the next time.<br />
This safety measure is designed so<br />
that the machine does not turn on<br />
every day if the setting was not<br />
cancelled before a longer time of<br />
absence, e.g. vacationing.<br />
22
Settings<br />
Turn off after<br />
The machine will turn off automatically<br />
to save energy after a programmed<br />
period of time. Time periods between<br />
15 minutes and 6 hours can be<br />
selected. If the machine is not used<br />
after dispensing beverages, it will turn<br />
off after the selected time.<br />
^ Select "Turning off after".<br />
For example a 0:15 display means that<br />
the unit will turn off after 15 minutes of<br />
no use.<br />
^ Set the hour when the appliance<br />
should turn off by selecting "+" or "–".<br />
^ Switch to "Minutes" and repeat.<br />
^ Select "OK" to save the selection.<br />
The machine will turn off after the<br />
desired time.<br />
Turn off at<br />
A specific time of day can be set to turn<br />
the coffee system off.<br />
^ Select "Turning off at".<br />
^ Set the hour when the appliance<br />
should turn on by selecting "+" or "–".<br />
^ Switch to "Minutes" and repeat.<br />
^ Select "OK" to save the selection.<br />
The machine will turn off at the selected<br />
time.<br />
^ Select "Clear" until the display shows<br />
the desired menu.<br />
If rinsing is set to "On" and a<br />
beverage was already dispensed, the<br />
lines will be automatically rinsed<br />
before turning off.<br />
If rinsing is set to "On" and a<br />
beverage was already dispensed, the<br />
lines will be automatically rinsed<br />
before turning off.<br />
23
Settings<br />
Activating a timer<br />
+ back SETTINGS ~<br />
+ CARE ...<br />
+ USER PROFILES<br />
^ Select "Settings".<br />
SETTINGS<br />
+ LANGUAGE F ... GRIND AMOUNT ... ~<br />
+ CLOCK PRE-BREWING ~<br />
+ TIMER ... more ~<br />
^ Select "Timer".<br />
The timer function "Turning on at" or<br />
"Turning off at" can be activated or<br />
deactivated.<br />
^ Select "Activate".<br />
^ Select "On" to activate the desired<br />
function.<br />
Select "Off" to deactivate the desired<br />
function. The selected times in the<br />
function will stay stored in the<br />
memory.<br />
^ Select "OK" to confirm the setting.<br />
24
Settings<br />
Grind amount<br />
The grind amount can be set,<br />
depending on the coffee type, between<br />
0.2 ounces and 0.5 ounces<br />
(6 - 14 grams). The more the coffee is<br />
ground the stronger the espresso,<br />
coffee or cappuccino will be.<br />
The crema is also influenced by the<br />
grind amount.<br />
– If the crema has an even but<br />
white/yellow coloring, the ground<br />
amount might be too little.<br />
– If the crema is dark brown to black in<br />
color on the one side and almost<br />
white on the other side, the grind<br />
amount might be too much.<br />
^ Select the User profile, for which you<br />
would like to set the grind amount.<br />
^ Select "Settings".<br />
SETTINGS<br />
+ LANGUAGE F ... GRIND AMOUNT ... ~<br />
+ CLOCK PRE-BREWING ~<br />
+ TIMER ... more ~<br />
^ Select "Grind amount".<br />
The grind amount can be set to<br />
individual preferences for espresso,<br />
coffee and cappuccino.<br />
^ Select the desired beverage.<br />
^ Select the center left or right touch<br />
control to set the grind amount to<br />
more or less.<br />
^ Select "OK" to save the setting in the<br />
User profile.<br />
^ Select "Clear" until the display shows<br />
the desired menu.<br />
Pre-brewing<br />
During pre-brewing a small amount of<br />
water is released onto the ground<br />
coffee. After a short time the remaining<br />
water is pushed through the ground<br />
coffee at a high pressure.<br />
If the function is turned off, the hot<br />
water will be immediately pushed at a<br />
high pressure through the ground<br />
coffee.<br />
Pre-brewing is set to off by default.<br />
^ Select the User profile, for which you<br />
would like to set the pre-brewing.<br />
+ back SETTINGS J... ~<br />
+ CARE ...<br />
+ USER PROFILES<br />
^ Select the "Settings" touch control.<br />
SETTINGS<br />
+ LANGUAGE F ... GRIND AMOUNT ... ~<br />
+ CLOCK PRE-BREWING ~<br />
+ TIMER ... more ~<br />
^ Select "Pre-brewing".<br />
PRE-BREWING<br />
+ Long Normal<br />
+ Normal<br />
+ Without OK ~<br />
The second line shows the currently<br />
selected pre-brewing option.<br />
^ Set the desired option and select<br />
"OK" to save the setting.<br />
25
Settings<br />
Temperature<br />
Five temperatures are available for<br />
each beverage, three for hot water.<br />
Maximum is the highest temperature,<br />
minimum the lowest.<br />
Not every coffee type allows high<br />
temperatures. Some types react so<br />
sensitively that the crema cannot be<br />
properly built.<br />
^ Select the User profile, for which you<br />
would like to set the temperature.<br />
^ Select "Settings" and then "more".<br />
SETTINGS<br />
+ back STEAM SYSTEM ~<br />
+ TEMPERATURE LIGHTING ... ~<br />
+ RINSE AUTOMATIC more ~<br />
^ Select "Temperature".<br />
The temperature can be set individually<br />
for espresso, coffee, cappuccino and<br />
hot water.<br />
^ Select the desired beverage.<br />
^ Each beverage shows the currently<br />
selected temperature.<br />
^ Select the respective touch control<br />
until the desired temperature is<br />
highlighted.<br />
^ Select "OK".<br />
Rinse automatic<br />
It is important to flush out any residual<br />
coffee from the lines when starting to<br />
use the machine for the day. If<br />
"Automatic Rinsing" is set to "on", the<br />
rinsing starts automatically once the<br />
machine is turned on and still cold. The<br />
lines are rinsed with hot water and in<br />
return prewarmed. A message shows in<br />
the display.<br />
The machine will also run an automatic<br />
rinse, before it switches off, if it has<br />
been used to prepare a drink.<br />
The rinse automatic is set to on by<br />
default.<br />
To turn rinse automatic off/on<br />
^ Select "Settings" and then "more".<br />
SETTINGS<br />
+ back STEAM SYSTEM ~<br />
+ TEMPERATURE LIGHTING ... ~<br />
+ RINSE AUTOMATIC more ~<br />
^ Select "Rinse automatic".<br />
+ Off<br />
RINSE AUTOMATIC<br />
On<br />
+ On OK ~<br />
The second line shows if the rinse<br />
automatic is turned on or off.<br />
^ Select "On" or "Off" and then "OK" to<br />
save the setting.<br />
It is recommended to set this option to<br />
"On" so that the rinse process cannot<br />
be forgotten.<br />
26
Settings<br />
Steam system<br />
The appliance has two heating<br />
systems. They allow for independent<br />
preparation of froth/cappuccino or<br />
espresso/coffee. The second heating<br />
system can be turned off to save<br />
energy during the heating phase e.g. if<br />
froth is not prepared very often.<br />
When the steam system is turned off<br />
and froth or cappuccino is selected,<br />
the unit must heat up first to produce<br />
steam.<br />
As long as the coffee system was<br />
not completely turned off, the steam<br />
system is on.<br />
The steam system is turned on by<br />
default.<br />
To turn the steam system off<br />
^ Select "Settings".<br />
^ Select "Steam system".<br />
The second line shows if the steam<br />
system is turned on or off.<br />
^ Select "On" or "Off" and then "OK" to<br />
save the setting.<br />
Lighting<br />
Lighting sets the type of light used<br />
when the appliance is turned on. The<br />
lighting can be turned on/off<br />
automatically or dimmed to the desired<br />
brightness. The dimming functions can<br />
be set independently for the upper or<br />
lower lighting.<br />
,Caution! Do not look directly or<br />
with an optical instrument into the<br />
lighting. Laser!<br />
To change the lighting<br />
^ Select "Settings" and then "more".<br />
^ Select "Lighting".<br />
^ Select "On during use" or "Dimming".<br />
On during use<br />
On: The lighting turns on and off when<br />
the unit is turned on and off.<br />
Off: The lighting stays turned off.<br />
Dimming<br />
The brightness of the upper and lower<br />
lighting can be set independently of<br />
each other.<br />
^ Select "Top" or "Bottom".<br />
^ Set the brightness by selecting the<br />
center touch control to the left or<br />
right.<br />
^ Select "OK" to save the selection.<br />
^ Select "Clear" to get back to<br />
"Settings".<br />
27
Settings<br />
Total no. coffees<br />
^ Select "Total coffee" to check the<br />
number of previously dispensed<br />
espresso, coffee and cappuccino.<br />
After a few seconds the display<br />
switches back to the "Settings" menu or<br />
touch "OK".<br />
System Lock<br />
The coffee system can be locked so<br />
that it cannot be used by children or<br />
those not familiar with the operating<br />
instructions.<br />
To activate the System Lock, it must be<br />
set in the settings.<br />
^ Select "Settings" and then select<br />
"more" twice.<br />
^ Select "System Lock".<br />
The second line shows if the System<br />
Lock is currently activated or not.<br />
^ Select "On" and confirm with "OK".<br />
If "Off" is selected, the unit cannot be<br />
locked (safety measure).<br />
^ Turn the appliance off with the<br />
"On/Off" touch control.<br />
^ Select the touch control next to W.<br />
+ Off<br />
SYSTEM LOCK<br />
Off<br />
+ On OK ~<br />
^ Select "On" and then "OK".<br />
The appliance is now locked and will<br />
not operate. The display shows a<br />
locked padlock X.<br />
Unlocking the coffee system<br />
^ Select the X symbol.<br />
^ Select "Off" and then "OK".<br />
The appliance is now unlocked and<br />
ready for use.<br />
28
Settings<br />
Water hardness<br />
The hardness of the water used in the<br />
coffee system must be determined and<br />
programmed into the appliance. The<br />
water hardness will determine how<br />
frequently the unit must be descaled to<br />
maintain the coffee system properly.<br />
The machine monitors the volume of<br />
water passing through it in conjunction<br />
with the hardness of the water and will<br />
indicate when descaling is necessary.<br />
Your local water authority can tell you<br />
the hardness of your tap water or you<br />
can measure it yourself using the<br />
enclosed test strip.<br />
To set the correct water hardness:<br />
+ back SETTINGS J... ~<br />
+ CARE ...<br />
+ USER PROFILES<br />
^ Select "Settings" and then "more"<br />
twice.<br />
^ Select "Water hardness".<br />
^ Select the center touch control to set<br />
the water hardness harder (right) or<br />
softer (left).<br />
^ Select "OK" to save the selection.<br />
^ Dip the test strip in the water for<br />
1 second and shake off any<br />
remaining water. The result is visible<br />
in about 1 minute.<br />
If the water hardness is greater than<br />
40 gr/gal, the water must be<br />
descaled more often than displayed.<br />
Calcium will build up faster than at a<br />
lower water hardness and may<br />
damage the machine.<br />
29
Settings<br />
User profiles<br />
Up to 10 different user profiles can be<br />
entered to accommodate different<br />
tastes i.e. different grind amounts,<br />
temperature, pre-brewing, portion<br />
sizes.<br />
Creating a user profile<br />
^ Select "Settings" and then "more"<br />
twice.<br />
^ Select "User profiles".<br />
The upper display line shows which<br />
user profile is currently set, if different<br />
profiles were already created.<br />
The "Standard" profile has standard<br />
settings.<br />
^ Select "Creating".<br />
^ Select the center left or right touch<br />
control to select a letter.<br />
^ Touch "Select".<br />
^ Repeat the step until the desired<br />
name is spelled out.<br />
To delete a letter:<br />
^ Select the "Backspace" touch control.<br />
The last letter will be deleted.<br />
To save a name:<br />
^ Select "OK". The display shows the<br />
typed name.<br />
The display shows more selections:<br />
"Change name", "Delete", "Change"<br />
Not saving a name:<br />
^ Select the "Clear" touch control.<br />
30
Settings<br />
Change name<br />
^ If you would like to change a name,<br />
touch "Change name" and then the<br />
touch control next to the name to be<br />
changed.<br />
^ Type in the name as described in<br />
"Creating a user profile" and select<br />
"OK".<br />
^ Select "Clear" to go back to the<br />
previous screen.<br />
Delete<br />
To delete the user profile completely<br />
^ Select the "Delete" touch control.<br />
^ Select the touch control next to the<br />
name to be deleted.<br />
^ Select "Yes" if you are sure you would<br />
like to delete the selected name.<br />
The selected name will be deleted from<br />
the list.<br />
Change<br />
The appliance can be set so that it<br />
changes back automatically to the<br />
standard profile or that the once set<br />
user profile is maintained.<br />
^ Select "Change".<br />
^ Select from:<br />
Never: The unit keeps the once<br />
selected user profile until another user<br />
profile is selected.<br />
At turning on: Every time the coffee<br />
maker is turned on, it selects<br />
automatically the standard user profile,<br />
regardless which user profile was last<br />
selected.<br />
After servings: After each dispensing<br />
of a drink the unit switches<br />
automatically back to the standard<br />
profile.<br />
Selecting a user profile<br />
^ Select "User profile - Standard" and<br />
then the desired profile.<br />
^ Select "OK".<br />
The "Standard" profile has standard<br />
settings.<br />
31
Settings<br />
Display<br />
The display contrast and brightness<br />
can be adjusted.<br />
^ Select "Settings" and then select<br />
"more" three times.<br />
SETTINGS<br />
+ back PLUMBED ... ~<br />
+ DISPLAY RESET ~<br />
+ TONE OPTIONS<br />
^ Select "Display".<br />
^ Select "Contrast" or "Brightness" and<br />
then the setting. The higher the<br />
number the higher the contrast or<br />
brightness.<br />
^ Select "OK" to save the selection.<br />
Tone options<br />
A tone can be selected to confirm the<br />
selection of a touch control.<br />
^ Select "Settings" and then "more"<br />
three times.<br />
SETTINGS<br />
+ back PLUMBED ... ~<br />
+ DISPLAY RESET ~<br />
+ TONE OPTIONS<br />
^ Select "Tone options".<br />
To turn the tone on or off<br />
^ Select "Keypad tone" until the desired<br />
option is highlighted.<br />
If the keypad tones are turned on, the<br />
volume can be adjusted. The higher the<br />
number the louder the tone.<br />
^ Confirm the selection with "OK".<br />
Volume<br />
^ Select "Volume" until the desired<br />
volume of the keypad tone is<br />
highlighted.<br />
32
Settings<br />
Reset<br />
To select the factory defaults select in<br />
the submenu to "Reset all" (all settings<br />
back to default: timer, rinse automatic,<br />
steam system, lighting, System Lock,<br />
water hardness, display, last selected<br />
coffee type and all standard profile<br />
settings), or the "User profiles".<br />
If you select one of these options<br />
^ Select "Yes" to reset to the default<br />
settings or "No" to keep the selected<br />
settings.<br />
33
Setting the serving sizes<br />
The flavor of the coffee depends on the<br />
coffee and quantity of water used. To<br />
ensure the machine uses exactly the<br />
amount of water to suit your taste and<br />
your cups, there is a choice of two<br />
serving sizes for espresso/coffee. The<br />
fill height can be programmed.<br />
Espresso serving size<br />
approx. 30 - 125 ml.<br />
Coffee serving size<br />
approx. 30 - 250 ml.<br />
Hot water serving size<br />
approx. 30 - 250 ml.<br />
Cappuccino is a combination of milk<br />
froth and espresso. When preparing<br />
milk froth the froth-time can be<br />
individually set. The amount of<br />
espresso can be set to approx. 30 -<br />
125 ml.<br />
^ Set the desired cup size under the<br />
coffee dispenser. For a cappuccino<br />
size, set the cup under the froth<br />
dispenser first.<br />
^ Select the desired drink of which you<br />
want to set the water amount. Press<br />
and hold the touch control until<br />
"Serving setting" is displayed under<br />
the drink type.<br />
^ Release the touch control.<br />
^ Select "OK" once the cup is filled to<br />
your desire.<br />
When setting the cappuccino<br />
amount set the cup under the<br />
dispenser and touch "Cappuccino"<br />
until the display shows "Serving<br />
setting".<br />
The programmed amount will be<br />
dispensed every time the drink is<br />
made.<br />
The water flow stops automatically<br />
when it reaches the maximum amount<br />
possible. The maximum filling quantity<br />
will then be saved for the drink.<br />
34
Cleaning and Care<br />
Allow the coffee system to cool<br />
before cleaning. Danger of burns!<br />
Do not clean the unit with a steam<br />
cleaner. Never use cleaners<br />
containing chlorides, sand, soda or<br />
scouring agents. These will damage<br />
the surface.<br />
To avoid mold of coffee waste, clean<br />
the unit regularly.<br />
All parts can be cleaned in the<br />
dishwasher, except the brew unit and<br />
the bean container. When the parts are<br />
cleaned in the dishwasher they might<br />
get discolored by food residues such<br />
as tomatoes.<br />
+ back SETTINGS J... ~<br />
+ CARE ...<br />
+ USER PROFILES<br />
^ In the main menu touch "more" until<br />
"Care" shows. Select "Care".<br />
^ Select "System rinse".<br />
^ Select "OK".<br />
Hot water will flow through and clean<br />
the brew unit, hot water and coffee<br />
dispensers.<br />
^ When finished select "OK", then<br />
"Clear" to go back to the main menu.<br />
Rinse<br />
If you do not wish to rinse the lines<br />
automatically, they have to be flushed<br />
manually. Rinse them twice daily, once<br />
before using the machine and before<br />
turning it off for the day.<br />
35
Cleaning and Care<br />
Water tank<br />
Empty the water tank daily and refill<br />
before preparing the first drink with<br />
fresh, cold tap water.<br />
Check if the valve is clean. If the<br />
valve has residues on it, the water<br />
tank will not connect properly and<br />
might leak.<br />
Waste unit<br />
The display shows a message to empty<br />
the waste unit. Clean the waste unit<br />
daily. Coffee waste can mold if there is<br />
water in the waste unit from the rinse<br />
process.<br />
Line the waste unit with a paper towel<br />
to make for easier cleaning.<br />
^ Pull the waste unit out.<br />
^ Wash the waste container in the<br />
dishwasher or by hand with hot water<br />
and liquid dish soap and dry with a<br />
soft cloth.<br />
^ Clean the niche of the waste unit in<br />
the machine.<br />
^ Push the waste unit completely into<br />
the machine.<br />
^ Clean the niche of the water tank.<br />
36
Cleaning and Care<br />
Drip tray<br />
The trip tray contains a sensor which<br />
causes the display to show when the<br />
tray is full and needs to be emptied.<br />
Clean the drip tray daily.<br />
Remove the drip tray after the final<br />
rinse when no more water runs from<br />
the lines.<br />
^ Open the door and pull the drip tray<br />
out.<br />
The drip tray contains a grid to avoid<br />
spilling during transport.<br />
^ Wash the drip tray in the dishwasher<br />
or by hand with hot water and liquid<br />
dish soap, then dry with a soft cloth.<br />
Take care that the metal contacts at<br />
the back of the drip tray are clean<br />
and dry. If the contacts are soiled or<br />
wet the unit cannot detect when the<br />
drip tray is full and needs to be<br />
emptied.<br />
^ Push the drip tray with grid along the<br />
right edge all way in the machine.<br />
^ Close the door.<br />
37
Cleaning and Care<br />
Drip catch with metal insert<br />
Bean container<br />
The bean container must be cleaned<br />
by hand with hot water and liquid<br />
dish soap.<br />
^ Take out and clean the drip catch<br />
and metal plate.<br />
^ Pull the bean container out and push<br />
the lid back.<br />
^ Wash the bean container by hand<br />
with hot water and liquid dish soap,<br />
then dry with a soft cloth.<br />
^ Push the lid back and reinsert the<br />
bean container into the machine.<br />
38
Cleaning and Care<br />
Coffee dispenser connector<br />
Interior and door<br />
^ Once all movable parts are removed<br />
clean the interior with a solution of hot<br />
water and liquid dish soap.<br />
Dry ground coffee can be vacuumed.<br />
A connector between the brew unit and<br />
coffee dispenser is located on the inner<br />
door.<br />
^ Gently clean the connector regularly<br />
with a damp cloth without removing<br />
the lubricant for the gasket.<br />
^ Lubricate the gasket once a month<br />
with the supplied silicone grease.<br />
^ The lower part of the inner door has a<br />
drip tray. Clean the drip tray.<br />
39
Cleaning and Care<br />
Brew unit<br />
Manually clean the brew unit weekly.<br />
The movable parts are lubricated<br />
and the gaskets will get damaged in<br />
the dishwasher.<br />
^ Take out the water tank, waste unit<br />
and the cover for the ground coffee<br />
funnel.<br />
^ Press the light colored button on the<br />
brew unit handle, a, and turn the<br />
handle to the left, b.<br />
^ Press the brew unit catch, c,<br />
downwards and pull the brew unit<br />
out.<br />
^ Rub off any coffee residue from the<br />
filters with a sponge. One filter is in<br />
the funnel, a, the second is to the<br />
left of the funnel, b.<br />
^ Dry the funnel, a, to prevent ground<br />
coffee from sticking.<br />
^ Clean the interior and remove coffee<br />
residues. Dry coffee grounds can be<br />
vacuumed.<br />
^ Push the brew unit in the track<br />
straight into the appliance.<br />
The brew unit is not in the correct<br />
position if it is hard to pull out. See<br />
"Frequently asked questions".<br />
^ Clean the brew unit under running<br />
warm water. Do not use soap.<br />
Leave the handle in position or the<br />
brew unit cannot be inserted<br />
properly.<br />
^ Press the light colored button on the<br />
brew unit handle, a, and turn the<br />
handle to the right, b.<br />
40
Cleaning and Care<br />
Cleaning/Degreasing the brew unit<br />
Depending on the fat content of the<br />
coffee, the brew unit can clog. Clean<br />
the brew unit approx. every 200 cups<br />
with the enclosed detergent tablets.<br />
They are specially developed for the<br />
coffee maker to optimize the<br />
degreasing. The cleaning tablets can<br />
be purchased from Miele.<br />
As a reminder the display shows<br />
"Cleaning must be started" after<br />
200 cups and then until the machine<br />
is cleaned. The cleaning process<br />
takes about 6 minutes.<br />
^ Set a 1 quart container under the<br />
coffee dispenser.<br />
The interior is also rinsed, therefore the<br />
drip tray must be emptied.<br />
When the display shows:<br />
Please drop the cleaning tablet in the<br />
funnel for ground coffee<br />
^ Take out the funnel cover and open<br />
the funnel lid.<br />
^ Select "Care".<br />
^ Select "Cleaning" and then "OK".<br />
The display guides you through the<br />
cleaning process. Please follow the<br />
single steps.<br />
^ Insert the cleaning tablet in the<br />
funnel.<br />
^ Close the lid, reinsert the cover and<br />
close the door.<br />
^ Select "OK".<br />
Follow the display messages.<br />
When the display shows:<br />
Process finished. Please confirm.<br />
The brew unit is cleaned and rinsed.<br />
^ Select "OK" and then "Clear" to go<br />
back to the main menu.<br />
41
Cleaning and Care<br />
Froth dispenser/Intake hose<br />
Clean the froth dispenser after each<br />
use, otherwise they may become<br />
blocked with dried milk and hard to<br />
clean.<br />
Rinsing does not replace cleaning in<br />
the dishwasher.<br />
^ Select "Care".<br />
^ Select "Rinse system".<br />
^ Set a glass with water under the<br />
intake hose and select "OK".<br />
The intake hose takes in the water and<br />
rinses it.<br />
Cleaning in the dishwasher<br />
To clean the froth dispenser in the<br />
dishwasher, take the parts from the<br />
machine. Regular cleaning in the<br />
dishwasher is important, so that the<br />
froth dispenser does not clog over time,<br />
when milk is not removed during<br />
rinsing.<br />
^ Pull all pieces apart. Remove the<br />
piece with the gaskets by turning and<br />
pulling it apart.<br />
^ Insert the pieces in the dishwasher<br />
and then lubricate the gaskets with<br />
the supplied silicone grease.<br />
Take care that the small holes of the<br />
single pieces are not clogged (see<br />
arrow).<br />
Pinch the soft parts to loosen the<br />
soiling, then blow them out.<br />
Do not use a needle to remove<br />
residues, the parts may get<br />
damaged.<br />
^ Turn the cover above the spout to the<br />
left, a.<br />
^ Pull the froth dispenser out of the<br />
machine, b, holding it by the spout<br />
and the intake hose.<br />
42
Cleaning and Care<br />
^ Reassemble the parts as shown.<br />
Take care that the raised parts (see<br />
arrow) point downwards and,<br />
^ Push the froth dispenser into the<br />
machine from underneath, a, and<br />
turn the cover above the spout to the<br />
right, b.<br />
Do not use the machine without the<br />
froth dispenser installed.<br />
^ that the marks are lined up.<br />
Steam will spit uncontrollably.<br />
Danger of scalding and machine<br />
damage.<br />
43
Cleaning and Care<br />
Exterior<br />
The front of the appliance can be<br />
cleaned with a sponge and a solution of<br />
warm water and non abrasive liquid<br />
dish soap. Dry with a soft cloth.<br />
Only use a slightly damp sponge<br />
when cleaning the controls. Water<br />
could penetrate into the electronics<br />
and cause damage.<br />
Never use abrasive cleaning agents.<br />
They will damage the machine.<br />
Wipe any spills from descaling<br />
immediately!<br />
Stainless steel surfaces<br />
Stainless steel surfaces can be cleaned<br />
using a non-abrasive stainless steel<br />
cleaner.<br />
To help prevent soiling, a conditioner<br />
for stainless steel can also be used.<br />
Apply sparingly and with even<br />
pressure.<br />
Stainless steel colored controls<br />
Clean the buttons and knobs with a<br />
sponge and a solution of warm<br />
water and liquid dish soap. These<br />
controls may become discolored or<br />
damaged if not cleaned regularly.<br />
Do not use a stainless steel cleaner<br />
on the knobs or buttons. Clean<br />
immediately after use.<br />
44
Descaling the appliance<br />
The coffee system must be descaled<br />
regularly. The appliance will display a<br />
reminder message to descale and will<br />
eventually lock if not descaled.<br />
The display will show "50 drinks<br />
remaining - descaling must be started".<br />
This message will now appear after<br />
each preparation. If the counter has<br />
elapsed to 0, the appliance will be<br />
locked.<br />
Select "Descale" to start the descaling<br />
immediately. The descaling takes about<br />
20 minutes. If you want to continue at a<br />
later point in time, turn the unit off. The<br />
appliance can only be used again once<br />
descaling is performed.<br />
Only use the enclosed descaling<br />
tablets for descaling. They are<br />
specially developed for the coffee<br />
system to optimize the descaling.<br />
The descaling tablets can be<br />
purchased from Miele.<br />
Other agents may damage the<br />
machine and affect the taste of<br />
coffee and hot water.<br />
The machine could also be<br />
damaged.<br />
Descaling<br />
^ To descale the unit before it is heated<br />
up, select "Descaling" in the main<br />
menu.<br />
^ To start the descaling process before<br />
prompted by the machine (e.g.<br />
because of very hard water), select<br />
"Care".<br />
^ Select "Descaling" and then "OK".<br />
The display prompts the user through<br />
the single steps of the descaling<br />
process. Follow the prompts.<br />
If the descaling is started while the<br />
machine is still hot, the appliance<br />
will cool down for 10 minutes before<br />
the descaling begins.<br />
The descaling process cannot be<br />
cancelled once "OK" is selected.<br />
The process now needs to be<br />
completed. This is a safety feature to<br />
ensure the process will be<br />
completed. It is important for best<br />
results and the longevity of the<br />
machine.<br />
Use the supplied descaling funnel to<br />
protect the appliance front from the<br />
descaling agent. Clean up any<br />
descaling spills immediately to<br />
avoid damage to the appliance front.<br />
Thoroughly clean the water tank and<br />
the drip tray of descaling residues.<br />
45
Descaling the appliance<br />
^ The display will prompt you through<br />
the next steps:<br />
– to fill the descaling agent into the<br />
water tank<br />
– take the water tank out<br />
– fill the water tank with fresh lukewarm<br />
tap water to the mark k. If not filled<br />
to the mark, the descaling will be<br />
cancelled prematurely and<br />
incomplete<br />
Dissolve two of the enclosed<br />
descaling tablets in the water. Close<br />
the water tank and insert into<br />
position.<br />
^ Please fill with fresh water: Take the<br />
water tank out, rinse out any<br />
descaling residues thoroughly with<br />
water. Fill with fresh water to the k<br />
mark.<br />
During rinsing water runs from the<br />
dispensers. When the display shows<br />
Please empty the drip tray: Empty the<br />
drip tray. Since the machine is also<br />
rinsed inside, the drip tray needs to be<br />
emptied to continue rinsing.<br />
When the display shows: Process<br />
finished: Descaling is complete. Follow<br />
the prompts in the display. The<br />
appliance is rinsed a final time.<br />
Since the lines are drained during<br />
descaling, they must be filled with<br />
water before the next use. See<br />
"Making coffee - Cappuccino and<br />
milk froth".<br />
^ Set the descaling funnels under the<br />
coffee dispensers. Set the funnel in<br />
the holes of the drip tray so the<br />
dispensed liquids are guided in the<br />
drip tray.<br />
During the descaling process the<br />
descaling solution will flow from the hot<br />
water and coffee dispensers. The<br />
machine rests briefly to allow the<br />
solution to take affect before<br />
dispensing again.<br />
46
Frequently asked questions<br />
Repairs to electrical appliances should only be carried out by a suitably<br />
qualified person in accordance with local and national safety regulations.<br />
Repairs and other work by unqualified persons could be dangerous. The<br />
manufacturer cannot be held responsible for unauthorized work.<br />
Machine Problems<br />
The light does not illuminate when the appliance is turned on.<br />
– Is the unit locked?<br />
– Is the lighting turned off? – See "Settings - Lighting".<br />
If not, the light bulb has burnt out.<br />
Contact Miele's Technical Service<br />
Department.<br />
The heating phase takes a long time.<br />
When the door is opened during the<br />
heating up phase, e.g. to fill the<br />
water tank, the heating element turns<br />
off. The unit heats only with the door<br />
closed.<br />
Keep the door closed during the heating<br />
phase.<br />
The light turns off suddenly.<br />
The light turns off automatically when the machine has not been used for<br />
10 minutes.<br />
The display messages are difficult to read.<br />
The contrast or brightness of the<br />
displays are too low / high.<br />
The display remains dark.<br />
The unit has no power.<br />
Adjust the display contrast / brightness.<br />
See "Settings - Display".<br />
– The main switch is turned off.<br />
– The machine is not plugged in.<br />
– Check that the fuse had not blown or is<br />
defective. If the fuse has blown contact<br />
Miele's Technical Service Department.<br />
47
Frequently asked questions<br />
The unit suddenly turns off.<br />
– Is the machine programmed to<br />
switch off after a programmed<br />
time?<br />
– The water temperature could be to<br />
high.<br />
– The machine goes into standby mode<br />
when not used for a programmed time.<br />
See "Settings - Timer - Turn off after".<br />
– The unit is locked until the water has<br />
cooled.<br />
– There could be pebbles within the<br />
coffee beans. The unit shuts off<br />
– Call Miele's Technical Service<br />
Department.<br />
after 20 secs. to avoid damages.<br />
– Is the machine plugged in? – Plug in the machine.<br />
The door cannot be closed.<br />
Check if all containers are properly inserted.<br />
The door is hard to open and close, and the gasket of the connector is<br />
pulled off.<br />
Adjust the door with the door hinges. See "<strong>Installation</strong> - Adjusting the door<br />
hinges".<br />
The gasket of the coffee dispenser connector is damaged and leaking.<br />
– The gasket is worn.<br />
– Change the gasket with a new one<br />
(supplied).<br />
– Check the door. Is the alignment – Adjust the door with the door hinges.<br />
off from damage to the gasket? See "<strong>Installation</strong> - Adjusting the door<br />
hinges".<br />
The grind control lever will not move.<br />
Close the unit and prepare a coffee/espresso. The grind grade can now be reset.<br />
The brew unit cannot be taken out.<br />
The brew unit is not in the correct<br />
position.<br />
Close the door and turn the appliance on.<br />
The brew unit will position itself into the<br />
correct position.<br />
The cover of the ground coffee funnel cannot be pushed in properly.<br />
Close the lid of the ground coffee funnel.<br />
48
Preparing / dispensing problems<br />
No water, steam or milk is dispensed from the froth dispenser.<br />
– The water tank is not correctly<br />
inserted.<br />
– The dispenser is clogged.<br />
The grinding sounds louder than usual.<br />
There could be pebbles within the<br />
coffee beans.<br />
The grinding is quieter than usual.<br />
The coffee bean container is empty.<br />
The respective message appears in<br />
the display.<br />
– Take out the water tank and reinsert it.<br />
– Clean the froth dispenser as described<br />
in "Cleaning and Care - Froth<br />
dispenser/Intake hose".<br />
Turn off the unit immediately.<br />
Contact the Miele's Tech. Service.<br />
Wait until no sound is heard and refill the<br />
coffee bean container.<br />
The coffee/espresso flows too fast into the cup.<br />
The grind control is set too coarse. Set the grind control to a finer grind.<br />
The coffee/espresso flows too slow into the cup.<br />
The grind control is set too fine. Set the grind control to a coarser grind.<br />
The coffee/espresso is not hot enough.<br />
– Were the supply lines pre-heated? – The smaller the cup, the more<br />
important it is to pre-heat.<br />
– The temperature is set too low. – Check on what temperature range the<br />
coffee type is set.<br />
– Check if the brew unit is clogged. – Clean the brew unit.<br />
No drink is prepared although the beans were grinded and enough water is<br />
in the container.<br />
– The grind control is set to the finest<br />
or the grind amount is set to the<br />
maximum.<br />
– The process is timed, the process<br />
might need so long, there is no<br />
time for brewing any more.<br />
Frequently asked questions<br />
– Set the grind control or the grind<br />
amount to a different position.<br />
49
Frequently asked questions<br />
The steam heating system is turned off but steam can still dispensed.<br />
Steam can be dispensed as long as the steam heating system is heated. Once it<br />
has cooled, steam can only be dispensed once the steam system has heated.<br />
The coffee dispensing is interrupted.<br />
The water tank is empty.<br />
Refill the water tank with fresh cold tap<br />
water.<br />
Instead of coffee only water is dispensed.<br />
– The beans may have gotten stuck. – Pull the bean container out and push it<br />
back in.<br />
– The ground coffee funnel cover<br />
was opened and closed and a<br />
preparation with ground coffee<br />
was selected but no ground coffee<br />
was inserted.<br />
The coffee system switches<br />
automatically back to beans use<br />
after the preparation.<br />
The drip tray is empty but a message to empty it is displayed.<br />
– The metal contacts are soiled or<br />
wet.<br />
– Check if the drip tray is inserted<br />
correctly.<br />
– Clean and dry the contacts.<br />
– Insert the drip tray as described in<br />
"Cleaning and Care - Drip tray".<br />
– Turn the machine off and on again with<br />
the main switch.<br />
– If the message still appears contact<br />
Technical Service.<br />
50
Frequently asked questions<br />
The machine does not rinse when turned on although the automatic rinse<br />
feature is set to "On".<br />
When the machine is still at a temperature of about 140°F (60°C). The machine<br />
will not rinse when it's too hot.<br />
The water dispensing stops when programming the serving size.<br />
– There was not enough water in the<br />
tank. The dispensed water amount<br />
will not be saved.<br />
– If the maximum water amount is<br />
dispensed, the water flow stops<br />
automatically. The maximum water<br />
amount is saved.<br />
Water is in the waste unit.<br />
This is not a fault.<br />
"Coffee water" is in the waste unit.<br />
If the grind control is set to very fine,<br />
there might be coffee water in the<br />
waste unit.<br />
– Fill the water tank before programming<br />
the serving size.<br />
This is residual water from the cleaning<br />
process.<br />
If the grind control is not set to very fine,<br />
contact Technical Service.<br />
The descaling process was started accidently.<br />
The descaling process cannot be cancelled once it is started. The process<br />
needs now to be completed. This is a safety feature to ensure the process will be<br />
completed. It is important for best results and the longevity of the machine.<br />
The preheating time is increased, the water flow amount is not correct and<br />
the unit performs less?<br />
The machine needs to be descaled. See "Descaling the appliance".<br />
No water flows from the spouts.<br />
The filters in the brew unit are<br />
clogged.<br />
Rub any residue off the filters with a<br />
sponge.<br />
51
Frequently asked questions<br />
The brew unit or waste unit could not be pulled from the machine.<br />
– The brew unit is not in the basic<br />
position.<br />
– The door was opened during<br />
grinding or brewing.<br />
No crema has formed or it is "different".<br />
– Check if the grind control is set too<br />
coarse or too fine.<br />
– Check what temperature range the<br />
coffee type is set. If the<br />
temperature is too high, there are<br />
black areas in the crema.<br />
– Close the door. The brew unit<br />
automatically gets into the basic<br />
position.<br />
– The coffee is not fresh enough.<br />
– The coffee is unsuitable for use in this<br />
machine. See "Filling the beans<br />
container".<br />
– The coffee dispensers are set too high.<br />
Too much crema has formed and is above the coffee dispensers.<br />
Some coffee types produce too<br />
much crema when the coffee /<br />
espresso temperature is set to the<br />
maximum and the amount of ground<br />
coffee is too much.<br />
Lower the temperature and amount of<br />
ground coffee.<br />
The milk froth does not flow but "spits".<br />
Before using for the first time the water lines need to be filled. See "Making<br />
coffee - Cappuccino and milk froth".<br />
When preparing milk froth for the first time, the milk is spit from the mug.<br />
The door was opened during the<br />
heating phase. High steam pressure<br />
has built making the steam<br />
dispensed too strong when the valve<br />
is opened.<br />
Keep the door closed during the heating<br />
phase.<br />
52
Frequently asked questions<br />
"F" messages<br />
The message F 10 or F 17 shows in the display.<br />
No water is dispensed.<br />
– The water tank is not inserted properly.<br />
Take it out and reinsert correctly.<br />
– The water tank was not filled correctly<br />
during the descaling process. Fill the<br />
water tank up to the correct mark.<br />
– After fixing the fault, the machine turns<br />
off then on again. Start the desired<br />
preparation again.<br />
– If the message still appears contact<br />
Technical Service.<br />
F 73 shows<br />
The brew unit is clogged and cannot<br />
reset to the correct position.<br />
– Select "Clear".<br />
– Take out and clean the brew unit. See<br />
"Cleaning and Care - Brew unit".<br />
– Reinsert the brew unit and close the<br />
door.<br />
– If the message still shows contact<br />
Technical Service.<br />
53
After sales service<br />
In the event of a fault which you cannot<br />
easily fix yourself, please contact the<br />
Miele Technical Service Department at<br />
the contact information on the back of<br />
this booklet.<br />
When contacting the Technical Service<br />
Department, please quote the model<br />
and serial number of your appliance<br />
given on the data plate inside the<br />
appliance.<br />
MieleCare<br />
MieleCare, our Extended Service<br />
Contract program, gives you the<br />
assurance of knowing that your<br />
appliance investment is covered by<br />
5 years of worry free ownership.<br />
MieleCare is the only Extended Service<br />
Contract in the industry that guarantees<br />
repairs by a Miele Authorized Service<br />
Provider using genuine Miele parts.<br />
Only genuine Miele parts installed by<br />
factory trained professionals can<br />
guarantee the safety, reliability, and<br />
longevity of your Miele appliance.<br />
Please note that unless expressly<br />
approved in writing by Miele’s Service<br />
department, Extended Service<br />
Contracts offered by other providers for<br />
Miele products will not be recognized<br />
by Miele. Our goal is to prevent<br />
unauthorized (and untrained) service<br />
personnel from working on your Miele<br />
products, possibly doing further<br />
damage to them, you and/or your<br />
home.<br />
To learn more about MieleCare<br />
Extended Service Contracts, please<br />
contact your appliance dealer or visit<br />
us online at:<br />
www.store.miele.com<br />
54
<strong>Installation</strong> <strong>Instructions</strong>
Caring for the environment<br />
Disposal of packing material<br />
The cardboard box and packing<br />
materials protect the appliance during<br />
shipping. They have been designed to<br />
be biodegradable and recyclable.<br />
Please recycle.<br />
Ensure that any plastic wrappings,<br />
bags, etc. are disposed of safely and<br />
kept out of the reach of children.<br />
Danger of suffocation!<br />
Disposal of an old appliance<br />
Old appliances may contain materials<br />
that can be recycled. Please contact<br />
your local recycling authority about the<br />
possibility of recycling these materials.<br />
Ensure that the appliance presents no<br />
danger to children while being stored<br />
for disposal. Before discarding an old<br />
appliance, unplug it from the outlet, cut<br />
off its power cord and remove any<br />
doors to prevent hazards.<br />
56
Electrical connection<br />
Ensure that power is not supplied to<br />
the machine while installation or<br />
maintenance work is performed.<br />
All electrical work should be<br />
performed by a qualified electrician<br />
in strict accordance with national<br />
and local safety regulations.<br />
<strong>Installation</strong>, repairs and other work<br />
by unqualified persons could be<br />
dangerous.<br />
Important<br />
The coffee system comes equipped<br />
with a 6 ft (1.8 m) power cord with a<br />
NEMA 5-15P molded plug for<br />
connection to a 120 V, 15 A, 60 Hz<br />
power supply.<br />
The manufacturer cannot be held<br />
responsible for unauthorized work.<br />
Verify that the voltage, load and circuit<br />
rating information found on the data<br />
plate match the household electrical<br />
supply before installing the coffee<br />
system.<br />
If there is any question concerning the<br />
electrical connection of this appliance<br />
to your power supply, please consult a<br />
licensed electrician or contact Miele’s<br />
Technical Service Department. See<br />
back page for contact information.<br />
WARNING:<br />
THIS APPLIANCE MUST BE<br />
GROUNDED<br />
57
<strong>Installation</strong><br />
<strong>Installation</strong> options<br />
The coffee system is designed to be<br />
built into cabinetry.<br />
A combination with other Miele built in<br />
appliances is possible. If the machine<br />
is installed in combination with other<br />
appliances, it should be installed with a<br />
protective base between the appliance<br />
and the unit (exception: installation with<br />
a built-in plate warmer).<br />
A special display cabinet is also<br />
available from your dealer or Miele, as<br />
an installation option.<br />
58
<strong>Installation</strong><br />
<strong>Installation</strong><br />
Make sure power is not supplied to<br />
the appliance while installation or<br />
maintenance work is performed.<br />
Disconnect the power supply to the<br />
work area by unplugging the unit,<br />
tripping the circuit breaker or<br />
removing the fuse. The coffee<br />
system must be installed into<br />
cabinetry before being used.<br />
^ If your cabinet has 3/4" (19 mm) side<br />
walls, drill four holes for the<br />
mounting.<br />
^ Center the unit and turn the screws a<br />
little bit in and then out again.<br />
^ Take the unit out of the niche and drill<br />
four holes at the screw markings<br />
(1/16" [2 mm], diameter 3/16"<br />
[4.5 mm])<br />
^ Plug the appliance into the electrical<br />
outlet.<br />
^ Push the appliance into the niche.<br />
^ Open the door and partially tighten<br />
the screws.<br />
^ Unscrew the height adjustable feet<br />
on the underside of the machine<br />
about 1/16" (2 mm).<br />
^ Push the appliance all the way back<br />
into the cabinet and center it. If<br />
necessary level the unit with the four<br />
height adjustable feet.<br />
The feet can be turned out up to 3/8"<br />
(10 mm).<br />
^ Carefully turn the lower screws, a, to<br />
center the machine.<br />
^ To secure the appliance in the<br />
cabinet, tighten the upper screws, b,<br />
by hand. Do not use an electric<br />
screwdriver.<br />
59
<strong>Installation</strong><br />
Adjusting the door hinges<br />
The door hinges can be adjusted if the<br />
door cannot be opened easily.<br />
^ To adjust the door sideways, a, turn<br />
screw a.<br />
^ To adjust the door to the front or<br />
back, b, turn screw b.<br />
60
Alteration rights reserved / 2906<br />
CVA 4070<br />
M.-Nr. 06 911 520 / 00<br />
en - USA / CDN