DIRECTV® Receiver User Guide (D11) - DBSInstall.com
DIRECTV® Receiver User Guide (D11) - DBSInstall.com
DIRECTV® Receiver User Guide (D11) - DBSInstall.com

You also want an ePaper? Increase the reach of your titles
YUMPU automatically turns print PDFs into web optimized ePapers that Google loves.
Safety & Care<br />
WARNING<br />
To reduce the risk of fire or electric<br />
shock, do not expose this product<br />
to rain or moisture. The apparatus<br />
shall not be exposed to dripping or<br />
splashing and that no objects filled<br />
with liquids, such as vases, shall<br />
be placed on the apparatus<br />
TIP<br />
CAUTION<br />
RISK OF ELECTRIC SHOCK<br />
DO NOT OPEN<br />
CAUTION: TO REDUCE THE RISK OF<br />
ELECTRIC SHOCK, DO NOT REMOVE<br />
COVER (OR BACK).<br />
NO USER-SERVICEABLE PARTS INSIDE.<br />
REFER SERVICING TO QUALIFIED SERVICE<br />
PERSONNEL.<br />
We highly re<strong>com</strong>mend plugging<br />
the DIRECTV <strong>Receiver</strong> into a surge<br />
protector to prevent damage from<br />
fl uctuations in your power supply.<br />
!<br />
Safety & Care<br />
Your DIRECTV <strong>Receiver</strong> has been designed and manufactured to stringent quality and safety<br />
standards. You should, however, be aware of the following important precautions for safe and optimal<br />
use of the equipment.<br />
Meaning of symbols printed on the rear panel of the product:<br />
• The “ bolt of lightning” indicates un-insulated material within your unit may cause an<br />
electrical shock. For the safety of everyone in your household, please do not remove product<br />
covering.<br />
• The “exclamation point” calls attention to features for which you should read the enclosed<br />
literature closely to prevent operating and maintenance problems.<br />
Important Safety Instructions<br />
1) Read these instructions.<br />
2) Keep these instructions.<br />
3) Heed all warnings.<br />
4) Follow all instructions.<br />
5) Do not use this apparatus near water.<br />
6) Clean only with dry cloth.<br />
7) Do not block any ventilation openings. Install in accordance with the manufacturer’s<br />
instructions.<br />
8) Do not install near any heat sources such as radiators, heat registers, stoves, or other apparatus<br />
(including amplifiers) that produce heat.
Safety & Care<br />
9) Do not defeat the safety purpose of the polarized or grounding-type plug. A polarized plug has<br />
two blades with one wider than the other. A grounding type plug has two blades and a third<br />
grounding prong. The wide blade or the third prong are provided for your safety. If the provided<br />
plug does not fit into your outlet, consult an electrician for replacement of the obsolete outlet.<br />
10) Protect the power cord from being walked on or pinched particularly at plugs, convenience<br />
receptacles, and the point where they exit from the apparatus.<br />
11) Only use attachments/accessories specified by the manufacturer.<br />
12) Use only with the cart, stand, tripod, bracket, or table specified by the manufacturer, or sold with<br />
the apparatus. When a cart is used, use caution when moving the cart/apparatus <strong>com</strong>bination to<br />
avoid injury from tip-over.<br />
13) Unplug this apparatus during lightning storms or when unused for long periods of time.<br />
14) Refer all servicing to qualified service personnel. Servicing is required when the apparatus has<br />
been damaged in any way, such as power-supply cord or plug is damaged, liquid has been spilled<br />
or objects have fallen into the apparatus, the apparatus has been exposed to rain or moisture, does<br />
not operate normally, or has been dropped.<br />
• CAUTION: Avoid moisture to reduce the risk of fi re or electric shock. The DIRECTV <strong>Receiver</strong><br />
should not be used near water (for example, kitchen sink, bathtub, pool, damp basement). Also, never<br />
spill liquid on the receiver, and do not place vases or other vessels containing liquid on top of it.<br />
Note to Satellite Dish Installer<br />
This reminder is provided to call your attention to articles 810 and 820 of the 2002 National Electrical Code. Refer<br />
to article 810, in particular 810-1 and 810-15, for required grounding of the metal structure of the dish antenna.<br />
Refer also to the 810-2 which, by reference to article 820, requires that the satellite dish coaxial cable shield be<br />
connected to the grounding system of the building as close to the point of cable entry as practical.<br />
The apparatus shall not be exposed<br />
to dripping or splashing and that<br />
no objects filled with liquids, such<br />
as vases, shall be placed on the<br />
apparatus<br />
Safety & Care<br />
iii
Safety & Care<br />
iv<br />
IMPORTANT: Be sure not<br />
to place your DIRECTV<br />
<strong>Receiver</strong> near anything<br />
WET or HOT!<br />
Safety & Care<br />
• Ensure proper ventilation — the vent slots on the DIRECTV <strong>Receiver</strong> must be left uncovered<br />
to allow proper airflow to the unit. Blocking the airflow to the unit could impair performance or<br />
damage your receiver and other <strong>com</strong>ponents.<br />
• Do not stack electronic <strong>com</strong>ponents or other objects on top of the DIRECTV <strong>Receiver</strong>. Also, do<br />
not stack the receiver on top of a “hot <strong>com</strong>ponent” such as an audio power amplifier.<br />
• Protect your <strong>com</strong>ponents from power surges by connecting all the <strong>com</strong>ponents before plugging any<br />
power cords into the wall outlet. Use of a surge protector is also re<strong>com</strong>mended.<br />
• Don’t overload power outlets or extension cords, which can result in the risk of fi re or shock. It’s<br />
also important to use only the type of power source indicated on the marking label or in this<br />
manual.<br />
• To prevent electrical shock, this apparatus shall be connected to a mains socket outlet with a<br />
protective earthing and fully inserted.<br />
• Avoid audio hum or interference by inserting all cable plugs fi rmly into their jacks. Also, place<br />
Audio/Video (A/V) cables to the sides of the TV back panel rather than down the middle once<br />
connected. Try not to coil any twin-lead cables and keep them away from A/V cables as much as<br />
possible.<br />
• Never insert objects of any kind into any openings in the DIRECTV <strong>Receiver</strong> (other than the<br />
DIRECTV ® Access Card as detailed in this chapter).<br />
• Place it on a flat, hard surface — do not operate the DIRECTV <strong>Receiver</strong> on a carpet or other<br />
padded surface.<br />
• Always unplug your DIRECTV <strong>Receiver</strong> before moving it.
Safety & Care<br />
• Always unplug the DIRECTV <strong>Receiver</strong>, TV and other equipment before you connect or<br />
disconnect any cables.<br />
• Leave the main power connector accessible the mains connector at the back of the unit in case of<br />
emergency shutdown<br />
• CAUTION: Electric Shock — never attempt to disassemble the DIRECTV <strong>Receiver</strong> yourself;<br />
always take it to a qualified service person when repair is required. Opening or removing covers<br />
may expose dangerous voltage or other risks, and incorrect reassembly can cause shock when<br />
receiver is subsequently used. Attempted self-repair may also void your warranty. Changes or<br />
modifications not expressly approved by the party responsible for <strong>com</strong>pliance (by the warranty or<br />
by the manufacturer) could void the user’s authority to operate the equipment.<br />
• Do not drop your DIRECTV <strong>Receiver</strong> and always move it with care.<br />
• Have your DIRECTV <strong>Receiver</strong> professionally serviced (do not attempt to service it yourself)<br />
• Any changes or modifications in construction of this device which are not expressly approved by<br />
the party responsible for <strong>com</strong>pliance could void the user’s authority to operate the equipment.<br />
For your information:<br />
The identification sticker can be located underneath or on the back of your receiver.<br />
The tele<strong>com</strong>munication network voltage used is the category number 3.<br />
Important<br />
Important: This device incorporates an anticopy process technology that is protected by U.S. patents and other intellectual<br />
property rights. The anticopy process is licensed for non-<strong>com</strong>mercial, home use only. Reverse engineering or disassembly<br />
is prohibited. Unauthorized changes or modifi cations to this equipment may void the user’s authority to operate it.<br />
Safety & Care<br />
v
Great TV viewing is in your<br />
hands!<br />
A good way to begin learning about your<br />
DIRECTV ® System is to familiarize yourself with<br />
the remote control. You’ll fi nd further details<br />
throughout the <strong>User</strong> <strong>Guide</strong> relating to specifi c<br />
functions.<br />
Navigating 101<br />
You’ll fi nd you can get around nearly all onscreen<br />
menus the same simple way.<br />
4Highlight… a menu or button by using the<br />
ARROW keys (up, down, left and right).<br />
4Choose it… by pressing SELECT while the item<br />
is highlighted.<br />
Note: Don’t worry about getting stuck in a menu. You can always<br />
press EXIT to return to video.<br />
Quick Tip<br />
To place batteries in your remote control:<br />
1. Remove cover from the battery <strong>com</strong>partment by<br />
sliding it downward.<br />
2. Insert 2 AA batteries (supplied), matching<br />
the positive (+) and negative (–) at each end.<br />
3. Slide the cover back on to <strong>com</strong>plete installation.<br />
To program your remote control:<br />
1. See “Programming Your Remote Control” on<br />
page 20.<br />
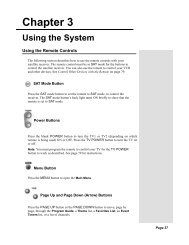
Keys in the shaded area below can be programmed to function with your VCR, DVD player or stand-alone DVR unit.<br />
MODE SWITCH<br />
Changes remote to control other equipment,<br />
for example, a DVD<br />
TV INPUT<br />
Changes the “source” — the piece of equipment<br />
whose signal is displayed on your TV<br />
STOP<br />
REPLAY<br />
REWIND<br />
PAUSE<br />
ACTIVE<br />
Displays the DIRECTV Interactive Home Page—<br />
local weather and more!<br />
GUIDE<br />
Displays the onscreen program <strong>Guide</strong><br />
SELECT<br />
Selects any highlighted item<br />
BACK<br />
Takes you to the screen you visited previously<br />
MENU<br />
Displays a <strong>com</strong>pact menu of settings and services<br />
RED<br />
In <strong>Guide</strong>, jumps 12 hours back; other functions<br />
vary — look for onscreen hints<br />
GREEN<br />
In <strong>Guide</strong>, jumps 12 hours forward; other functions<br />
vary — look for onscreen hints<br />
VOLUME<br />
Raises or lowers volume<br />
MUTE<br />
Toggles sound volume on/off<br />
NUMBER KEYS & DASH<br />
Tune to a channel directly; also input numbers and<br />
letters when needed in onscreen menus<br />
TV<br />
INPUT<br />
GUIDE<br />
VOL<br />
BACK<br />
MUTE<br />
MENU<br />
1 2 3<br />
ABC<br />
4 5 6<br />
GHI<br />
JKL<br />
7 8 9<br />
PQRS<br />
DASH<br />
ACTIVE<br />
AV1 AV2 TV<br />
PWR<br />
SELECT<br />
TUV<br />
0<br />
LIST<br />
R<br />
INFO<br />
CHAN<br />
PREV<br />
DEF<br />
MNO<br />
WXYZ<br />
ENTER<br />
EXIT<br />
TV<br />
POWER<br />
ON<br />
OFF<br />
PAGE<br />
POWER<br />
Turns other equipment on and off, as selected<br />
with MODE switch<br />
TV POWER ON/OFF<br />
Turns your TV and DIRECTV <strong>Receiver</strong> on and off<br />
ADVANCE<br />
PLAY<br />
FFWD<br />
RECORD<br />
LIST<br />
Displays your To Do List<br />
EXIT<br />
Exits any menu and returns to last channel viewed<br />
ARROWS<br />
Move highlight to items in any direction needed<br />
INFO<br />
Displays info for a highlighted or fullscreen<br />
program<br />
BLUE<br />
In live TV, displays the Mini <strong>Guide</strong>; other functions<br />
vary — look for onscreen hints<br />
YELLOW<br />
In fullscreen TV, cycles through alternate audio<br />
tracks; other functions vary — look for onscreen<br />
hints<br />
CHAN/PAGE<br />
In live TV, changes channel up or down; in a menu,<br />
such as the <strong>Guide</strong>, scrolls page up or down<br />
PREV<br />
Tunes to last channel viewed<br />
ENTER<br />
Activates number entries quickly
Contents<br />
Chapter 1 – Getting Started<br />
Wel<strong>com</strong>e ..................................................................................................................................... 2<br />
Making the Right Connections ..................................................................................................3<br />
Hardware Reference .................................................................................................................... 4<br />
Getting Familiar ......................................................................................................................... 7<br />
Choose Your Setup .................................................................................................................... 10<br />
<strong>Guide</strong>d Setup & Activation ...................................................................................................... 18<br />
Programming Your Remote Control ......................................................................................... 20<br />
Chapter 2 – What’s On<br />
Watching TV ............................................................................................................................ 24<br />
The <strong>Guide</strong> ................................................................................................................................. 26<br />
Autotune ................................................................................................................................... 28<br />
Pay Per View ............................................................................................................................. 30<br />
viii
Section Contents Title<br />
Chapter 3 – The Quick Menu<br />
Using the Quick Menu ............................................................................................................. 32<br />
Settings ..................................................................................................................................... 32<br />
Audio Options .......................................................................................................................... 34<br />
Category Sort ............................................................................................................................ 35<br />
Pay Per View ............................................................................................................................. 35<br />
Find By ..................................................................................................................................... 36<br />
Date & Time ............................................................................................................................ 37<br />
Favorites .................................................................................................................................... 37<br />
Caller ID & Messages ............................................................................................................... 39<br />
Parental Controls ...................................................................................................................... 40<br />
Chapter 4 – Other Information<br />
Troubleshooting ........................................................................................................................ 46<br />
Limited 90-Day Warranty ........................................................................................................ 55<br />
Product Information ................................................................................................................. 60<br />
DIRECTV PROTECTION PLAN ......................................................................................... 61<br />
FCC Customer Information ..................................................................................................... 63<br />
Index ......................................................................................................................................... 67<br />
Chapter 1<br />
ix
Chapter 1<br />
2 Wel<strong>com</strong>e<br />
3 Making the Right Connections<br />
4 Hardware Reference<br />
7 Getting Familiar<br />
10 Choose Your Setup<br />
18 <strong>Guide</strong>d Setup & Activation<br />
20 Programming Your Remote Control
Getting Started<br />
Wel<strong>com</strong>e<br />
TIP<br />
You can fi nd additional<br />
information and the latest<br />
updates at DIRECTV.<strong>com</strong>.<br />
With its astounding variety of channels and choices, crisp digital-quality picture and sound and<br />
one-of-a-kind sports and events… DIRECTV ® service offers everything you’d want in your television<br />
experience. With the DIRECTV <strong>Receiver</strong> you can expect more than ever before, with access to over<br />
225 channels, including over 30 premium movie channels, with all the convenience of DIRECTV<br />
service. DIRECTV ® Pay Per View offers a handy choice in recent hit movies, plus exciting live sports,<br />
concerts and specials. There’s exclusive sports subscriptions for every taste and team. Even access to 36<br />
<strong>com</strong>mercial-free music channels!<br />
To deliver this unique programming and enhance your entertainment experience, the DIRECTV ®<br />
System has been designed to be simple and user-friendly. You’ll fi nd that most features are selfexplanatory,<br />
with onscreen directions to lead you through them.<br />
So, wel<strong>com</strong>e to the family.<br />
2<br />
Wel<strong>com</strong>e
Safety & Care<br />
Making the Right Connections<br />
When you are ready to connect your <strong>DIRECTV®</strong> <strong>Receiver</strong> and your other <strong>com</strong>ponents, whether<br />
you’re having your system professionally installed or handling it yourself, be sure to read over the<br />
following few pages to familiarize yourself with some important tips for safety and care.<br />
Before you begin<br />
Your satellite dish antenna must be installed before you can begin following the procedures in this<br />
<strong>User</strong> <strong>Guide</strong>. (Professional installation is highly re<strong>com</strong>mended.) Your dish needs to be mounted<br />
in a position where it has access to the satellite signals, and RG-6 coaxial cables must be run into<br />
the room(s) where your receiver(s) will be located. If you choose to install the dish yourself, see the<br />
separate instruction manual that came with your satellite dish antenna.<br />
Package Contents<br />
The following items are included with your DIRECTV <strong>Receiver</strong>:<br />
4 A/V cables (RCA type) 4 Access card<br />
4 S-Video cable 4 <strong>User</strong> <strong>Guide</strong><br />
4 Phone cord 4 Remote Control & batteries<br />
4 Power cord<br />
Chapter 1<br />
3
Getting Started<br />
Hardware Reference<br />
General<br />
Satellite Dish Antenna<br />
This is your “dish” and related hardware, affi xed to your roof or other surface, which picks up the<br />
broadcast signals from our satellites.<br />
DIRECTV <strong>Receiver</strong> (or Satellite <strong>Receiver</strong>)<br />
Your DIRECTV <strong>Receiver</strong> picks up the signal from your satellite dish antenna and translates it into<br />
v i e w a ble T V pr o g r a m m i n g .<br />
DIRECTV<br />
Access Card<br />
Contains information about your <strong>DIRECTV®</strong> service. It must be properly inserted for your receiver to<br />
work and to activate your programming.<br />
4<br />
Hardware Reference
Hardware Reference<br />
Cables & Connections<br />
Best Video: S-Video Jack and Cable<br />
S-Video jacks and cables provide the best picture quality. You will still need to connect the left and<br />
right audio cables to the TV, or optical audio cable to your stereo, because the S-Video cable only<br />
carries the picture signal, not sound.<br />
S-Video Jack<br />
Audio/Video (A/V) Jack and Cable<br />
Audio/Video (A/V) cables provide very good picture quality and stereo sound, and should be used if<br />
your TV does not have S-Video jacks. The DIRECTV <strong>Receiver</strong>’s A/V jacks are color coded (yellow<br />
for video, red for right audio and white for left audio). If your TV has only one input for audio<br />
(mono), connect it to the left (white) audio jack on the DIRECTV <strong>Receiver</strong>.<br />
RF Jack and Coaxial Cable (F-type)<br />
RF jacks and coaxial cables provide good picture and mono sound quality. They should be used<br />
if A/V connections are not available on your TV. RF jacks are used to connect to your TV and<br />
satellite dish, off-air antenna and cable feed connections. The RF jacks on the receiver are labeled<br />
SATELLITE IN, OFF-AIR IN and OUT TO TV. Note: Be sure to use RG-6 coaxial cable when<br />
connecting from the satellite dish to the DIRECTV <strong>Receiver</strong>.<br />
R<br />
L<br />
Video<br />
RF Jack<br />
Chapter 1<br />
5
Getting Started<br />
Phone<br />
Jack<br />
Telephone Jack and Cord<br />
The telephone line cord is required to connect your DIRECTV <strong>Receiver</strong> to a land-based telephone<br />
line if you choose to subscribe to DIRECTV programming. The phone line connection is used to<br />
periodically call DIRECTV. You will need an RJ11-type modulator jack (the most <strong>com</strong>mon type<br />
of phone jack). Note: Do not connect your receiver to a digital PBX phone system — doing so may<br />
permanently damage your equipment and void your warranty.<br />
Note: Not all cables <strong>com</strong>e with your<br />
digital satellite receiver; you may<br />
need to purchase additional cables<br />
depending on your setup.<br />
6<br />
Cables & Connections
Helpful Hardware Getting Reference Familiar<br />
Getting Familiar<br />
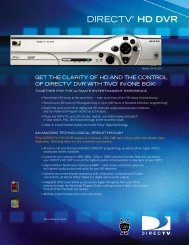
DIRECTV <strong>Receiver</strong> Front Panel<br />
1 2 3 4 5 6 5 7 8 9<br />
1) POWER – Turns your DIRECTV <strong>Receiver</strong> on or off. Your DIRECTV <strong>Receiver</strong> still tunes and<br />
receives messages when powered off.<br />
2) REMOTE SENSOR – The infrared sensor picks up <strong>com</strong>mands from the remote control.<br />
3) GUIDE – Displays the onscreen program guide.<br />
4) MENU – Brings up the Quick Menu to access settings and services.<br />
5) ARROWS – Move the onscreen highlight up, down, left or right.<br />
6) SELECT – Selects the item highlighted.<br />
7) ACTIVE – Displays the DIRECTV Interactive Home Page—local weather and more!<br />
8) INFO – Displays channel banner or info to a highlighted program or channel cell.<br />
9) DOOR PANEL – The access card slot and RESET button are located behind the door panel.<br />
Chapter 1<br />
7
Getting Started<br />
Insert your DIRECTV Access Card<br />
SELECT<br />
Active Info<br />
Locate the access card that came packed with your DIRECTV <strong>Receiver</strong> materials and insert the card,<br />
facing upward, fully into the slot.<br />
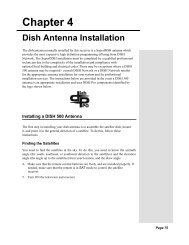
DIRECTV <strong>Receiver</strong> Rear Panel<br />
8<br />
Getting Familiar<br />
1 2 3 4 5 6 7 8 9 10<br />
Your equipment may not look exactly like the model illustrated.<br />
1) SATELLITE IN – Use to connect the DIRECTV <strong>Receiver</strong> to the satellite dish antenna.<br />
2) OUT TO TV – Connects the DIRECTV <strong>Receiver</strong> to your TV or VCR using RF coaxial cable.<br />
This jack provides the most basic connection, carrying good sound and video quality.<br />
3) OFF-AIR IN – Connect a standard TV antenna or cable feed to the DIRECTV <strong>Receiver</strong> using<br />
this jack. You can then switch between the DIRECTV <strong>Receiver</strong>’s signal and the TV/cable feed.<br />
4) 3/4 CHANNEL SWITCH – Allows users to choose the channel that is not used in<br />
your area (3 or 4) when the receiver is connected to TV using RF coaxial cable from the<br />
DIRECTV <strong>Receiver</strong>’s OUT TO TV.
Getting Familiar<br />
5) S-VIDEO – Provides the best picture quality, better than VIDEO RCA-type or RF coaxial cable<br />
jacks. If your TV has an S-Video jack, use it along with the audio jacks (S-Video only carries<br />
picture information, not sound) to connect to your TV.<br />
6) VIDEO (Yellow) – Provides better picture quality than the OUT TO TV jack. Connect the<br />
second RCA-type <strong>com</strong>posite VIDEO jack to another device, such as a VCR. You must also<br />
connect the AUDIO cables when using the VIDEO connection.<br />
7) AUDIO (R-Red and L-White) – Audio cables offer better sound quality than RF coaxial cables.<br />
You can connect a second set of audio cables to another <strong>com</strong>ponent, such as a VCR or stereo.<br />
8) USB PORT – For future use.<br />
9) PHONE – Connects the DIRECTV <strong>Receiver</strong> to a telephone wall jack. We require a land-based<br />
telephone connection to <strong>com</strong>municate periodically with your DIRECTV <strong>Receiver</strong>.<br />
10) POWER – Connects the DIRECTV <strong>Receiver</strong> to an electrical outlet. We re<strong>com</strong>mend you use a<br />
surge protector to safeguard your DIRECTV <strong>Receiver</strong> from power spikes.<br />
Chapter 1<br />
9
Getting Started<br />
Choose Your Setup<br />
TIP<br />
When working with<br />
cables, be sure to<br />
connect corresponding<br />
outputs and inputs (Video<br />
OUT to Video IN, Right<br />
Audio OUT to Right Audio<br />
IN, etc.). Never connect<br />
an IN to an IN or an OUT<br />
to an OUT.<br />
OUT<br />
IN<br />
All A/V jacks and inputs<br />
are color coded. Always<br />
match the color of the<br />
plug to the same color of<br />
the jack.<br />
There are several ways to connect your receiver to match your particular equipment setup and to gain<br />
optimum signal quality. The basic steps are as follows:<br />
• Connect the satellite dish cable to your receiver.<br />
• Connect the receiver audio and video to your TV or VCR.<br />
• If you connected the receiver to a VCR, connect the VCR to your TV.<br />
• Connect the receiver to a telephone line.<br />
• Plug in all power cords.<br />
The following pages give detailed instructions on the types of connections you can make, depending<br />
on the equipment you have, in order to get the best picture and sound quality. Note that the back<br />
panels of your TV and other equipment may not exactly match those illustrated.<br />
Connecting Your DIRECTV <strong>Receiver</strong> to the Satellite Dish<br />
Connect the RG-6 RF coaxial cable from your satellite dish to the jack labeled SATELLITE IN on<br />
the DIRECTV <strong>Receiver</strong>.<br />
10<br />
Choose Your Setup
Choose Your Setup<br />
Connecting Your DIRECTV <strong>Receiver</strong> to your TV or VCR<br />
Depending on the connections on the back of your TV or VCR, you have the following options:<br />
• S-Video & A/V Audio Connection (Best Quality)<br />
• A/V Connection (Better Quality)<br />
• RF Coaxial Connection (Good Quality)<br />
These connections are described on the following pages.<br />
Note<br />
NOTE: To obtain optimum picture quality, make sure the receiver is connected directly to the TV. Connecting the<br />
receiver to the TV through a VCR or DVD recorder is known to yield less than optimum picture quality, particularly<br />
when viewing copy-protected programming.<br />
Chapter 1<br />
11
Getting Started<br />
S-Video & A/V Audio Connection (Best Quality)<br />
Using the S-Video cable, connect one end to the S-VIDEO output jack on the DIRECTV <strong>Receiver</strong><br />
and the other end to the S-Video input jack on the TV.<br />
Using the A/V cable, connect the white and red plugs from one end of the A/V cable to the AUDIO<br />
L (white) and R (red) jacks on the back of the DIRECTV <strong>Receiver</strong>. Connect the plugs from other end<br />
of the A/V cable to the corresponding audio input jacks on your TV or VCR. Do not plug the video<br />
(yellow) into either the DIRECTV <strong>Receiver</strong> or the TV.<br />
If hooking up a VCR, use another A/V cable to connect the white and red plugs from one end of the<br />
A/V cable to the audio L (white) and R (red) and video (yellow) output jacks on the back of the VCR.<br />
Connect the plugs from the other end of the A/V cable to the corresponding input jacks on your TV.<br />
Then, use another A/V cable to connect the white and red plugs from one end of the A/V cable to the<br />
AUDIO L (white) and R (red) and VIDEO (yellow) OUTPUT jacks on the back of the DIRECTV<br />
<strong>Receiver</strong>. Connect the plugs from other end of the A/V cable to the corresponding input jacks on<br />
your VCR.<br />
Now, continue on page 16, “Connecting Your DIRECTV <strong>Receiver</strong> to Your Telephone Line.”<br />
12<br />
Choose Your Setup
Choose Your Setup<br />
Television<br />
BEST QUALITY<br />
CONNECTION –<br />
S-Video & A/V Audio<br />
The back panels of<br />
your equipment may not<br />
look exactly like those<br />
illustrated.<br />
DIRECTV ® <strong>Receiver</strong><br />
Chapter 1<br />
13
Getting Started<br />
TIP<br />
To switch between watching your<br />
VCR and watching video from your<br />
receiver, you may need to program<br />
the INPUT key on your DIRECTV<br />
remote. (See page 20 for info.)<br />
Some TVs also have a MENU button<br />
that allows you to change the video<br />
source using an onscreen menu. If<br />
you have trouble changing the video<br />
source, refer to the instructions that<br />
came with your TV.<br />
A/V Connection (Better Quality)<br />
Using the A/V cable, connect the white, red and yellow plugs from one end of the A/V cable to<br />
the AUDIO L (white) and R (red) and VIDEO (yellow) output jacks on the back of the DIRECTV<br />
<strong>Receiver</strong>. Connect the other end of the A/V cable to the corresponding A/V input jacks on your TV.<br />
If hooking up a VCR, using another A/V cable, connect the white, red and yellow plugs from one end<br />
of the A/V cable to the AUDIO L (white) and R (red) and VIDEO (yellow) output jacks on the back<br />
of the DIRECTV <strong>Receiver</strong>. Connect the other end of the A/V cable to the corresponding input jacks<br />
on your VCR.<br />
Then, run an A/V cable from the VCR’s A/V output to the TV’s A/V inputs. This will allow you to<br />
watch videotapes. NOTE: If your TV only has one set of A/V input jacks, this connection can also be<br />
made by running a RF cable from the VCR’s out to TV jack, to the TV’s antenna in jack.<br />
Now, continue on page 16, “Connecting Your DIRECTV <strong>Receiver</strong> to Your Telephone Line.”<br />
14<br />
Choose Your Setup<br />
Note<br />
If your TV only has one audio input jack use AUDIO L (white) jack on the back of the DIRECTV <strong>Receiver</strong> to make<br />
the connection.
Choose Your Setup<br />
Television<br />
VERY GOOD QUALITY<br />
CONNECTION – A/V<br />
The back panels of your<br />
equipment may not look<br />
exactly like those illustrated.<br />
DIRECTV ® <strong>Receiver</strong><br />
Chapter 1<br />
15
Getting Started<br />
TIP<br />
To switch between watching your<br />
VCR and watching video from your<br />
receiver, you may need to program<br />
the INPUT key on your DIRECTV<br />
remote. (See page 20 for info.)<br />
Some TVs also have a MENU button<br />
that allows you to change the video<br />
source using an onscreen menu. If<br />
you have trouble changing the video<br />
source, refer to the instructions that<br />
came with your TV.<br />
RF Coaxial Connection (Good Quality)<br />
Using an RF coaxial cable, connect one end to the OUT TO TV jack on the DIRECTV <strong>Receiver</strong><br />
and the other end to the antenna in jack on the TV or VCR. If hooking up a VCR, use another RF<br />
coaxial cable to connect one end to the out to TV jack on the VCR and the other end to the antenna<br />
in jack on the TV.<br />
Set the 3/4 switch on the back of the DIRECTV <strong>Receiver</strong> to the “blank” local channel for in your<br />
area. For example, if you have a local Channel 3 in your area, then move the 3/4 switch to Channel 4.<br />
If you have a local Channel 4, then set the switch to Channel 3. To watch DIRECTV programming,<br />
tune your TV to Channel 3 or 4 (depending on the position of the 3/4 switch in step 3 above).<br />
Connecting Your DIRECTV <strong>Receiver</strong> to Your Telephone Line<br />
Plug one end of the telephone cord into a phone jack on your wall (or into a phone splitter that<br />
is plugged into a phone jack) and the other end into the PHONE JACK on the back of the<br />
DIRECTV <strong>Receiver</strong>.<br />
16<br />
Choose Your Setup<br />
Completing the Connections<br />
Plug all power cords into electrical sockets.<br />
Note<br />
NOTE: The Good Quality connection can also be made using A/V cables if your VCR has A/V inputs. To connect using<br />
the A/V cables, connect the audio L (white), R (red) and video (yellow) plugs from one end of the A/V cable to the<br />
AUDIO 1 L and R and VIDEO 1 jacks on the back of the DIRECTV <strong>Receiver</strong>. Connect the other end of the A/V cable to<br />
the corresponding jacks on your VCR.
Choose Your Setup<br />
Television<br />
GOOD QUALITY<br />
CONNECTION – RF Coaxial<br />
The back panels of your<br />
equipment may not look exactly<br />
like those illustrated.<br />
DIRECTV ® <strong>Receiver</strong><br />
Chapter 1<br />
17
Getting Started<br />
<strong>Guide</strong>d Setup & Activation<br />
Now that your receiver and equipment are all hooked up and plugged in, you’re ready to<br />
fi nish all the details to begin receiving your DIRECTV service.<br />
TIP<br />
You may decide to set up,<br />
change or adjust some of the<br />
settings later. When you’re<br />
ready, press MENU on your<br />
remote, press SELECT on<br />
Settings then select Setup.<br />
MENU<br />
SELECT<br />
1) Make sure the MODE SWITCH on the remote control is set to DIRECTV.<br />
2) Press TV POWER ON. The DIRECTV <strong>Receiver</strong> will turn on.<br />
3) The fi rst screen will allow you to select a language. Using the arrow keys on the remote control,<br />
move to the language you prefer and press SELECT.<br />
4) You will see a Wel<strong>com</strong>e screen.<br />
Now, let us lead the way…<br />
Simply follow the onscreen directions to <strong>com</strong>plete your setup functions. If you’ve installed your<br />
satellite dish and system yourself, you’ll be guided though various functions for optimizing your<br />
signal and setup — including positioning your dish and a system test. If, like most people, you had<br />
your system professionally installed, these functions already have been <strong>com</strong>pleted.<br />
Important<br />
18<br />
<strong>Guide</strong>d Setup & Activation<br />
In order to protect your TV screen from burn-in (a side-effect caused when a stationary image is displayed for too long),<br />
the DIRECTV <strong>Receiver</strong> interface automatically goes into screen saver mode, and displays a black screen with a moving<br />
logo when no key is pressed for 5 minutes or more while a stationary image is displayed on the TV. To dismiss the<br />
screen saver and return to what you were doing, press any key on the remote. Burn-in may cause permanent damage to<br />
your TV and DIRECTV is not liable for any damages that may be caused to your TV.
<strong>Guide</strong>d Setup & Activation<br />
After these setup procedures are <strong>com</strong>plete, you’ll see the Satellite Data Acquisition screen, as the<br />
receiver gathers information from the satellite for the onscreen program guide.<br />
Next, you’ll be given the opportunity to set up your phone connection, as well as program your<br />
remote to control other equipment such as your TV and/or DVD player. Just follow the screen<br />
instructions and you’ll be ready to watch in no time!<br />
Activate Your DIRECTV Service<br />
Once all the setup processes are <strong>com</strong>plete, all that’s left to do is activate your DIRECTV service.<br />
Before you make the call, be sure to:<br />
4 Tune to Channel 100 and be sure you’re picking up a satellite signal (DIRECTV channel).<br />
4 Have on hand your service address, social security number and a valid major credit card.<br />
4 Note your access card and receiver ID numbers (fi nd these by pressing MENU, then go to<br />
Settings and press SELECT. Then go to Setup and press SELECT. Highlight Info & Test and press<br />
SELECT.<br />
When you’re ready, just call 1-800-DIRECTV (1-800-347-3288) and pick the programming package<br />
that’s right for you.<br />
Chapter 1<br />
19
Getting Started<br />
Programming Your Remote Control<br />
You can program the DIRECTV remote control to operate your TV power, volume and mute,<br />
additional equipment such as a DVD, VCR, stereo, or second TV or DIRECTV <strong>Receiver</strong>.<br />
1) Press MENU to display the Quick Menu.<br />
2) Highlight Settings and press SELECT.<br />
3) Highlight Setup and press SELECT.<br />
4) Press SELECT on Remote in the left menu.<br />
5) Follow the onscreen instructions to program your remote for your TV or additional equipment<br />
(AV1 and AV2).<br />
Once your remote is programmed to work with your TV, the VOL and MUTE key control the TV<br />
regardless of the slide switch position. If you would like to change the VOL and MUTE to work with<br />
another <strong>com</strong>ponent, you can. Simply set up your remote to work with the <strong>com</strong>ponent, and then move<br />
the slide switch to the position you would like to lock the VOL and MUTE keys to. Point the remote<br />
away from your DIRECTV <strong>Receiver</strong> and press and hold MUTE and SELECT until the light near<br />
the slide switch blinks twice (about 5 seconds). Enter 9-9-3. The light will blink twice, indicating the<br />
VOL and MUTE are now locked to the chosen <strong>com</strong>ponent, no matter what position the slide switch<br />
is in.<br />
20<br />
Programming Your Remote Control
Programming Your Remote Section Control Title<br />
Factory Defaults<br />
To reset all the functions of the remote control to the factory defaults, follow these steps:<br />
1) Point the remote away from your DIRECTV <strong>Receiver</strong> and <strong>com</strong>ponents. Press and hold MUTE<br />
and SELECT until the light above the slide switch on the remote fl ashes twice (about 5 seconds).<br />
2) Enter 9-8-1. The light on the remote will fl ash twice, indicating you have cleared AV1, AV2 and<br />
TV modes.<br />
Chapter 1<br />
21
Getting Started<br />
22<br />
Chapter 1
Chapter 2<br />
24 Watching TV<br />
26 The <strong>Guide</strong><br />
28 Autotune<br />
30 Pay Per View
What’s On<br />
TIP<br />
Use the Channel Lineup (included<br />
in your Wel<strong>com</strong>e package) to get<br />
familiar with our channel numbers.<br />
Watching TV<br />
Now that everything’s set up, you’re ready to grab your remote and start surfi ng!<br />
With the MODE switch to the left (under the DIRECTV logo), press TV POWER ON. To access<br />
the channel of your choice, simply key in its numbers on your remote (the channel will appear in a<br />
few seconds, or press ENTER after the numbers and it will appear right away). You can also navigate<br />
to different channels through the <strong>Guide</strong>, covered in detail starting on page 26. Keep in mind, either<br />
way, you’ll only be able to access those channels in your chosen DIRECTV ® programming package.<br />
Use the black keys on the left side of your remote control to adjust volume up or down (VOL) or mute<br />
the sound ( MUTE). The black keys on the right side can take you to the next channel numerically up<br />
or down (CHAN), or jump to the previous channel you watched (PREV).<br />
24 Watching TV
Watching TV<br />
The Channel Banner<br />
Any time you tune to a channel, you’ll see the channel banner appear across the top of<br />
the screen. This banner displays the following useful information:<br />
1) Current date & time<br />
1 2 3 4 5 6 7<br />
The channel banner gives you info<br />
on the channel and show you are<br />
currently watching.<br />
2) DIRECTV Channel – Channel logo, number and call letters of the station you’re currently<br />
viewing.<br />
3) Program – Program title, stop and start time and rating of the current program.<br />
4) Current Favorites – Favorite Channels list currently in use.<br />
5) Audio options – Two states: bright and dim. If displayed brightly, alternate audio options are<br />
available.<br />
6) Messages – Two states: bright and dim. If displayed brightly, there are new DIRECTV messages<br />
in Caller ID & Messages.<br />
7) Pa r e nt a l C o nt r o l s – Parental Controls lock status. Three states: Locked, unlocked and<br />
temporarily unlocked.<br />
To see program details at any time<br />
press INFO on your remote (press<br />
a second time to clear). Select<br />
More Info button to see additional<br />
options.<br />
Music Channels<br />
Your DIRECTV service includes dozens of enjoyable, continuous, <strong>com</strong>mercial-free music channels with something for every<br />
taste. Tune to these just as you would to any channel. You’ll see a special Channel Banner that initially displays the channel<br />
description (for example, “Alternative,” “Today’s Country”). As each song is played, its info will appear in the banner,<br />
including song title, artist and record <strong>com</strong>pany..<br />
Chapter 2<br />
25
What’s On<br />
The <strong>Guide</strong><br />
Overview of the DIRECTV Advanced Program <strong>Guide</strong> ®<br />
The <strong>Guide</strong> displays listings of current and up<strong>com</strong>ing programs for up to 3.5 days in advance. Find<br />
out what’s on (now or later), change the channel, fi nd and purchase a pay per view movie or event, or<br />
search for a program you’re interested in.<br />
TIP<br />
Press the GUIDE key twice to skip<br />
the Category Sort screen.<br />
GUIDE<br />
Icons you may see in the <strong>Guide</strong>:<br />
4 – Broadcast in letterbox (16:9 or widescreen) format<br />
4 – All Day Ticket Pay Per View showings (pay once, watch all day)<br />
26 The <strong>Guide</strong>
The <strong>Guide</strong><br />
Getting Around in the <strong>Guide</strong><br />
Press the GUIDE key on your remote, then choose how you want to fi lter the <strong>Guide</strong>. Select All<br />
Channels, or channels in a specific category.<br />
Moving through the <strong>Guide</strong> is simple:<br />
4 The UP, DOWN, LEFT and RIGHT arrow keys move you through listings and time slots.<br />
Highlight a program or channel cell to view its description.<br />
4 Use the CHAN key up or down to scroll a full page.<br />
4 Press the RED or GREEN keys to move forward or back in time.<br />
4 To tune to a program that is on now, highlight the program and press SELECT. Selecting a future<br />
program displays program information.<br />
GUIDE<br />
BACK<br />
ACTIVE<br />
SELECT<br />
MENU<br />
LIST<br />
INFO<br />
Highlight an item by using the arrow<br />
keys to move LEFT, RIGHT, UP or<br />
DOWN. Press SELECT to access the<br />
information or channel.<br />
EXIT<br />
4 Press INFO when you’ve highlighted a show in the <strong>Guide</strong> to view a more in-depth description and<br />
options. Pressing INFO when you’ve highlighted the channel name displays the channel’s listing<br />
for up to 3.5 days.<br />
4 Press SELECT when you’ve highlighted a channel cell (far left) to view that channel in the TV<br />
window.<br />
4 Press MENU to see <strong>Guide</strong> options, change your Favorites list, or jump to a desired date and time.<br />
Chapter 2<br />
27
What’s On<br />
Autotune<br />
An even better way to catch all your favorites<br />
Autotune is a great way to see your favorite programs on your schedule. You won’t miss your favorite<br />
series because it moved to a different day or time, or miss your team’s playoff game because you had to<br />
work late. Just set a program to autotune and your DIRECTV ® <strong>Receiver</strong> will tune to it automatically<br />
when it starts.<br />
To schedule a program for autotuning with specific options:<br />
1) Highlight a program that interests you and press INFO.<br />
2) Highlight and select Autotune. A screen is displayed where you can set Autotune options for that<br />
program. Follow the onscreen instructions to set the program to autotune as you wish.<br />
3) Select the Set Autotune button, then OK on the confi rmation screen.<br />
If a program you select to autotune confl icts with another program, you will be notified of the confl ict<br />
at the time and given a choice of which autotune to cancel.<br />
28 Autotune
Autotune<br />
Changing Autotune Options/Canceling an Autotune<br />
Once you have scheduled a program to autotune, you can change the autotune options or cancel<br />
the autotune by selecting the program in the <strong>Guide</strong> or the To Do List (press LIST); then, select the<br />
Autotune item in the left menu, and follow the onscreen instructions to change the program’s options<br />
or cancel the Autotune <strong>com</strong>pletely.<br />
You can change the following Autotune options:<br />
• For all programs, you can extend Autotune start and stop times (for example, start 1 minute before<br />
the program; stop 5 minutes after the scheduled end of the program).<br />
• For programs with multiple episodes, you can select whether to Autotune fi rst run programs and<br />
repeats or just fi rst runs.<br />
Recording to VCR<br />
To record a program on your VCR, make sure you’ve connected your VCR properly to your<br />
DIRECTV <strong>Receiver</strong>, then set up your VCR to record at the same time as a scheduled autotune<br />
and you’re set. See your VCR <strong>User</strong>’s <strong>Guide</strong> for information on how to set it up for scheduled or<br />
manual recording.<br />
Chapter 2<br />
29
What’s On<br />
Pay Per View<br />
The Latest Movies, 24 Hours a Day<br />
You don’t have to go out for the best and biggest movies and special events! Recent hits and events like<br />
sports, <strong>com</strong>edy and more are available 24 hours a day on DIRECTV ® Pay Per View. You’ll fi nd them<br />
listed in the <strong>Guide</strong> in the 100s, with previews on channel 100.<br />
TIP<br />
You can also order DIRECTV Pay<br />
Per View movies and events on the<br />
Internet at DIRECTV.<strong>com</strong> or over the<br />
phone at 1-800-531-5000. Keep in<br />
mind, though, there is an ordering<br />
fee for those purchases placed over<br />
the phone.<br />
Tune to a pay per view program or press INFO on a highlighted pay per view program. Select a Buy<br />
option and follow the onscreen instructions. As long as your receiver has been connected to a landbased<br />
phone line, you can use your remote to order. You’ll get a reminder a few minutes before the pay<br />
per view’s start time.<br />
You can cancel your pay per view order for any reason as long as none of the program has been<br />
viewed. Press LIST to display the To Do List. Press SELECT on the Purchase item in the left menu.<br />
Select the desired program and follow the onscreen instructions.<br />
30 Pay Per View
Chapter 3<br />
32 Using the Quick Menu<br />
32 Settings<br />
35 Audio Options<br />
36 Category Sort<br />
36 Pay Per View<br />
37 Find By<br />
38 Date & Time<br />
38 Favorites<br />
39 Caller ID & Messages<br />
40 Parental Controls
The Quick Menu<br />
Using the Quick Menu<br />
Press MENU on your remote to easily access DIRECTV features. Once the Quick Menu is<br />
displayed, use the UP and DOWN arrows to highlight a desired menu item, then press SELECT<br />
to access that item. Some menu items will display a submenu, others will take you directly to a new<br />
screen. To remove the Quick Menu at any time, press MENU again.<br />
Settings<br />
Selecting Settings in the Quick Menu displays a submenu of items that lets you customize, adjust<br />
and keep track of your DIRECTV viewing experience.<br />
Setup<br />
The Setup item in the Quick Menu displays the Setup screen, where you can access the Info & Test,<br />
Satellite Setup, Remote Setup, Audio Setup, Display Setup, Access Card and System Reset screens.<br />
32<br />
Using the Quick Menu
Settings<br />
Info & Test<br />
The System Info option lets you view the current system information. The System Test option lets<br />
you run a test on the tuner, access card, receiver ID and phone line.<br />
Satellite<br />
This option is useful if your DIRECTV ® <strong>Receiver</strong> has lost signal strength, or you need to realign<br />
your satellite dish.<br />
Access Card<br />
Follow the onscreen directions to replace your access card. You will need your old and new access<br />
cards to <strong>com</strong>plete this process. (Note: DIRECTV will provide new access cards and instructions<br />
when necessary.)<br />
Reset<br />
From here you can restart the receiver, reset to factory defaults, or reset everything.<br />
Scheduler<br />
This feature gives you an overview of and access to all the programs you’ve set to Autotune or<br />
purchase.<br />
Chapter 3 33
The Quick Menu<br />
Favorites<br />
Check the current status of your Favorites list(s) by clicking here, and make changes if you like. See<br />
page 38 for more details.<br />
Parental Controls<br />
Check the current restrictions of your Parental Controls by clicking here, and make any<br />
adjustments. See page 40 for more details.<br />
34<br />
Favorites
Audio Options<br />
Audio Options<br />
Some programs have alternate audio available (such as other language tracks or Dolby Digital). This<br />
option only appears in the Quick Menu over Live TV when the current program has alternate audio.<br />
You can set the default so that whenever a program has alternate audio available, it automatically<br />
plays this audio, or you can change the alternate audio temporarily for the program you are<br />
watching. In either case, press MENU while in Live TV, then:<br />
To change the default audio, from the Quick Menu, select Settings, select Setup, then select Audio<br />
in the left menu and follow the onscreen instructions.<br />
To temporarily change the audio, from the Quick Menu, select Audio Options, then select the<br />
audio track you prefer. Once the program is over or you change the channel, the audio will change<br />
back to the default setting.<br />
Chapter 3 35
The Quick Menu<br />
Category Sort<br />
This feature lets you temporarily arrange the <strong>Guide</strong> to list only programs in a particular category<br />
such as Movies, Sports or News.<br />
While in the <strong>Guide</strong>, from the Quick Menu, select Category Sort. To further narrow your search,<br />
select the category you want, then select a subcategory if you wish. To quickly move through the<br />
Category Search results, use the RED or GREEN key on your remote to advance or reverse in 90-<br />
minute increments.<br />
Press GUIDE to return to the regular <strong>Guide</strong>, or EXIT to return to live TV.<br />
Pay Per View<br />
This option enables you to check out DIRECTV Pay Per View listings by category.<br />
36<br />
Category Sort<br />
While in the <strong>Guide</strong>, press MENU, then select Pay Per View. You will see three choices for sorting<br />
the listings. Choose All to display all current pay per view programs. Movies will give you listings of<br />
all current movies available. Pick Special Events to see specific events such as sports, <strong>com</strong>edy specials<br />
and more. The <strong>Guide</strong> will update with matching programs.
Find By<br />
Find By<br />
Would you like to locate a particular program, movie or sports event you want to see — even shows<br />
starring a favorite actor, or games with your favorite team? Find by offers some easy ways to spot just<br />
what you want to watch.<br />
Press MENU, then select Find by. You can fi nd a program by Title, Person, Keyword or Channel.<br />
Your search will be quicker if you narrow your search by selecting subcategories; just follow the<br />
onscreen instructions. Once you’ve found a program you’re after, all you have to do is highlight and<br />
select the title to display when the program is on.<br />
Recent Finds<br />
If you’d like to repeat a previous search, select Recent Finds, then select your search to view<br />
matching programs.<br />
Note<br />
Keep in mind, when you search with Find by, only those programs slated to air within the <strong>Guide</strong>’s<br />
number of days of programming supported by your receiver will appear on your list.<br />
Chapter 3 37
The Quick Menu<br />
Date & Time<br />
This option gives you a convenient way to look several days ahead in the <strong>Guide</strong>, without having to<br />
scroll through pages of programs.<br />
Favorites<br />
Favorites allows you to set up special, customized <strong>Guide</strong> that shows only those channels you choose.<br />
So you can have easy access to the channels you like best, or perhaps a grouping of family channels<br />
just for the kids.<br />
When you’re using a Favorites list, the <strong>Guide</strong> will only display those channels you’ve<br />
chosen — and you’ll also only see those channels when you change channels using CHAN UP/<br />
D OW N on y ou r r e mot e .<br />
Keep in mind, no matter what Favorites list you’re currently using, you can still always access any<br />
channel you receive by keying in its channel number on your remote. You can also edit or delete a<br />
list at any time.<br />
38<br />
Date & Time
Caller ID & Messages<br />
Caller ID & Messages<br />
This feature lets you get messages from DIRECTV. If you have Caller ID service*, you can also<br />
view phone calls you’ve received or turn call notification on or off. Press MENU to display the<br />
Quick Menu, select Caller ID & Msgs, then select Edit Settings. Select either Caller ID or Messages<br />
from the left menu, as desired.<br />
Caller ID<br />
The Call Log tab displays up to 25 recent in<strong>com</strong>ing calls. Highlight and select a name to delete that<br />
listing from your log.<br />
The Notifi cation tab lets you turn the notification feature on or off. When the Notifi cation option is<br />
on, you’ll see a notice on your TV screen whenever a call <strong>com</strong>es in.<br />
Note<br />
* You must subscribe to Caller ID service through your local telephone <strong>com</strong>pany, and your DIRECTV<br />
<strong>Receiver</strong> must be connected to a phone line.<br />
Chapter 3 39
The Quick Menu<br />
DIRECTV Messages<br />
This feature lets you view a listing of current DIRECTV messages waiting for you. Simply<br />
highlight and select a message in the list to read, then you’ll have the choice to keep or delete it.<br />
The messages icon will appear brightly on your channel banner whenever there’s any new or unread<br />
message in your Inbox.<br />
Parental Controls<br />
Parental Controls enables parents to place certain restrictions on just who’s watching what, and<br />
require a passcode to view restricted programming. Whether it’s for mature content or spending<br />
amounts, you’re always able to keep limitations where you want them for the whole family.<br />
Press MENU to display the Quick Menu, SELECT Parental Controls, then Edit Settings, and you’ll<br />
see the current status showing any restrictions. The system default is “unlocked” for all categories.<br />
40<br />
Parental Controls
Parental Controls<br />
Ratings<br />
Here you can set rating limits for Movies and TV:<br />
1) S E L E C T Ratings.<br />
2) Move to the right to SELECT the another tab. Note: You can use RED or GREEN to cycle<br />
tabs.<br />
Movies<br />
Highlight and select the Movies tab, then set the overall rating limit you wish to impose Brief<br />
descriptions of the ratings appear for your guidance.<br />
TV Programs<br />
SELECT the TV tab, then highlight and select the TV rating you desire. You can also set ratings<br />
for particular content (for example, Fantasy Violence, Dialogue), each of which is described when<br />
highlighted.<br />
Other Shows<br />
To block programming that has no rating — such as news and sports and shows with a rating of<br />
“None” — select the Other tab.<br />
TIP<br />
For ratings limits and channel<br />
blocks, as well as most other<br />
checkbox-type items, pressing<br />
SELECT<br />
SELECT toggles the item on and off<br />
when setting them up.<br />
Chapter 3 41
The Quick Menu<br />
Channel Blocks<br />
You can block viewing of a certain channel or channels from this menu.<br />
SELECT Chan Blocks in the left menu, then scroll down the channel list to SELECT those you<br />
wish to block, or key in channel numbers for quicker access. Use Block All or Allow All to save time<br />
if you wish to affect a large number of channels.<br />
Spending<br />
From the left menu, SELECT Spending, then set your preferred spending limit<br />
for any single pay per view purchase. Simply key in the amount using the numbers on your remote.<br />
Hours<br />
From the left menu, SELECT Hours, then set your preferred hours during which TV can be<br />
viewed. You can set hours based on “school nights” and weekend nights—Monday-Thursday,<br />
Friday-Saturday, and Sunday.<br />
42<br />
Parental Controls
Parental Controls<br />
Now, lock it<br />
Once you’ve set the restrictions you want, choose Lock Now from the left menu. You’ll be directed<br />
to create a passcode (which you’ll want to make easy enough to remember, but hard enough that the<br />
little ones won’t guess it!). This passcode will be your entry to unlocking and adjusting limitations<br />
in the future.<br />
An onscreen message will appear whenever anyone tries to tune to a channel or program that has<br />
been restricted, or attempts to spend or watch beyond limitations set. He or she will not be allowed<br />
to proceed without the passcode. Using your passcode, you can easily override the limits.<br />
Let me in…!<br />
Temporarily or permanently unlocking a restriction is easy. To temporarily unlock a particular<br />
program:<br />
1) When any controls are currently activated, Unlock Now will appear if you try to tune to a<br />
restricted program.<br />
TIP<br />
The Parental Control icon in the<br />
Channel Banner will tell you if the<br />
receiver is locked, temporarily<br />
unlocked, or unlocked.<br />
2) Select Unlock Now and enter the password.<br />
For more unlock options:<br />
1) Pr e s s M E N U, t he n S E L E C T Parental Controls.<br />
Locked<br />
Unlocked Temporarily<br />
Unlocked<br />
Chapter 3 43
The Quick Menu<br />
2) Various options for removing restrictions temporarily or permanently will appear. Select one<br />
and enter your password.<br />
Also note: If you have Parental Controls set and temporarily unlocked, turning the receiver power<br />
off will relock the box. If anyone tries to unlock restrictions using an invalid passcode, there’s a time<br />
delay that’s added with each additional attempt to discourage them.<br />
To change your passcode at any time:<br />
1) Pr e s s M E N U, S E L E C T Parental Controls, then Edit Settings.<br />
2) Scroll down to Passcode and press SELECT.<br />
3) Enter your old password, then enter a new one twice to confi rm.<br />
44<br />
Parental Controls
Chapter 4<br />
46 Troubleshooting<br />
55 Limited 90-Day Warranty<br />
60 Product Information<br />
61 DIRECTV PROTECTION PLAN<br />
63 FCC Customer Information<br />
67 Index
Other Information<br />
TIP<br />
You can fi nd additional<br />
troubleshooting help at DIRECTV.<br />
<strong>com</strong>.<br />
Troubleshooting<br />
Many problems can be corrected by performing a simple reset of the DIRECTV ® <strong>Receiver</strong>. If you<br />
experience the image freezes, audio freezes or blank screen, or the system won’t respond to front<br />
panel button or remote control, try one of these:<br />
4 Press the red RESET button behind the access card panel door on the front of the<br />
DIRECTV <strong>Receiver</strong>, then wait for program guide information to be acquired.<br />
4 If the problems persist, try unplugging the power cord of the DIRECTV <strong>Receiver</strong> for 15<br />
seconds, then plug it in again.<br />
4 Running the System Test (later in this section) can also help you diagnose and solve many<br />
<strong>com</strong>mon problems.<br />
46<br />
Troubleshooting<br />
System Upgrades<br />
Your DIRECTV <strong>Receiver</strong> is able to receive upgrades or modifications to some of its features and<br />
functions. These modifications will occur automatically, usually at times when the receiver would<br />
likely be turned off. If your receiver is on when an upgrade or modification is sent, you may<br />
experience a disruption in reception for a minute or two. Your reception should return to normal<br />
after the modification is <strong>com</strong>plete. Your receiver must be plugged in to AC power to receive any<br />
Note<br />
If preferred, you can have an Authorized Service Representative visit your home for a fee, to set up your digital satellite<br />
receiver and instruct you on its operation. For details about this service, call 1-800-DIRECTV or visit DIRECTV.<strong>com</strong>.
Troubleshooting<br />
upgrades. Do not unplug your receiver while an upgrade is in progress. Please consult the Upgrade<br />
Menu to fi nd a schedule of upgrades or modifications planned by DIRECTV.<br />
DIRECTV <strong>Receiver</strong> or TV Problems<br />
Progress bar freezes during Satellite Data Acquisition<br />
This is normal. The progress bar times out after two minutes. If your screen is still blank for a few<br />
minutes after the progress bar times out, press the RESET button behind the access panel door on<br />
the front of the DIRECTV <strong>Receiver</strong> and wait for program guide information to be acquired.<br />
Wrong picture, blue screen, snow or black/blank picture<br />
The DIRECTV <strong>Receiver</strong> and most TVs and VCRs let you toggle between video sources. If you don’t<br />
see the signal you think you should be seeing, try using these buttons to toggle between the signals:<br />
4 Press the TV/VCR button on the VCR remote or on the VCR’s front panel.<br />
4 Press the TV INPUT button on the DIRECTV remote control.<br />
4 If problems persist, turn off all equipment that is connected to your TV, wait a few minutes,<br />
then turn the DIRECTV <strong>Receiver</strong> back on.<br />
Note<br />
If your TV is connected with just coaxial cables, you must tune to Channel 3 or 4, as set with the 3/4 switch on the<br />
back of your DIRECTV <strong>Receiver</strong> box. Chapter 4<br />
47
Other Information<br />
Problems with Caller ID<br />
4 You must subscribe to Caller ID service through your local phone <strong>com</strong>pany.<br />
Also, check to be sure your Caller ID feature is turned on (see page 39).<br />
4 If you are plugging your receiver to a wireless phone jack, note that it typically does not transmit Caller ID<br />
information and you may need a special wireless phone jack to use with Caller ID service. See the user’s manual<br />
that came with the wireless phone jack to see if it transmits Caller ID information. If it doesn’t, either connect the<br />
phone line directly to a standard wall-mount phone jack or install a wireless phone jack that transmits Caller ID<br />
information.<br />
DIRECTV <strong>Receiver</strong> will not turn on<br />
4 Check to make sure the power cord is plugged into the DIRECTV <strong>Receiver</strong> and the wall outlet.<br />
4 Check the wall receptacle (or extension cord) to make sure it is “live” by plugging in<br />
something else.<br />
4 Make sure the remote control is on DIRECTV mode, and press TV POWER ON.<br />
4 Press TV POWER ON, then press it a second time.<br />
4 C he c k b a t t e r i e s i n r e mot e c ont r ol .<br />
4 Be sure remote control is pointed at remote sensor, and front of receiver is not blocked.<br />
4 Unplug the receiver. Wait five minutes. Plug it in again.<br />
48<br />
Troubleshooting
Troubleshooting<br />
Turns off while playing<br />
4 Electronic protection circuit may have been activated because of a power surge. Wait 30 seconds, then turn<br />
on again.<br />
4 Unplug DIRECTV <strong>Receiver</strong> for a few minutes, then plug back in. If this happens frequently, the voltage in your<br />
house may be abnormally high or low.<br />
4 Consider using a surge protector or line conditioner.<br />
4 If your TV turns off while playing, and other lights/appliances in your house do too, you may have blown a circuit<br />
breaker or be experiencing a power outage.<br />
4 Consult an electrician if the problem is frequent or severe, especially if other household appliances or electronics<br />
are affected.<br />
DIRECTV <strong>Receiver</strong> turns on or changes channels unexpectedly<br />
4 An Autotune may have been activated. See page 28.<br />
4 Your TV’s timer may have been activated.<br />
4 Check your TV owner’s manual.<br />
Blank screen<br />
4 Check that all <strong>com</strong>ponents connected to the input jacks are turned on.<br />
4 Try another channel.<br />
Chapter 4 49
Other Information<br />
4 Your DIRECTV <strong>Receiver</strong> may be hooked up incorrectly to the TV. Press the INFO button on the front panel<br />
of the DIRECTV <strong>Receiver</strong> to see if the channel banner appears. If it does not, check the Setup and Connections<br />
section for instructions about connecting your satellite receiver.<br />
4 If the DIRECTV <strong>Receiver</strong> is connected to the RF input of your TV, makes sure that the TV channel matches the<br />
3/4 RF switch on the back panel.<br />
4 Press the TV INPUT key on the remote to make sure your TV input is set to the TV input your DIRECTV<br />
<strong>Receiver</strong> is connected to.<br />
4 Press the POWER button on the front of the DIRECTV <strong>Receiver</strong>.<br />
4 Press the red RESET button behind the door on the front panel of the<br />
DIRECTV <strong>Receiver</strong>.<br />
Temporary loss of the satellite signal or Searching for Satellite Signal message<br />
4 Your satellite system may be experiencing rain fade, a temporary loss of the satellite signal due to unusually heavy<br />
rain clouds or rainfall. Rain fade is usually brief, lasting only as long as the heavy rain cloud condition persists.<br />
4 Your dish may be blocked. Check that something is not blocking the dish.<br />
50<br />
Troubleshooting
Troubleshooting<br />
Partial programming loss/channels missing from the <strong>Guide</strong>/channel is in the <strong>Guide</strong> but can’t tune to<br />
4 Your satellite dish antenna may be incorrectly confi gured. Check the dish type set in your receiver’s preferences<br />
and change if necessary. Press the MENU key on the remote control, then select Settings, then Setup. In the next<br />
menu, select Satellite, then Repeat Satellite Dish Setup. Follow the steps. From the Satellite Dish Type screen, make<br />
sure the proper dish type is selected (round, oval with a dual LNB or oval with a triple LNB).<br />
4 The channels might be excluded from the Favorites list currently in use. Press MENU on the remote, select<br />
Favorites, then All Channels, or enter the channel number manually.<br />
My video and audio are out of sync.<br />
4 Try changing channels.<br />
4 Press LIST, then EXIT.<br />
4 If neither of those work, restart your DIRECTV <strong>Receiver</strong>. Press MENU, press SELECT on Settings, then<br />
SELECT Setup. Select the Reset item from the left menu and follow the onscreen instructions.<br />
My DIRECTV <strong>Receiver</strong> is “frozen” on a single frame of a TV picture.<br />
4 If you are on a Pay Per View channel, watching the free portion of a program, the free portion may be <strong>com</strong>pleted.<br />
You must buy the program to continue watching.<br />
4 If that doesn’t work, restart your DIRECTV <strong>Receiver</strong>. Press MENU, press SELECT on Settings, then SELECT<br />
Setup. Select the Reset item from the left menu and follow the onscreen instructions.<br />
Chapter 4 51
Other Information<br />
Remote Control Problems<br />
P r o b l e m s w i t h t h e r e m o t e c o nt r o l<br />
4 Check that nothing is between the remote control and the remote sensor.<br />
4 Make sure the remote control is in DIRECTV mode. Slide the mode switch to the DIRECTV position so the<br />
remote will control the DIRECTV <strong>Receiver</strong>.<br />
4 Check the batteries in the remote control. They may be weak, dead or installed incorrectly. Try replacing batteries.<br />
4 If you’re entering a channel number that is less than four digits long, the receiver might wait two seconds before<br />
tuning to the channel. Press ENTER after entering a channel number to tune immediately.<br />
4 If you are trying to operate a device other than the DIRECTV <strong>Receiver</strong> that you have programmed the remote<br />
to control, make sure you fi rst slide the input switch to the corresponding device (DVD player, VCR, etc.). The<br />
indicator light for the <strong>com</strong>ponent you’re trying to control should light up when you press a valid key for that<br />
<strong>com</strong>ponent. If it doesn’t, make sure the input switch is clicked into the correct position.<br />
A remote control indicator light starts flashing.<br />
The batteries in the remote control are running low and should be replaced soon. (Note that when you replace the batteries,<br />
you may have to reprogram your remote to control other devices.)<br />
52<br />
Troubleshooting
Troubleshooting<br />
Fine-Tuning the Signal<br />
If you self-installed your satellite dish antenna, you may have already used <strong>Guide</strong>d Setup to fi nd the dish-pointing<br />
coordinates, acquire and fi ne-tune the signal and run a system test. If you need to run <strong>Guide</strong>d Setup again,<br />
select Settings from the Quick Menu, then select <strong>Guide</strong>d Setup. Next, press SELECT on Satellite, then select<br />
Repeat Satellite Setup.<br />
Running the System Test<br />
The System Test allows you to run a basic diagnostics check on your DIRECTV <strong>Receiver</strong>. If you are experiencing any<br />
trouble with your receiver, run the system test. It will also allow you to get your access card and receiver ID numbers<br />
or to initiate diagnostic procedures on your digital satellite receiver.<br />
First make sure that:<br />
4 All connections — jacks, cables, etc. — are in place correctly (see Chapter Two,<br />
Getting Connected, for more information)<br />
4 There are batteries in the remote control, and they are working correctly<br />
4 The access card is installed in the DIRECTV <strong>Receiver</strong>.<br />
Follow these steps to run the diagnostics system test on your DIRECTV <strong>Receiver</strong>.<br />
1) Turn on your TV and the DIRECTV <strong>Receiver</strong>.<br />
2) Slide the mode switch to the DIRECTV position to put the remote control in satellite receiver-controlling mode,<br />
then press MENU to bring up the Quick Menu.<br />
Chapter 4 53
Other Information<br />
3) Select Settings.<br />
4) Select S e t u p, then Info & Test.<br />
5) Use arrow keys to highlight the System Test tab, then press SELECT on Run Test.<br />
6) If your system does not pass the system test, check any of these potential trouble areas: cabling, pointing the<br />
satellite dish, phone connection and access card.<br />
7) If you continue to have problems, call DIRECTV Customer Service at 1-800-DIRECTV.<br />
You should run a system test several times before concluding that there is a problem. Occasional fluctuations in the<br />
phone line or satellite signal can give temporary false readings.<br />
54<br />
Troubleshooting
Limited 90-Day Warranty<br />
Limited 90-Day Warranty<br />
DIRECTV warrants your DIRECTV <strong>Receiver</strong> (Model Number: <strong>D11</strong>) and any included accessories against defects in<br />
material or workmanship for a period of ninety (90) days after the date of purchase.<br />
Who is Covered?<br />
You must have proof of purchase to receive warranty service. A sales receipt or other document showing that you<br />
purchased the product is considered proof of purchase. THIS LIMITED WARRANTY EXTENDS ONLY TO<br />
THE ORIGINAL CONSUMER PURCHASER OR ANY PERSON RECEIVING THE DIRECTV RECEIVER<br />
AS A GIFT FROM THE ORIGINAL CONSUMER PURCHASER AND TO NO OTHER PURCHASER OR<br />
TRANSFEREE. THIS WARRANTY DOES NOT EXTEND TO COMMERCIAL USERS. THIS PRODUCT<br />
IS NOT AUTHORIZED FOR USE OUTSIDE THE UNITED STATES AND ANY SUCH USE VOIDS<br />
THIS WARRANTY.<br />
What is Covered?<br />
Warranty coverage begins the day you purchase the product. For ninety (90) days from the purchase date, at the option of<br />
DIRECTV, the DIRECTV <strong>Receiver</strong> will be repaired or replaced with a new, repaired, refurbished or <strong>com</strong>parable product<br />
(whichever is deemed necessary) if it be<strong>com</strong>es defective or inoperative. This exchange is done without charge to you for parts<br />
and labor. You will be responsible for the cost of shipping to and from the location designated by DIRECTV. If DIRECTV<br />
cannot reasonably repair or replace the <strong>Receiver</strong> then DIRECTV may, at its sole discretion, refund the price you paid for<br />
the product or the current retail price of the product.<br />
Chapter 4 55
Other Information<br />
All products, including replacement products, are covered only for the original warranty period. When the warranty on<br />
the original product expires, the warranty on the replacement product also expires. After ninety (90) days from the date of<br />
purchase, you pay for the replacement of all parts, and for all labor charges.<br />
SOME STATES DO NOT ALLOW LIMITATIONS ON HOW LONG AN IMPLIED WARRANTY LASTS, SO THE<br />
ABOVE LIMITATION MAY NOT APPLY TO YOU.<br />
What is Excluded?<br />
Your warranty does NOT cover:<br />
4 Labor charges for installation or setup of the product.<br />
4 Installation, performance of, or repair of: audio/video cabling, telephone line, or accessory attachments used with the<br />
product.<br />
4 Product replacement because of misuse, accident, lightning damage, unauthorized repair, or other cause not within the<br />
control of DIRECTV.<br />
4 Incidental or consequential damages resulting from the product. SOME STATES DO NOT ALLOW THE<br />
EXCLUSION OF INCIDENTAL OR CONSEQUENTIAL DAMAGES, SO THE ABOVE EXCLUSION MAY<br />
NOT APPLY TO YOU.<br />
4 Any modifications or other changes to the product, including but not limited to software or hardware modification<br />
in any way other than as expressly authorized by DIRECTV will void this limited warranty. Except in the case of<br />
56<br />
Limited 90-Day Warranty
Limited 90-Day Warranty<br />
hardware or software provided by DIRECTV, installing software modifications, “hacks” or utilizing service access or<br />
“back doors” will void this limited warranty.<br />
4 Reception transmission problems caused by signal conditions, telephone line, or cable or antenna systems outside<br />
the unit.<br />
4 A product that has been modified or adapted to enable it to operate in any country other than the country for which it<br />
was designed, manufactured, approved and/or authorized, or repair of products damaged by these modifications.<br />
4 A product used for <strong>com</strong>mercial or institutional purposes.<br />
4 DIRECTV makes no warranty that the access connection will be a local (not long distance) phone call.<br />
4 The continued provisioning of any of the programming and other services delivered through the <strong>Receiver</strong> including but<br />
not limited to television programming, show information, program guide data, and scheduling information.<br />
Make Sure You Keep...<br />
Please keep your sales receipt or other document showing proof of purchase. Attach it to this <strong>User</strong> <strong>Guide</strong> and keep both<br />
nearby. Also keep the original box and packing material in case you need to return your product.<br />
Before Requesting Repair Service...<br />
Please check the troubleshooting section of this guide. This may save you a call to DIRECTV Customer Care.<br />
Chapter 4 57
Other Information<br />
To Get Warranty Service...<br />
Warranty service will be provided by DIRECTV. If you believe you need service for your <strong>Receiver</strong>, contact DIRECTV at<br />
1-800-DIRECTV. A representative will go through a diagnostic checklist with you. If it is determined that the product<br />
needs to be returned for service or exchanged, you will receive a return authorization number. The representative will give<br />
you <strong>com</strong>plete shipping details.<br />
To Get Out-of-Warranty Service...<br />
To obtain out-of- warranty service contact DIRECTV at 1-800-DIRECTV for information on the possibility of and any<br />
costs for repair or replacement of out-of- warranty products.<br />
ALL WARRANTIES IMPLIED BY LAW, INCLUDING ANY IMPLIED WARRANTIES OF MERCHANTABILITY<br />
AND FITNESS FOR A PARTICULAR PURPOSE ARE EXPRESSLY LIMITED TO THE DURATION OF THIS<br />
EXPRESS LIMITED WARRANTY.<br />
WITH THE EXCEPTION OF ANY WARRANTIES IMPLIED BY THE LAW OF ANY STATE OF THE U.S.A.,<br />
THIS EXPRESS LIMITED WARRANTY IS EXCLUSIVE AND IN LIEU OF ALL OTHER WARRANTIES,<br />
GUARANTEES, AGREEMENTS AND SIMILAR OBLIGATIONS OF DIRECTV. REPAIR OR REPLACEMENT<br />
AS PROVIDED IN THIS LIMITED WARRANTY IS THE EXCLUSIVE REMEDY UNDER THIS LIMITED<br />
WARRANTY. IN NO EVENT WILL DIRECTV BE LIABLE FOR ANY AMOUNT GREATER THAN THE<br />
58<br />
Limited 90-Day Warranty
Limited 90-Day Warranty<br />
RETAIL PRICE OF THE DIRECTV RECEIVER. DIRECTV SHALL NOT BE LIABLE FOR ANY INCIDENTAL<br />
OR CONSEQUENTIAL DAMAGES FOR BREACH OF ANY EXPRESS OR IMPLIED WARRANTY ON THE<br />
DIRECTV RECEIVER.<br />
SOME STATES DO NOT ALLOW LIMITATIONS ON WARRANTIES, SO THE ABOVE LIMITATIONS MAY<br />
NOT APPLY TO YOU. THIS WARRANTY GIVES YOU SPECIFIC LEGAL RIGHTS. YOU MAY HAVE OTHER<br />
RIGHTS WHICH VARY FROM STATE TO STATE.<br />
DIRECTV, Inc.<br />
2230 E. Imperial Hwy<br />
El Segundo, CA 90245<br />
1-800-DIRECTV<br />
Chapter 4 59
Other Information<br />
Product Information<br />
Keep your sales receipt to obtain warranty parts and service and for proof of purchase. Attach it here and record the<br />
serial and model numbers in case you need them. These numbers are located on the product.<br />
Model No. ___________________________________________________________________<br />
Serial No. ____________________________________________________________________<br />
Purchase Date: ________________________________________________________________<br />
Dealer/Address/Phone: _________________________________________________________<br />
Access Card: _________________________________________________________________<br />
<strong>Receiver</strong> ID: __________________________________________________________________<br />
60<br />
Product Information
DIRECTV PROTECTION PLAN<br />
DIRECTV PROTECTION PLAN<br />
Protect your DIRECTV ® System with the DIRECTV PROTECTION PLAN. For a low monthly fee, the DIRECTV<br />
PROTECTION PLAN covers the <strong>com</strong>ponents of your DIRECTV System, giving you peace of mind and<br />
<strong>com</strong>prehensive support to ensure that you and your family enjoy nonstop DIRECTV ® entertainment.<br />
DIRECTV PROTECTION PLAN Benefits<br />
Your DIRECTV Limited Warranty provides certain remedies for this receiver during the stated coverage term. The<br />
DIRECTV PROTECTION PLAN provides <strong>com</strong>prehensive coverage for your DIRECTV System, including:<br />
4 In-home service calls when needed 4 24-hour Technical Support<br />
4 Power surge related repairs 4 Dish antenna realignments<br />
4 Cables, switches, and associated wiring 4 Replacement of defective equipment (if<br />
throughout home<br />
problem can not be resolved over the phone) *<br />
4 Defective remote control replacements 4 All parts and labor for repair<br />
Get ALL THAT FOR JUST $5.99 a month for accounts with standard DIRECTV <strong>Receiver</strong>s and only $7.99 a month<br />
for accounts with DIRECTV Plus ® <strong>Receiver</strong>, DIRECTV ® DVR, DIRECTV HD <strong>Receiver</strong>s, DIRECTV HD DVR or<br />
DIRECTV <strong>Receiver</strong> with UltimateTV Service. This one low monthly fee covers every DIRECTV <strong>com</strong>ponent and<br />
receiver on your account.<br />
Chapter 4 61
Other Information<br />
Sign up for the DIRECTV PROTECTION PLAN Today<br />
If you have standard DIRECTV <strong>Receiver</strong>(s), visit DIRECTV.<strong>com</strong> and SIGN IN using the simple steps below or call<br />
1-800-DIRECTV.<br />
1. SIGN IN with your user name and password, or click on the “Register Now” link and go through the easy steps,<br />
then continue with Step 2.<br />
2. SELECT Option B, and then click the “Next” button at the bottom of the page.<br />
3. SCROLL down to Step 3 (Add Additional Services) and SELECT “DIRECTV PROTECTION PLAN,” then<br />
CLICK on the “Next” button.<br />
4. REVIEW your change and CLICK on the “Accept These Changes” button.<br />
If you have a DIRECTV Plus <strong>Receiver</strong>, DIRECTV DVR, DIRECTV HD <strong>Receiver</strong>, DIRECTV HD DVR or<br />
DIRECTV <strong>Receiver</strong> with UltimateTV Service, please call 1-800-DIRECTV to sign up.<br />
The DIRECTV PROTECTION PLAN is offered by AIG Warranty Guard and underwritten by New Hampshire<br />
Insurance Company on behalf of DIRECTV where authorized by law. Certain limitations apply. Pricing, terms<br />
and conditions of the DIRECTV PROTECTION PLAN are subject to change. Full terms and conditions will<br />
be mailed to you prior to service billing and are available at DIRECTV.<strong>com</strong>. (Note: Annual payment option no<br />
longer available.)<br />
Note<br />
62<br />
PROTECTION PLAN<br />
*A fee of $49 for standard IRD equipment, $249 for DIRECTV DVR, DIRECTV Plus <strong>Receiver</strong> or Ultimate TV<br />
equipment, $400 for HD equipment, or $1,000 for DIRECTV HD DVR equipment will be charged to your DIRECTV bill<br />
if the defective equipment that we are replacing for you is not returned within 30 calendar days. The plan will provide<br />
a return box for the defective equipment and even pick up the shipping costs. You’ll receive replacement equipment in<br />
about 72 hours.
DIRECTV PROTECTION PLAN<br />
FCC Customer Information<br />
This device <strong>com</strong>plies with Part 15 of the FCC Rules. Operation is subject to the following two conditions: (1) this device<br />
may not cause harmful interference, and (2) this device must accept any interference received, including interference that may<br />
cause undesired operation.<br />
Responsible Party:<br />
DIRECTV, Inc.<br />
2230 E. Imperial Hwy<br />
El Segundo, CA 90245<br />
1-800-DIRECTV<br />
4 Trade Name: DIRECTV<br />
4 Type of Equipment: DIRECTV Satellite <strong>Receiver</strong><br />
4 Model Number: <strong>D11</strong><br />
Federal Communications Commission (FCC): This equipment <strong>com</strong>plies with both Part 15 and Part 68 of the FCC rules.<br />
This equipment has been tested and found to <strong>com</strong>ply with the limits of a Class B digital device, pursuant to part 15 of the<br />
FCC Rules. These limits are designed to provide reasonable protection against harmful interference in a residential installation.<br />
Chapter 4 63
Other Information<br />
This equipment generates, uses, and can radiate radio frequency energy and, if not installed and used in accordance with the<br />
instructions, may cause harmful interference to radio <strong>com</strong>munications. However there is no guarantee that interference will<br />
not occur in a particular installation. If this equipment does cause harmful interference to radio or television reception, which<br />
can be determined by removing and applying power to the equipment, the user is encouraged to try to correct the interference<br />
by one or more of the following measures:<br />
4 Reorient or relocate the receiving satellite dish antenna.<br />
4 Increase the separation between the equipment and the DIRECTV <strong>Receiver</strong>.<br />
4 Connect the equipment into an outlet on a circuit different from that to which the DIRECTV <strong>Receiver</strong> is connected.<br />
4 Consult the dealer or an experienced radio/TV technician for help.<br />
4 CAUTION: Changes or modifications not expressly approved by the manufacturer responsible for <strong>com</strong>pliance could void<br />
the user’s authority to operate the equipment.<br />
The user may find the following booklet, prepared by the Federal Communications Commission, helpful: “How to Identify<br />
and Resolve Radio and TV Interference Problems.” This booklet is available from the U.S. Government Printing Office,<br />
Washington, DC. To meet FCC requirements, only peripherals (<strong>com</strong>puter input/output devices, terminals, printers, etc.) certified<br />
to <strong>com</strong>ply with Class B limits may be attached to this device. Operation with non-certified peripherals is likely to result<br />
in interference to radio and TV reception. To meet FCC requirements, shielded cables are required to connect the device to a<br />
personal <strong>com</strong>puter, peripheral, or other Class B certified device.<br />
64<br />
FCC Customer Information
FCC Customer Section Information Title<br />
This equipment <strong>com</strong>plies with Part 68 of the FCC Rules and the requirements adopted by ACTA. On the back of this equipment<br />
is a label that contains a product identifier in the format US:AAAEQ##TXXXX. If requested, this information must be<br />
provided to your telephone <strong>com</strong>pany. This equipment uses the following USOC Jack: RJ11C. A plug and jack used to connect<br />
this equipment to the premises wiring and telephone network must <strong>com</strong>ply with the applicable FCC Part 68 rules and<br />
requirements adopted by ACTA. A <strong>com</strong>pliant telephone cord and modular plug is provided with this product. It is designed<br />
to be connected to a <strong>com</strong>patible modular jack that is also <strong>com</strong>pliant. See installation instructions for details.<br />
The REN is used to determine the number of devices that may connect to a telephone line. Excessive RENs on a telephone<br />
line may result in the devices not ringing in response to an in<strong>com</strong>ing call. In most but not all areas, the sum of the RENs<br />
should not exceed five (5.0).<br />
To be certain of the number of devices that may be connected to a line, as determined by the total RENs, contact your local<br />
telephone <strong>com</strong>pany. The REN for this product is part of the product identifier that has the format US: AAAEQ##TXXXX.<br />
The digits represented by ## are the REN without the decimal point (e.g., 03 is a REN of 0.3).<br />
If this DIRECTV <strong>Receiver</strong> causes harm to the telephone network, the telephone <strong>com</strong>pany will notify you in advance that<br />
temporary discontinuance of service may be required. But if advance notice isn’t practical, the telephone <strong>com</strong>pany will notify<br />
the customer as soon as possible. Also, you will be advised of your right to file a <strong>com</strong>plaint with the FCC if you believe it<br />
is necessary.<br />
Chapter 4<br />
65
Other Information<br />
The telephone <strong>com</strong>pany may make changes in its facilities, equipment, operations or procedures that could affect the proper<br />
functioning of your equipment. If they do, you will be notified in advance in order for you to make necessary modifications<br />
to maintain uninterrupted service. Connection to party line service is subject to state tariffs. Contact the state public utility<br />
<strong>com</strong>mission, public service <strong>com</strong>mission or corporation <strong>com</strong>mission for information.<br />
If trouble is experienced with this unit, for repair or warranty information, please contact DIRECTV Customer Care at<br />
the address and phone number listed below. If the equipment is causing harm to the network, the telephone <strong>com</strong>pany may<br />
request that you disconnect the equipment until the problem is resolved.<br />
DIRECTV, Inc.<br />
2230 E. Imperial Hwy<br />
El Segundo, CA 90245<br />
1-800-DIRECTV<br />
If your home has specially wired alarm equipment connected to the telephone line, ensure the installation of this DIRECTV<br />
Satellite <strong>Receiver</strong> does not disable your alarm equipment. If you have questions about what will disable alarm equipment,<br />
consult your alarm <strong>com</strong>pany, telephone <strong>com</strong>pany or a qualified installer.<br />
DO NOT DISASSEMBLE THIS EQUIPMENT. It does not contain any user-serviceable <strong>com</strong>ponents.<br />
66<br />
We re<strong>com</strong>mend the installation of an AC surge arrester in the AC outlet to which this equipment is connected. Telephone<br />
<strong>com</strong>panies report that electrical surges, typically lightning transients, are very destructive to customer terminal equipment<br />
connected to AC power sources.<br />
FCC Customer Information
Index<br />
Index<br />
A<br />
Access card 7, 8, 19, 53, 54<br />
ARROW keys 7<br />
Audio options 25, 35<br />
Language 35<br />
Autotune 28<br />
B<br />
Back panel 50<br />
Batteries 48, 52, 53<br />
Buttons 47<br />
C<br />
Cables 5, 9, 10, 12, 14, 16, 49, 53<br />
Caller ID<br />
Problems 31, 48<br />
Category sort 36<br />
Channel banner 7, 25, 40, 50<br />
Channel blocks 41<br />
Channel list 42<br />
Connections 1, 5, 50, 53<br />
D<br />
Date & Time 31<br />
DIRECTV mode 48, 52<br />
DIRECTV PROTECTION PLAN<br />
61<br />
DIRECTV <strong>Receiver</strong> Problems 47<br />
Dish-pointing coordinates 53<br />
E<br />
EXIT key 36<br />
F<br />
Favorites 25, 31, 38, 51<br />
FCC Customer Information 63<br />
Find by 37<br />
Fine-Tuning the Signal 55<br />
G<br />
<strong>Guide</strong> 36<br />
<strong>Guide</strong>d Setup 1, 18, 53<br />
GUIDE key 27<br />
I<br />
INFO 25, 27, 30, 50<br />
INFO button 27, 50<br />
J<br />
Jacks 5, 9, 10, 12, 14, 16, 49, 53<br />
L<br />
Language 18<br />
Language for audio 35<br />
Lock 43<br />
Locking the system 43<br />
M<br />
MENU key 7, 14, 16, 18, 19, 32,<br />
36, 37, 43, 44, 51, 53<br />
Messages 25, 31, 39, 40<br />
Mode switch 52<br />
remote control 52, 53<br />
Movie ratings 41<br />
MUTE key 20, 21, 24<br />
Chapter 4<br />
67
Other Information<br />
N<br />
Notification 39<br />
P<br />
Parental Controls 25, 31, 34, 40,<br />
43, 44<br />
channel blocks 25, 31, 34, 40, 43,<br />
44<br />
ratings 25, 31, 34, 40, 43, 44<br />
spending limits 25, 31, 34, 40,<br />
43, 44<br />
unlocking 25, 31, 34, 40, 43, 44<br />
unrated programs 25, 31, 34, 40,<br />
43, 44<br />
viewing hours 25, 31, 34, 40, 43,<br />
44<br />
Passcode 43, 44<br />
Pay Per View 2, 23, 26, 30, 31, 36,<br />
42<br />
Power surge 49<br />
Previous channel 24<br />
Previous channels 49<br />
Programming 2, 4, 6, 7, 16, 19, 24,<br />
37, 41, 51, 57<br />
ordering 2, 4, 6, 7, 16, 19, 20, 24,<br />
37, 41, 45, 51, 57<br />
tuning to 2, 4, 6, 7, 16, 19, 20, 24,<br />
37, 41, 45, 51, 57<br />
Program details 25<br />
Program guide 19, 46, 47, 57<br />
date & time 19, 46, 47, 57<br />
quick menu 19, 46, 47, 57<br />
scrolling 19, 46, 47, 57<br />
sorting 19, 46, 47, 57<br />
tuning to a program 19, 46, 47, 57<br />
using 19, 46, 47, 57<br />
Purchases 30<br />
Q<br />
Quick Menu 7, 32, 34, 36, 38, 40,<br />
42, 53<br />
R<br />
Ratings 41<br />
Rear Panel 8<br />
<strong>Receiver</strong> Rear Panel 8<br />
Recent Finds 37<br />
Remote control 7, 14, 16, 18, 19,<br />
20, 21, 24, 25, 27, 30, 32, 38,<br />
42, 46, 47, 48, 50, 51, 52, 53<br />
keys 7, 14, 16, 18, 19, 20, 21, 24,<br />
25, 27, 30, 32, 38, 42, 46, 47,<br />
48, 50, 51, 52, 53<br />
modes 7, 14, 16, 18, 19, 20, 21,<br />
24, 25, 27, 30, 32, 38, 42, 46,<br />
47, 48, 50, 51, 52, 53<br />
problems 7, 14, 16, 18, 19, 20, 21,<br />
24, 25, 27, 30, 32, 38, 42, 46,<br />
47, 48, 50, 51, 52, 53<br />
programming 7, 14, 16, 18, 19,<br />
20, 21, 24, 25, 27, 30, 32, 38,<br />
42, 46, 47, 48, 50, 51, 52, 53<br />
RESET 46, 47, 50<br />
Restart 51<br />
68<br />
Index
Index<br />
S<br />
Satellite Data Acquisition 19, 47<br />
Satellite Setup 53<br />
Scheduler 33<br />
Search 26, 37<br />
Settings 18, 44, 54<br />
Setup 1, 10, 12, 14, 15, 16, 17, 18,<br />
19, 50, 51, 53, 54<br />
Showings 26<br />
Spending limit 42<br />
System Test 46, 53, 54<br />
T<br />
Temporarily unlock 43<br />
Timer 49<br />
To Do List 29, 30<br />
Troubleshooting 45, 46<br />
Tuning to 52<br />
Tuning to a program 52<br />
TV ratings 41<br />
U<br />
Unlock a particular program 43<br />
<strong>User</strong> profile<br />
spending limit 2<br />
viewing hours 2<br />
W<br />
Warranty 6, 45, 55, 56, 57, 58, 60<br />
Chapter 4<br />
69
Notes<br />
70
Notes<br />
71
Other Information<br />
DIRECTV programming sold separately. ACTIVATION OF PROGRAMMING MAY BE SUBJECT TO CREDIT APPROVAL AND<br />
REQUIRES VALID SERVICE ADDRESS, SOCIAL SECURITY NUMBER AND/OR MAJOR CREDIT CARD. DEPOSIT OR PRE-<br />
PAYMENT MAY BE REQUIRED. Programming subject to change. DIRECTV services not available outside the U.S. DIRECTV programming<br />
is sold separately and independently of DIRECTV System hardware. A valid programming subscription is required to operate<br />
DIRECTV System hardware. Activate your DIRECTV programming today at 1-800-DIRECTV (1-800-347-3288). ©2005 DIRECTV,<br />
Inc. DIRECTV, the Cyclone Design logo and ADVANCED PROGRAM GUIDE are registered trademarks of DIRECTV, Inc.<br />
This product incorporates copyright protection technology that is protected by U.S. patents and other intellectual property rights. Use of this<br />
copyright protection technology must be authorized by Macrovision Corporation, and is intended for home and other limited viewing uses<br />
only unless otherwise authorized by Macrovision. Reverse engineering or disassembly is prohibited.<br />
Due to restrictions imposed by copyright holders, certain programming may include content protection measures that may restrict viewing<br />
in high defi nition and/or recording with certain consumer electronics equipment attached to the receiver. Please contact the manufacturer<br />
of such equipment for additional information.<br />
Rev. 1.3 — <strong>D11</strong>.050518<br />
72
Icon Reference<br />
Arrow Icons<br />
Indicate that a show’s start or end time is earlier or<br />
later than is visible in the <strong>Guide</strong> program cell.<br />
LEFT and RIGHT arrows on the remote offer<br />
special functionality.<br />
Objects are scrollable above or below the visible<br />
window.<br />
UP and DOWN arrows on the receiver front panel<br />
offer special functionality.<br />
Scheduler Icons<br />
Shows an Autotune has been set for a future program,<br />
or a present program<br />
is Autotuned.<br />
Indicates an Autotune has been set for all episodes<br />
of an ongoing program.<br />
Indicates an Autotune set for a present or future<br />
program confl icts with<br />
another scheduled program.<br />
Shows an Autotune has been set for matching<br />
programs in a “Find by.”<br />
Indicates a present or future pay per view program<br />
has been scheduled for purchase.<br />
Other Icons<br />
Denotes one or more alternate audio tracks available<br />
for a program.<br />
Denotes that no alternate audio tracks available.<br />
Indicates one or more new messages are in the<br />
Inbox.<br />
Indicates no new messages are in the Inbox.<br />
Shows that Parental Control limits are currently<br />
“locked.”<br />
Shows that limits are temporarily unlocked.<br />
Shows that there are no current limits imposed.<br />
Indicates a rating level or channel that is blocked via<br />
Parental Controls.<br />
Indicates a pay per view program is available as an<br />
All Day Ticket replay.<br />
Indicates program shown in letterbox format.<br />
Denotes an error condition has occurred.