Dräger Polytron 3000 - ancb.it
Dräger Polytron 3000 - ancb.it
Dräger Polytron 3000 - ancb.it

Create successful ePaper yourself
Turn your PDF publications into a flip-book with our unique Google optimized e-Paper software.
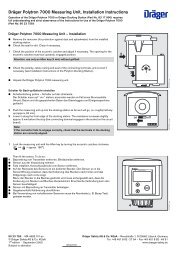
Installing the transm<strong>it</strong>ter<br />
Installing the transm<strong>it</strong>ters in non-explosion-hazard areas<br />
Caution:<br />
The explosion-protection markings has to be removed from the transm<strong>it</strong>ter. Once the transm<strong>it</strong>ter has been used after<br />
installation in this manner, <strong>it</strong> may never be installed in explosion-hazard areas.<br />
Ex-hazard area, zone 2 or non explosion-hazard area<br />
Non-explosion-hazard area<br />
+<br />
4 ... 20 mA<br />
+<br />
0 V<br />
–<br />
+24 V<br />
4 to 20 mA<br />
Control un<strong>it</strong><br />
00533020_1_en.eps<br />
Installing the measuring un<strong>it</strong> <strong>Dräger</strong> <strong>Polytron</strong> <strong>3000</strong><br />
● Remove the rain cover from the previously installed docking station.<br />
● Examine seal for signs of dirt and clean if necessary.<br />
1 Check pos<strong>it</strong>ion of eccentric catches and correct if necessary.<br />
The eccentric opening must point upwards, engaged pos<strong>it</strong>ion.<br />
Attention:<br />
Use only a 5 mm Allen key w<strong>it</strong>hout a ball head.<br />
2<br />
● Check the polar<strong>it</strong>y (marking in the docking station) and cable routing and check<br />
that the connector is securely seated; rectify as necessary (see the installation<br />
notes for the <strong>Polytron</strong> docking station).<br />
● Unpack the measuring un<strong>it</strong> <strong>Dräger</strong> <strong>Polytron</strong> <strong>3000</strong>.<br />
3 1<br />
2 Insert the measuring un<strong>it</strong> about halfway up the docking station and slide <strong>it</strong> in as<br />
far as <strong>it</strong> will go.<br />
3 Lower the un<strong>it</strong> along the front edge of the docking station. About 5 mm before <strong>it</strong>s<br />
h<strong>it</strong>s the stop, the resistance will increase as the connector engages w<strong>it</strong>h the socket<br />
on the printed circu<strong>it</strong> board.<br />
Note!<br />
Check that the terminals in the docking station are correctly aligned if the<br />
connector does not engage correctly!<br />
00623758_1.eps<br />
Note:<br />
Ensure that the front bottom of the measuring un<strong>it</strong> is flush w<strong>it</strong>h the bottom<br />
of the Docking Station. Apply pressure to the measuring un<strong>it</strong> until <strong>it</strong><br />
"clicks" into place. If the fronts are not flush, the measuring un<strong>it</strong> is not<br />
completely sealed and could get water inside the transm<strong>it</strong>ter!<br />
1 Turn the eccentric catches clockwise w<strong>it</strong>h an Allen key to lock the measuring un<strong>it</strong><br />
( ⇒ = approx. 180 o ).<br />
10