You also want an ePaper? Increase the reach of your titles
YUMPU automatically turns print PDFs into web optimized ePapers that Google loves.
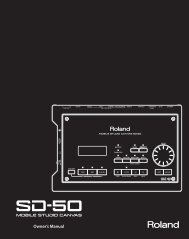
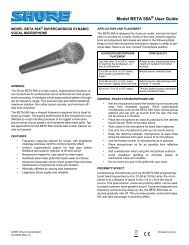
Panel Descriptions<br />
Front Panel<br />
3<br />
7<br />
9 10<br />
15<br />
16<br />
4 5<br />
11<br />
8<br />
1<br />
6<br />
12 13<br />
14<br />
2<br />
1. USB MEMORY connector<br />
Connect a USB memory here and use the GW-8 to play<br />
back files (songs) that have been stored on USB memory.<br />
You can also back up data to USB memory.<br />
2. VOLUME knob<br />
This knob controls the volume of the entire GW-8.<br />
3. D BEAM controller<br />
Use this controller simply by moving your hand above it<br />
(p. 34).<br />
4. SOLO SYNTH button<br />
Play the GW-8 as a monophonic synthesizer (p. 34).<br />
5. ASSIGNABLE 1/2 buttons<br />
Use these buttons to turn the D Beam controller on/off, or<br />
to select the D Beam function (p. 35).<br />
6. STYLE SELECT buttons<br />
These buttons allow you to select one of the twelve Style<br />
categories.<br />
BACKING TRACK section<br />
7. BACKING TYPE buttons<br />
Use these buttons to select the backing type (p. 24).<br />
8. BALANCE buttons<br />
Use these buttons to adjust the volume balance between<br />
the backing and the keyboard. (p. 24)<br />
9. PART VIEW button<br />
Use this to adjust the volume, etc. of each part (p. 25, p.<br />
28).<br />
10. SONG REC button<br />
Press this button to record a Song (p. 27).<br />
11. STYLE CONTROL buttons<br />
Use these buttons to select the desired Style pattern (p. 25).<br />
12. SYNC buttons<br />
These buttons allow you to start/stop the Style by playing<br />
a note in the left side of the keyboard (p. 26).<br />
13. TAP TEMPO button<br />
Use this button to set the tempo (p. 24).<br />
14. VARIATION [1]–[4], AUTO FILL-IN, START/STOP, and<br />
SONG/USB MEMORY PLAYER CONTROL buttons<br />
The operation of these buttons will depend on the<br />
BACKING TYPE buttons (7).<br />
If you’ve used the BACKING TYPE buttons (7) to select<br />
“STYLE,” these buttons will start/stop the Style or select<br />
variations (p. 25).<br />
If you’ve used the BACKING TYPE buttons (7) to select<br />
“SONG” or “USB MEMORY PLAYER,” these buttons control<br />
the song playback as the SONG/USB MEMORY PLAYER<br />
CONTROL buttons (p. 30, p. 32).<br />
15. ANALOG MODIFY section<br />
Turn the knobs to control the functions you select by<br />
pressing the SELECT button (p. 37).<br />
16. Display<br />
This displays various information according to the<br />
operations you perform.<br />
17. VALUE dial<br />
Use this to edit the value of the parameters (settings) in the<br />
screen.<br />
EDIT section<br />
18. Cursor buttons ([ ] [ ] [ ] [ ])<br />
Use these buttons to move the cursor in the screen.<br />
19. EXIT/ENTER buttons<br />
Pressed to issue the “Cancel” (EXIT) or “Execute” (ENTER)<br />
commands in screens that prompt you to make such a<br />
selection.<br />
You’ll also use the ENTER button to access lists of Tones,<br />
Performances, Styles, Songs, or Favorites.<br />
20. MENU button<br />
This button takes you to the settings screen for various<br />
parameters (p. 46).<br />
10