LUXOMAT® PD2-M-DIM
LUXOMAT® PD2-M-DIM
LUXOMAT® PD2-M-DIM

Create successful ePaper yourself
Turn your PDF publications into a flip-book with our unique Google optimized e-Paper software.
LUXOMAT ® <strong>PD2</strong>-M-<strong>DIM</strong><br />
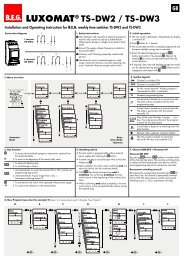
Installation and Operating Instruction for B.E.G. - Occupancy detectors <strong>PD2</strong>-Master-<strong>DIM</strong>-SM/-FC/-FM<br />
GB<br />
1. Mounting preparations<br />
Work on the 230 V mains supply<br />
may only be carried out by qualified<br />
professionals or by instructed persons<br />
under the direction and supervision<br />
of qualified skilled electrical personnel<br />
in accordance with electrotechnical<br />
regulations.<br />
Disconnect supply before installing!<br />
The device is not suited for safe<br />
disconnection of the mains supply.<br />
When in Master/Slave mode of<br />
operation, the Master-appliance<br />
must always be installed at the<br />
location where there is least<br />
daylight.<br />
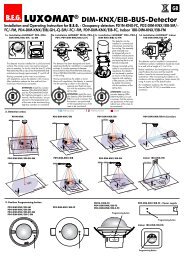
2a. Installation of the LUXOMAT ®<br />
<strong>PD2</strong>-M-<strong>DIM</strong>-SM<br />
The detector must be installed<br />
on a solid and level surface.<br />
There is no need for frames.<br />
For mounting remove lens (C)<br />
(turn anticlockwise). Fasten the<br />
mounting pod<br />
to the ceiling.<br />
Having connected up the wires in accordance with<br />
regulations, secure the detector with 2 screws as<br />
per the illustration above. In order to assemble the<br />
detector outside, the <strong>PD2</strong>-IP54 base-plate, which<br />
is available as an accessory, must be mounted<br />
between the detector and the surface on which it is<br />
to be installed.<br />
2b. Installation of the LUXOMAT ®<br />
<strong>PD2</strong>-M-<strong>DIM</strong>-FC<br />
68 mm<br />
The detector has<br />
been designed<br />
and developed<br />
specifically for installation<br />
in suspended<br />
ceilings.<br />
A circular opening of<br />
diameter 68 mm must<br />
be produced in the<br />
ceiling.<br />
Having connected up the cables in accordance<br />
with regulations, the detector is<br />
inserted into the opening as shown in the<br />
drawing opposite and fixed into position<br />
with the assistance of the spring clips.<br />
2c. Installation of the LUXOMAT ®<br />
<strong>PD2</strong>-M-<strong>DIM</strong>-FM<br />
The detector can be installed<br />
in conventional inlet-sockets<br />
mounted on the ceiling.<br />
Q.C.<br />
PA SED<br />
1<br />
B.I.T.<br />
The assembly plate enclosed<br />
must be stripped off prior to<br />
installation and secured to the<br />
ceiling using 4 screws and<br />
ensuring that it is not laterally<br />
transposed.<br />
Having connected up the<br />
cables in accordance with<br />
regulations, the detector can be<br />
placed in position as shown in<br />
the drawing opposite and, applying<br />
a little pressure, can then<br />
be locked into position with the<br />
assistance of the spring clips.<br />
2d. Self test cycle<br />
2000<br />
1200<br />
600<br />
200<br />
40<br />
The product enters an initial 60-second<br />
self-test cycle, when the supply<br />
is first connected. The occupancy<br />
detector is ready for operation.<br />
120 60<br />
A 50<br />
40<br />
30<br />
15<br />
5 10<br />
3025 22<br />
1816<br />
R1<br />
16 10 10<br />
TEST 1 3 6 5<br />
2<br />
1<br />
TEST 15 30<br />
3. Putting into operation / Settings<br />
9s<br />
2000<br />
1200<br />
600<br />
200<br />
40<br />
ON<br />
OFF<br />
60<br />
50<br />
30<br />
5 10<br />
LED ON<br />
LED OFF<br />
2s<br />
Follow-up time for light control<br />
The time can be set infinitely variably at between<br />
1 and 30 minutes.<br />
Symbol TEST: Test mode (Every movement switches on the<br />
light for a period of 1 second, switching it off for a period of<br />
2 seconds after that regardless of the level of brightness.)<br />
Twilight-switch for light control (relay 1)<br />
The switch-on value for the light can be set at between 10<br />
and 2000 Lux. Using the rotary control, the luminance set<br />
points can be set as desired.<br />
Symbol : Night-time operation<br />
Symbol : Daytime/Night-time operation<br />
Orientation lighting<br />
This rotary controller serves to determine the working time of<br />
the orientation lighting (fixed to 20 %).<br />
“ON” for permanent orientation lighting.<br />
“OFF” for deactiviation of orientation lighting.<br />
Pulse spacing PD-Slave<br />
2 or 9 seconds can be set for the pause between 2 pulses<br />
sent to the master. The setting can be made with activated<br />
( ) or deactivated ( ) LED indicator.<br />
For devices with a separate slave input, 2 sec. can be set.<br />
4. Settings carried out using remote control (optional)<br />
1<br />
3025 22<br />
1816<br />
R1<br />
10<br />
TEST 1 3 6<br />
120 60<br />
A 50<br />
40<br />
30<br />
15<br />
5 10<br />
16 10 5<br />
2<br />
1<br />
TEST 15 30<br />
2<br />
2000<br />
1200<br />
600<br />
200<br />
40<br />
1 2<br />
3025 22 2000<br />
1816<br />
1200<br />
R1<br />
600<br />
10<br />
TEST 1 3 6<br />
200<br />
40<br />
Remote control LUXOMAT ® IR-PDim<br />
1. Check Battery:<br />
open battery compartment by pressing the<br />
plastic springs together and removing the<br />
battery-holder.<br />
2. IMPORTANT<br />
Please pay attention, that the setting is Potentiometer<br />
1 at “TEST” and Potentiometer 2 not at<br />
“SUN”. All values which have been programmed<br />
using the remote control will be deleted in the<br />
event of power failure in the position “TEST/<br />
SUN”. Please switch Potentiometer 2 over to<br />
“MOON” or any other value.<br />
Caution:<br />
Settings with remote control supersede the<br />
settings by courtesy of potentiometers.<br />
5. Option:<br />
6. Settings by remote control in opened state 7. Key functions in closed state<br />
Unlocking device - Activation of<br />
the programming mode<br />
Lock device<br />
Resetting when<br />
open: deletes all<br />
values set with<br />
the remote control,<br />
light OFF.<br />
50<br />
Lux to 1500<br />
Lux<br />
or<br />
or<br />
Luminance set point for<br />
constant light control<br />
Dimming of the lighting on<br />
the desired luminance value<br />
Test mode<br />
Reset to deactivate<br />
Resetting when closed<br />
The lighting relay is switched off, i.e.<br />
opened and the follow-up times reset.<br />
IR-PDim<br />
Wall bracket for remote<br />
control IR-PDim<br />
max<br />
1<br />
min to 30<br />
max<br />
min<br />
ON<br />
ON<br />
OFF<br />
1<br />
min to 60<br />
min<br />
50<br />
Lux<br />
t < 5 sec.<br />
1500<br />
Lux<br />
50 1500<br />
Automatic reading Luxin the Lux<br />
current light value as new<br />
max50<br />
luminance 1500 set point<br />
Lux Lux<br />
OFF<br />
Follow-up time light<br />
Orientation lighting ON/OFF<br />
20 % of the nominal light<br />
Orientation lighting and its<br />
follow-up ime<br />
max<br />
Preset/user mode<br />
=> (see page 2, point 9)<br />
ON<br />
Fully automatic/semi automatic<br />
mode => (see page 2, point 8)<br />
OFF<br />
Locking device – Exit<br />
programming mode<br />
LED flashes<br />
t < 5 sec.<br />
50<br />
Lux<br />
Permanent protection against sabotage<br />
This function blocks the unit permanently (green LED is illuminated).<br />
This operating mode can only be activated during the<br />
period of 5 seconds after pressing the “lock“ button. This status<br />
will only permit actuating the function “Light on/Light off”.<br />
The procedure for leaving this mode is as follows:<br />
1. Switch off the current<br />
2. Apply current for 31 - 59 seconds<br />
3. Switch of the current again<br />
1500<br />
Lux<br />
4. Apply current<br />
5. Open detector<br />
Light on/off in closed state => (see page 2, point 10)<br />
The light will remain switched on/off for as long as movements<br />
are detected in the areas of coverage. Once the last movement<br />
has been detected, the light will remain on for the duration of the<br />
follow-up time as per setting.<br />
The appliance will then return independently to the mode<br />
selected (Fully or Semi-automatic).<br />
ON<br />
Permanent protection against<br />
sabotage<br />
OFF<br />
50 1500
ON<br />
8. Fully / Semi automatic mode<br />
OFF<br />
(for IR-PDim functions see page 1)<br />
The system switches over when the “Light” push-button is<br />
open (see remote control functions, page 1).<br />
Each time a push-button is pressed, the current operating<br />
mode is indicated by the red LED:<br />
Lit for 3 sec. = Fully automatic mode<br />
Flashes for 3 sec. = Semi-automatic mode<br />
Fully automatic operation<br />
In this operating mode, the lighting switches automatically<br />
on and off for increased comfort, depending on presence<br />
and brightness.<br />
Semiautomatic operation<br />
(Semiautomatic can only be activated via the remote control!)<br />
In this operating condition, in order to gain increased<br />
savings, the lighting is energized only after being manually<br />
switched on. Switch-off takes place automatically.<br />
The semiautomatic mode basically behaves like the fully<br />
automatic one. However, the difference is that switching-on<br />
must always be carried out manually!<br />
As many (closer-contact) buttons as desired can be wired in<br />
parallel on the “S” button input (ON/OFF Dimm).<br />
1<br />
2<br />
3<br />
9. Manual Dimming – Preset / User<br />
(for IR-PDim functions see page 1)<br />
You can dim manually by pressing the push button for<br />
a long time (> 2 sec). When the button is released,<br />
50<br />
the current dimming value is retained. Upon renewed Lux<br />
dimming, the dimming direction is reversed.<br />
max<br />
PRESET – the luminance set point is set during start-up<br />
operation by the installer and remains unchanged.<br />
The luminance set- point configured ONthrough manual<br />
dimming is only applied for the time being.<br />
Caution:<br />
OFF<br />
The constant light regulation is now deactivated!<br />
The currently set artificial light is retained independent<br />
of the ambient/daylight brightness!<br />
After switching off and then back on, the originally set<br />
luminance set-point is reset = constant light regulation<br />
is activated.<br />
USER – can only be activated via the remote control!<br />
The luminance set-point is max changed upon each manual<br />
dimming and re-adjusted by the user (Conformation<br />
through relay clicking!)<br />
The constant light regulation ON remains activated!<br />
10. Manual Switching OFF<br />
You can switch the lighting on and off manually by<br />
pressing the pushbutton for a short time. It will stay on or<br />
off as long as people are detected plus the configured<br />
follow up time.<br />
11. Range of Coverage<br />
10 m<br />
2.50 m<br />
1<br />
quer walking zum across Melder gehen<br />
frontal walking zum towards Melder gehen<br />
Unterkriechschutz<br />
seated<br />
12. Exclude sources of interference<br />
3<br />
360°<br />
In case the sensing area of the LUXOMAT ® <strong>PD2</strong>-M-<br />
<strong>DIM</strong> is too large or areas are being covered that<br />
should not be monitored, the range can be reduced<br />
or limited through use of the enclosed masking<br />
clips (e).<br />
e<br />
2<br />
4 m<br />
6 m<br />
10 m<br />
50<br />
Lux<br />
1500<br />
Lux<br />
1500<br />
Lux<br />
13. Wiring diagrams<br />
Standard mode with master <strong>DIM</strong> occupancy detectors<br />
L<br />
N<br />
<br />
T1<br />
S N L L΄<br />
<br />
14. <strong>PD2</strong>-M-<strong>DIM</strong> – Connections<br />
15. Article / Part nr. / Accessory<br />
Type SM FC FM<br />
<strong>PD2</strong>-M-<strong>DIM</strong> (Master) 92153 92167 92157<br />
<strong>PD2</strong>-S (Slave) 92152 92166 92156<br />
LUXOMAT ® Remote control:<br />
IR-PDim (incl. wall bracket) 92200<br />
Accessory:<br />
BSK Ball basket guard 92199<br />
Wall bracket for remote control as replacement 92100<br />
Occupancy detectors - Covering IP23 92206<br />
Socket IP54 92161<br />
111<br />
<br />
We recommend that before dimming of the connected<br />
lights a 100 h burn in (T5 tubes or 80 hours for T8 Tubes)<br />
function takes place.<br />
The lifespan of the lamps can be reduced if the burn in does<br />
not take place.<br />
N<br />
L<br />
+<br />
<br />
+ R<br />
R N L<br />
C1<br />
optional<br />
T1 = NO button for semi-automatic mode<br />
Slave for enlargement of detection area<br />
L<br />
N<br />
L<br />
N<br />
R<br />
Slave<br />
R<br />
Slave<br />
T1<br />
R S L' L N N – +<br />
T1<br />
S L' L N<br />
R – +<br />
N<br />
L<br />
+<br />
–<br />
<strong>PD2</strong>-M-<strong>DIM</strong>-SM<br />
N<br />
L<br />
+<br />
–<br />
E1<br />
1-10 V<br />
EB<br />
E1<br />
1-10 V<br />
EB<br />
<strong>PD2</strong>-M-<strong>DIM</strong>-FC/-FM<br />
16. Technical data <strong>PD2</strong>-Master-<strong>DIM</strong><br />
Sensor and power supply in one case for onwall-, ceiling- and<br />
flushmounting<br />
Power supply: 230 V~ ±10 %<br />
Power consumption: < 1W<br />
Ambient temperature: -25°C to +50°C<br />
Degree of protection /class: SM IP20, with accessory IP54, FC<br />
and FM IP20 with accessory IP23/ II<br />
Settings: <br />
locally and by remote control<br />
Light values - IR-PDim: 50 - 1500 Lux<br />
Extension of the detection area: with Slaves<br />
Area of coverage: circular 360°<br />
Range of coverage Ø H 2.50 m / T=18°C:<br />
seated 4 m / tangential 10 m / radial 6 m<br />
Recommended height for mounting: 2 - 3 m<br />
Light measurement: mixed light, daylight + artificial light<br />
Lux values - Potentiometer: 10 - 2000 Lux<br />
• Relay/Channel 1 for light-connection<br />
Type of contact:<br />
NOC/with pretravel tungsten contact<br />
Contact load: 2300 W cos ϕ =1 /<br />
1150 VA cos ϕ = 0.5, µ-Contact<br />
<strong>DIM</strong>-Output: 1 x (1-10 V)<br />
Max. no. of series-connected electronic ballasts:<br />
max. 50 electronic ballasts by one single supply with<br />
max. 100 m cable run and a conductur cross-section of<br />
0.75 mm²<br />
Time-settings:<br />
1 - 30 min. / test<br />
Dimensions HxØ [mm] SM FC FM<br />
<strong>PD2</strong>-M-<strong>DIM</strong> 50 x 98 84,5 x 80 65 x 98<br />
Visible portion when built into ceiling: 34 x 79 mm<br />
<br />
<br />
<br />
<br />
<br />
<br />
<br />
<br />
Technical data <strong>PD2</strong>-Slave<br />
Power supply: 230 V~ ±10 %<br />
Impulse output:<br />
Optocoupler max. 2 W<br />
Impulse duration: 2 sec. or 9 sec.<br />
Dimensions:<br />
see above<br />
Declaration of Conformity: The product complies with the low<br />
voltage recommendation 2006/95/EC and the EMV recommendation<br />
2004/108/EC.<br />
17. LED-functional indicators, fault-finding<br />
The functional indicators in the case of the LUXOMAT ®<br />
<strong>PD2</strong>-M-<strong>DIM</strong>-MASTER (red and green LED‘s)<br />
Red LED indicating self-checking mode (over a period<br />
of 60 seconds following mains‘-supply lock-on)<br />
Flashing at intervals of 1 second<br />
EEPROM/memory empty<br />
Flashing rapidly<br />
EEPROM/memory contains information<br />
Red LED as an indicator of status<br />
Flashing irregularly<br />
Movements are detected within the area of coverage<br />
Flashing regularly<br />
Detector identifies bright, light off<br />
(dependent upon operating mode)<br />
Not illuminated<br />
Detector identifies dark, light on<br />
(dependent upon operating mode)<br />
Flashing extremely rapidly<br />
Too bright / Too dark / Undefined<br />
Red LED as an acknowledgement of receipt for<br />
commands from the remote control<br />
Illuminated for 2 seconds<br />
Signal validly received<br />
Illuminated for 0.5 seconds<br />
Not-accepted command, detector blocked<br />
Flashing extremely rapidly<br />
Not-accepted command, occurs, for example, when an<br />
attempt is made to input twilight-value are too bright<br />
or too dark<br />
Green LED as an acknowledgement of receipt for<br />
commands from the remote control<br />
Lights up for 3 seconds<br />
Semi automatic or user signal correctly received<br />
Green LED as an indicator of status (only for status<br />
“Permanent protection against sabotage”)<br />
Flashing irregularly<br />
Movement are detected within the area of coverage<br />
Flashing regularly<br />
Detector identifies bright, light off<br />
(dependent upon operating mode)<br />
Not illuminated<br />
Detector identifies dark, light on<br />
(dependent upon operating mode)<br />
lluminated for 2 seconds<br />
Signal validly received<br />
(dependent upon operating mode)<br />
MAN 5562 –140711–2