Introduction to Dutch Defense Material - Zuka
Introduction to Dutch Defense Material - Zuka
Introduction to Dutch Defense Material - Zuka

You also want an ePaper? Increase the reach of your titles
YUMPU automatically turns print PDFs into web optimized ePapers that Google loves.
Chapter 11<br />
Introducing the Dangerfield Attack<br />
I<br />
If you are a class-level player, you probably hate facing the<br />
<strong>Dutch</strong>. After spending so much time studying the typical<br />
lines of your main opening, you find yourself staring down<br />
at that silly pawn on f5, knowing your opponent knows his<br />
opening better than you do.<br />
Time <strong>to</strong> make your opponent an alien on his own<br />
planet.<br />
The Colle-Zuker<strong>to</strong>rt possesses several appealing qualities.<br />
The “double-barreled” system I propose for meeting the<br />
<strong>Dutch</strong> <strong>Defense</strong> shares several of those qualities.<br />
• Against many <strong>Dutch</strong> setups, White has a particular configuration<br />
<strong>to</strong> aim at.<br />
• There are plenty of tactics, but they are generally thematic<br />
and strategically motivated (so mere mortals like me<br />
can find them).<br />
• At the same time, the reper<strong>to</strong>ire here should keep all the<br />
fun on White’s side of the board. Black finds himself with little<br />
in the way of counter-attacking options.<br />
If you have ever found yourself matched against someone<br />
proficient in the <strong>Dutch</strong>, you likely appreciate this last point.<br />
Finally, like the C-Z, the system described here is offbeat.<br />
In fact, “offbeat” is a mild term. It makes the rather syncopated<br />
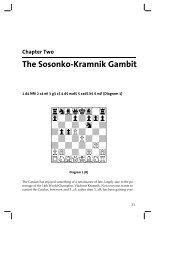
1.d4 f5 2.g3 Nf6 3.Bg2 g6 4.Nf3 Bg7 5.0-0 0-0 6.b4!?<br />
look like a main line. No matter what manual your opponent<br />
used for his reper<strong>to</strong>ire, you can be reasonably confident he<br />
will soon be out of book.<br />
209
Chapter 11<br />
Book Survey<br />
Fundamentally, my system against the <strong>Dutch</strong> combines two<br />
threats, hence the “double-barreled” adjective. First, White<br />
hints at gaining fantastic piece placement by developing his<br />
dark-squared Bishop <strong>to</strong> f4 and then opening up the other<br />
with e3.<br />
1.d4 f5 2.Bf4 Nf6 3.e3<br />
!@@@@@@@@#<br />
$‰NıQappleBzR%<br />
$P∏P∏PzP∏%<br />
$zxzxzNzx%<br />
$xzxzx∏xz%<br />
$zxzpzbzx%<br />
$xzxzpzxz%<br />
$πpπxzpπp%<br />
$rñxœk∫n®%<br />
^&&&&&&&&*<br />
Then, most of the time he will switch gears and aim for<br />
a powerful K-side pawn fusillade. For example, a common<br />
continuation is:<br />
3…g6?! 4.h4<br />
These two threats, actively placing both Bishops and s<strong>to</strong>rming<br />
the K-side, complement one another. In the <strong>Dutch</strong> Black’s<br />
standard antidote against a K‐side pawn raid is <strong>to</strong> set up a<br />
S<strong>to</strong>newall formation, and that is precisely what Black does not<br />
want <strong>to</strong> do against 2.Bf4! Indeed, Aagaard writes in his <strong>Dutch</strong><br />
S<strong>to</strong>newall, referencing the position after 1.d4 f5 2.c4 e6 3.Nc3<br />
d5, “This version of the S<strong>to</strong>newall cannot be recommended.<br />
White’s fluid development soon leads <strong>to</strong> a dangerous initiative.”<br />
The reason for his disapproval becomes clear after 4.Nf3<br />
c6 5.Bf4, “White should not be allowed the luxury of bringing<br />
out both Bishops.” In his summary he writes “Systems involving<br />
e2-e3 are not a threat <strong>to</strong> the S<strong>to</strong>newall player unless White<br />
has already brought his Queen’s Bishop in<strong>to</strong> play.” Aagaard<br />
gives no suggested method <strong>to</strong> meet this contingency.<br />
210
Introducing the Dangerfield Attack<br />
For this reason, I believe 2.Bf4 is vastly underestimated. It<br />
is certainly not well examined in the various opening manuals.<br />
A survey of recent books yields stunning results.<br />
Book and Author Year Pgs<br />
<strong>Dutch</strong> <strong>Defense</strong> by Christiansen and Silman 1989 1<br />
The <strong>Dutch</strong> for the Attacking Player by Pedersen 1996 ½<br />
The <strong>Dutch</strong> Leningrad by McDonald 1997 0<br />
<strong>Dutch</strong> S<strong>to</strong>newall by Aagaard 2000 0<br />
Classical <strong>Dutch</strong> by Pinski 2002 1<br />
Understanding the Leningrad <strong>Dutch</strong> by Beim 2002 0<br />
Play the Classical <strong>Dutch</strong> by Williams 2003 0<br />
Starting Out: the <strong>Dutch</strong> <strong>Defense</strong> by McDonald 2004 0<br />
Leningrad System by Kindermann 2005 ¼<br />
Win with the S<strong>to</strong>newall <strong>Dutch</strong> by Johnsen et al. 2009 4<br />
Dangerous Weapons: The <strong>Dutch</strong> Palliser et al. 2009 0<br />
I’ve estimated the coverage in what I hope is a fair manner.<br />
Johnsen, Bern, and Agdestein give 1.d4 e6 as a reper<strong>to</strong>ire<br />
line. For the Zuker<strong>to</strong>rt player, this means you are going <strong>to</strong> be<br />
playing 1.d4 e6 2.Nf3 f5 3.Bf4, so I counted coverage for those<br />
lines. Similarly, Pinski only spends 1/8 of a page on 2.Bf4, but<br />
two or three variations he gives in various annotated games<br />
land in our reper<strong>to</strong>ire by transposition, so I included that coverage<br />
in the statistics. Lastly, though Aagaard spends 1½ pages<br />
describing how Black should not contemplate the S<strong>to</strong>newall<br />
after White plays Bf4, he doesn’t provide any guidance for<br />
what Black should do, so I indicated 0 pages for his book.<br />
Many of these books treat lines where White plays Bf4<br />
later, but there appears a decided tendency <strong>to</strong> omit move<br />
orders that allow White <strong>to</strong> use the double-barreled plan.<br />
For example, several manuals give coverage of 1.d4 f5 2.Nc3<br />
with Bf4 coming later, but with that move order much of the<br />
fizzle has escaped from White’s standard method of punish-<br />
211
Chapter 11<br />
ing a S<strong>to</strong>newall played against Bf4. The c-pawn is blocked.<br />
Similarly, Kindermann spends four times as much space on<br />
1.d4 f5 2.Nf3 Nf6 3.Bf4 g6, as he does on 1.d4 f5 2.Bf4, but<br />
the Knight on f3 turns out <strong>to</strong> be misplaced as it blocks the<br />
Queen’s access <strong>to</strong> the K-side.<br />
The Move That Gets No Respect<br />
Rodney Dangerfield built a career on the catchphrase “I<br />
get no respect.” The authors of books written from the Black<br />
side of the <strong>Dutch</strong> have some pretty harsh words for 2.Bf4. In<br />
one of his books McDonald makes a blanket statement that<br />
any development using e3 rather than g3 is “completely harmless,”<br />
and evidently does not consider Bf4 worth even a line of<br />
discussion. Pinski uses precisely the same phrase, “completely<br />
harmless,” <strong>to</strong> refer <strong>to</strong> the same setups. Kindermann is particularly<br />
unabashed in his disdain. In one place he speaks of how<br />
“Bf4 has little <strong>to</strong> recommend it,” and in another he groups it<br />
with a collection of odds and ends upon which he casts the<br />
aspersion “I would not recommend a single one of the White<br />
ideas in this section.”<br />
Yet Kindermann’s suggested antidote <strong>to</strong> an early Bf4 is<br />
hopeless, saving Black from the fire only by transporting him<br />
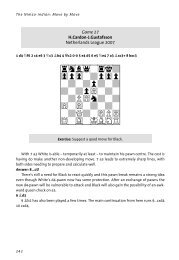
<strong>to</strong> the frying pan. He recommends 1.d4 f5 2.Bf4 Nf6 3.e3 g6<br />
4.h4! h6, allowing Black <strong>to</strong> close the K-side should White<br />
play 5.h5, but this gives White both an enduring attack and<br />
fantastic position so long as he knows the key, one-move<br />
refutation.<br />
212
Introducing the Dangerfield Attack<br />
!@@@@@@@@#<br />
$‰NıQappleBzR%<br />
$P∏P∏Pzxz%<br />
$zxzxzN∏P%<br />
$xzxzx∏xz%<br />
$zxzpzbzp%<br />
$xzxzpzxz%<br />
$πpπxzpπx%<br />
$rñxœk∫n®%<br />
^&&&&&&&&*<br />
White <strong>to</strong> play and eviscerate<br />
Do you see how White can exploit the vulnerability on g6<br />
created by Black’s 4…h6? (See next chapter for details.)<br />
Only Aagaard and Johnsen et al. give much respect <strong>to</strong> this<br />
line, the latter giving several variations where White achieves ≈<br />
without any suggested improvements for Black. It is likely no<br />
coincidence that their books focus on the S<strong>to</strong>newall variation,<br />
which they do not recommend Black adopt against Bf4.<br />
Some of the invective ladled upon Bf4 can be attributed<br />
<strong>to</strong> the tendency of authors <strong>to</strong> favor the side from which their<br />
book is written. These are all books written from the Black<br />
side of the board, so it is not surprising <strong>to</strong> see negative sentiment<br />
concerning uninteresting side variations they hope the<br />
reader never actually has <strong>to</strong> engage.<br />
However, these authors have been kind enough <strong>to</strong> describe<br />
the problems they see in an early Bf4, so it is appropriate <strong>to</strong><br />
discuss these as well as the move’s virtues. We shall do this in<br />
the next two sections.<br />
Bf4’s Supposed Vices<br />
Contempt for Bf4 is commonly justified by referencing three<br />
shortcomings:<br />
1. The Bishop is vulnerable <strong>to</strong> attack by …h6 and …g5.<br />
213
Chapter 11<br />
2. Developing the Bishop in this way is inconsistent with<br />
White’s desire <strong>to</strong> fianchet<strong>to</strong> his other Bishop.<br />
3. Black’s thematic …e5 comes with tempo and practically<br />
guarantees equality.<br />
Hold on a sec. Why is Bf4 “inconsistent” with fianchet<strong>to</strong>ing<br />
the light-squared Bishop?<br />
If Black plays …d6 and White plays g3, there is not much<br />
breathing room for a dark-squared Bishop on that wing.<br />
Anyway, I contend these concerns lose significant potency<br />
if White castles long, or at least retains the ability <strong>to</strong> do so.<br />
White then welcomes the expansion of Black’s K-side pawns,<br />
so the first point listed above is hardly a concern. It will, in<br />
fact, seldom even be a reasonable plan <strong>to</strong> consider. Similarly,<br />
the value attached <strong>to</strong> playing Bg2 depends on the assumption<br />
that White castles short. In typical play, White attacks on the<br />
Q‐side while Black presses on the K-side. A Bishop on g2 helps<br />
defend White’s King and also hinders Black’s Q-side development,<br />
particularly in that Black has trouble safely playing<br />
…Bb7. In our reper<strong>to</strong>ire, however, lines with a Bishop on b7<br />
are not particularly troublesome, especially as they leave e6,<br />
f5, and g4 with less protection.<br />
With regard <strong>to</strong> the third point, Black has by no means<br />
solved all his problems once he plays …e5. Indeed, the pawns<br />
on e5 and f5 are high-maintenance and can be real liabilities if<br />
White castles long. To see an example of this, consider a typical<br />
position suggested by Pinski (via transposition) after:<br />
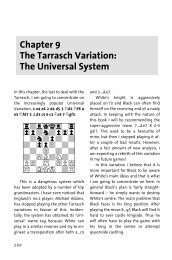
1.d4 f5 2.Bf4 e6 3.Nf3 Nf6 4.e3 d6 5.c4 Be7 6.Nc3 0-0 7.Qc2<br />
Qe8 8.h3 Nc6 9.a3 Bd8 10.0-0-0<br />
214
Introducing the Dangerfield Attack<br />
!@@@@@@@@#<br />
$‰xıBŒRapplex%<br />
$P∏PzxzP∏%<br />
$zx˜P∏Nzx%<br />
$xzxzx∏xz%<br />
$zxπpzbzx%<br />
$pznzpñxπ%<br />
$zpœxzpπx%<br />
$xzk®x∫x®%<br />
^&&&&&&&&*<br />
After 10...e5 11.dxe5 dxe5 12.Bh2, Black’s pieces are tied<br />
down defending his e-pawn. White has a free hand <strong>to</strong> prepare<br />
standard opposite-castle operations: Kb1, Rg1, perhaps Nd2<br />
(<strong>to</strong> safeguard e4) and/or Be2 (sometimes needed <strong>to</strong> defuse<br />
tactical threats against the Knight on f3 after g4).<br />
Bf4’s Virtues<br />
So, what does Bf4 have <strong>to</strong> commend it? Several things.<br />
We have already mentioned how a Bishop on f4 dissuades<br />
Black from establishing a S<strong>to</strong>newall setup, and the pressure<br />
on c7 and e5 is obvious. There are two more nuanced points<br />
worth noting.<br />
First, Bf4 allows White <strong>to</strong> play e3 with a clear conscience,<br />
opening a transportation lane for the Queen. For example,<br />
many books grudgingly discourage Black from using the line:<br />
1.d4 f5 2.Bf4 Nf6 3.e3 g6<br />
!@@@@@@@@#<br />
$‰NıQappleBzR%<br />
$P∏P∏Pzx∏%<br />
$zxzxzN∏x%<br />
$xzxzx∏xz%<br />
$zxzpzbzx%<br />
$xzxzpzxz%<br />
$πpπxzpπp%<br />
$rñxœk∫n®%<br />
^&&&&&&&&*<br />
215
Chapter 11<br />
And now the continuation mentioned above, 4.h4! Bg7?!<br />
5.h5, is very dangerous. Kindermann suggests that 4…h6 is<br />
the antidote. But it does not save Black, as we shall see later.<br />
Second, Black’s flexibility is limited by the moves he makes<br />
while White is playing Bf4 and e3. For example, after 1.d4 f5<br />
2.c4 e6 3.Nc3, Black can play 3…Bb4. However, if White’s<br />
move order involves playing Bf4, e3, and Nf3 before c4 and<br />
Nc3, Black will either no longer have the option of playing<br />
…Bb4 (e.g. 1.d4 f5 2.Bf4 Nf6 3.e3 e6 4.Nf3 d6 5.c4 Be7<br />
6.Nc3) or will have at least already moved his dark-squared<br />
Bishop once (e.g. 1.d4 f5 2.Bf4 Nf6 3.e3 e6 4.Nf3 Be7 5.c4<br />
0-0 6.Nc3). Actually, my official recommendation in the latter<br />
case involves not allowing Black <strong>to</strong> pin a Knight on c3 even at<br />
the cost of the tempo. Playing 6.Be2 is preferable.<br />
Why a New Response <strong>to</strong> the <strong>Dutch</strong>?<br />
Players who use the lines suggested in the first volume<br />
of Zuke ’Em likely have A Killer Chess Opening Reper<strong>to</strong>ire by<br />
Summerscale and Johnsen, and it is reasonable <strong>to</strong> question<br />
the time required <strong>to</strong> learn a new system. Obviously, only the<br />
reader can determine this. If you like playing the system in<br />
AKCOR and are comfortable with it, your study time is probably<br />
better spent elsewhere. That said, certain concerns are<br />
worth mentioning.<br />
Summerscale’s recommendation, 2.Bg5, is a strong move.<br />
Unfortunately, because of its strength, there is now a good<br />
deal of theory known. Right now it appears the wind is at<br />
Black’s back in the main line:<br />
1.d4 f5 2.Bg5 g6 3.Nd2 Bg7 4.e4 fxe4 5.Nxe4 d5! 6.Nc5 b6<br />
7.Nb3 Nh6!<br />
216
Introducing the Dangerfield Attack<br />
!@@@@@@@@#<br />
$‰NıQapplexzR%<br />
$PzPzPzB∏%<br />
$zPzxzx∏N%<br />
$xzx∏xzbz%<br />
$zxzpzxzx%<br />
$xñxzxzxz%<br />
$πpπxzpπp%<br />
$rzxœk∫n®%<br />
^&&&&&&&&*<br />
If your opponent is building his reper<strong>to</strong>ire from a book<br />
published after 2003, he probably knows this continuation,<br />
which looks very good for Black. It is frustrating <strong>to</strong> know your<br />
theory solidly as White and still get the worse position!<br />
If you want <strong>to</strong> keep playing 2.Bg5 as your solution here, I<br />
would instead suggest the somewhat simplistic:<br />
1.d4 f5 2.Bg5 g6 3.Nc3 Bg7 4.Nf3 Nf6 5.Bxf6 Bxf6 6.Qd2!?<br />
!@@@@@@@@#<br />
$‰NıQapplexzR%<br />
$P∏P∏Pzx∏%<br />
$zxzxzB∏x%<br />
$xzxzx∏xz%<br />
$zxzpzxzx%<br />
$xznzxñxz%<br />
$πpπqπpπp%<br />
$rzxzk∫x®%<br />
^&&&&&&&&*<br />
From here White can castle long, play e3, and then get<br />
down <strong>to</strong> business with h4. I’d be happy <strong>to</strong> play the White<br />
pieces in that position.<br />
White’s 3rd move has been recently criticized as looking<br />
poor after Black plays an eventual d5, but if you are aiming<br />
at the line given above, you should end up at pretty much<br />
the same place if Black continues 3…d5 4.h4 Bg7 5.Nf3 Nf6<br />
6.Bxf6 Bxf6 7.Qd2.<br />
217
Chapter 11<br />
If you are going <strong>to</strong> play these lines as White, be psychologically<br />
prepared for 1.d4 f5 2.Bg5 g6 3.Nc3 d5 4.h4 Bg7 5.Nf3<br />
c6!? 6.Qd2 Be6 7.Qe3 Bf7 8.h5 Nd7.<br />
!@@@@@@@@#<br />
$‰xzQapplex˜R%<br />
$P∏x˜PıB∏%<br />
$zx∏xzx∏x%<br />
$xzx∏x∏bπ%<br />
$zxzpzxzx%<br />
$xznzqñxz%<br />
$πpπxπpπx%<br />
$rzxzk∫x®%<br />
^&&&&&&&&*<br />
This and similar positions have occurred several times in<br />
strong competition, and Black can get a Q-side pawn s<strong>to</strong>rm<br />
brewing very quickly. Be warned! Indeed, we will be aiming<br />
for a much improved version of this in this book.<br />
Unfortunately, a less easily addressed problem occurs in<br />
the <strong>Dutch</strong> Deferred (1.d4 e6 2.Nf3 f5). If you currently use<br />
AKCOR’s recommendation, 3.d5, then I suggest you take a<br />
long, hard look at what happens when Black shows no rush<br />
<strong>to</strong> recapture his pawn after 3…Nf6 4.dxe6 d5!<br />
!@@@@@@@@#<br />
$‰NıQappleBzR%<br />
$P∏PzxzP∏%<br />
$zxzxπNzx%<br />
$xzx∏x∏xz%<br />
$zxzxzxzx%<br />
$xzxzxñxz%<br />
$πpπxπpπp%<br />
$rñbœk∫x®%<br />
^&&&&&&&&*<br />
Igor Naumkin has played this as Black several times with<br />
success. The good thing is that you can find another response<br />
<strong>to</strong> 1.d4 e6 2.Nf3 f5 while keeping 2.Bg5 as your standard way<br />
218
Introducing the Dangerfield Attack<br />
of meeting 1.d4 f5, should that be your aim. In our reper<strong>to</strong>ire,<br />
there is no need <strong>to</strong> learn a separate line for 1.d4 e6.<br />
219