View sample pages (pdf) - Chess Direct Ltd
View sample pages (pdf) - Chess Direct Ltd
View sample pages (pdf) - Chess Direct Ltd

Create successful ePaper yourself
Turn your PDF publications into a flip-book with our unique Google optimized e-Paper software.
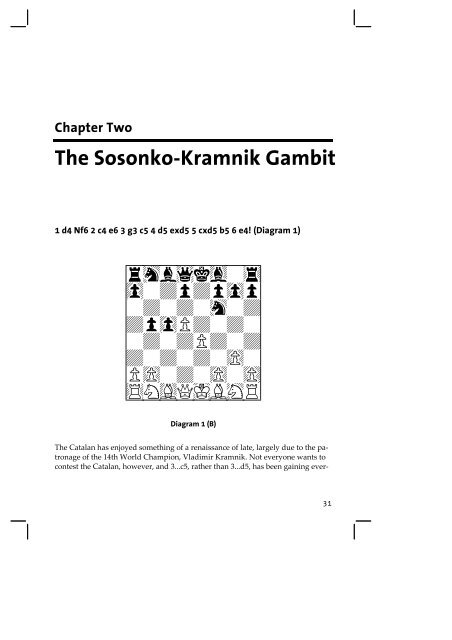
Chapter Two<br />
The Sosonko-Kramnik Gambit<br />
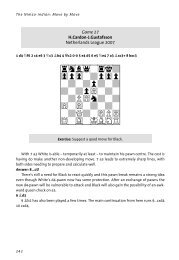
1 d4 Nf6 2 c4 e6 3 g3 c5 4 d5 exd5 5 cxd5 b5 6 e4! (Diagram 1)<br />
W________W<br />
[rhb1kgW4]<br />
[0WDpDp0p]<br />
[WDWDWhWD]<br />
[Dp0PDWDW]<br />
[WDWDPDWD]<br />
[DWDWDW)W]<br />
[P)WDW)W)]<br />
[$NGQIBHR]<br />
W--------W<br />
Diagram 1 (B)<br />
The Catalan has enjoyed something of a renaissance of late, largely due to the patronage<br />
of the 14th World Champion, Vladimir Kramnik. Not everyone wants to<br />
contest the Catalan, however, and 3...c5, rather than 3...d5, has been gaining ever‐<br />
31
Dangerous Weapons: The Benoni and Benko<br />
increasing support. Following 4 d5 exd5 5 cxd5 Black can take play into the Modern<br />
Benoni proper with 5...d6, but many 3...c5 exponents aren’t genuine Benoni<br />
players. Thus they prefer the uncompromising 5...b5!? which has long enjoyed a<br />
decent reputation. That was at least until 6 e4, an old gambit idea of Sosonko’s,<br />
was brought back on to the world stage by Kramnik. Hence my christening of 6 e4<br />
as the Sosonko‐Kramnik Gambit. It poses immediate problems for Black and I believe<br />
that 6 e4 is the most critical test of his ambitious early move order.<br />
V.Kramnik • E.Alekseev<br />
Tal Memorial, Moscow 2007<br />
1 d4 Nf6 2 c4 e6 3 g3 c5 4 d5 exd5 5 cxd5 b5 6 e4! Nxe4<br />
Critical and one of Black’s problems, not least for an opponent surprised over the<br />
board by the Sosonko‐Kramnik, is that Black lacks a good way to decline the gambit.<br />
For a start he can’t continue his standard Benoni development:<br />
a) 6...g6? fails to detect either of White’s threats and 7 e5 Qe7 8 Nf3 Ng4 (Black’s<br />
position also badly fails to convince after both 8...Bg7 9 Bxb5 0‐0 10 0‐0 Ng4 11 Bg5<br />
and 8...d6? 9 Bxb5+ Bd7 10 0‐0!) 9 Bxb5 Nxe5 10 0‐0 (Diagram 2) leaves Black in<br />
serious danger of losing a miniature, especially since the e‐file is open. As 10...Bg7<br />
loses to 11 d6 Qe6 12 Nxe5 Bxe5 13 Qf3, Black would have to try 10...f6, but I don’t<br />
think that we need to analyse any further after 11 Nc3.<br />
W________W<br />
[rhbDkgW4]<br />
[0WDp1pDp]<br />
[WDWDWDpD]<br />
[DB0PhWDW]<br />
[WDWDWDWD]<br />
[DWDWDN)W]<br />
[P)WDW)W)]<br />
[$NGQDRIW]<br />
W--------W<br />
Diagram 2 (B)<br />
W________W<br />
[rhbDkgW4]<br />
[0WDp1p0p]<br />
[WDWDWDWD]<br />
[Dp0PDWDW]<br />
[WDWDnDWD]<br />
[DWDWDW)W]<br />
[P)WDQ)B)]<br />
[$NGWIWHR]<br />
W--------W<br />
Diagram 3 (B)<br />
b) 6...d6?! 7 Bxb5+ Bd7 8 Bxd7+ Nbxd7 gives Black a little bit of compensation as<br />
White has weakened his kingside with g3. However, it’s hard to imagine that it<br />
will be anywhere near enough so long as White remains careful after, say, 9 Nc3<br />
32
The Sosonko-Kramnik Gambit<br />
g6 10 Nf3 Bg7 11 0‐0 0‐0 12 Bf4.<br />
Perhaps 6...Qe7 and 6...Bb7 are better alternatives, although, as we will see below,<br />
White retains the upper hand after both of those too.<br />
7 Qe2 Qe7 8 Bg2 (Diagram 3) 8...Nd6<br />
A solid choice. Black has to avoid, of course, 8...Nf6? 9 Qxe7+ Bxe7 10 d6, but the<br />
combative 8...f5!? is probably a more critical choice, as we will analyse below in<br />
the Looking A Little Deeper section.<br />
9 Be3 b4?!<br />
Now Black is definitely worse. More combative might be 9...c4 10 Nc3 a6?! (this is<br />
probably too slow, although even after the superior 10...b4 White has a pleasant<br />
choice between 11 Na4 and taking the exchange with 11 Nb5!? Nxb5 12 d6 Nxd6<br />
13 Bxa8), but after 11 Nh3! (developing the kingside and without blocking the g2‐<br />
bishop; instead Ligterink has suggested 11 Bc5 and after, say, 11...Qxe2+ 12 Ngxe2<br />
Nf5 13 Bxf8 Kxf8 14 a4 b4 15 Ne4 White retains reasonable play for the pawn despite<br />
the exchange of queens, but I prefer the text or even 11 0‐0‐0!?, followed by<br />
Nf3, Rhe1 and perhaps then Nd4) 11...g6 (and not 11...Nf5? 12 d6) 12 0‐0 Bg7 13<br />
Rfe1 (Diagram 4) White is doing rather well. Indeed Black pretty much has to give<br />
up an exchange, but 13...0‐0 14 Bc5 Qxe2 15 Rxe2 Nf5 16 Bxf8 Bxf8 doesn’t offer<br />
him enough for it since White can invade the back rank with 17 Re8.<br />
W________W<br />
[rhbDkDW4]<br />
[DWDp1pgp]<br />
[pDWhWDpD]<br />
[DpDPDWDW]<br />
[WDpDWDWD]<br />
[DWHWGW)N]<br />
[P)WDQ)B)]<br />
[$WDW$WIW]<br />
W--------W<br />
Diagram 4 (B)<br />
W________W<br />
[rDbDkgW4]<br />
[0WDpDp0p]<br />
[nDWhWDWD]<br />
[DWGPDWDW]<br />
[W0WDWDWD]<br />
[DWDWDW)W]<br />
[P)WDN)B)]<br />
[$NDWIWDR]<br />
W--------W<br />
Diagram 5 (W)<br />
I should also mention two fairly obscure games quoted in the latest New In <strong>Chess</strong><br />
Yearbook (86). In Iliushina‐Pokusaev, Novokuznetsk 2007, 9...Bb7!? 10 Bxc5 (the<br />
reader should also investigate 10 Nc3!?, with the possible continuation 10...b4 11<br />
Nb5 Nxb5 12 Qxb5 Ba6 13 Qa4 Qd6 14 0‐0‐0, followed by 15 Bf4, maintaining the<br />
initiative) 10...Qxe2+ 11 Nxe2 Na6 12 Bd4 Nb4 13 Na3 Bxd5 14 Bxd5 Nxd5 15 Rd1<br />
33
Dangerous Weapons: The Benoni and Benko<br />
gave White decent play for her pawn, while Iliushina‐Petukhov, Novokuznetsk<br />
2007, deviated with 9...Na6!? and after 10 Nh3 g6 11 0‐0 Bg7 12 Re1 0‐0 13 Nc3 b4<br />
14 Na4 White again had decent play for her pawn.<br />
Do expect to see more of the sensible developing moves 9...Bb7 and 9...Na6. Indeed,<br />
the latter has been tried in two further games since this chapter was first<br />
written. Instead of 10 Nh3, White might do better to lure the black queenside<br />
pawns forward with 10 Nc3!? b4 11 Na4 c4 (11...g6 can be met by 12 0‐0‐0!?, but in<br />
A.Moiseenko‐P.Carlsson, European Championship, Plovdiv 2008, White preferred<br />
the simple 12 Nxc5 Nxc5 13 Bxc5 a5 14 Bd4 Rg8 15 0‐0‐0, which saw him regain his<br />
pawn while retaining an edge due to his safer king position) 12 Nh3, as recommended<br />
by Sosonko. This idea was tested in the game C.Batchuluun‐S.Van Eijk,<br />
Novokuznetsk 2008, in which Black preferred 10...Rb8 and after 11 a4!? Nf5 12 d6!<br />
Nxd6 13 Nd5 Qe5 14 f4 Qe6 15 axb5 Bb7, White should have settled for 16 f5 Qe5<br />
17 0‐0‐0! with a strong initiative.<br />
10 Bxc5 Qxe2+ 11 Nxe2 Na6 (Diagram 5)<br />
Alekseev was probably relying on being able to catch up in development after<br />
this, but Kramnik was ready with a strong novelty.<br />
12 Bxd6!<br />
Improving over an earlier game, G.Sosonko‐F.Olafsson, Wijk aan Zee 1977. That<br />
had seen 12 Bd4 Nf5 13 0‐0 (Sosonko points out that even here White can gain a<br />
small advantage with 13 Nd2!? and after, for example, 13...Nxd4 14 Nxd4 Bc5 15<br />
N2b3 Black is under some pressure, although I suspect that 13...Bb7!? is a superior<br />
try) 13...Bc5! 14 Bxc5 Nxc5 15 Nd2 Ba6 16 Rfc1 Nd3 and Black developed sufficient<br />
counterplay.<br />
12...Bxd6 13 Nd2<br />
DANGEROUS WEAPON! Black might enjoy an unopposed darksquared<br />
bishop, but that is about to be destabilized, while his<br />
other two minor pieces are hardly ideally placed.<br />
White thus has a pleasant edge, although Black remains far from easy to break<br />
down and Kramnik has to manoeuvre well.<br />
13...Rb8<br />
White also begins to put his lead in development to good use in the line 13...Bb7<br />
14 Nc4 Bc5 15 0‐0!? (Black may be able to grovel after 15 Na5 0‐0‐0 16 0‐0 Rhe8: the<br />
loss of his light‐squared bishop is surprisingly not too dangerous for him) 15...Rc8<br />
16 Rac1 when a timely Na5, probably after first doubling rooks on the c‐file, will<br />
add to Black’s difficulties.<br />
14 Nc4 (Diagram 6) 14...Be7<br />
Now Black’s dark‐squared bishop becomes a target on f6. However, no better was<br />
34
The Sosonko-Kramnik Gambit<br />
14...Bc5!?, as suggested after the game by Kramnik, because 15 d6 0‐0 16 0‐0 maintains<br />
a pleasant pull. White can direct his rooks to either the c‐ or the e‐file, as well<br />
as bring a knight to d5, such as with 16...Bb7 17 Bxb7 Rxb7 18 Nf4.<br />
15 d6 Bf6 16 Nf4 Nc5 17 0-0 Ba6<br />
Black has nothing better than to transpose after 17...0‐0 18 Nd5 with 18...Ba6, since<br />
18...Bd8 19 Rfe1 would keep him horribly tied up.<br />
18 Nd5! 0-0<br />
White regains his piece with interest after 18...Bxc4 19 Nxf6+ gxf6 20 Rfc1.<br />
19 Nxf6+ gxf6 (Diagram 7) 20 Bd5?!<br />
W________W<br />
[W4bDkDW4]<br />
[0WDpDp0p]<br />
[nDWgWDWD]<br />
[DWDPDWDW]<br />
[W0NDWDWD]<br />
[DWDWDW)W]<br />
[P)WDN)B)]<br />
[$WDWIWDR]<br />
W--------W<br />
Diagram 6 (B)<br />
W________W<br />
[W4WDW4kD]<br />
[0WDpDpDp]<br />
[bDW)W0WD]<br />
[DWhWDWDW]<br />
[W0NDWDWD]<br />
[DWDWDW)W]<br />
[P)WDW)B)]<br />
[$WDWDRIW]<br />
W--------W<br />
Diagram 7 (W)<br />
Placing both minor pieces on good central squares looks very natural, but now<br />
Black is able to attack the d6‐pawn. Thus White should have first inserted 20 Rfd1!<br />
when he maintains an edge since 20...Bxc4 21 Rdc1 again regains the piece.<br />
20...Na4?<br />
Alekseev is, of course, fully aware that knights on the rim are dim, but he must<br />
have thought that his counterplay against b2 was worth something. However,<br />
Black is now undone by some powerful play from Kramnik. Instead 20...Rfe8 21<br />
Rfd1 Re2 22 b3 (Sosonko) would have restricted White to an edge, but I haven’t<br />
been able to find anything against 20...Rfc8!, not least because 21 b3 (or 21 Rfe1<br />
Nd3) 21...Bxc4 22 Bxc4 Ne4 23 Rfd1 Rb6 24 a3 bxa3 25 Rxa3 Rxd6 26 Rxd6 Nxd6 27<br />
Rxa7 Nxc4 28 bxc4 Rxc4 29 Rxd7 fizzles out to a draw. This game has been widely<br />
considered a crushing positional masterpiece, but it does seem that here Alekseev<br />
missed a good opportunity to save himself.<br />
21 Rfc1! (Diagram 8)<br />
35
Dangerous Weapons: The Benoni and Benko<br />
W________W<br />
[W4WDW4kD]<br />
[0WDpDpDp]<br />
[bDW)W0WD]<br />
[DWDBDWDW]<br />
[n0NDWDWD]<br />
[DWDWDW)W]<br />
[P)WDW)W)]<br />
[$W$WDWIW]<br />
W--------W<br />
Diagram 8 (B)<br />
W________W<br />
[WDWDWDWi]<br />
[0W$RDBDp]<br />
[W4WDW0WD]<br />
[DWDWDNDW]<br />
[W0WDWIWD]<br />
[DWDWDW)W]<br />
[PhWDb)W)]<br />
[DWDW4WDW]<br />
W--------W<br />
Diagram 9 (B)<br />
21...Rfe8<br />
Not the most consistent of follow‐ups, but after 21...Bxc4 22 Rxc4 Nxb2 (or<br />
22...Nb6 23 Rg4+ Kh8 24 Bb3) 23 Rg4+ Kh8 24 Rb1 Nd3 25 Rd4 Nc5 26 Rdxb4 Rxb4<br />
27 Rxb4 White’s superior pieces dominate the board.<br />
22 Ne3! Rb6?!<br />
After this the tactics favour White. Probably the last chance to grovel was<br />
22...Nxb2 23 Rc7 Bb5, although White retains a clear advantage after 24 Rb1 Nd3<br />
25 Rxa7.<br />
23 Rc7 Rxd6 24 Rd1<br />
Kramnik has calculated everything most impressively. White’s active pieces now<br />
combine in a decisive attack, while Black’s sorry minor pieces can but look on<br />
from afar.<br />
24...Kh8 25 Nf5 Rb6 26 Bxf7 Nxb2 27 Rdxd7 Re1+ 28 Kg2 Bf1+ 29 Kf3 Be2+ 30 Kf4<br />
(Diagram 9) 30...Rb8<br />
This doesn’t help, but mate would have followed in the event of 30...Nd3+ 31<br />
Rxd3 Bxd3 32 Rc8+.<br />
31 Bc4 1-0<br />
Powerful play from Kramnik, but does Black have to meekly retreat his knight to<br />
d6 in the opening?<br />
36