Mappler Tutorial - New Jersey Audubon Society
Mappler Tutorial - New Jersey Audubon Society
Mappler Tutorial - New Jersey Audubon Society

Create successful ePaper yourself
Turn your PDF publications into a flip-book with our unique Google optimized e-Paper software.
NJA Harbor Heron Surveys:<br />
using a <strong>Mappler</strong>K App to<br />
submit observations<br />
Introduction by Eden Buenaventura,<br />
Other contributors: Carolyn Paul, Brandon Rogers, and Emilia Topp<br />
Developed with support from: Rick Lathrop, Nellie Tsipoura<br />
Commons.wikimedia.org
Project Goals<br />
• To determine the abundance and distribution of<br />
“Harbor Herons” by recording amateur bird watcher<br />
observations<br />
• To determine the overall health of the species and<br />
environment<br />
Commons.wikimedia.org
Project Goals<br />
• While citizen scientists have been<br />
submitting rigorous data using standard<br />
survey methodologies since 2008, we would<br />
like to include observations from birders<br />
who happen to see Harbor Herons<br />
anywhere, anytime<br />
Commons.wikimedia.org
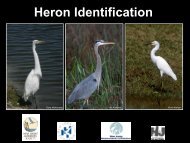
The Project<br />
• Observations of the following species can be entered<br />
– Great Egret (Ardea alba)<br />
– Snowy Egret (Egretta thula)<br />
– Great Blue Heron (Ardea herodias)<br />
– Black-crowned Night Heron (Nycticorax nycticorax)<br />
– Yellow-crowned Night Heron (Nyctanassa violacea)<br />
– Glossy Ibis (Plegadis falcinellus)<br />
– Green Heron (Butorides virescens)<br />
– Tricolored Heron (Egretta tricolor)<br />
Flickr user Mike’s Birds<br />
Public Domain
Data and Variables<br />
• Species<br />
• Name of User<br />
• Affiliation<br />
– NJ <strong>Audubon</strong><br />
<strong>Society</strong><br />
– Citizen Science<br />
(General Public)<br />
• Site<br />
• Count (of each<br />
species)<br />
• Weather<br />
• Temperature (F)<br />
• Picture<br />
• Optional: Low tide<br />
• Optional: Minutes to<br />
Low Tide<br />
•<br />
Commons.wikimedia.org
Data and Variables<br />
• There are also<br />
categories that will<br />
be recorded<br />
automatically:<br />
• ID #<br />
• Date<br />
• Time<br />
• Longitude/Latitude<br />
Commons.wikimedia.org
Data and Variables<br />
• Site information:<br />
– Can be entered<br />
automatically<br />
– Latitude and<br />
longitude<br />
– Can be entered as<br />
specific site<br />
– Pull down menu<br />
Please make sure that if you use specific site<br />
it matches the lat/long of the site, not where<br />
you are entering the data<br />
Commons.wikimedia.org
<strong>Mappler</strong> Application<br />
• To be used by Citizen Science and NJ/NY<br />
<strong>Audubon</strong><br />
– Drop down selections facilitate accurate collection of data<br />
– Optional fields allow contributions from various levels of<br />
knowledge.<br />
– Automatic collection of date, time, ID number, and location<br />
– Mobile ready application<br />
– Photos can be included<br />
– Capacity for 5000+ observations
<strong>Mappler</strong> <strong>Tutorial</strong><br />
Citizen Science Program<br />
<strong>New</strong> <strong>Jersey</strong> <strong>Audubon</strong><br />
<strong>Tutorial</strong> by Eden<br />
Buenaventura
To begin using <strong>Mappler</strong> you must first<br />
download the <strong>Mappler</strong> application.<br />
To do this, click on the App Store on your<br />
Apple iPhone.
Now click on the search button and type in<br />
“mappler”.
The search should yield an app named<br />
<strong>Mappler</strong>K as the first result. Click on the<br />
Install button to download the app. Once it<br />
installs, open the app.
To log-in, select the “Each” option and use<br />
the ID “birds” and password “mappler”. Hit<br />
OK when asked to use your location.
You will see a brief tutorial screen that<br />
explains how to navigate through the app.<br />
Click the X at the bottom right to close this.
If you would like to get back to the tutorial<br />
for help with the application, you can click<br />
the button in the top left hand corner and<br />
click on the <strong>Tutorial</strong> option. This menu also<br />
features the button to log out of your<br />
project. Click on your project under View<br />
Map to go back to it.
Now you should see a main screen that<br />
shows the data points for the project that<br />
have already been entered. At the beginning<br />
of the season, there might be few points<br />
listed, but they will accumulate throughout<br />
the season.
If you click on a specific point you can see a<br />
pop-up window that shows all of the<br />
information about that particular data<br />
entry.
Using the Category button you can choose<br />
which types of points you would like to see<br />
on the map. Put a checkmark in the box for<br />
those that you want to be visible.
The map layout can be changed to show<br />
other types of imagery by clicking the Map<br />
drop down button. By unchecking the Labels<br />
box, you can remove the text from on screen.
By clicking the arrow in the bottom left<br />
corner, the app will take you to your current<br />
location.
If you click and drag the little man icon in<br />
the top left corner, the roads become<br />
highlighted in blue. Dragging him to a blue<br />
road lets you then see the street view of that<br />
area and navigate through the streets to<br />
find a particular location by using the<br />
directional arrows.
The address where you are in street view is<br />
visible at the top of the app. If you click and<br />
hold it, it becomes highlighted and you can<br />
copy it, should you need to use that address<br />
somewhere.
To get back to the main map view, click on<br />
the circular arrow button.
To add a point, simply click on the plus sign<br />
on the top right corner of the screen. This<br />
will take you to a screen that shows the<br />
coordinates of your current location. If you<br />
would like to move the point to a different<br />
location, click and hold where you want the<br />
point to go, and the pin will be moved to that<br />
area.
You can toggle between the map view and<br />
the aerial photography view by using the two<br />
buttons in the bottom right corner.
By clicking the GPS coordinate button in the<br />
top left, you can get a view of your location<br />
that rotates as you do, so you can orient<br />
yourself spatially. To go back to a fixed<br />
orientation, click the new raindrop button<br />
that appears under the GPS button.
Once your point is established, click the<br />
right arrow at the top right of the screen to<br />
move on to the next step in making a new<br />
point. You will see a screen that looks like<br />
this <br />
Just as shown, you can either take a picture<br />
where you are or upload a photo that was<br />
previously saved to your phone.<br />
However, adding photos is optional, and can<br />
be skipped simply by clicking the arrow<br />
button on the top right again.
If you choose to take a picture, you will get a<br />
screen like this <br />
By clicking the button in the top left, you can<br />
toggle between the flash being on, off, or on<br />
automatic.<br />
If you have an iPhone 4 or later, the button<br />
on the top right allows you to change<br />
between the front and back cameras on your<br />
iPhone.<br />
Then you can click the camera button on the<br />
bottom of the screen to take the picture.<br />
Alternatively, you can also take pictures<br />
using the top volume button on the side of<br />
your phone.
Once the picture is secured, you can either<br />
choose to use the picture or retake it.
After you click Use, the app will take you to<br />
a screen where all of the pictures you have<br />
taken in the app are located. Choose the one<br />
you want to use and you can then enter all of<br />
the data that will be saved at that point<br />
location.
For drop down menus, click on the down<br />
arrow and then your selection.
When you have entered all of the<br />
information for your data point, click<br />
Submit.
Now you will see a screen like the following:<br />
Congratulations! You have now successfully<br />
navigated <strong>Mappler</strong>.<br />
If you should have any problems with the<br />
app closing out suddenly, either reopen the<br />
app, close the app out and reboot it, or delete<br />
and reinstall the app if it will not work<br />
properly.
Acknowledgements<br />
This project was brought to you in<br />
conjunction with the <strong>New</strong> <strong>Jersey</strong> <strong>Audubon</strong>,<br />
<strong>New</strong> York City <strong>Audubon</strong>, and <strong>New</strong> <strong>Jersey</strong><br />
Division of Fish and Wildlife and the<br />
Rutgers Advanced Geomatics class.<br />
<strong>Mappler</strong> application and rights licensed to<br />
Dr. Wansoo Im. Learn more about the<br />
program at www.mappler.net<br />
For more information or<br />
question about the Harbor<br />
Heron Project, please contact<br />
Laura Stern at<br />
citizen.science@njaudubon.org<br />
Michael Allen at<br />
michael.allen@njaudubon.org<br />
Nellie Tsipoura at<br />
nellie.tsipoura@njaudubon.org<br />
<strong>Tutorial</strong> created by Eden Buenaventura<br />
For additional assistance or troubleshooting<br />
with the app, in relation to this project,<br />
please contact Eden Buenaventura at<br />
edenxb@gmail.com
Questions?<br />
Commons.wikimedia.org