TRX Suspension Trainer: Basic Exercises - RonJones.Org
TRX Suspension Trainer: Basic Exercises - RonJones.Org
TRX Suspension Trainer: Basic Exercises - RonJones.Org

You also want an ePaper? Increase the reach of your titles
YUMPU automatically turns print PDFs into web optimized ePapers that Google loves.
<strong>TRX</strong> <strong>Suspension</strong> <strong>Trainer</strong>: <strong>Basic</strong> <strong>Exercises</strong><br />
The <strong>TRX</strong> <strong>Suspension</strong> <strong>Trainer</strong> is a helpful tool for not only strength conditioning—but also assisted<br />
stretching and rehabilitative exercise. It is great for individuals, groups, and circuit training too.<br />
The <strong>TRX</strong> can be mounted off a wall or suspended under the ceiling or some other appropriate<br />
rack system. All of the basic exercises below can be done with a side wall mount.<br />
Here are ten good ones that are both safe and effective to get y’all started--Enjoy!<br />
Stretching Technique: For stretching, we prefer “dynamic” or stretching that involves a sort of<br />
“prying” motion as you gently move in and out of different angles and ranges of motion. These<br />
seem to work better and feel better for most people, but if you prefer “static” stretching that holds<br />
end ranges of motion—this is fine. Please note that “static” stretching has been shown to<br />
decrease performance right before activity—and potentially even increase chance for injury.<br />
Static stretching is best done following your activity or sport event.<br />
Safety: Read <strong>TRX</strong> instructions for details, but make sure to mount the <strong>TRX</strong> securely using proper<br />
hardware. When leaning in extreme positions, make sure to secure footing and maintain strong<br />
grip on handles. Newer <strong>TRX</strong> units have a safety strap to prevent the webbing from side-to-side<br />
shifting, but older units need more attention to “center” the webbing in order to prevent a side slip<br />
issue. Use proper progressions to safely perform exercises. Do NOT get into positions with the<br />
<strong>TRX</strong> that you cannot control! Do NOT force joints into positions they are not ready to obtain!<br />
Gently use the “pry” method to ease in and out of various angles and positions that your body<br />
finds acceptable and appropriate for your level of ability. With all <strong>TRX</strong> Stretches/Strength<br />
<strong>Exercises</strong>, make sure to not overextend the lower back (excessive arch).<br />
STRETCHING EXERCISES<br />
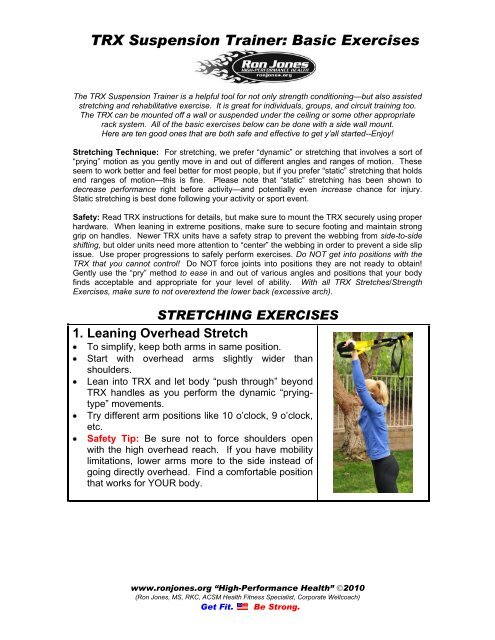
1. Leaning Overhead Stretch<br />
To simplify, keep both arms in same position.<br />
Start with overhead arms slightly wider than<br />
shoulders.<br />
Lean into <strong>TRX</strong> and let body “push through” beyond<br />
<strong>TRX</strong> handles as you perform the dynamic “pryingtype”<br />
movements.<br />
Try different arm positions like 10 o’clock, 9 o’clock,<br />
etc.<br />
Safety Tip: Be sure not to force shoulders open<br />
with the high overhead reach. If you have mobility<br />
limitations, lower arms more to the side instead of<br />
going directly overhead. Find a comfortable position<br />
that works for YOUR body.<br />
www.ronjones.org “High-Performance Health” 2010<br />
(Ron Jones, MS, RKC, ACSM Health Fitness Specialist, Corporate Wellcoach)<br />
Get Fit. Be Strong.
<strong>TRX</strong> <strong>Suspension</strong> <strong>Trainer</strong>: <strong>Basic</strong> <strong>Exercises</strong><br />
2. Leaning Side Twist Stretch<br />
Using a staggered stance with diagonal arms, try<br />
this progression from the initial Leaning Overhead<br />
Stretch.<br />
Shift one arm overhead at angle as you lean or<br />
“twist” your back one direction, move gently in this<br />
lean direction then go back the other direction and<br />
allow the other arm to come overhead. There is no<br />
“one” position for this exercise, and both arms are<br />
not in the same place like the Overhead Leaning<br />
Stretch.<br />
Safety Tip: Ease into comfortable positions—not<br />
force. The <strong>TRX</strong> is a great tool to help you control<br />
the amount of twist and stretch.<br />
3. Side Reach Stretch<br />
Stand sideways to <strong>TRX</strong> then place feet and legs together.<br />
Arch your body into a “Half Moon” position using a 1-hand or 2-hands grip.<br />
Try both grips because they will stretch your body in different ways.<br />
4. Shoulder & Thoracic Stretch<br />
Face <strong>TRX</strong> with feet shoulder width apart while<br />
standing upright.<br />
Allow your thoracic spine (mid back) to round as<br />
your chest sinks away from <strong>TRX</strong> then push chest<br />
and spine forward while pulling shoulders together.<br />
To emphasize thoracic “mid back” only, keep<br />
shoulders set in place while you focus on the front to<br />
back spinal mobility. This is harder to do but can be<br />
very helpful as many people have lost mobility in the<br />
mid back areas due to prolonged sitting.<br />
PHOTO<br />
TO BE POSTED<br />
www.ronjones.org “High-Performance Health” 2010<br />
(Ron Jones, MS, RKC, ACSM Health Fitness Specialist, Corporate Wellcoach)<br />
Get Fit. Be Strong.
<strong>TRX</strong> <strong>Suspension</strong> <strong>Trainer</strong>: <strong>Basic</strong> <strong>Exercises</strong><br />
5. Back Rotation Stretch<br />
Face <strong>TRX</strong> with feet shoulder width. Allow torso to “sink down” as you rotate<br />
the spine in a diagonal pattern—basically twisting and rotating away from the<br />
center line.<br />
Move back and forth in different lines finding the positions that feel good to<br />
your body. Allow torso to rise and sink in various positions—experiment—this<br />
one feels good.<br />
6. Squat Stretch<br />
Squatting is generally referred to as a “strength”<br />
exercise, but it’s also a great hip and low back<br />
stretch when using the <strong>TRX</strong>.<br />
Get into good squat position with feet square and<br />
about shoulder width.<br />
Allow arms to reach forward as the <strong>TRX</strong> guides you<br />
down while helping you to balance. Sink deeply into<br />
the squat so you get a full stretch. For added<br />
benefit, allow hips to shift slightly left and right.<br />
You should be able to go much deeper with a <strong>TRX</strong>assisted<br />
squat because you won’t have to worry<br />
about balance issues. This will give you a much<br />
better stretch on your backside.<br />
www.ronjones.org “High-Performance Health” 2010<br />
(Ron Jones, MS, RKC, ACSM Health Fitness Specialist, Corporate Wellcoach)<br />
Get Fit. Be Strong.
<strong>TRX</strong> <strong>Suspension</strong> <strong>Trainer</strong>: <strong>Basic</strong> <strong>Exercises</strong><br />
STRENGTH EXERCISES<br />
1. Squat<br />
Place feet square and about shoulder width apart.<br />
Bring arms and shoulders back into a “packed”<br />
position then descend into a deep squat. If you can,<br />
get your thighs at least parallel to the floor on the<br />
bottom position. If desired, you can also drop even<br />
deeper than parallel.<br />
You will be able to go much deeper with a <strong>TRX</strong>assisted<br />
squat because you won’t have to worry<br />
about balance issues.<br />
2. Back Row<br />
Place feet about shoulder-width apart. Slowly lean back as you allow arms to<br />
straighten.<br />
Be sure to keep your back flat—do not allow back to round!<br />
Pull or “row” yourself back to upright position as you pinch shoulders together.<br />
Keep elbows close to ribs throughout movement.<br />
Safety Tip: Make sure feet are secure and will not slip as you lean back!<br />
www.ronjones.org “High-Performance Health” 2010<br />
(Ron Jones, MS, RKC, ACSM Health Fitness Specialist, Corporate Wellcoach)<br />
Get Fit. Be Strong.
<strong>TRX</strong> <strong>Suspension</strong> <strong>Trainer</strong>: <strong>Basic</strong> <strong>Exercises</strong><br />
3. Leaning Chest Press<br />
Place feet about shoulder-width apart with arms straight, out, and down.<br />
While keeping core tight and back flat, lean into handles as we bring elbows<br />
back until elbows are about 90 .<br />
Press arms back out and down as you bring your torso back upright.<br />
Safety Tip: Do NOT allow low back to overextend (excessive arch). Make<br />
sure your feet are secure and won’t slip. Be careful because you have your<br />
shoulders loaded on the bottom position—only lean forward as far as you can<br />
control. To make easier, perform press in more upright position.<br />
www.ronjones.org “High-Performance Health” 2010<br />
(Ron Jones, MS, RKC, ACSM Health Fitness Specialist, Corporate Wellcoach)<br />
Get Fit. Be Strong.
<strong>TRX</strong> <strong>Suspension</strong> <strong>Trainer</strong>: <strong>Basic</strong> <strong>Exercises</strong><br />
4. Leaning ABS<br />
Face away from <strong>TRX</strong> with knees about hip-width apart. Arms are reaching out<br />
slightly below chest level.<br />
Slowly allow arms to reach overhead while you press hips and torso forward—<br />
this is similar to using an “AB Wheel” to roll out and back.<br />
When in outstretched position with ABS loaded, press arms back down and<br />
out in front of torso into starting position.<br />
Safety Tip: Do NOT hyperextend your low back/lumbar vertebrae! If you feel<br />
your low back start to arch too much, stop then limit the amount of overhead<br />
reach.<br />
More Info: Go to www.fitnessanywhere.com for more <strong>TRX</strong> info. They have<br />
many training DVDs available. There are also many <strong>TRX</strong> workouts posted on<br />
YouTube, but remember, safety first and only do what you can control.<br />
Ron & Candas Jones (1.5.11)<br />
www.ronjones.org “High-Performance Health” 2010<br />
(Ron Jones, MS, RKC, ACSM Health Fitness Specialist, Corporate Wellcoach)<br />
Get Fit. Be Strong.