Operating Manual PORTABLE LCD DVD PLAYER Model: MTW-746 ...
Operating Manual PORTABLE LCD DVD PLAYER Model: MTW-746 ...
Operating Manual PORTABLE LCD DVD PLAYER Model: MTW-746 ...

Create successful ePaper yourself
Turn your PDF publications into a flip-book with our unique Google optimized e-Paper software.
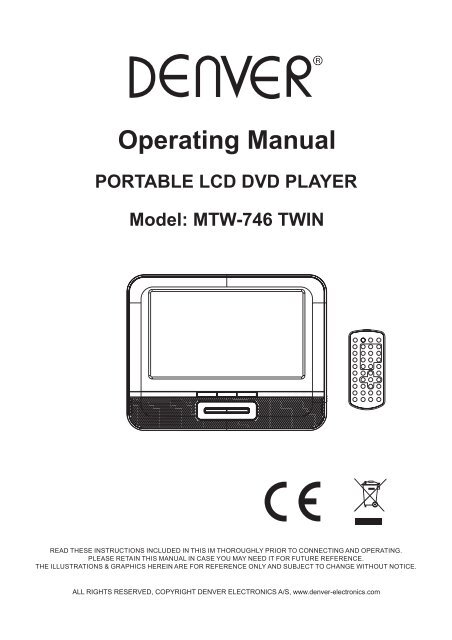
<strong>Operating</strong> <strong>Manual</strong><br />
<strong>PORTABLE</strong> <strong>LCD</strong> <strong>DVD</strong> <strong>PLAYER</strong><br />
<strong>Model</strong>: <strong>MTW</strong>-<strong>746</strong> TWIN<br />
READ THESE INSTRUCTIONS INCLUDED IN THIS IM THOROUGHLY PRIOR TO CONNECTING AND OPERATING.<br />
PLEASE RETAIN THIS MANUAL IN CASE YOU MAY NEED IT FOR FUTURE REFERENCE.<br />
THE ILLUSTRATIONS & GRAPHICS HEREIN ARE FOR REFERENCE ONLY AND SUBJECT TO CHANGE WITHOUT NOTICE.<br />
ALL RIGHTS RESERVED, COPYRIGHT DENVER ELECTRONICS A/S, www.denver-electronics.com
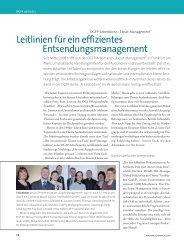
OVERVIEW OF THE <strong>DVD</strong> <strong>PLAYER</strong>:<br />
1<br />
2<br />
19<br />
SLAVE SCREEN:<br />
3 4 5 6 7<br />
11 13 15 16 17<br />
12 14<br />
21<br />
12 12<br />
20<br />
2 3 4 5 6 7<br />
8 9 10 11<br />
10<br />
9<br />
8<br />
19<br />
1<br />
18<br />
1<br />
1. NAVIGATION UP KEY<br />
2. PLAY/PAUSE KEY<br />
3. PREVIOUS/F.BWD KEY<br />
4. NAVIGATION LEFT/VOL- KEY<br />
5. NAVIGATION DOWN KEY<br />
6. NAVIGATION RIGHT/VOL+ KEY<br />
7. NEXT/F.FWD KEY<br />
8. STOP/USB/CARD KEY<br />
9. OK/SETUP KEY<br />
10. TFT SCREEN<br />
11. DC IN JACK<br />
12. POWER ON/OFF SWITCH<br />
13. POWER INDICATOR<br />
14. PHONE JACK<br />
15. AUDIO/VIDEO OUT JACK<br />
16. USB PORT<br />
17. SD/MMC CARD SLOT<br />
18. BRACKET<br />
19. SPEAKERS<br />
20. REMOTE SENSOR<br />
21. DISC COVER OPEN AREA<br />
1. DISPLAY<br />
2. BRIGHTNESS DOWN KEY<br />
3. BRIGHTNESS UP KEY<br />
4. COLOR DOWN KEY<br />
5. COLOR UP KEY<br />
6. VOL - KEY<br />
7. VOL + KEY<br />
8. DC IN JACK<br />
9. POWER ON/OFF SWITCH<br />
10. AV INPUT JACK<br />
11. PHONE JACK<br />
12. SPEAKERS
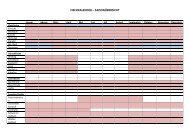
Remote control unit<br />
1<br />
2<br />
3<br />
4<br />
5<br />
6<br />
7<br />
8<br />
9<br />
10<br />
11<br />
12<br />
13<br />
14<br />
1. MUTE button<br />
2. VOLUME+ button<br />
3. VOLUME- button<br />
4. REPEAT 1/ALL&A-B button<br />
5. MENU button<br />
6. SUBTITLE button<br />
7. PLAY button<br />
8. TITLE button<br />
9. AUDIO button<br />
10. PAUSE/STEP button<br />
11. F.BWD button<br />
12. F.FWD button<br />
13. ANGLE button<br />
14. ZOOM button<br />
15. DISPLAY button<br />
16. SETUP button<br />
17. TFT SET button<br />
18. NUMERIC buttons<br />
19. CLEAR button<br />
20. STOP&<strong>DVD</strong>/SD/USB button<br />
21. ENTER button<br />
22. NAVIGATION buttons<br />
23. SLOW button<br />
24. NEXT button<br />
25. PREVIOUS button<br />
26. SEARCH button<br />
27. PROGRAM button<br />
15<br />
16<br />
17<br />
18<br />
19<br />
20<br />
21<br />
22<br />
23<br />
24<br />
25<br />
26<br />
27<br />
2<br />
BASIC CONNECTION<br />
�<br />
�<br />
�<br />
�<br />
It is recommended to connect a multi-system TV.<br />
Ensure that this player and other equipment to be<br />
connected are set to OFF mode and disconnect the AC<br />
power cords before commencing connection.<br />
Do not block ventilation holes of any of the equipment and<br />
arrange them so that air can circulate freely.<br />
Read through the instructions before connecting other<br />
equipment.<br />
� Ensure that you observe the color coding when connecting<br />
audio, video cables. If the RCA adapter is supplied only,<br />
the audio/video RCA cable is required. Plug one end of the<br />
RCA adapter to the unit. Then connect the audio/video<br />
RCA cable to the RCA adapter and the television.<br />
Note:<br />
� During <strong>DVD</strong> play, the TV volume may be at a lower level<br />
than during TV broadcasts, etc. If this is the case, adjust<br />
the volume to the desired level.<br />
� If the <strong>DVD</strong>/CD player is connected to the TV through a<br />
video cassette recorder, the picture may not be played<br />
back normally with some <strong>DVD</strong>s. If this is the case, do not<br />
connect the player via the VCR.<br />
� The mother unit of the <strong>DVD</strong> player is designed to be<br />
used both for indoor and in-car, the slave is only for incar<br />
usage. Please refer to Page 2-3, the power<br />
connection section in the user manual.<br />
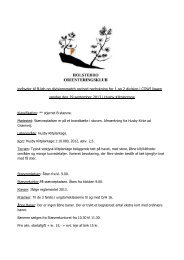
Connecting to a stereo TV set<br />
AUDIO R AUDIO L VIDEO IN<br />
AV AUDIO/VIDEO INPUT<br />
S-VIDEO<br />
A/V cable<br />
YUV INPUT<br />
Connecting to an affiliated screen<br />
This unit is equipped with another affiliated screen, you can<br />
use the affiliated screen and player to appreciate the<br />
programme at the same time, the connecting method is<br />
illustrated as below using the in car adapter.<br />
Slave screen<br />
connector<br />
To the cigarette lighter socket<br />
TV SET<br />
After connection is firmed and securely done, plug AC<br />
ADAPTER to an applicable wall outlet and turn on the player.
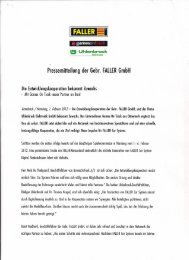
CONNECTING TO AC ADAPTOR<br />
Ensure all the cable are disconnected with mother unit before<br />
connect to AC power source by AC Adaptor.<br />
Mother Unit<br />
To power outlet<br />
AC Adaptor<br />
NOTE:<br />
Before connect to<br />
AC power, push the<br />
POWER ON/OFF<br />
switch to OFF.<br />
CONNECTING TO A CAR ADAPTOR<br />
The car power adaptor is designed for use with vehicles that<br />
have a 12V, negative ground electrical system.<br />
WARNING:<br />
Disconnect the car power adaptor when not in use. Not in use<br />
in 24V vehicles.<br />
To the cigarette lighter socket<br />
CAUTIONS:<br />
� Use the unit only with the recommended car power adaptor,<br />
use with other car power adaptor might damage the unit.<br />
� The recommended car power adaptor is for use with this<br />
unit only. Do not use it with other equipment.<br />
� In the interests of road traffic safety, do not operate the unit<br />
or view video software while driving a vehicle.<br />
� Make sure the unit is fastened securely to prevent from<br />
moving outside of the vehicle in an accident<br />
� When the inside of the cigarette lighter socket is dirty with<br />
ashes or dust, the plug section may become hot due to<br />
poor contact. Be sure to clean the cigarette lighter socket<br />
before use.<br />
� After use, disconnect the car power adaptor from both the<br />
unit and cigarette lighter socket.<br />
FUSE REPLACEMENT<br />
FUSE<br />
POSITIVE(+) CAP<br />
NOTE: Don't throw out the positive(+) cap when replace the<br />
fuse.<br />
OPERATIONS<br />
PREPARATION<br />
Power on the TV set and select video input mode.<br />
Power on the audio system which is connected to the player.<br />
GET STARTED<br />
1. Slide POWER switch to turn on the player.<br />
2. Open the disc tray by hand.<br />
3. Place a disc onto the disc tray.<br />
4. Close the disc tray by hand and the playback starts<br />
automatically.<br />
5. When a menu screen appears on the TV, move the navigation<br />
buttons or press the numeric buttons to select a preferred<br />
track number, then press ENTER/OK button to start playback.<br />
3<br />
ADJUST THE VOLUME<br />
Press the VOLUME+/- button on the remote or press and hold<br />
VOL+/- button on the unit to increase or reduce the volume.<br />
MUTE<br />
While the power is on, the audio output of the main unit is to<br />
be shut off by pressing the button. Press it again to resume<br />
sound output.<br />
SKIP AHEAD OR BACK<br />
Press PREV button during play to skip previous chapter (<strong>DVD</strong>)<br />
or a track (CD), Press NEXT button during play to skip next<br />
chapter (<strong>DVD</strong>) or a track (CD).<br />
COLOR AND BRIGHTNESS ADJUSTMENT (FOR THE <strong>LCD</strong><br />
SCREEN)<br />
Press TFT SET button on the remote repeatedly to adjust the<br />
color intensity and brightness respectively via navigation<br />
left/right button.<br />
Press and hold this button for a moment to turn on or off the<br />
TFT display.<br />
RAPID ADVANCE/REVERSE<br />
During playback, press and hold F.FWD button or F.BWD<br />
button on the unit or press these two buttons on the remote<br />
respectively to scan the disc forward or backward at X2, X4,<br />
X8, X20 normal speed.<br />
Press PLAY button to resume normal play.<br />
PAUSE/STEP PLAY<br />
Press pause/step button during playback to pause. during<br />
pause mode, each time the pause/step button is pressed, the<br />
player will only play one frame; to resume normal play, press<br />
play button.<br />
STOP PLAYBACK<br />
Press STOP button during playback to stop playback; the<br />
player activates its resume function when STOP is pressed in<br />
STOP mode; press PLAY button again, playback resumes at<br />
the point it stopped previously; open the disc tray or press the<br />
STOP button one more time to clear the resume function.<br />
SLOW-MOTION PLAY (<strong>DVD</strong>)<br />
Press SLOW button during playback, the disc will be played at<br />
1/2 normal speed at first, each time this button is pressed, the<br />
play speed becomes slower (down to 1/7 normal speed.)<br />
Press PLAY button, normal play will resume.<br />
REPEAT<br />
Press REPEAT 1/ALL&A-B button during play, it will repeat<br />
play one chapter/title or repeat all (for <strong>DVD</strong> disc), or repeat<br />
play a track or all tracks (for<br />
CD), or repeat the sections<br />
between two specific points (A-B).<br />
SEARCH FOR PREFERRED SCENE<br />
1. Press SEARCH button during play and highlight the item to<br />
be played (Title, Chapter, or Chapter time) by navigation<br />
buttons.<br />
2. Input the desired number or time via the numeric buttons.<br />
3. Press OK button to confirm and the playback from the<br />
located scene starts.<br />
4. To exit search menu, press SEARCH button directly.<br />
PROGRAM PLAY (UP TO 16 MEMORIES)<br />
1. Press PROGRAM during playback to display the program<br />
menu.<br />
2. Select location(s) to be memorized via navigation buttons and<br />
then enter desired Titles/Chapters numbers via numeric<br />
buttons.<br />
Example: Track 3, press "3"<br />
Track 12, press "+10" and then "2"<br />
Track 21, press "+10" twice and then "1"<br />
3. To start<br />
programmed playback, select PLAY on the menu;<br />
pressing PROGRAM button again to exit programming.
4.<br />
To clear a programmed item, enter program menu and scroll<br />
to the item you want to clear, press CLEAR button on the<br />
remote to clear the selected item. To clear all items, select the<br />
on the menu, and then press OK button on remote<br />
control.<br />
5. You can also cancel program mode by clearing all the items in<br />
the program menu.<br />
ZOOM PLAY<br />
Press ZOOM button continuously to zoom in the picture by 2,<br />
3, and 4 times, zoom out by 1/2,1/3,1/4 normal size.<br />
Press this button once more when the picture is at 1/4 size to<br />
return to the normal size display.<br />
Scroll to view the enlarged picture using Navigation buttons.<br />
ON SCREEN DISPLAY INFORMATION<br />
When the player is in operation, press DISPLAY button<br />
continuously, the screen will display parts of information<br />
(current disc type, title number, chapter number, playtime,<br />
audio language, audio type, subtitle language and multi angle,<br />
etc) in a sequence.<br />
CHANGING AUDIO SOUNDTRACK LANGUAGE (<strong>DVD</strong><br />
DISC)<br />
It is possible to change the audio soundtrack language to a<br />
different language from the one selected at the initial settings<br />
(This operation works only with discs on which multiple audio<br />
soundtrack languages are recorded).<br />
Press AUDIO button during <strong>DVD</strong> disc play, the sound track<br />
will be changed with a selected sound track showing on the<br />
screen.<br />
NOTE: When no soundtrack languages are recorded,<br />
pressing this button will not work.<br />
MULTI-ANGLE VIEWING (<strong>DVD</strong> ONLY)<br />
Press ANGLE button to select your desired angle to view the<br />
scene.<br />
Note: only the <strong>DVD</strong>s shot with multi-angle scenes have this<br />
function.<br />
CHANGING SUBTITLE LANGUAGE (<strong>DVD</strong> ONLY)<br />
Press SUBTITLE button several times during <strong>DVD</strong> playback,<br />
the subtitle language will be changed with the selected subtitle<br />
language showing on the screen;<br />
When the desired language appears, release the button to<br />
view the subtitle in that language.<br />
Note: this function only works on the <strong>DVD</strong>s recorded with<br />
multi-language subtitles.<br />
RETURN TO MAIN MENU AND PLAY THE TITLE (<strong>DVD</strong>)<br />
During playback, press MENU button to return to main menu<br />
and press TITLE button to play the title.<br />
MPEG 4 PLAYBACK<br />
1. Load the MPEG 4 disc onto the disc tray, then select a<br />
corresponding format (music, picture, video) to play the disc<br />
with navigation left/right button and press OK Button to<br />
confirm. Then the TV screen will show folders of the<br />
selected format on the disc.<br />
2. Select the folder you want by the navigation buttons and<br />
then press OK button to confirm.<br />
3. The files in this folder are displayed and select your<br />
favourable track via navigation buttons and press ok button<br />
to start playback.<br />
4. Press NEXT and PREV button to select track directly.<br />
5.<br />
Press REPEAT1/ALL&A-B button change play mode.<br />
4<br />
KODAK PICTURE CD / JPEG CD PLAYBACK<br />
Load a Kodak picture CD/JPEG CD disc onto the disc tray,<br />
then select picture format to play the disc with navigation<br />
left/right button and press OK Button to confirm.<br />
Slide show of Kodak Picture CD begins automatically;<br />
Folders of JPEG picture CD are displayed on the TV screen;<br />
use the navigation buttons on the remote to select the desired<br />
folder and then press OK button to confirm.<br />
The files in this folder are displayed and you can select your<br />
favourable pictures using the up/down navigation buttons on<br />
the remote and press ENTER/OK button to start playback.<br />
Preview of the picture, resolution, size, date will be displayed<br />
while you scroll across the file names.<br />
KODAK PICTURE CD / JPEG CD OPERATIONS<br />
1. PLAY MODES<br />
Press REPEAT 1/ALL&A-B button to change play mode.<br />
During playback, press STOP to enter preview mode.<br />
2. SKIP TO NEXT/PREVIOUS PICTURE<br />
Press NEXT button to skip to the next picture or PREV<br />
button to the previous picture.<br />
3. PICTURE ROTATIONS<br />
Press RIGHT and LEFT navigation buttons to rotate the<br />
picture Clockwise and anti-clockwise respectively.<br />
4. PICTURE FLIP AND TURN<br />
Press UP navigation button to flip the picture up or down.<br />
Press DOWN navigation button to flip the picture left or right.<br />
5. PICTURE ZOOM IN/OUT<br />
Press ZOOM button continuously, the picture zooms in by 2,<br />
3, 4 times or zooms out by 1/2, 1/3, 1/4 the original size.<br />
Press this button once more when the picture getting 1/4 size<br />
to return to the normal play.<br />
If the picture is enlarged, you may use the navigation buttons<br />
to view blocked parts of the picture.<br />
6. SLIDE SHOW TRANSITION MODES<br />
During slide show playback, press the PROGRAM button<br />
cyclically to select one play mode to play picture.<br />
EXTERNAL MEMORY MEDIA OPERATION (USB&SD/MMC<br />
CARD)<br />
Prepare the player for External Memory media operation<br />
1. Slide the POWER switch to ON position, Insert a USB data<br />
traveller filled with media files into the USB port or plug the<br />
SD/MMC card into the card slot, the USB or the SD/MMC<br />
card is successfully detected , select a corresponding<br />
format via navigation right/left button for play and press<br />
ENTER Button to confirm. Folders show on the screen and<br />
use navigation buttons to select your desired folder and<br />
track to play.<br />
2. Press NEXT or PREVIOUS button to skip forward or<br />
backward.<br />
Note: Press and hold STOP button to call out the source<br />
menu and make selection among USB, card and disc via<br />
navigation RIGHT/LEFT button, press ENTER/OK button to<br />
enter the selected mode.<br />
CAUTION: To avoid electronic static discharge, don't touch<br />
the USB port and card slot during playback.
INITIAL SETTINGS<br />
Initial settings page is for you to make your preferred settings<br />
up for your player. Once the initial settings are done they are<br />
retained in the CPU of the player until otherwise modified.<br />
COMMON PROCEDURES FOR INITIAL SETTINGS<br />
1. Press SETUP button on the remote or press and hold<br />
OK/SETUP button on the unit to enter the setup menu.<br />
2. Use the navigation buttons to select the item you want to<br />
modify, setting page with further setting items displayed<br />
shows on the TV screen. Again use navigation buttons to<br />
make changes. Press ENTER/OK button to confirm<br />
modifications.<br />
3. Use navigation buttons to switch to another setting on the<br />
main setting page.<br />
4. Press SETUP button on the remote or press and hold<br />
OK/SETUP button on the unit to exit main setting page.<br />
1. SYSTEM SETUP<br />
1.1 TV SYSTEM - it is used to select the TV mode.<br />
Please select this option as per your TV set.<br />
1.2 SCREEN SAVER- when the player is not in used for<br />
several minutes, a running <strong>DVD</strong> logo will move across the<br />
TV screen to protect the TV screen.<br />
Options: On: Screen saver is enabled<br />
Off: Screen saver is disabled<br />
1.3 TV TYPE- it is used to select the TV scan mode, please<br />
set as per your TV set.<br />
Options: 4:3PS : Normal Pan & scan mode<br />
4:3LB : normal Letter box mode<br />
16:9 : 16:9 wide screen mode<br />
1.4 PASSWORD-<br />
input password to unlock the system. The<br />
steps are as follows:<br />
1.4.1 Enter SYSTEM SETUP, select the PASSWORD item by<br />
scrolling the down navigation button, and then press the<br />
right navigation button to select the input box.<br />
1.4.2 Input user's password "0000" to unlock it, in this case,<br />
select the input box again to change the password by<br />
inputting another new four numeric numbers and then<br />
press ENTER/OK button to confirm. When the password<br />
is changed, you are needed to input the new one to<br />
unlock the system.<br />
1.4.3 Once you forget your own password, use the<br />
supervisor's password "8200" to unlock it.<br />
NOTE:<br />
If wrong password was input in unlock status, the<br />
system will lock.<br />
1.5 RATING - Set the rating of this player. If you want to<br />
change the rating of parental lock, please input the<br />
password to unlock first.<br />
Options: 1KIDSAFE/2G/3PG/4PG13/5PG-R /<br />
6R / 7 NC-17 / 8 ADULT<br />
1.6 DEFAULT - Reset to factory settings.<br />
Options: RESTORE<br />
2. LANGUAGE SETUP<br />
2.1 OSD LANGUAGE - It is used to select different On<br />
Screen Display language for different user.<br />
2.2 AUDIO LANG - select preferred audio language.<br />
(<strong>DVD</strong> only, need disc software support)<br />
2.3 SUBTITLE LANG- Select preferred subtitle language.<br />
(<strong>DVD</strong> only, need disc software support)<br />
2.4 MENU LANG - Select preferred disc menu language.<br />
(<strong>DVD</strong> only, need disc software support)<br />
5<br />
3. VIDEO SETUP<br />
3.1 BRIGHTNESS - to set the brightness for the display.<br />
Options: 0/2/4/6/8/10/12<br />
3.2 CONTRAST - to set the contrast effect for display.<br />
Options: 0/2/4/6/8/10/12<br />
3.3 HUE - to set the colour impression for display.<br />
Options: -6/-4/-2/0/+2/+4/+6<br />
3.4 SATURATION - to set the saturation level for display.<br />
Options: 0/2/4/6/8/10/12<br />
4. SPEAKER SETUP<br />
4.1 DOWNMIX<br />
Options: LT/RT - Left/Right mix mode<br />
STEREO - Select this option if you don't have a 5.1<br />
channels amplifier.<br />
DISC HANDLING PRECAUTIONS<br />
�<br />
�<br />
�<br />
�<br />
�<br />
�<br />
�<br />
Hold the disc by the edge so the surface will not<br />
be soiled with finger prints. Finger prints, dirt and<br />
scratches can cause skipping and distortion.<br />
Do not write on the label side with a ball-point<br />
pen or other writing utensils.<br />
Do not apply benzine, thinner, and liquid that<br />
prevents against static electricity.<br />
Be careful not to drop or bend the disc.<br />
Install only one disc on the disc tray.<br />
Do not try to close the disc tray when the disc is<br />
not installed properly.<br />
Be sure to store the disc in its case when not in<br />
use.
TROUBLESHOOTING<br />
If your <strong>DVD</strong> player does not seem to be functioning properly, check the items below before you contact an authorized service center<br />
Power does not turn on or<br />
suddenly turns off.<br />
Remote control won't work<br />
No picture or sound<br />
No picture<br />
No sound<br />
Symptom<br />
No picture and sound<br />
Distorted video or sound<br />
6<br />
Check<br />
Make sure the adapter is securely plugged in.<br />
Turn the power off and then back on.<br />
Check that the battery is inserted in the "+" and "-" direction properly.<br />
The battery may be flat. Replace it with a new one.<br />
Check that the signal transmission is directed at the remote control sensor on the <strong>DVD</strong> player.<br />
Remove the obstacle between the remote controller and remote control sensor.<br />
Check that the A/V cables are securely connected.<br />
Check that the disc is a <strong>DVD</strong>, <strong>DVD</strong>-RW or AUDIO CD.<br />
Do not use a disc that has scratches or dirt.<br />
Check that the label-side of the disc is facing up.<br />
The pick-up lens of the <strong>DVD</strong> player may be dirty. Contact the service center for lens cleaning.<br />
Check that the TV channel is set to VIDEO or AV if viewing with a TV.<br />
Check that the <strong>LCD</strong> display is turned on.<br />
Check the volume setting. If set to zero, turn up volume level.<br />
Check that the headphones are plugged into the PHONES socket.<br />
Speakers cannot be used with the headphones.<br />
Check that the Adapter is properly connected.<br />
Use a disc without scratches or dents.<br />
CAUTION<br />
� The apparatus shall not be exposed to dripping or splashing and that no objects filled with liquids, such as vases, shall be<br />
placed on the apparatus.<br />
� Minimum distances 2.0cm around the apparatus for sufficient ventilation.<br />
� The ventilation should not be impeded by covering the ventilation openings with items, such as newspapers, table-cloths,<br />
curtains, etc.<br />
� No naked flame sources, such as lighted candles, should be placed on the apparatus.<br />
� When the mains plug or an appliance coupler is used as the disconnect device, the disconnect device shall remain readily<br />
operable.<br />
� The use of apparatus is in tropical and/or moderate climates.<br />
� Attention should be drawn to the environmental aspects of battery disposal.<br />
Electric and electronic equipment and included batteries contains materials, components and substances that<br />
can be hazardous to your health and the environment, if the waste material (discarded electric and electronic<br />
equipment and batteries) is not handled correctly.<br />
Electric and electronic equipment and batteries is marked with the crossed out trash can symbol, seen below.<br />
This symbol signifies that electric and electronic equipment and batteries should not be disposed of with other<br />
household waste, but should be disposed of separately.<br />
As the end user it is important that you submit your used batteries to the appropriate and designated facility. In<br />
this manner you make sure that the batteries are recycled in accordance with legislature and will not harm the<br />
environment.<br />
All cities have established collection points, where electric and electronic equipment and batteries can either be<br />
submitted free of charge at recycling stations and other collection sites, or be collected from the households.<br />
Additional information is available at the technical department of your city.