Rear Leaf Springs with Torque Arm
Rear Leaf Springs with Torque Arm
Rear Leaf Springs with Torque Arm

Create successful ePaper yourself
Turn your PDF publications into a flip-book with our unique Google optimized e-Paper software.
MMf Ech<br />
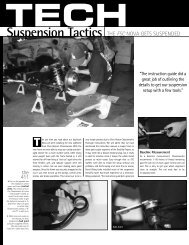
TECH | REAR SUSPENSION UPGRADE<br />
11<br />
14<br />
the polyurethane bushing’s steel sleeve is installed next, again <strong>with</strong> a light<br />
coating of the supplied teflon grease to prevent suspension squeaks. the<br />
assembled leaf springs can now be installed back on the car utilizing the<br />
new spring-eye-bolt hardware provided in the suspension kit.<br />
to help keep the Hauler going down the track pointed in the right<br />
direction, we opted for tcP’s weld-in subframe connectors <strong>with</strong> bolt-in<br />
connector support and driveshaft safety loop. to prep the connectors for<br />
welding, an initial test fitting is done using supports. the ’69-’70 mustang<br />
will also require trimming the ends of the front floor supports/subframe.<br />
12<br />
15<br />
With the subframe<br />
connectors properly<br />
placed, a marker<br />
is used to locate<br />
the edges of the<br />
connectors in<br />
relation to the<br />
chassis. these<br />
areas will need to<br />
be cleaned to bare<br />
steel for welding.<br />
also included in the leaf spring suspension kit are new, beefier spring<br />
shackles <strong>with</strong> polyurethane bushings. the bushings are lubricated and<br />
installed into the mid-eye spring ends as well as the rear framerails. the<br />
passenger-side shackle assembly is shown here.<br />
13<br />
16<br />
the subframe<br />
connectors are then<br />
removed and the floor<br />
supports/subframe<br />
and rear framerails/<br />
torque boxes are<br />
ground down <strong>with</strong> a<br />
60-grit sanding disc<br />
on a pneumatic die<br />
grinder. the edges of the subframe connectors will also be ground to bare<br />
steel so that good weld penetration will not be a problem.<br />
17<br />
for the driver-side shackle, due to the tighter working room, you’ll have<br />
to assemble the outer bushing and bushing sleeve onto the shackle bolt<br />
as shown in this photo. this is the only way to get the bolt into place in<br />
the frame, as installing the bushing first will not give you enough working<br />
“angle” to get the bolt started.<br />
another fit check is<br />
made to ensure that the<br />
chassis and the subframe<br />
connectors have been<br />
cleaned to bare steel<br />
in the proper areas. all<br />
looks good, but we have<br />
one more step before we<br />
can squeeze the trigger<br />
on our mig.<br />
42 modifiedmustangsandfords.com February 2013