Rear Leaf Springs with Torque Arm
Rear Leaf Springs with Torque Arm
Rear Leaf Springs with Torque Arm

You also want an ePaper? Increase the reach of your titles
YUMPU automatically turns print PDFs into web optimized ePapers that Google loves.
TCP’s leaf springs are made from alloy steel<br />
and formed to TCP’s own specs <strong>with</strong> a standard<br />
rear eye; mid- and reverse-eye springs<br />
are optional to achieve the desired ride<br />
height. TCP also offers 4-, 4½-, and 5-leaf<br />
spring setups to provide an increase in ride<br />
firmness while resisting spring wrap up, which<br />
causes wheelhop. Included in the package are<br />
VariShock adjustable shocks, beefy shackles<br />
<strong>with</strong> polyurethane bushings, spring mounting<br />
plates <strong>with</strong> new hardware, and replacement<br />
front eye bushings, also in polyurethane.<br />
Complementing the leaf-spring kit is TCP’s<br />
optional torque arm. This unit takes the<br />
twisting torque of the rear axle and converts<br />
it into a downward force that keeps the tires<br />
in contact <strong>with</strong> the road surface for maximum<br />
traction. Although similar in function to<br />
a traction bar, a torque-arm suspension will<br />
also keep the tires planted when cornering<br />
forces come into play. This makes it a great<br />
all-round suspension aid, no matter what<br />
type of driving you do. While the easiest<br />
way to install the TCP torque arm is <strong>with</strong> one<br />
of the company’s Fab9 axle housings, TCP<br />
also offers a bracket kit for traditional 9-inch<br />
and 8-inch Ford axle housings. In our case,<br />
our 8-inch had already been beefed up <strong>with</strong><br />
gears, a differential, 31-spline axles, and<br />
more, so we opted for the weld-on configuration.<br />
The final piece of the rear-suspension<br />
puzzle is TCP’s chassis-bracing package.<br />
The kit consists of 2x2-inch, square-tube<br />
subframe connectors, a bolt-in tubular subframe-connector<br />
support, and an adjustable<br />
driveshaft safety loop. TCP’s subframe connectors<br />
feature 7-gauge steel endplates and<br />
a weld-in design for the utmost in chassis<br />
strengthening. The tubular connector support<br />
is fastened to the connectors to further<br />
tie the front and rear subframes together.<br />
It also includes the forward mounting point<br />
for the torque-arm system and a gusseted<br />
mounting plate for the driveshaft loop. We’ve<br />
got quite a bit of work ahead of us, but when<br />
we’re done, the High School Hauler should<br />
be able to firmly plant its 275-series drag<br />
radials and move out <strong>with</strong> authority.<br />
1<br />
3<br />
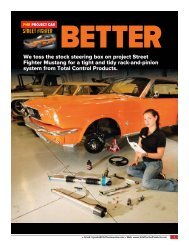
since welding is involved on the axle housing, not to mention it is bolted<br />
to the leaf springs we’ll also be replacing, we figured it was best to pull<br />
the axle apart in the car so it wasn’t such a back breaker. first to come<br />
out are the axles. remove the four retaining nuts for each axle and slide<br />
them out. if they’ve been installed for a while, a slide-hammer and/or pry<br />
bar will be your friend here.<br />
disconnect the driveshaft from the axle housing by removing the four<br />
1<br />
⁄2-inch retaining nuts and the u-bolts. You can either completely remove<br />
the driveshaft (plugging the trans tailshaft to prevent fluid leaks), or you<br />
can support the driveshaft across the mufflers <strong>with</strong> a piece of wood or a<br />
long-handled tool.<br />
2<br />
4<br />
it’s easier to remove the axle brake lines from the wheel cylinders than<br />
it is the parking brake cables. disconnect the brake hard lines, pull the<br />
four (per side) t-bolts out of the axle housing ends, and let the brake<br />
assemblies hang by the parking brake cables as shown here.<br />
remove the center section’s retaining nuts and copper washers (if still<br />
equipped) and use a plastic-faced mallet to separate the center section<br />
from the axle housing. Let the fluid drain completely before removing the<br />
center section altogether.<br />
February 2013 modifiedmustangsandfords.com 39