Rear Leaf Springs with Torque Arm
Rear Leaf Springs with Torque Arm
Rear Leaf Springs with Torque Arm

Create successful ePaper yourself
Turn your PDF publications into a flip-book with our unique Google optimized e-Paper software.
MMf Ech<br />
TECH | REAR SUSPENSION UPGRADE<br />
Web Links:<br />
• Product Page<br />
• Data Sheet<br />
We wrap up our High School Hauler’s suspension upgrades<br />
<strong>with</strong> TCP’s leaf-spring kit and optional torque arm<br />
Ready foR<br />
action, PaRt 2<br />
By Mark Houlahan<br />
today, most everything you can<br />
think of for your home or garage<br />
is offered in package form. From<br />
home theater systems to oil-andfilter<br />
kits, packages offer several<br />
benefits to the end consumer. First, packaged<br />
items are designed to work together<br />
harmoniously. There’s no hunting for the<br />
right A/V cable or wondering what lifters<br />
will work properly <strong>with</strong> a certain camshaft.<br />
The parts are picked by the manufacturer to<br />
ensure that when you open the box, you’ve<br />
got everything you need. You won’t be fighting<br />
to fit things together, either. Oftentimes<br />
the package concept will save the consumer<br />
a few bucks as well.<br />
In our Oct. ’12 issue, we installed a Total<br />
Control Products (TCP) coilover package on<br />
the front of our ’70 Mustang, dubbed the<br />
High School Hauler. Now, we’re rolling the<br />
car back into the Source Interlink Media tech<br />
center to wrap up our suspension upgrades<br />
<strong>with</strong> TCP’s rear leaf-spring suspension package,<br />
chassis-stiffening package, and torquearm<br />
kit. It’s a complete solution that’ll keep<br />
our rear tires planted <strong>with</strong> maximum traction<br />
and the coupe heading wherever we point it.<br />
38 modifiedmustangsandfords.com February 2013
TCP’s leaf springs are made from alloy steel<br />
and formed to TCP’s own specs <strong>with</strong> a standard<br />
rear eye; mid- and reverse-eye springs<br />
are optional to achieve the desired ride<br />
height. TCP also offers 4-, 4½-, and 5-leaf<br />
spring setups to provide an increase in ride<br />
firmness while resisting spring wrap up, which<br />
causes wheelhop. Included in the package are<br />
VariShock adjustable shocks, beefy shackles<br />
<strong>with</strong> polyurethane bushings, spring mounting<br />
plates <strong>with</strong> new hardware, and replacement<br />
front eye bushings, also in polyurethane.<br />
Complementing the leaf-spring kit is TCP’s<br />
optional torque arm. This unit takes the<br />
twisting torque of the rear axle and converts<br />
it into a downward force that keeps the tires<br />
in contact <strong>with</strong> the road surface for maximum<br />
traction. Although similar in function to<br />
a traction bar, a torque-arm suspension will<br />
also keep the tires planted when cornering<br />
forces come into play. This makes it a great<br />
all-round suspension aid, no matter what<br />
type of driving you do. While the easiest<br />
way to install the TCP torque arm is <strong>with</strong> one<br />
of the company’s Fab9 axle housings, TCP<br />
also offers a bracket kit for traditional 9-inch<br />
and 8-inch Ford axle housings. In our case,<br />
our 8-inch had already been beefed up <strong>with</strong><br />
gears, a differential, 31-spline axles, and<br />
more, so we opted for the weld-on configuration.<br />
The final piece of the rear-suspension<br />
puzzle is TCP’s chassis-bracing package.<br />
The kit consists of 2x2-inch, square-tube<br />
subframe connectors, a bolt-in tubular subframe-connector<br />
support, and an adjustable<br />
driveshaft safety loop. TCP’s subframe connectors<br />
feature 7-gauge steel endplates and<br />
a weld-in design for the utmost in chassis<br />
strengthening. The tubular connector support<br />
is fastened to the connectors to further<br />
tie the front and rear subframes together.<br />
It also includes the forward mounting point<br />
for the torque-arm system and a gusseted<br />
mounting plate for the driveshaft loop. We’ve<br />
got quite a bit of work ahead of us, but when<br />
we’re done, the High School Hauler should<br />
be able to firmly plant its 275-series drag<br />
radials and move out <strong>with</strong> authority.<br />
1<br />
3<br />
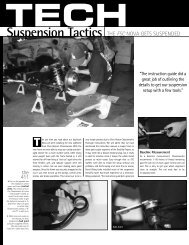
since welding is involved on the axle housing, not to mention it is bolted<br />
to the leaf springs we’ll also be replacing, we figured it was best to pull<br />
the axle apart in the car so it wasn’t such a back breaker. first to come<br />
out are the axles. remove the four retaining nuts for each axle and slide<br />
them out. if they’ve been installed for a while, a slide-hammer and/or pry<br />
bar will be your friend here.<br />
disconnect the driveshaft from the axle housing by removing the four<br />
1<br />
⁄2-inch retaining nuts and the u-bolts. You can either completely remove<br />
the driveshaft (plugging the trans tailshaft to prevent fluid leaks), or you<br />
can support the driveshaft across the mufflers <strong>with</strong> a piece of wood or a<br />
long-handled tool.<br />
2<br />
4<br />
it’s easier to remove the axle brake lines from the wheel cylinders than<br />
it is the parking brake cables. disconnect the brake hard lines, pull the<br />
four (per side) t-bolts out of the axle housing ends, and let the brake<br />
assemblies hang by the parking brake cables as shown here.<br />
remove the center section’s retaining nuts and copper washers (if still<br />
equipped) and use a plastic-faced mallet to separate the center section<br />
from the axle housing. Let the fluid drain completely before removing the<br />
center section altogether.<br />
February 2013 modifiedmustangsandfords.com 39
MMf Ech<br />
TECH | REAR SUSPENSION UPGRADE<br />
5<br />
8<br />
the last pieces holding the axle housing in place are the spring plates and<br />
retaining u-bolts. the threads on these bolts will often be quite rusty and<br />
a cut-off wheel is sometimes called in to cut the u-bolts off, but we were<br />
lucky (aided <strong>with</strong> some previously sprayed penetrating oil) that all eight<br />
nuts came off <strong>with</strong>out an issue.<br />
With the shackle ends free, the leaf springs can be lowered, providing a<br />
bit more access to the front spring eye through-bolts. a pair of ¾-inch<br />
sockets separates the bolts and nuts here. once again, you might end up<br />
fighting a rusty bolt that is seized inside the eye bushing. We’ve had to<br />
resort to a reciprocating saw to cut the bolt before. However, we lucked<br />
out again and both of our leaf spring bolts came out freely.<br />
6<br />
9<br />
With a helping hand from the High school Hauler’s owner, the factory<br />
8-inch housing is pulled from the car by sliding the housing one way far<br />
enough to clear the leaf spring, then lowering the housing and sliding it<br />
back to clear the other spring. the bare housing is much easier to handle<br />
than one full of gears, diff, brakes, and axles too!<br />
the main component of tcP’s leaf spring rear suspension kit is of course<br />
the pair of leaf springs. available in several spring styles, we opted for<br />
the 4½-leaf mid-eye spring. the extra half-leaf helps prevent spring wrap<br />
during acceleration and offers additional stiffness. the spring comes <strong>with</strong><br />
a front-eye-bushing made from rubber. We’re using a press tool here to<br />
remove it in anticipation of upgrading to polyurethane bushings.<br />
7<br />
10<br />
to remove our<br />
tired stock leaf<br />
springs, we start<br />
at the shackle<br />
mounting at<br />
the rear. first<br />
the shackle<br />
hardware<br />
is removed<br />
and then the<br />
shackle’s upper<br />
pivot shaft is<br />
pried from the<br />
shackle bushings in the framerail. Plenty of penetrating oil helps make<br />
this an easier job, especially when it comes time to remove the bushings<br />
themselves.<br />
the polyurethane bushings are part of the rear leaf spring suspension kit,<br />
though the end-user is responsible for installation. once the stock rubber<br />
bushing is pressed out, the polyurethane bushings are lubricated and are<br />
pressed into place by hand.<br />
40 modifiedmustangsandfords.com February 2013
MMf Ech<br />
TECH | REAR SUSPENSION UPGRADE<br />
11<br />
14<br />
the polyurethane bushing’s steel sleeve is installed next, again <strong>with</strong> a light<br />
coating of the supplied teflon grease to prevent suspension squeaks. the<br />
assembled leaf springs can now be installed back on the car utilizing the<br />
new spring-eye-bolt hardware provided in the suspension kit.<br />
to help keep the Hauler going down the track pointed in the right<br />
direction, we opted for tcP’s weld-in subframe connectors <strong>with</strong> bolt-in<br />
connector support and driveshaft safety loop. to prep the connectors for<br />
welding, an initial test fitting is done using supports. the ’69-’70 mustang<br />
will also require trimming the ends of the front floor supports/subframe.<br />
12<br />
15<br />
With the subframe<br />
connectors properly<br />
placed, a marker<br />
is used to locate<br />
the edges of the<br />
connectors in<br />
relation to the<br />
chassis. these<br />
areas will need to<br />
be cleaned to bare<br />
steel for welding.<br />
also included in the leaf spring suspension kit are new, beefier spring<br />
shackles <strong>with</strong> polyurethane bushings. the bushings are lubricated and<br />
installed into the mid-eye spring ends as well as the rear framerails. the<br />
passenger-side shackle assembly is shown here.<br />
13<br />
16<br />
the subframe<br />
connectors are then<br />
removed and the floor<br />
supports/subframe<br />
and rear framerails/<br />
torque boxes are<br />
ground down <strong>with</strong> a<br />
60-grit sanding disc<br />
on a pneumatic die<br />
grinder. the edges of the subframe connectors will also be ground to bare<br />
steel so that good weld penetration will not be a problem.<br />
17<br />
for the driver-side shackle, due to the tighter working room, you’ll have<br />
to assemble the outer bushing and bushing sleeve onto the shackle bolt<br />
as shown in this photo. this is the only way to get the bolt into place in<br />
the frame, as installing the bushing first will not give you enough working<br />
“angle” to get the bolt started.<br />
another fit check is<br />
made to ensure that the<br />
chassis and the subframe<br />
connectors have been<br />
cleaned to bare steel<br />
in the proper areas. all<br />
looks good, but we have<br />
one more step before we<br />
can squeeze the trigger<br />
on our mig.<br />
42 modifiedmustangsandfords.com February 2013
18<br />
21<br />
our subframe connectors are ready to go, but we want to test fit our boltin<br />
connector support. unfortunately, the Pypes exhaust you see here that<br />
we installed last year has to go—part of it anyway. We’ll unbolt the header<br />
collectors and slip the mid-pipes out of the muffler inlets to give us some<br />
working room.<br />
Part of the subframe connector and support kit is this nice bolt-on safety<br />
loop. the loop uses an L-shaped mounting bracket, allowing for fore and<br />
aft adjustment. the loop itself has slotted mounting holes, which allow the<br />
loop to be adjusted as needed to perfectly center it around your driveshaft<br />
for maximum clearance.<br />
19<br />
22<br />
the connector support brace bolts into place front and rear. the front<br />
bolts pass through the floor supports, so you’ll have to bust out the drill<br />
and a nice, sharp 3 ⁄8-inch drill bit. With the support brace loosely bolted in,<br />
everything fits nice. We’ll be scheduling another trip to the exhaust shop<br />
however.<br />
20<br />
the final upgrade our ’70 coupe is going to see out back is one of tcP’s<br />
33-inch torque arm kits. these kits are available for 9-inch axle housings<br />
(they even offer a fab9 housing <strong>with</strong> all the mounts installed and ready<br />
to bolt-in) as well as 8-inch housings. following tcP’s instruction sheet,<br />
the axle housing is measured to find true center and then the bracket<br />
locations are affixed off of that measurement.<br />
We’re pretty good<br />
<strong>with</strong> a welder, but<br />
when it really counts<br />
(rollbars, chassis<br />
support, and so on),<br />
we call in a favor to<br />
our pal Pete epple<br />
from our sister<br />
magazine Circle<br />
Track. if they can<br />
weld together whole<br />
race car chassis, our<br />
subframe connectors<br />
are nothing for these<br />
guys. thanks Pete!<br />
23<br />
using the torque arm’s ends to help locate the mounting tabs, the tabs are<br />
tack welded to the housing.<br />
February 2013 modifiedmustangsandfords.com 43
MMf Ech<br />
TECH | REAR SUSPENSION UPGRADE<br />
24<br />
27<br />
fully welding<br />
the bracket<br />
is necessary<br />
for optimum<br />
strength. do<br />
not remove the<br />
torque arm or<br />
spacer/tool until<br />
the welds have<br />
fully cooled to<br />
prevent fitment<br />
issues later.<br />
25<br />
the modified axle housing<br />
is returned to the car<br />
and fitted to the new leaf<br />
springs. securing the<br />
axle housing to the new<br />
springs is the job of tcP’s<br />
trick spring plates <strong>with</strong><br />
integral tie-down loops<br />
and new u-bolt retaining<br />
hardware; all part of the<br />
rear suspension kit.<br />
With the axle housing reassembled,<br />
the torque arm is bolted up and<br />
pinion angle set per the included<br />
instructions. We need to take our High<br />
school Hauler in for a performance<br />
alignment and to rebuild the custom<br />
exhaust betwixt the headers and<br />
mufflers, but we plan to hit the<br />
track soon to compare its current<br />
performance to our baseline. stay<br />
tuned.<br />
26<br />
the rear leaf-spring<br />
suspension kit<br />
comes standard <strong>with</strong><br />
single-adjustable<br />
Quickset 1<br />
Varishocks, but we<br />
upgraded to the<br />
double-adjustable<br />
Quickset 2 option.<br />
the doubleadjustable<br />
Quickset<br />
2 Varishock offers<br />
16 independent<br />
settings to control shock rebound and extension for a total of 256 shock combinations<br />
for ultimate tuning at the track for any condition.<br />
TCP ReaR SuSPenSion<br />
ComPonenTS uSed<br />
tcP-rLss-mu rear <strong>Leaf</strong>-spring suspension $875<br />
tcP-Lsm-m45 4½-leaf mid-eye option $20<br />
Vas 14244-715 Quickset 2 Varishock option $200<br />
tcP ta2f9-33 torque arm $389<br />
tcP taBKt-4 torque arm axle Brackets $50<br />
tcP PKg-sfc-01 subframe/support/Loop Kit $498<br />
total $2,032<br />
SouRCe<br />
ToTal ConTRol<br />
PRoduCTS<br />
(888) 388-0298<br />
www.totalcontrolproducts.com