Owner's manual dobsonian telescope - telescopes and - Akadem.us
Owner's manual dobsonian telescope - telescopes and - Akadem.us
Owner's manual dobsonian telescope - telescopes and - Akadem.us

You also want an ePaper? Increase the reach of your titles
YUMPU automatically turns print PDFs into web optimized ePapers that Google loves.
3<br />
0˚<br />
15<br />
15˚E<br />
OWNER’S MANUAL<br />
DOBSONIAN TELESCOPE<br />
ZHUMELL Z10 DELUXE DOBSONIAN REFLECTOR TELESCOPE<br />
5˚W<br />
60˚W<br />
30˚W<br />
45˚W
Zhumell c<strong>us</strong>tomers know that there are plenty of ways<br />
to experience the world. They also underst<strong>and</strong> that,<br />
however you choose to explore it, the best experience is one<br />
that fully immerses you in the world’s most striking details.<br />
That’s where our optics products come in. We strive to put<br />
high-performance products in the h<strong>and</strong>s of our c<strong>us</strong>tomers<br />
so that they can experience the world up close, with their<br />
own eyes.<br />
With Zhumell, you get field-tested, precision-crafted optics at<br />
the best possible value. So even if you’re j<strong>us</strong>t starting out as<br />
an amateur birder or astronomer, you don’t have to settle for<br />
entry-level products. Zhumell c<strong>us</strong>tomers enjoy life’s pursuits,<br />
hobbies, <strong>and</strong> adventures in rich, colorful detail- the kind of<br />
detail that only high-performance optics can produce.<br />
At Zhumell, we design our binoculars, <strong>telescope</strong>s, <strong>and</strong><br />
spotting scopes for discerning, price-conscio<strong>us</strong> <strong>us</strong>ers<br />
who are uncompromising on quality. If you’re looking for<br />
accessibly priced optics that will bring your world within<br />
reach, you’re looking for Zhumell.<br />
Enjoy the dob.<br />
2
ENJOYING YOUR<br />
ZHUMELL DOBSONIAN TELESCOPE<br />
1. Caring For Your Telescope<br />
i. Warnings<br />
ii. Cleaning <strong>and</strong> Maintenance<br />
iii. Collimation<br />
2. Specifications<br />
3. Parts List<br />
4. Telescope Assembly<br />
i. Base Assembly<br />
ii. Optical Tube Assembly<br />
5. Donsonian Telescope Basics<br />
i. 1.25-inch Eyepieces<br />
ii. 2-inch Eyepieces<br />
iii. Altitude <strong>and</strong> Azimuth<br />
iv. Foc<strong>us</strong>ing the Image<br />
v. Cooling Fan<br />
vi. Transportation<br />
6. Viewing Through Your Telescope<br />
i. Checking <strong>and</strong> Aligning Your Finderscope<br />
7. Observation Tips<br />
i. Selecting a Viewing Site<br />
ii. Cooling Your Telescope<br />
iii. Seeing <strong>and</strong> Transparency<br />
iv. Dark-Adapting<br />
v. Tracking Celestial Objects<br />
vi. Selecting an Eyepiece<br />
8. Cool Views<br />
i. The Moon<br />
ii. The Planets<br />
iii. The Stars<br />
iv. Deep-Sky Objects<br />
v. Starhopping<br />
9. Astronomy Formulas<br />
10. Astronomy Terminology<br />
11. Telescope Terminology<br />
12. FAQs<br />
13. Warranty<br />
3
CARING FOR YOUR<br />
ZHUMELL DOBSONIAN TELESCOPE<br />
Zhumell <strong>telescope</strong>s are precision astronomical instruments<br />
designed for ease of <strong>us</strong>e <strong>and</strong> versatility in their application. As<br />
with any <strong>telescope</strong>, Zhumell <strong>telescope</strong>s require some technical<br />
knowledge of stellar movement <strong>and</strong> optical properties. We have<br />
provided basic instructions for <strong>telescope</strong> <strong>us</strong>e <strong>and</strong> astronomical<br />
viewing in this <strong>manual</strong>.<br />
Your Zhumell Dobsonian <strong>telescope</strong> is built with the highest-quality<br />
optics <strong>and</strong> top-notch construction to provide years of reliable<br />
functionality, but will require proper care.<br />
If, after reading this <strong>manual</strong>, you still have questions about your<br />
Zhumell <strong>telescope</strong>, please visit http://www.zhumell.com for<br />
more helpful tips <strong>and</strong> contact information. Our c<strong>us</strong>tomer service<br />
representatives are available to address any problems you<br />
encounter with your <strong>telescope</strong>. Please let <strong>us</strong> know about your<br />
experiences; we would like to hear your feedback.<br />
Enjoy your Zhumell.<br />
4
CARING FOR YOUR<br />
ZHUMELL DOBSONIAN TELESCOPE<br />
WARNINGS<br />
• Do not <strong>us</strong>e <strong>telescope</strong> or finderscope to look at the sun without<br />
an appropriate solar filter. Doing so will ca<strong>us</strong>e permanent <strong>and</strong><br />
irreversible eye damage.<br />
• Never <strong>us</strong>e an eyepiece filter as a solar filter. Only solar filters will<br />
completely cover the opening of the optical tube <strong>and</strong> provide<br />
proper eye protection.<br />
• Make sure no screws are loose before <strong>us</strong>ing <strong>telescope</strong>.<br />
• Do not drop or shake your <strong>telescope</strong> as doing so may damage<br />
the optics, or harm you or the people around you.<br />
5
USING YOUR<br />
ZHUMELL DOBSONIAN TELESCOPE<br />
COLLIMATION<br />
Periodically, you will find that it is necessary to align the optical components<br />
of your <strong>telescope</strong>. This procedure is called collimation. There is no<br />
collimator included with the Zhumell Dobsonian, but regular collimation is<br />
recommended for optimum <strong>telescope</strong> <strong>us</strong>age.<br />
1. Remove the eyepiece from the eyepiece holder <strong>and</strong> insert laser<br />
collimator into eyepiece holder. Secure the laser collimator by tightening<br />
thumbscrew.<br />
2. Turn the thumbscrew located on the side of the collimator to turn on<br />
the collimator.<br />
3. Look through the hole in the side of collimator to see where the laser is<br />
reflected onto the reticle. If you cannot see the laser reflected back onto<br />
the reticle, align the secondary mirror by adj<strong>us</strong>ting the secondary mirror<br />
collimation screws until the laser is reflected onto the inside of<br />
the collimator.<br />
4. Loosen 3 locking screws on bottom of optical tube (the thin ones that<br />
stick farther out from the back of the mirror).<br />
5. Align the laser to the center of the reticle by adj<strong>us</strong>ting the 3 primary<br />
mirror adj<strong>us</strong>tment screws (the thick screws in the back of the mirror). Do<br />
not over-turn these screws (max of ¼ turn at a time).<br />
6. Tighten the 3 locking screws on bottom of optical tube to lock the<br />
primary mirror into place.<br />
6
USING YOUR<br />
ZHUMELL DOBSONIAN TELESCOPE<br />
CLEANING AND MAINTENANCE<br />
A <strong>telescope</strong> is carefully aligned during construction, <strong>and</strong> great care should<br />
be taken to maintain this alignment over the life of the <strong>telescope</strong>. Cleaning<br />
should be done as little as possible <strong>and</strong> then only with mild soap solution<br />
<strong>and</strong> a soft, lint-free cloth. Do not rub elements when cleaning. Blot optical<br />
components gently <strong>and</strong> allow <strong>telescope</strong> to air-dry. Store <strong>telescope</strong> in its box<br />
or in a <strong>telescope</strong> case when not in <strong>us</strong>e. Do not <strong>us</strong>e pure alcohol or solvents<br />
to clean any parts of the <strong>telescope</strong>. Do not remove optical elements from the<br />
<strong>telescope</strong> as doing so may affect the alignment of optical components when<br />
reassembled. If <strong>telescope</strong> needs realignment, contact Zhumell or another<br />
professional.<br />
1. Br<strong>us</strong>h <strong>telescope</strong> optics with camelhair br<strong>us</strong>h or blow off d<strong>us</strong>t with an ear<br />
syringe (can be purchased at any pharmacy). Do not <strong>us</strong>e a commercial<br />
photographic lens cleaner.<br />
2. Remove organic materials (e.g. fingerprints) with short gentle strokes <strong>us</strong>ing<br />
soft white tissue paper <strong>and</strong> a solution of three parts distilled water <strong>and</strong><br />
one part isopropyl alcohol. You may also add one drop of biodegradable<br />
dish soap to one pint of the homemade solution. Do not <strong>us</strong>e lotioned or<br />
scented tissues as they could damage the optics of your <strong>telescope</strong>.<br />
3. Wipe down the outside of your <strong>telescope</strong> with a dry cloth to remove<br />
condensation prior to packing up your <strong>telescope</strong>. Do not wipe any of the<br />
optical surfaces. Instead, allow the optics to dry naturally in warm indoor<br />
air prior to packing up your <strong>telescope</strong>.<br />
4. Protect your <strong>telescope</strong> from excessive heat. For example, do not<br />
store your <strong>telescope</strong> in a sealed car on a warm day. Excessive storage<br />
temperatures can damage your <strong>telescope</strong>.<br />
7
SPECIFICATIONS FOR YOUR<br />
ZHUMELL DOBSONIAN TELESCOPE<br />
OPTICAL TUBE ASSEMBLY<br />
Zhumell Z10<br />
Objective/Aperture<br />
Focal Length<br />
254 mm / 10 inches<br />
1250 mm<br />
Limiting Magnitude 14.52<br />
Focal Ratio<br />
F/4.92<br />
Eyepiece Format: 1.25 inch, <strong>and</strong> 2 inch<br />
Finderscope: 8x50<br />
Mount Type: Dobsonian<br />
Tube Mount: Cradle Mount<br />
Mount Adj<strong>us</strong>tment: Altitude-Azimuth<br />
Materials: Wood, Melamine<br />
PARTS LIST<br />
Box 1 of 2<br />
• Dobsonian optical tube<br />
• Plastic tube cover<br />
• 2 silver side bearings<br />
• Cooling fan, attached at bottom of optical<br />
tube<br />
• Battery pack for cooling fan<br />
• Newtonian collimator<br />
• 30 mm eyepiece (2 inch format)<br />
• 9 mm eyepiece (1.25 inch format)<br />
• Moon filter (1.25 inch format)<br />
Box 2 of 2<br />
• 8x50 finderscope<br />
• H<strong>and</strong>le<br />
• 10 long black Allen screws<br />
• 2 medium silver Allen screws<br />
• 3 medium silver Phillips screws<br />
• Allen wrench<br />
• 3 black plastic feet<br />
• 2 short black Phillips screws<br />
• Eyepiece holder shelf<br />
• 2 large round black wood base plates<br />
• Lazy s<strong>us</strong>an (2 metal discs with a black<br />
plastic roller in the middle)<br />
• One black knob, with a thick screw, spacer,<br />
large washer, small ball bearing washer, <strong>and</strong><br />
small plain washer<br />
• 2 large black wood side panels for the base<br />
• 1 small black wood side panel for the base<br />
Not Included<br />
• Philips Screwdriver<br />
• AA Batteries<br />
All Holes have been predrilled<br />
8
ASSEMBLY OF YOUR<br />
ZHUMELL DOBSONIAN TELESCOPE<br />
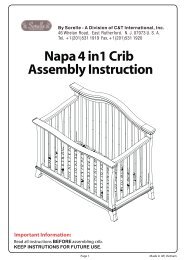
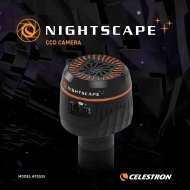
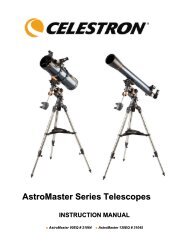
Unbox <strong>and</strong> gather the pieces for base assembly. You will need:<br />
a. Base Sides (2)<br />
b. Base Front<br />
c. Base Plates (2)<br />
d. Bearing Plates (3)<br />
e. H<strong>and</strong>le (<strong>and</strong> (2) silver<br />
Allen screws)<br />
f. Eyepiece Tray (<strong>and</strong> (2) black<br />
Philips screws)<br />
g. Feet (3)<br />
h. Long Black Allen Screws (10)<br />
i. Allen Wrench<br />
j. Adj<strong>us</strong>tment Bolt (with (2)<br />
washers, (1) ball bearing, <strong>and</strong><br />
(1) Axle Sleeve)<br />
b<br />
a<br />
d<br />
c<br />
e<br />
f<br />
g<br />
h<br />
j
ASSEMBLY OF YOUR<br />
ZHUMELL DOBSONIAN TELESCOPE<br />
1<br />
BASE ASSEMBLY<br />
First, you will be assembling the <strong>telescope</strong> base ho<strong>us</strong>ing. This will be the structure that holds your<br />
scope in place.<br />
STEP 1: Screw the h<strong>and</strong>le onto the Base Front <strong>us</strong>ing the (2) pre-drilled holes on the<br />
front. Make sure that it is secure.<br />
STEP 2: Connect the Base Front to the Left Base Side <strong>us</strong>ing the pre-drilled holes in the Base Front <strong>and</strong><br />
(2) Long Black Allen Screws<br />
STEP 3: Repeat with the Right Base Side to complete the box. Be sure that all three sides are firmly<br />
attached <strong>and</strong> feel stable.<br />
10
ASSEMBLY OF YOUR<br />
ZHUMELL DOBSONIAN TELESCOPE<br />
STEP 4: To attach the Eyepiece Tray to the Right Base, it’s easiest to turn the assembly on its side. Attach<br />
the tray <strong>us</strong>ing the (2) pre-drilled holes <strong>and</strong> (2) black Philips screws. Return the base to st<strong>and</strong>ing position <strong>and</strong><br />
make sure the tray is secure.<br />
YOU ARE NOW READY TO BEGIN THE ASSEMBLY OF THE BASE PLATE. THIS WILL BE THE PART THAT<br />
ALLOWS YOUR BASE HOUSING AND TELESCOPE TO ROTATE IN A “LAZY SUSAN” STYLE.<br />
STEP 5: First, the feet m<strong>us</strong>t be attached to the Base Plate. Choose the Base Plate with (1) center hole <strong>and</strong><br />
(3) holes around the edge. IMPORTANT: The feet m<strong>us</strong>t be attached to the side with a brass center hole.<br />
Screw all (3) feet in place, with the wider side facing the board, <strong>us</strong>ing (3) medium silver Philips screws.<br />
STEP 6: Choose the Base Plate with (1) center hole <strong>and</strong> (6) holes around the edge. Flip the base ho<strong>us</strong>ing<br />
upside-down <strong>and</strong> align the six pre-drilled holes with the base plate.<br />
11
ASSEMBLY OF YOUR<br />
ZHUMELL DOBSONIAN TELESCOPE<br />
STEP 7: Be sure the side with recessed holes is facing away from the base ho<strong>us</strong>ing. Screw (6) long black<br />
Allen screws into these holes until they are fl<strong>us</strong>h with the surface.<br />
STEP 8: To assemble the Adj<strong>us</strong>tment Bolt, hold the parts in your h<strong>and</strong> in this order: Small Washer; Ball<br />
Bearing; Large Washer. Place them on the threaded bolt in that order, with the small washer closest to the<br />
plastic knob.<br />
STEP 9: Place the Base Plate with feet on level ground, feet facing downward. Insert the Axle Sleeve into<br />
the center hole.<br />
12
ASSEMBLY OF YOUR<br />
ZHUMELL DOBSONIAN TELESCOPE<br />
STEP 10: Arrange the Bearing Plates with the “wagon wheel” plate s<strong>and</strong>wiched between the two light blue plates.<br />
Place this whole assembly onto the Axle Sleeve centered on the Base Plate. Check that it rotates smoothly.<br />
STEP 11: Pick up the Base Plate <strong>and</strong> Base Ho<strong>us</strong>ing assembly <strong>and</strong> place it on top of the Base Plate <strong>and</strong> Bearing<br />
Plate Assembly, aligning the center hole with the Axle Sleeve. The top assembly should now rotate freely over the<br />
bottom Base Plate.<br />
STEP 12: Screw the Adj<strong>us</strong>tment Bolt (with washers <strong>and</strong> ball bearing) into the Axle Sleeve, through all of the<br />
assembled base parts. This will be your means to rotate <strong>and</strong> secure your Dobsonian.<br />
13
ASSEMBLY OF YOUR<br />
ZHUMELL DOBSONIAN TELESCOPE<br />
2<br />
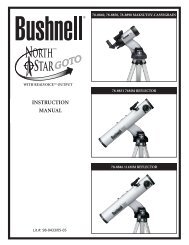
OPTICAL TUBE ASSEMBLY<br />
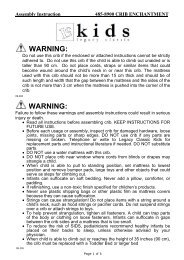
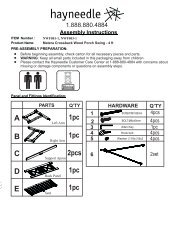
Unbox <strong>and</strong> gather the pieces for the Optical Tube Assembly. These are -<br />
a<br />
b<br />
c<br />
d<br />
e<br />
f<br />
g<br />
h<br />
a. Dobsonian Optical Tube<br />
b. Finderscope<br />
c. Silver Side Bearings (2)<br />
d. Laser Collimator<br />
e. Battery Pack for Cooling Fan<br />
f. 1.25-inch 9mm Plossl Eyepiece<br />
g. 2-inch 30mm Plossl Eyepiece<br />
h. 1.25-inch Moon Filter.<br />
STEP 1: Remove the (2) bolts found on the opening on one side of the OTA. This is where you will<br />
connect the silver Side Bearing. Align the bearing (top bolt first) <strong>and</strong> tighten into place. Repeat on the other<br />
side of the OTA.<br />
14
ASSEMBLY OF YOUR<br />
ZHUMELL DOBSONIAN TELESCOPE<br />
STEP 1: Remove the (2) bolts found on the opening on one side of the OTA. This is where you will<br />
connect the silver Side Bearing. Align the bearing (top bolt first) <strong>and</strong> tighten into place. Repeat on the other<br />
side of the OTA.<br />
STEP 2: You are now ready to place the OTA onto the Base Assembly. Be sure to have the base<br />
assembly ready to align with the OTA before you lift the optical tube. The indentations on the Base<br />
Assembly will perfectly fit the silver Side Bearings on the OTA.<br />
STEP 3: Locate the Finderscope Bracket on the OTA. Loosen the thumbscrew on the bracket with your<br />
fingers <strong>and</strong> slide the Finderscope into place. Tighten the screw so that the Finderscope is secure.<br />
You are now ready to insert an eyepiece <strong>and</strong> begin <strong>us</strong>ing your Zhumell Dobsonian<br />
<strong>telescope</strong>. Continue reading for instructions <strong>and</strong> viewing tips.<br />
15
BASICS FOR YOUR<br />
ZHUMELL DOBSONIAN TELESCOPE<br />
USING 1.25-INCH EYEPIECES<br />
1. The 1.25-inch is the most commonly <strong>us</strong>ed eyepiece format. The<br />
measurement of 1.25 inches is the diameter of the eyepiece tube,<br />
measured on the chrome side.<br />
2. The eyepiece holder <strong>and</strong> Crayford foc<strong>us</strong>er come already attached to the<br />
optical tube, next to where the finderscope is mounted.<br />
3. Remove the plastic d<strong>us</strong>t cover from the eyepiece holder.<br />
4. Loosen the silver thumbscrew closest to the eyepiece hole. (It is part of<br />
the 1.25-inch adapter. More on this adapter in the Z- inch<br />
eyepiece section.)<br />
5. Take out your 1.25-inch eyepiece. Remove the plastic covers <strong>and</strong> pull<br />
up the rubber to <strong>us</strong>e the eyecup.<br />
6. Slide the chrome end of the eyepiece into the eyepiece holder.<br />
7. View through the eyepiece <strong>and</strong> foc<strong>us</strong> as needed. (See foc<strong>us</strong>ing section.)<br />
8. To remove the eyepiece, loosen the silver thumbscrew.<br />
9. Pull out the eyepiece from the holder.<br />
10. Use the plastic d<strong>us</strong>t covers to protect the eyepiece <strong>and</strong> foc<strong>us</strong>er<br />
during storage.<br />
16
BASICS FOR YOUR<br />
ZHUMELL DOBSONIAN TELESCOPE<br />
USING 2-INCH EYEPIECES<br />
1. The 2-inch eyepiece format is the largest. 2 inches is the diameter of the<br />
eyepiece tube, measured on the chrome side.<br />
2. Loosen the silver thumb screw underneath the eyepiece opening.<br />
3. Pull the adapter out of the foc<strong>us</strong>er.<br />
4. Take out your 2-inch eyepiece. Remove the plastic covers.<br />
5. Slide the chrome end of the eyepiece into the foc<strong>us</strong>er.<br />
6. Tighten the bottom thumbscrew to hold eyepiece in place.<br />
7. View <strong>and</strong> foc<strong>us</strong> as desired.<br />
8. To remove, loosen the thumbscrew <strong>and</strong> pull the eyepiece out of the foc<strong>us</strong>er.<br />
9. For storage, replace the adapter with the d<strong>us</strong>t cover.<br />
17
BASICS FOR YOUR<br />
ZHUMELL DOBSONIAN TELESCOPE<br />
ALTITUDE AND AZIMUTH<br />
1. Your Zhumell Dobsonian is adj<strong>us</strong>table along two axes - altitude (up/<br />
down) <strong>and</strong> azimuth (left/right). Adj<strong>us</strong>tments to the <strong>telescope</strong>’s position<br />
can be made along one or both axes at the same time.<br />
2. Gently take hold of the end of the OTA <strong>and</strong> move it either left or right (it<br />
will spin about its central azimuth bolt) or up <strong>and</strong> down (it will rotate on<br />
the Side Bearings on the OTA).<br />
3. The <strong>telescope</strong> can be positioned to view anywhere in the night sky, but<br />
be sure to let it move naturally - never force your <strong>telescope</strong> to move.<br />
FOCUSING THE IMAGE<br />
1. With an eyepiece in the foc<strong>us</strong>er, loosen both back thumbscrews on the<br />
left side on foc<strong>us</strong>er.<br />
2. P<strong>us</strong>h or pull the foc<strong>us</strong>er gently until image becomes as clear as possible.<br />
3. Alternatively, turn the large, up-down, rack-<strong>and</strong>-pinion knobs to adj<strong>us</strong>t<br />
the foc<strong>us</strong>. The black knob will adj<strong>us</strong>t in smaller increments than the<br />
large silver knobs.<br />
4. The back thumbscrew will completely lock the foc<strong>us</strong>. The front<br />
thumbscrew will lock the p<strong>us</strong>h/pull ability, so that only the rack-<strong>and</strong>pinion<br />
knobs can be <strong>us</strong>ed to adj<strong>us</strong>t foc<strong>us</strong>.<br />
5. Tighten both knobs to completely lock the foc<strong>us</strong>er.<br />
18
BASICS FOR YOUR<br />
ZHUMELL DOBSONIAN TELESCOPE<br />
COOLING FAN OPERATION<br />
(10- <strong>and</strong> 12-inch models only)<br />
1. Insert 8 AA batteries into the battery adapter.<br />
2. Locate the cooling fan at the bottom of the OTA.<br />
3. Plug in the battery adapter to the <strong>telescope</strong> - cooling fan will begin running.<br />
4. When you are finished <strong>us</strong>ing the <strong>telescope</strong>, unplug the battery adapter,<br />
take out batteries, <strong>and</strong> store.<br />
TRANSPORTATION<br />
1. IMPORTANT - never try <strong>and</strong> transport both the base <strong>and</strong> OTA as a<br />
single unit. Gently lift the OTA off the base <strong>and</strong> secure in a <strong>telescope</strong><br />
case for transportation. Move the base separately, as a single unit,<br />
<strong>and</strong> h<strong>and</strong>le with care.<br />
2. If you do not have a case for your Dobsonian, let common sense<br />
dictate your transportation storage. It is vital that the OTA does not<br />
roll or move around at all during travel, as this will affect the <strong>telescope</strong><br />
alignment. Pad <strong>and</strong> secure your <strong>telescope</strong> accordingly.<br />
19
VIEWING THROUGH YOUR<br />
ZHUMELL DOBSONIAN TELESCOPE<br />
Never look at the sun without <strong>us</strong>ing a solar filter. Do not <strong>us</strong>e a regular<br />
eyepiece as a solar filter. When <strong>us</strong>ing a solar filter, do not remove the<br />
full lenscap, view only through the small opening. Looking at the sun<br />
without proper <strong>us</strong>e of a solar filter can ca<strong>us</strong>e permanent eye damage,<br />
included blindness.<br />
When viewing through the <strong>telescope</strong>, the image will appear to be<br />
upside-down <strong>and</strong> inverted. This is normal <strong>and</strong> is a result of the optical<br />
system design. It can be corrected by <strong>us</strong>ing an erecting prism when<br />
viewing, but it is not necessary to do so.<br />
Using your finderscope will help you locate celestial much more<br />
quickly as the finderscope is equipped with a wider field of view than<br />
your <strong>telescope</strong>. To simplify foc<strong>us</strong>ing while viewing, start with the lowest<br />
power magnification <strong>and</strong> work up to the desired power.<br />
When viewing faint deep-sky objects, images will not show color. The<br />
human eye is not able to distinguish the differences in color found in<br />
such dim images. The lack of color is due to human anatomy, not any<br />
limitations of <strong>telescope</strong> construction.<br />
20
VIEWING THROUGH YOUR<br />
ZHUMELL DOBSONIAN TELESCOPE<br />
CHECKING AND ALIGNING YOUR FINDERSCOPE<br />
Finderscope alignment is the first step to fine-tuning your Zhumell<br />
Dobsonian setup <strong>and</strong> viewing celestial objects. Follow these steps to<br />
properly set up <strong>and</strong> align your finderscope.<br />
1. Insert the lowest-power eyepiece into the eyepiece adapter. Foc<strong>us</strong><br />
eyepiece to view an easily recognizable, stationary distant object like a<br />
sign or lightpole.<br />
2. Look through the finderscope, but be careful not to move the<br />
<strong>telescope</strong> in any way. Adj<strong>us</strong>t the finderscope foc<strong>us</strong> by turning the<br />
eyepiece of the finderscope back <strong>and</strong> forth until the image is in foc<strong>us</strong>.<br />
Check to see if the object viewed through your <strong>telescope</strong> eyepiece<br />
is lined up at the center of the finderscope crosshairs. If not, your<br />
finderscope m<strong>us</strong>t be re-aligned.<br />
3. To align your finderscope, slightly loosen the thumbscrews which<br />
on the finderscope bracket. Gently move the finderscope until the<br />
crosshairs are centered on your object. Tighten the thumbscrews to<br />
secure the finderscope in this position. It may take many tries to get it<br />
exactly right, but it will make finding objects much, much easier when<br />
you’re ready to <strong>us</strong>e your <strong>telescope</strong>.<br />
OBSERVATION TIPS<br />
SELECTING A VIEWING SITE<br />
The ideal site for <strong>us</strong>ing your Dobsonian is in the middle of nowhere. Most<br />
<strong>us</strong>ers don’t have access to the darkest of skies, however, so select a<br />
site that is both far from light pollution <strong>and</strong> practical for you. Avoid street<br />
lights, yard lighting, rooftops, <strong>and</strong> chimneys, <strong>and</strong> never observe through<br />
an open window indoors. Be sure your site is out-of-town or very dark<br />
<strong>and</strong> has clear view of a large portion of the sky.<br />
21
OBSERVATION TIPS FOR YOUR<br />
ZHUMELL DOBSONIAN TELESCOPE<br />
COOLING YOUR TELESCOPE<br />
To achieve optimum stability of its lenses <strong>and</strong> mirrors, your<br />
<strong>telescope</strong> needs to reach “thermal equilibrium” before <strong>us</strong>e.<br />
When moved to a warmer or colder environment, the air inside<br />
the <strong>telescope</strong> needs time to adj<strong>us</strong>t to match the outdoor<br />
temperature. The bigger the <strong>telescope</strong>, the more time will be<br />
needed to reach equilibrium.<br />
Dobsonian <strong>telescope</strong>s are some of the largest available, so<br />
you will need to allow at least 30 minutes for yours to reach<br />
thermal equilibrium. If the scope experiences more than a<br />
40° temperature change, allow at least an hour. In the colder<br />
months, storing your <strong>telescope</strong> in a shed or garage greatly<br />
reduces the time needed for equilibrium. Similarly, keeping<br />
your <strong>telescope</strong> covered in the sun prevents the air inside from<br />
warming too drastically.<br />
Your Zhumell Dobsonian comes with a cooling fan to help<br />
speed up the process of reaching thermal equilibrium. When<br />
plugged into the scope, it will bring in outside air <strong>and</strong> reduce<br />
the time you need to wait.<br />
SEEING AND TRANSPARENCY<br />
Atmospheric conditions are of the utmost importance when considering<br />
viewing conditions for your astronomical binoculars. These<br />
conditions are commonly referred to as “seeing.” When seeing is<br />
good, star twinkling is minimal <strong>and</strong> objects appear steady in your<br />
lenses. Seeing is best overhead, worst at the horizon, <strong>and</strong> generally<br />
better after midnight. You can’t see the stars without looking through<br />
the atmosphere, so the clearer the air <strong>and</strong> the higher your altitude,<br />
the better seeing conditions you will encounter.<br />
22
OBSERVATION TIPS FOR YOUR<br />
ZHUMELL DOBSONIAN TELESCOPE<br />
A reliably quick way to judge seeing conditions is to look at bright<br />
stars about 40° above the horizon. If the stars appear to twinkle,<br />
there is significant atmospheric distortion <strong>and</strong> viewing at high magnification<br />
will not be ideal. If these stars are steadily bright, chances of<br />
successful viewing at high magnification are much better.<br />
Judging the transparency of the air is also important in determining<br />
viewing conditions. The best air is free of moisture, d<strong>us</strong>t, <strong>and</strong> smoke,<br />
which tend to scatter light, reducing a viewed object’s brightness.<br />
How many stars can you see with your naked eye? If you are unable<br />
to see stars of magnitude 3.5 or dimmer, transparency in your area<br />
is poor. A good indicator star for this test is Megrez (mag. 3.4) - the<br />
star in the Big Dipper connecting the h<strong>and</strong>le to the dipper. If Megrez<br />
is not visible, elements in the air will negatively affect your view.<br />
DARK-ADAPTING YOUR EYES<br />
When you go out into the dark, your eyes need time to adj<strong>us</strong>t. You<br />
will initially be able to see only a fraction of the stars <strong>and</strong> objects<br />
your eyes are capable of.<br />
Remain in the dark (don’t look at any lights or cell phones) for at<br />
least 30 minutes, <strong>and</strong> your eyes should be around 80% of their full<br />
dark-adapted sensitivity. Every time bright light comes into your eye,<br />
the dark-adapting process will start over.<br />
When eyes are fully dark-adapted, you will probably still need to see<br />
what you’re doing. Use a red-light flashlight to maneuver around<br />
the area. A regular flashlight covered in red cellophane will work, but<br />
red LED lights are best.<br />
23
OBSERVATION TIPS FOR YOUR<br />
ZHUMELL DOBSONIAN TELESCOPE<br />
TRACKING CELESTIAL OBJECTS<br />
The Earth is always rotating about its polar axis, completing one full<br />
rotation every 24 hours. This is what defines our “day”, <strong>and</strong> we see<br />
it in the apparent movement of sun <strong>and</strong> stars throughout each rotation.<br />
In the same way that the sun rises <strong>and</strong> sets each day, the stars<br />
in the sky rise <strong>and</strong> set each night. The motion translates to a rate of<br />
approximately .25° per minute, or 15 arc-seconds per second. This<br />
is commonly referred to as the sidereal rate.<br />
As you observe any celestial object, remember that it is in motion.<br />
You will need to continuo<strong>us</strong>ly update your <strong>telescope</strong>’s position<br />
throughout a viewing session, which is where your Dobsonian’s fine<br />
altitude <strong>and</strong> azimuth adj<strong>us</strong>tments become <strong>us</strong>eful. As an object begins<br />
to leave your field of view, gently nudge the OTA in the correct<br />
direction <strong>and</strong> bring it back to center.<br />
Remember, the higher the magnification at which you’re viewing, the<br />
smaller your field of view. Objects will appear to move faster as you<br />
raise magnification, <strong>and</strong> more frequent positional adj<strong>us</strong>tments will<br />
need to be made.<br />
SELECTING AN EYEPIECE<br />
By <strong>us</strong>ing eyepieces of different focal lengths, many different magnifications<br />
can be achieved with your Zhumell Dobsonian <strong>telescope</strong>.<br />
The best place to start is with the included 9mm <strong>and</strong> 32mm Plossl<br />
eyepieces for higher <strong>and</strong> lower magnifications, respectively. Many<br />
astronomers own a large number of eyepieces in order to c<strong>us</strong>tomize<br />
their equipment based on the object being viewed. To calculate the<br />
magnification of a <strong>telescope</strong>/eyepiece combination, divide the focal<br />
length of the <strong>telescope</strong> by the focal length of the eyepiece.<br />
24
OBSERVATION TIPS FOR YOUR<br />
ZHUMELL DOBSONIAN TELESCOPE<br />
No matter which eyepiece you intend to <strong>us</strong>e, always start by <strong>us</strong>ing the<br />
lowest-power (longest focal length) eyepiece to locate <strong>and</strong> center the<br />
object. Lower magnification means a wider field of view, making it easier<br />
to find an object <strong>and</strong> j<strong>us</strong>tify your scope in its direction.<br />
Once you’ve centered the desired object <strong>us</strong>ing your lowest-power<br />
eyepiece, go ahead <strong>and</strong> make the switch to a higher magnification. Make<br />
further centering adj<strong>us</strong>tments, <strong>and</strong> continue to work up if desired. Higher<br />
magnifications are <strong>us</strong>eful for small <strong>and</strong> bright objects like planets <strong>and</strong><br />
double stars. Viewing the Moon with increased magnification also yields<br />
great results.<br />
Deep-sky objects, however, typically look best at medium <strong>and</strong> low magnifications.<br />
This is beca<strong>us</strong>e they tend to be faint, yet have apparent width.<br />
Deep-sky objects often fall from view at higher magnifications, since the<br />
image becomes dimmer. This is not an unbreakable rule, since many<br />
galaxies are bright enough for high magnification, but words as a decent<br />
rule-of-thumb.<br />
Regardless of the object, or what recommendations are made, the best<br />
way to become familiar with proper viewing magnifications is to experiment.<br />
Always start with low magnification <strong>and</strong> wide field-of-view <strong>and</strong> work<br />
your way up. If the view continues to improve, continue increasing power.<br />
If the image begins to degrade, back off the magnification <strong>and</strong> <strong>us</strong>e a<br />
lower-power eyepiece.<br />
25
COOL VIEWS WITH YOUR<br />
ZHUMELL ASTRONOMICAL BINOCULARS<br />
THE MOON<br />
The Earth’s moon is one of the easiest <strong>and</strong> most rewarding targets<br />
at which to point your binoculars. Its rocky, cratered surface is close<br />
enough to be rendered in some detail, <strong>and</strong> allows for satisfying<br />
exploration. The best time for lunar viewing is during its partial phases,<br />
when shadows fall on the craters <strong>and</strong> canyon walls to give them<br />
definition. Even though the full moon may look like a tempting target,<br />
the light is too bright <strong>and</strong> the definition too low for optimal viewing.<br />
THE STARS<br />
Through your binoculars, stars will appear much as they do to the<br />
naked eye - as tiny points of light against a dark sky. Even powerful<br />
binoculars cannot magnify stars to appear as anything more than<br />
these pinpoints. You can, however, enjoy the different colors of their<br />
glow <strong>and</strong> locate many beautiful double- <strong>and</strong> multiple-stars. Two<br />
popular targets are the “Double-Double” in the constellation Lyra <strong>and</strong><br />
the two-color double star Albireo in Cygn<strong>us</strong>.<br />
THE PLANETS<br />
The planets are beautiful <strong>and</strong> popular targets for astronomers, but they<br />
can be more difficult to keep track of than the stars or moon. Planetary<br />
position charts can readily be found online or in any astronomical<br />
publication. Sun <strong>and</strong> Moon aside, the brightest objects in the night<br />
sky are Ven<strong>us</strong>, Mars, Jupiter, <strong>and</strong> Saturn. The apparent size of planets<br />
can be quite small, but high-power binoculars provide an adequately<br />
enjoyable view.<br />
26
ADVANCED OBSERVATION<br />
JUPITER<br />
Jupiter is our solar system’s largest planet. Through your binocs, you<br />
can easily see the planet <strong>and</strong> observe the changing positions of its<br />
four largest moons: Io, Callisto, Europa, <strong>and</strong> Ganymede. With the right<br />
conditions, you may be able to see cloud b<strong>and</strong>s wrapped around the<br />
planet <strong>and</strong> the famo<strong>us</strong> Great Red Spot.<br />
SATURN<br />
This infamo<strong>us</strong>ly ringed planet can be a fantastic sight through your<br />
binoculars. The tilt-angle of the rings varies over a period of many<br />
years, so they may be seen edge-on (like a thin line) or broadside (like<br />
giant “ears” on each side of the planet). You will need a good steady<br />
atmosphere to achieve a worthwhile view of Saturn. If you look closely<br />
enough, you can see the Cassini division - a thin, dark gap in the rings.<br />
You can also often make out one or more of Saturns moons, including<br />
the largest - Titan.<br />
VENUS<br />
At its brightest, Ven<strong>us</strong> is the most lumino<strong>us</strong> of all the planets - so bright<br />
that it is occasionally visible in full daylight. Ven<strong>us</strong> appears as only a<br />
thin crescent at its brightest, <strong>and</strong> it is never found far from morning<br />
or evening horizon. No surface detail can be seen on Ven<strong>us</strong> as it is<br />
surrounded by dense cloud cover.<br />
MARS<br />
Mars makes a close approach to our planet once every two years,<br />
which is the best time to observe it. With your binoculars, you’ll be able<br />
to see a salmon-colored disk marked with dark patches <strong>and</strong> possible a<br />
whitish polar ice cap. Surface detail on Mars is only observable during<br />
prime conditions with a high-power magnification.<br />
27
ADVANCED OBSERVATION<br />
DEEP-SKY OBJECTS<br />
With dark skies, ideal viewing conditions, <strong>and</strong> powerful astronomical<br />
binoculars, you can observe a number of amazing objects outside our<br />
solar system - commonly referred to as “deep-sky objects”. These<br />
include star cl<strong>us</strong>ters, galaxies, gaseo<strong>us</strong> nebulas, <strong>and</strong> more. With<br />
primary conditions, your binoculars are well equipped to gather the light<br />
necessary to view these objects, but you will need to find a viewing site<br />
well away from light pollution <strong>and</strong> give your eyes plenty of time to fully<br />
dark-adapt. As you continue to view, your eyes will become trained, <strong>and</strong><br />
more <strong>and</strong> more subtle details from these objects will become apparent.<br />
Don’t expect to see color, however, as human eyes are not sensitive<br />
enough to distinguish color from faint light.<br />
STARHOPPING<br />
Starhopping is the most common <strong>and</strong> simplest way to reliably track<br />
down objects in the night sky. It <strong>us</strong>es relative positioning, beginning at<br />
a star with a known location <strong>and</strong> progressing to other stars closer <strong>and</strong><br />
closer to the destination object. It’s been <strong>us</strong>ed for hundreds of years,<br />
<strong>and</strong> - with practice - will never let you down when finding an object.<br />
Starhopping can be very difficult at first, so be patient <strong>and</strong> keep trying!<br />
You will need a small number of additional resources to successfully<br />
employ Starhopping as your night-sky positioning technique. A star<br />
chart or atlas that shows stars to at least magnitude 5 is required.<br />
Choose one that shows the positions of many deep-sky objects to give<br />
yourself a wealth of options. If you don’t already know the positions of<br />
the constellations in the night sky, you will need a planisphere as well.<br />
28
ADVANCED OBSERVATION<br />
Begin by choosing brighter deep-sky objects as your destination.<br />
The brightness of an object is measured by its visual magnitude;<br />
the brighter an object, the lower its magnitude. Choose an object<br />
with a visual magnitude of 9 or lower. Most beginners start with<br />
the Messier objects, some of the brightest <strong>and</strong> most beautiful<br />
deep-sky objects, first catalogued about 200 years ago by French<br />
astronomer Charles Messier.<br />
Using your star chart, determine in which constellation your<br />
object lies <strong>and</strong> locate that constellation in the night sky. Turn your<br />
binoculars to face this general direction. Find the brightest star in<br />
this constellation <strong>and</strong> center your view on it. Consult your star chart<br />
again, <strong>and</strong> determine the next brightest star between your currently<br />
foc<strong>us</strong>ed star <strong>and</strong> your object destination. Move your binoculars<br />
slightly to foc<strong>us</strong> <strong>and</strong> center this next star.<br />
Continue on this course, <strong>us</strong>ing each star as a guidepost for the<br />
next, until you reach the area in the sky in which the object of your<br />
hunt should be seen. Center the object <strong>and</strong> bring it into foc<strong>us</strong>.<br />
You’ve j<strong>us</strong>t found a deep-sky object.<br />
If the object is still not in view, retrace your starhopping steps <strong>and</strong><br />
start again. Remember, expertise in this hobby will require both<br />
patience <strong>and</strong> practice. Good luck out there!<br />
29
ASTRONOMY FORMULAS FOR YOUR<br />
ZHUMELL DOBSONIAN TELESCOPE<br />
MAGNIFICATION<br />
To determine the magnification of a <strong>telescope</strong> <strong>and</strong> eyepiece<br />
combina¬tion, divide the <strong>telescope</strong> focal length be the eyepiece<br />
focal length.<br />
Magnification (x) = Telescope Focal Length (mm)/Eyepiece<br />
Focal Length (mm)<br />
Ex: 20mm Eyepiece with a 254x1250mm <strong>telescope</strong>.<br />
Magnification = 1250mm/32mm<br />
Magnification = 39.06x<br />
FOCAL RATIO<br />
To determine the focal ratio of a <strong>telescope</strong>, divide the focal<br />
length of the <strong>telescope</strong> by the aperture.<br />
Focal Ratio (F/x)= Telescope Focal Length (mm)/Aperture (mm)<br />
Ex: Focal Ratio of a 254x1250mm <strong>telescope</strong>.<br />
Focal Ratio (f/x)= 1250mm/254mm<br />
Focal Ratio (f/x)= f/4.92<br />
30
ASTRONOMY FORMULAS FOR YOUR<br />
ZHUMELL DOBSONIAN TELESCOPE<br />
LIMITING MAGNITUDE<br />
To determine the limiting magnitude of a <strong>telescope</strong>, <strong>us</strong>e the aperture<br />
in the following formula for an approximation.<br />
Limiting Magnitude = 7.5 + 5LOG(Aperture in cm)<br />
Ex: Limiting Magnitude of a 254x1250mm <strong>telescope</strong>.<br />
Limiting Magnitude = 7.5 + 5LOG(25.4cm)<br />
Limiting Magnitude = 7.5 + (5 x 1.405)<br />
Limiting Magnitude = 14.52<br />
RESOLVING POWER<br />
To determine the resolving power of a <strong>telescope</strong> under ideal<br />
conditions, divide the aperture into 4.56.<br />
Resolving Power = 4.56/Aperture (in inches)<br />
Ex: Resolving Power of a 254x1250mm <strong>telescope</strong>.<br />
Aperture (in.) = 70mm/25.4 = 2.75 in.<br />
Resolving Power = 4.56/10in.<br />
Resolving Power = .456<br />
31
ASTRONOMY TERMINOLOGY<br />
DECLINATION (DEC.) - The astronomical<br />
equivalent of latitude. Declination describes<br />
the angle of a celestial object above or below<br />
the celestial equator. The sky over the northern<br />
hemisphere has a positive declination. The sky over<br />
the Southern hemisphere has a negative declination.<br />
For example, Polaris (the North Star) which lies nearly<br />
directly over the North Pole, has a declination value<br />
of 90°.<br />
RIGHT ASCENSION (R.A.) -<br />
The astronomical equivalent of longitude. Right<br />
ascension measures the degree of distance of<br />
a star to the east of where the ecliptic crosses<br />
the celestial equator. R.A. is measured in hours,<br />
minutes, <strong>and</strong> seconds as opposed to degrees. It<br />
is different than the term “meridian”, which is <strong>us</strong>ed<br />
in referring to lines of longitude. Right ascension<br />
is referred to in “hour circles”. There are 24 hour<br />
circles of right ascension which run from the north<br />
to south celestial poles.<br />
CELESTIAL EQUATOR - The celestial equator is<br />
the line of declination which lies directly above the<br />
Earth’s equator. The celestial equator lies halfway<br />
between the north <strong>and</strong> south celestial poles <strong>and</strong><br />
serves as the 0° point in measuring declination.<br />
ECLIPTIC - The ecliptic is the apparent path of<br />
the sun through the sky over the course of the<br />
year. Since we view the sun from different angles<br />
throughout the year, it appears to move in relation<br />
to other stars. The vernal (spring) <strong>and</strong> autumnal<br />
(fall) equinoxes lie at the points where the ecliptic<br />
intersects the celestial equator. The vernal equinox<br />
is where right ascension is at 0h (hours). The<br />
autumnal equinox can be found at 12h R.A.<br />
ZENITH - The zenith is the point in the celestial<br />
sphere directly above your head. The zenith varies<br />
depending upon your location. In general, the<br />
declination point of your zenith is equal to the<br />
latitude at which you are st<strong>and</strong>ing on Earth.<br />
EPHEMERIS - The ephemeris of a planet or the<br />
sun or the moon is a table giving the coordinates of<br />
the object at regular intervals of time.<br />
The coordinates will be listed <strong>us</strong>ing declination <strong>and</strong><br />
right ascension. Other information such as distance<br />
<strong>and</strong> magnitude may be listed in ephemerides<br />
(plural of ephemeris).<br />
ALTITUDE - The altitude of a celestial object is the<br />
angular distance of that object above the horizon.<br />
The maximum possible altitude is the altitude of an<br />
object at the zenith, 90°. The altitude of an object<br />
on the horizon is 0°. Altitude is measured from your<br />
point of observation <strong>and</strong> does not directly correlate<br />
to points on the celestial sphere.<br />
AZIMUTH - Azimuth is the angular distance<br />
around the horizon measured eastward in degrees<br />
from the North Horizon Point. Th<strong>us</strong>, the North<br />
Horizon Point lies at an azimuth of 0°, while the<br />
East Horizon Point lies at 90°, <strong>and</strong> the South<br />
Horizon Point at 180°. Azimuth is measured from<br />
the point of observation <strong>and</strong> does not directly<br />
correspond to points on the celestial sphere.<br />
ANGULAR DISTANCE - Angular distance is the<br />
size of the angle through which a <strong>telescope</strong> tube<br />
or binocular aiming at one object m<strong>us</strong>t be turned in<br />
order to aim at another object. If you m<strong>us</strong>t rotate the<br />
equipment from the zenith to the horizon, the angular<br />
distance between the two points would be 90°.<br />
32
TELESCOPE TERMINOLOGY<br />
OBJECTIVE - The objective is the front lens of a<br />
<strong>telescope</strong>. The listed measurement for objective<br />
lenses is the lens diameter. A larger objective<br />
allows more light to enter a <strong>telescope</strong> <strong>and</strong> provides<br />
a brighter image. The objective diameter is also<br />
sometimes referred to as the aperture of<br />
a <strong>telescope</strong>.<br />
FOCAL LENGTH - The focal length of a <strong>telescope</strong><br />
is the distance from the point where light enters<br />
a <strong>telescope</strong> (the objective) to the point where the<br />
image is in foc<strong>us</strong>. In <strong>telescope</strong>s with the same size<br />
objective, a longer focal length will provide higher<br />
magnification <strong>and</strong> a smaller field of view.<br />
MAGNIFICATION - The magnification of a<br />
<strong>telescope</strong> is determined by the relationship between<br />
the focal length of the <strong>telescope</strong> <strong>and</strong> the focal length<br />
of the eyepiece <strong>us</strong>ed. A greater difference in these<br />
focal lengths results in a greater the magnification<br />
of the <strong>telescope</strong>. Every <strong>telescope</strong> has a maximum<br />
<strong>us</strong>eful magnification of about 60 times the diameter<br />
of the objective in inches. Magnification beyond the<br />
maximum <strong>us</strong>eful magnification will provide dim, lowcontrast<br />
images.<br />
FOCAL RATIO - The focal ratio of a <strong>telescope</strong><br />
is a description of the relationship between the<br />
focal length <strong>and</strong> objective lens size of a <strong>telescope</strong>.<br />
Visually, a smaller focal ratio (also called f-stop)<br />
provides a wider field of view. Photographically,<br />
the lower the f-stop, the shorter the exposure time<br />
needed to capture an object on film.<br />
LIMITING MAGNITUDE - The limiting magnitude<br />
of a <strong>telescope</strong> describes the faintest object you<br />
can see with a <strong>telescope</strong>. The magnitude of a star<br />
describes its brightness. The larger the magnitude<br />
of an object, the fainter it appears to be. The<br />
brightest stars have a magnitude of 0 or less.<br />
RESOLVING POWER - The resolving power, or<br />
Dawes’ Limit, of a <strong>telescope</strong> is the ability to view<br />
closely spaced objects through a <strong>telescope</strong>. The<br />
resolving power of a <strong>telescope</strong> is measured in<br />
seconds of arc. The smaller the resolving power, the<br />
better you will be able to separate binary stars when<br />
viewing through your <strong>telescope</strong>.<br />
ABERRATION - Aberrations are degradations<br />
in image, which can occur due to optical system<br />
design or improper alignment of optical system<br />
components. The most common types of<br />
aberration are chromatic aberration, spherical<br />
aberration, coma, astigmatism, <strong>and</strong> field curvature.<br />
COLLIMATION - Collimation is the alignment<br />
of optical components within an optical system.<br />
Improper collimation will distort an image <strong>and</strong><br />
may result in aberrations present in the image.<br />
Most reflector <strong>telescope</strong>s have collimation<br />
adj<strong>us</strong>tments which can be made in order to<br />
reduce aberrations <strong>and</strong> image distortion. Refractor<br />
<strong>telescope</strong>s do not require collimation nearly as often<br />
as reflector <strong>telescope</strong>s.<br />
33
FAQS FOR YOUR<br />
ZHUMELL DOBSONIAN TELESCOPE<br />
CAN I TAKE THE OPTICAL TUBE OFF OF THE MOUNT WHEN I MOVE THE SCOPE?<br />
The optical tube on Zhumell Dobsonian <strong>telescope</strong>s can easily be taken off of<br />
its base. Removing the optical tube assembly from the base makes moving<br />
your Dobsonian much easier <strong>and</strong> will help prevent damage to the mount or<br />
optical tube during transport. To remove the optical tube from the mount, simply<br />
lift the tube out of the cradle mount by grasping the silver side bearings.<br />
HOW DO I KNOW WHEN I NEED TO COLLIMATE MY TELESCOPE?<br />
When the optics of a <strong>telescope</strong> are out of alignment, image clarity will be lost.<br />
In extreme cases, you may not even be able to foc<strong>us</strong> an image. If you notice<br />
that you are having problems achieving foc<strong>us</strong>, try collimating your <strong>telescope</strong>.<br />
It is recommended that reflector <strong>telescope</strong>s be collimated every time they<br />
are <strong>us</strong>ed.<br />
THE IMAGE I SEE IN MY FINDERSCOPE IS NOT THE SAME AS THE IMAGE I SEE<br />
THROUGH MY TELESCOPE. WHAT IS WRONG?<br />
In order for the finderscope to show the same part of the sky which your<br />
<strong>telescope</strong> should see, the finderscope m<strong>us</strong>t be aligned. Since the finderscope<br />
has less magnification <strong>and</strong> a wider field of view than the <strong>telescope</strong>, it will help<br />
you zero in on stars once it is properly aligned with the optical tube.<br />
CAN I TAKE ASTROPHOTOGRAPHS THROUGH MY DOBSONIAN?<br />
Astrophotography generally requires long exposure times in order to compensate<br />
for the limited amount of light available for shots of stars <strong>and</strong> planets.<br />
Since long exposures are required, your Dobsonian <strong>telescope</strong> will not work<br />
well for astrophotography. Due to the rotation of the Earth <strong>and</strong> the apparent<br />
movement of the stars, a tracking motor or go-to system is best-suited for<br />
astrophotography. If you are considering trying astrophotography, we recommend<br />
looking into purchasing an equatorial (EQ) mount with a motor drive or<br />
go-to system.<br />
34
FAQS FOR YOUR<br />
ZHUMELL DOBSONIAN TELESCOPE<br />
CAN I USE THE OPTICAL TUBE FROM MY DOBSONIAN ON ANY<br />
OTHER MOUNTS?<br />
The optical tube from your Dobsonian <strong>telescope</strong> will work on any type<br />
of mount, as long as the mount is able to support the weight <strong>and</strong> size<br />
of the optical tube while still moving freely. In order to <strong>us</strong>e the optical<br />
tube from your Dobsonian <strong>telescope</strong> on an equatorial mount, you<br />
will need to purchase the correct size tube rings <strong>and</strong> a dovetail plate;<br />
these will allow you to attach the optical tube to the mount. Tube rings<br />
can be purchased in many different sizes <strong>and</strong> are available through<br />
many astronomical retailers. In order to determine the correct tube ring<br />
size, measure the diameter of the optical tube (which is larger than the<br />
diameter of the primary mirror). If you have questions about whether<br />
a particular mount will work the optical tube, please check with the<br />
mount’s manufacturer about the specifications for the mount.<br />
WHY IS IT CALLED A DOBSONIAN TELESCOPE?<br />
Although it is based on the Newtonian optical tube design, the<br />
Dobsonian gets its name from the person who developed the type of<br />
mount <strong>us</strong>ed on most Dobsonian <strong>telescope</strong>s. John Dobson revolutionized<br />
the world of astronomy by making <strong>telescope</strong>s out of “junk”. One<br />
of his first <strong>telescope</strong>s was made from a ship’s porthole window, scrap<br />
wood, <strong>and</strong> cardboard. Dobson’s approach to design drastically reduced<br />
the price of <strong>telescope</strong>s <strong>and</strong> made the price of large aperture <strong>telescope</strong>s<br />
accessible to amateur astronomers. John Dobson was known for both<br />
his ingenuity in <strong>us</strong>ing common materials <strong>and</strong> his outreach to the general<br />
public through the San Francisco Sidewalk Astronomers.<br />
35
WARRANTY<br />
Zhumell products are designed to provide you with the highest quality <strong>and</strong><br />
best value available, which is why we’re proud to offer a world-class warranty<br />
on all of our products. All Zhumell monoculars <strong>and</strong> spotting scopes<br />
are covered by a 3-year no-fault warranty.<br />
To obtain warranty service, the damaged equipment m<strong>us</strong>t be returned to<br />
Zhumell. Our C<strong>us</strong>tomer Care associates will be happy to assist you in completing<br />
this return to get your Zhumell in working order as quickly as possible.<br />
There is a $15 surcharge associated with warranty returns to cover<br />
return shipping <strong>and</strong> h<strong>and</strong>ling.<br />
For more information, contact information, <strong>and</strong> to download the Zhumell<br />
Warranty Return Form, please visit http://www.zhumell.com.