Centre Console - Classic Ford
Centre Console - Classic Ford
Centre Console - Classic Ford

Create successful ePaper yourself
Turn your PDF publications into a flip-book with our unique Google optimized e-Paper software.
tech features<br />
inside this issue:<br />
Getting technical with the best in the<br />
business. Here’s all you need.<br />
114<br />
PROJECT cortina<br />
Our MkII gets cut<br />
about to take a<br />
six-speed ’box.<br />
120<br />
the ford<br />
specialist<br />
Dave Bean has got<br />
’60s <strong>Ford</strong>s covered<br />
in the USA.<br />
<strong>Classic</strong><strong>Ford</strong> 148 buying Letters a<br />
mki transit<br />
How to pic up a decent<br />
parts hauler<br />
for the right price.<br />
Before you<br />
start...<br />
Safety FIRST<br />
1 2<br />
Always remember safety first when it<br />
comes to power tools and welders so that<br />
means goggles and gloves where<br />
necessary and a decent welding mask (I<br />
would recommend getting a reactive<br />
helmet), and never try and work with a<br />
cheap hand held. When using power tools<br />
always use the correct guards and clamp<br />
the work piece securely to prevent injury.<br />
Before cutting into the steel or alloy sheet, start by<br />
making a template. Some stiff card and a marker<br />
pen are needed here and line it up where you have<br />
decided it will go.<br />
You can then cut the card to shape and make any<br />
adjustments now before transferring the template<br />
to the metal. Remember to take into account any<br />
mounting lips and return folds.<br />
3 4<br />
5<br />
Once this is done, trace round the template onto<br />
your work piece, marking it out as accurately as<br />
possible. Use a biro or similar as it will give a more<br />
accurate line.<br />
6<br />
Using decent tin snips, cut out the console<br />
following the lines carefully. If using thicker allloy<br />
then you may need to use a jigsaw, but make sure<br />
you protect the metal to stop it getting scratched.<br />
7<br />
To add some detail we are putting a series of holes<br />
down each side, so after marking them out with a<br />
pen, the centre of each hole is marked with a centre<br />
punch, which will stop the drill from wandering.<br />
Make Your Own<br />
<strong>Centre</strong> <strong>Console</strong><br />
Don’t want to cut your dash to fit extra gauges or switches?<br />
Then make your own centre console for just a tenner.<br />
For photographic purposes we have removed the<br />
guards, so don’t try this at home kids! We are using<br />
a 25 mm/1 inch hole saw to cut out the holes, five<br />
down either side.<br />
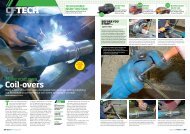
Using a simple vice-mounted folder, the two edges<br />
were folded over at 90 degrees; this will make the<br />
panel nice and stiff and stop it from flexing.<br />
Words and photos Jon Betts<br />
This month we show you how to<br />
make the ever popular centre<br />
console, a common addition to<br />
many modified classic <strong>Ford</strong>s, especially<br />
those going for the race or rally look,<br />
as it creates somewhere to fit all those<br />
extra switches you need. They are also<br />
a popular addition to many road cars<br />
allowing you to insert extra gauges, a<br />
stereo head unit or switchgear without<br />
having to cut into the dash.<br />
A simple console can be made from<br />
either steel or aluminium, the latter<br />
often the preferred medium, although<br />
personally I have opted for the steel<br />
version as it is a little more forgiving<br />
and once painted looks just as good. If<br />
you do opt for an alloy version take<br />
great care when handling the metal as<br />
it is easily marked, and you don’t want<br />
to bugger up all that hard work with a<br />
big scratch right down the front. As<br />
“Perfect for<br />
that race or<br />
rally look”<br />
Info<br />
Tools: pillar drill, hole<br />
saw, hole flare tool, tin<br />
snips, welder, grinder,<br />
hacksaw, file, punch,<br />
hammer, metal bender,<br />
vice and spanners.<br />
Time taken: About an<br />
hour should do it.<br />
Cost: Around 10 quid<br />
for the steel maybe<br />
less if you raid the<br />
scrap bin.<br />
well as painting you could cover it in<br />
vinyl, leather or cloth to match the rest<br />
of your interior — the choice is yours.<br />
We used a piece of 1 mm steel and<br />
again put our Frost hole flaring tool to<br />
good use to add some detail and<br />
strength to the folded edge. No other<br />
special tools are required so you should<br />
be able to tackle this one easily at<br />
home. Again we used and abused the<br />
facilities down at Retro Motorsport in<br />
Harlow, and made the console to fit an<br />
Anglia that was in the workshop<br />
awaiting Gary’s special touch.<br />
8<br />
Using our Frost flaring tool, we added some detail<br />
to each of the holes; this also helps to add strength.<br />
The tool simply clamps to the metal and flares out<br />
one side.<br />
9<br />
The mounting flanges at the top and the bottom<br />
will also need to be bent, but because the sides are<br />
folded over we couldn’t use the folder so a couple<br />
of pieces of angle iron in the vice were used.<br />
10<br />
The piece was then trial fitted in the car so we could<br />
see how much more the lips needed bending. It’s<br />
best to do this a little bit at a time as the piece can<br />
deform if you try to straighten it out.<br />
110 January 2009<br />
January 2009 111
CFTech<br />
11 12 13<br />
Using a body hammer we made some slight<br />
adjustments to both mounting flanges until the<br />
piece fitted perfectly in the car. Using the hammer<br />
kept the bend nice and tight.<br />
14<br />
You can mount just about anything in the console,<br />
but we have opted for a battery kill switch and<br />
some simple toggle switches. So decide where<br />
they are going and mark the position for the holes.<br />
15<br />
We need to drill three holes for the switches and a<br />
1 inch hole for the kill switch. Once drilled, de-burr<br />
the holes and then trial fit all the hardware.<br />
16<br />
We decided to make a small bracket to put an<br />
external pull cable on the kill switch, this was just a<br />
small diamond shape bent in half and braced. Once<br />
welded we cleaned it up with the grinder.<br />
17<br />
Here you can see the bracket better, along with the<br />
M8 nut we welded in place which will house the<br />
adjuster, similar to the ones found on your old pedal<br />
bike on the brake lever.<br />
Sadly I couldn’t find an adjuster so decided to make<br />
my own from an M8 allen head bolt, I simply drilled<br />
down the centre with a one-eighth drill bit to allow<br />
the cable to go through it.<br />
18<br />
Here you can see how it all goes together after<br />
everything has had a lick of paint. The cable<br />
goes to the outside of the car allowing a<br />
marshal to kill the electrical system and so shut<br />
down the car in the event of an accident.<br />
Next<br />
Month<br />
spare wheel<br />
mount<br />
And here it is in the car and I reckon it looks pretty<br />
good. They can be made to fit just about any car,<br />
and if you are lucky you will be able to use some of<br />
the original fixings on the dash to mount it.<br />
112 January 2009