Krohne Optiwave 7300 C Radar Level Meter Quickstart ... - Instrumart
Krohne Optiwave 7300 C Radar Level Meter Quickstart ... - Instrumart Krohne Optiwave 7300 C Radar Level Meter Quickstart ... - Instrumart
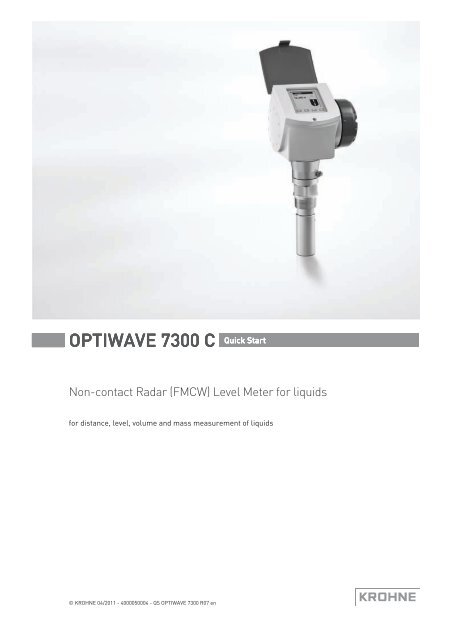
OPTIWAVE 7300 C Quick Start Non-contact Radar (FMCW) Level Meter for liquids for distance, level, volume and mass measurement of liquids © KROHNE 04/2011 - 4000050004 - QS OPTIWAVE 7300 R07 en
- Page 2 and 3: CONTENTS OPTIWAVE 7300 C 1 Safety i
- Page 4 and 5: 2 INSTALLATION OPTIWAVE 7300 C 2.1
- Page 6 and 7: 2 INSTALLATION OPTIWAVE 7300 C 2.3
- Page 8 and 9: 2 INSTALLATION OPTIWAVE 7300 C 2.5
- Page 10 and 11: 2 INSTALLATION OPTIWAVE 7300 C 2.7.
- Page 12 and 13: 2 INSTALLATION OPTIWAVE 7300 C 2.8
- Page 14 and 15: 2 INSTALLATION OPTIWAVE 7300 C Requ
- Page 16 and 17: 2 INSTALLATION OPTIWAVE 7300 C Tri-
- Page 18 and 19: 2 INSTALLATION OPTIWAVE 7300 C Equi
- Page 20 and 21: 2 INSTALLATION OPTIWAVE 7300 C 2.9.
- Page 22 and 23: 3 ELECTRICAL CONNECTIONS OPTIWAVE 7
- Page 24 and 25: 3 ELECTRICAL CONNECTIONS OPTIWAVE 7
- Page 26 and 27: 4 TECHNICAL DATA OPTIWAVE 7300 C Me
- Page 28 and 29: 4 TECHNICAL DATA OPTIWAVE 7300 C Pr
- Page 30 and 31: 4 TECHNICAL DATA OPTIWAVE 7300 C CS
- Page 32: KROHNE product overview © KROHNE 0
OPTIWAVE <strong>7300</strong> C Quick Start<br />
Non-contact <strong>Radar</strong> (FMCW) <strong>Level</strong> <strong>Meter</strong> for liquids<br />
for distance, level, volume and mass measurement of liquids<br />
© KROHNE 04/2011 - 4000050004 - QS OPTIWAVE <strong>7300</strong> R07 en
CONTENTS<br />
OPTIWAVE <strong>7300</strong> C<br />
1 Safety instructions 3<br />
2 Installation 4<br />
2.1 Intended use ..................................................................................................................... 4<br />
2.2 Scope of delivery............................................................................................................... 4<br />
2.3 Visual Check ..................................................................................................................... 6<br />
2.4 Storage ............................................................................................................................. 7<br />
2.5 Transport .......................................................................................................................... 8<br />
2.6 Pre-installation requirements ......................................................................................... 8<br />
2.7 How to prepare the tank before you install the device.................................................... 9<br />
2.7.1 Pressure and temperature ranges......................................................................................... 9<br />
2.7.2 Theoretical data for nozzle position .....................................................................................10<br />
2.7.3 Theoretical data for hygienic applications ........................................................................... 11<br />
2.8 Installation recommendations for liquids...................................................................... 12<br />
2.8.1 General requirements .......................................................................................................... 12<br />
2.8.2 Standpipes............................................................................................................................. 13<br />
2.9 How to install the device on the tank ............................................................................. 13<br />
2.9.1 How to install a device with a flange connection ................................................................. 13<br />
2.9.2 How to install a device with a threaded connection............................................................. 14<br />
2.9.3 How to install a device with a hygienic connection .............................................................. 15<br />
2.9.4 How to attach antenna extensions ....................................................................................... 17<br />
2.9.5 How to turn or remove the signal converter ........................................................................ 19<br />
2.9.6 How to attach the weather protection to the device............................................................. 20<br />
2.9.7 How to open the weather protection .................................................................................... 21<br />
3 Electrical connections 22<br />
3.1 Safety instructions.......................................................................................................... 22<br />
3.2 Electrical installation: outputs 1 and 2 .......................................................................... 22<br />
3.2.1 Non-Ex devices ..................................................................................................................... 23<br />
3.2.2 Devices for hazardous locations........................................................................................... 23<br />
3.2.3 PROFIBUS PA........................................................................................................................ 24<br />
3.2.4 FOUNDATION Fieldbus ......................................................................................................... 24<br />
3.3 Protection category ........................................................................................................24<br />
4 Technical data 25<br />
4.1 Technical data................................................................................................................. 25<br />
5 Notes 31<br />
2 www.krohne.com 04/2011 - 4000050004 - QS OPTIWAVE <strong>7300</strong> R07 en
OPTIWAVE <strong>7300</strong> C<br />
SAFETY INSTRUCTIONS 1<br />
Warnings and symbols used<br />
DANGER!<br />
This information refers to the immediate danger when working with electricity.<br />
DANGER!<br />
These warnings must be observed without fail. Even partial disregard of this warning can lead to<br />
serious health problems and even death. There is also the risk of seriously damaging the device<br />
or parts of the operator's plant.<br />
WARNING!<br />
Disregarding this safety warning, even if only in part, poses the risk of serious health problems.<br />
There is also the risk of damaging the device or parts of the operator's plant.<br />
CAUTION!<br />
Disregarding these instructions can result in damage to the device or to parts of the operator's<br />
plant.<br />
INFORMATION!<br />
These instructions contain important information for the handling of the device.<br />
HANDLING<br />
• This symbol designates all instructions for actions to be carried out by the operator in the<br />
specified sequence.<br />
i<br />
RESULT<br />
This symbol refers to all important consequences of the previous actions.<br />
Safety instructions for the operator<br />
CAUTION!<br />
Installation, assembly, start-up and maintenance may only be performed by appropriately<br />
trained personnel. The regional occupational health and safety directives must always be<br />
observed.<br />
LEGAL NOTICE!<br />
The responsibility as to the suitability and intended use of this device rests solely with the user.<br />
The supplier assumes no responsibility in the event of improper use by the customer. Improper<br />
installation and operation may lead to loss of warranty. In addition, the "Terms and Conditions of<br />
Sale" apply which form the basis of the purchase contract.<br />
INFORMATION!<br />
• Further information can be found on the supplied CD-ROM in the manual, on the data sheet,<br />
in special manuals, certificates and on the manufacturer's website.<br />
• If you need to return the device to the manufacturer or supplier, please fill out the form<br />
contained on the CD-ROM and send it with the device. Unfortunately, the manufacturer<br />
cannot repair or inspect the device without the completed form.<br />
04/2011 - 4000050004 - QS OPTIWAVE <strong>7300</strong> R07 en<br />
www.krohne.com<br />
3
2 INSTALLATION<br />
OPTIWAVE <strong>7300</strong> C<br />
2.1 Intended use<br />
This radar level transmitter measures distance, level, mass, volume and reflectivity of liquids,<br />
pastes and slurries.<br />
It can be installed on tanks, reactors and open channels.<br />
2.2 Scope of delivery<br />
INFORMATION!<br />
Check the packing list to check if you received completely all that you ordered.<br />
Scope of delivery - horn antenna<br />
Figure 2-1: Scope of delivery - horn antenna<br />
1 Signal converter and antenna in compact version<br />
2 Antenna extensions (option)<br />
3 Quick Start<br />
4 CD-ROM (including Handbook, Quick Start, Technical Datasheet and related software)<br />
4<br />
www.krohne.com<br />
04/2011 - 4000050004 - QS OPTIWAVE <strong>7300</strong> R07 en
OPTIWAVE <strong>7300</strong> C<br />
INSTALLATION 2<br />
Scope of delivery - Drop antenna<br />
Figure 2-2: Scope of delivery - Drop antenna<br />
1 Signal converter and antenna in compact version<br />
2 Antenna extensions (option) and o-ring for each antenna extension<br />
3 Quick Start<br />
4 CD-ROM (including Handbook, Quick Start, Technical Datasheet, and related software)<br />
Scope of delivery - hygienic antenna<br />
Figure 2-3: Scope of delivery - hygienic antenna<br />
1 Signal converter and antenna in compact version<br />
2 Quick Start<br />
3 CD-ROM (including Handbook, Quick Start, Technical Datasheet, and related software)<br />
INFORMATION!<br />
No special tools or training required!<br />
04/2011 - 4000050004 - QS OPTIWAVE <strong>7300</strong> R07 en<br />
www.krohne.com<br />
5
2 INSTALLATION<br />
OPTIWAVE <strong>7300</strong> C<br />
2.3 Visual Check<br />
WARNING!<br />
If the display screen glass is broken, do not touch.<br />
INFORMATION!<br />
Inspect the cartons carefully for damage or signs of rough handling. Report damage to the<br />
carrier and to the local office of the manufacturer.<br />
Figure 2-4: Visual check<br />
1 Device nameplate (for more data, refer to the handbook)<br />
2 Process connection data (size and pressure rating, material reference and heat number)<br />
3 Gasket material data - refer to the illustration that follows<br />
Figure 2-5: Symbols for the supplied gasket material (on the side of the process connection)<br />
1 EPDM<br />
2 Kalrez ® 6375<br />
If the device is supplied with an FKM/FPM gasket, there is no symbol on the side of the process<br />
connection.<br />
INFORMATION!<br />
Look at the device nameplate to ensure that the device is delivered according to your order.<br />
Check for the correct supply voltage printed on the nameplate.<br />
INFORMATION!<br />
Compare the material references on the side of the process connection with the order.<br />
6<br />
www.krohne.com<br />
04/2011 - 4000050004 - QS OPTIWAVE <strong>7300</strong> R07 en
OPTIWAVE <strong>7300</strong> C<br />
INSTALLATION 2<br />
2.4 Storage<br />
WARNING!<br />
Do not keep the device in a vertical position. This will damage the antenna and the device will not<br />
measure correctly.<br />
Figure 2-6: Storage conditions<br />
1 When you put the device into storage, do not keep it in a vertical position<br />
2 Put the device on its side. We recommend that you use the packaging in which it was delivered.<br />
3 Storage temperature range: -40...+85°C / -40...+185°F<br />
• Store the device in a dry and dust-free location.<br />
• Keep the converter out of the sunlight.<br />
• Store the device in its original packing.<br />
04/2011 - 4000050004 - QS OPTIWAVE <strong>7300</strong> R07 en<br />
www.krohne.com<br />
7
2 INSTALLATION<br />
OPTIWAVE <strong>7300</strong> C<br />
2.5 Transport<br />
Figure 2-7: How to lift the device<br />
1 Remove the converter before you lift the device with a hoist.<br />
WARNING!<br />
Lift the device carefully to prevent damage to the antenna.<br />
2.6 Pre-installation requirements<br />
INFORMATION!<br />
Obey the precautions that follow to make sure that the device is correctly installed.<br />
• Make sure that there is sufficent space on all sides.<br />
• Protect the signal converter from direct sunlight. If necessary, install the weather protection<br />
accessory.<br />
• Do not subject the signal converter to heavy vibrations. The devices are tested for vibration<br />
and agree with EN 50178 and IEC 60068-2-6.<br />
8<br />
www.krohne.com<br />
04/2011 - 4000050004 - QS OPTIWAVE <strong>7300</strong> R07 en
OPTIWAVE <strong>7300</strong> C<br />
INSTALLATION 2<br />
2.7 How to prepare the tank before you install the device<br />
CAUTION!<br />
To avoid measuring errors and device malfunction, obey these precautions.<br />
2.7.1 Pressure and temperature ranges<br />
Figure 2-8: Pressure and temperature ranges<br />
1 Flange temperature<br />
FKM/FPM gasket: -40...+200°C / -40...+390°F; Kalrez ® 6375 gasket: -20...+200°C / -4...+390°F;<br />
EPDM gasket: -50...+150°C / -58...+300°F<br />
Depends on the antenna type. Refer to the table that follows.<br />
Ex devices: see supplementary operating instructions<br />
2 Ambient temperature for operation of the display<br />
-20...+60°C / -4...+140°F<br />
If the ambient temperature is not between these limits, the display screen switches off automatically<br />
3 Ambient temperature<br />
Non-Ex devices: -40...+80°C / -40...+175°F<br />
Ex devices: see supplementary operating instructions<br />
4 Process pressure<br />
Depends on the antenna type. Refer to the table that follows.<br />
WARNING!<br />
The process connection temperature range must agree with the temperature limits of the<br />
gasket material. The operating pressure range is subject to the process connection used and the<br />
flange temperature.<br />
Antenna type<br />
Maximum process connection<br />
temperature<br />
Maximum operating pressure<br />
[°C] [°F] barg psig<br />
PP Drop +100 +210 16 232<br />
PTFE Drop +150 +300 40 580<br />
Hygienic +150 +300 10 145<br />
Horn / Sheet metal horn +150 (+200) 1 +300 (+390) 1 40 (100) 2 580 (1450) 2<br />
1 Standard max. process connection temperature: +150°C / +300°F. Optional max. process temperature: +200°C /<br />
+390°F.<br />
2 Standard max. operating pressure: 40 barg / 580 psig. Optional max. operating pressure: 100 barg / 1450 psig.<br />
04/2011 - 4000050004 - QS OPTIWAVE <strong>7300</strong> R07 en<br />
www.krohne.com<br />
9
2 INSTALLATION<br />
OPTIWAVE <strong>7300</strong> C<br />
2.7.2 Theoretical data for nozzle position<br />
CAUTION!<br />
Follow these recommendations to make sure that the device measures correctly.<br />
Figure 2-9: Recommended nozzle position for liquids, pastes and slurries<br />
1 Nozzles for DN40 or DN50 Horn antennas, or DN50 Hygienic antenna<br />
2 Nozzles for DN80 or DN100 Horn antennas, or DN80 Drop antenna<br />
3 Tank height<br />
4 Tank diameter<br />
5 Minimum distance of nozzle from the tank wall : 1/7 × tank height<br />
Maximum distance of nozzle from the tank wall : 1/3 × tank diameter<br />
6 Minimum distance of nozzle from the tank wall : 1/10 × tank height<br />
Maximum distance of nozzle from the tank wall : 1/3 × tank diameter<br />
INFORMATION!<br />
If possible, do not install a nozzle on the tank centerline.<br />
CAUTION!<br />
Do not put the device near to the product inlet. If the product that enters the tank touches the<br />
antenna, the device will measure incorrectly. If the product fills the tank directly below the<br />
antenna, the device will also measure incorrectly.<br />
10<br />
www.krohne.com<br />
04/2011 - 4000050004 - QS OPTIWAVE <strong>7300</strong> R07 en
OPTIWAVE <strong>7300</strong> C<br />
INSTALLATION 2<br />
Figure 2-10: Product inlets<br />
1 The device is in the correct position.<br />
2 The device is too near to the product inlet.<br />
Figure 2-11: More than 1 FMCW radar level meter can be operated in a tank<br />
More than 1 FMCW radar level meter can be operated in a tank.<br />
2.7.3 Theoretical data for hygienic applications<br />
To make the cleaning of the antenna easier, attach the device to a short socket.<br />
Figure 2-12: Requirements for hygienic applications<br />
1 Maximum height of process connection: 50 mm / 2¨<br />
04/2011 - 4000050004 - QS OPTIWAVE <strong>7300</strong> R07 en<br />
www.krohne.com<br />
11
2 INSTALLATION<br />
OPTIWAVE <strong>7300</strong> C<br />
2.8 Installation recommendations for liquids<br />
2.8.1 General requirements<br />
INFORMATION!<br />
We recommend that you configure the device when the tank is empty.<br />
Figure 2-13: General Installation recommendations<br />
1 Do not tilt the device more than 2°<br />
2 If there are too many obstacles in the radar beam, do an empty spectrum scan (refer to the handbook) or install a bypass<br />
chamber or stilling well<br />
3 2.5 mm / 0.1¨ max. for high-dielectric constant liquids<br />
4 Curved and conical tank bottoms. Refer to the handbook for fine adjustment of the device.<br />
5 Radius of radar footprint (DN40 Horn antenna): increments of 180 mm/m or 2.15¨/ft (10°)<br />
Radius of radar footprint (DN50 Horn antenna or DN50 Hygienic antenna): increments of 130 mm/m or 1.55¨/ft (7.5°)<br />
Radius of radar footprint (DN80 Horn antenna): increments of 90 mm/m or 1.1¨/ft (5°)<br />
Radius of radar footprint (DN100 Horn antenna and DN80 Drop antenna): increments of 70 mm/m or 0.83¨/ft (4°)<br />
12<br />
www.krohne.com<br />
04/2011 - 4000050004 - QS OPTIWAVE <strong>7300</strong> R07 en
OPTIWAVE <strong>7300</strong> C<br />
INSTALLATION 2<br />
2.8.2 Standpipes<br />
Use a standpipe if:<br />
• There is highly conductive foam in the tank.<br />
• The liquid is very turbulent or agitated.<br />
• There are too many other objects in the tank.<br />
• The device is measuring a liquid (petro-chemicals) in a tank with a floating roof.<br />
For more data, refer to the Handbook.<br />
Figure 2-14: Installation recommendations for standpipes (stilling wells and bypass chambers)<br />
1 Stilling well<br />
2 Bypass chamber<br />
3 Air circulation hole<br />
4 <strong>Level</strong> of the liquid<br />
2.9 How to install the device on the tank<br />
2.9.1 How to install a device with a flange connection<br />
Equipment needed:<br />
• Device<br />
• Gasket (not supplied)<br />
• Nuts and bolts (not supplied)<br />
• Wrench (not supplied)<br />
04/2011 - 4000050004 - QS OPTIWAVE <strong>7300</strong> R07 en<br />
www.krohne.com<br />
13
2 INSTALLATION<br />
OPTIWAVE <strong>7300</strong> C<br />
Requirements for flange connections<br />
Figure 2-15: Flange connection<br />
• Make sure the flange on the nozzle is level.<br />
• Make sure that you use the applicable gasket for the flange dimensions and the process.<br />
• Align the gasket correctly on the flange facing of the nozzle.<br />
• Lower the antenna carefully into the tank.<br />
• Tighten the flange bolts.<br />
i Refer to local rules and regulations for the correct torque to apply to the bolts.<br />
For more data, refer to the handbook.<br />
2.9.2 How to install a device with a threaded connection<br />
Equipment needed:<br />
• Device<br />
• Gasket for G 1½ connection (not supplied)<br />
• 50 mm / 2¨ wrench (not supplied)<br />
Requirements for threaded connections<br />
Figure 2-16: Threaded connection<br />
14<br />
www.krohne.com<br />
04/2011 - 4000050004 - QS OPTIWAVE <strong>7300</strong> R07 en
OPTIWAVE <strong>7300</strong> C<br />
INSTALLATION 2<br />
• Make sure the tank connection is level.<br />
• Make sure that you use the applicable gasket for the connection dimensions and the process.<br />
• Align the gasket correctly.<br />
• Lower the antenna carefully into the tank.<br />
• Turn the threaded connection on the housing to attach the device to the process connection.<br />
• Tighten the connection.<br />
i Refer to local rules and regulations for the correct torque to apply to the connection.<br />
For more data, refer to the handbook.<br />
2.9.3 How to install a device with a hygienic connection<br />
INFORMATION!<br />
To make the cleaning of the antenna easier, attach the device to a short socket.<br />
BioControl ®<br />
Equipment needed:<br />
• Device<br />
• Gasket<br />
• Flange bolts (not supplied)<br />
• Wrench (not supplied)<br />
Figure 2-17: BioControl ® connection<br />
1 BioControl ® connection on the tank<br />
2 Flange bolts<br />
How to attach a device with a Biocontrol ® connection<br />
• Make sure the flange on the nozzle is level.<br />
• Make sure that you use the applicable gasket for the flange dimensions and the process.<br />
• Align the gasket correctly on the flange facing of the nozzle.<br />
• Lower the antenna carefully into the tank.<br />
• Tighten the flange bolts.<br />
i Refer to local rules and regulations for the correct torque to apply to the bolts.<br />
04/2011 - 4000050004 - QS OPTIWAVE <strong>7300</strong> R07 en<br />
www.krohne.com<br />
15
2 INSTALLATION<br />
OPTIWAVE <strong>7300</strong> C<br />
Tri-Clamp ®<br />
Equipment needed:<br />
• Device<br />
• Gasket (not supplied)<br />
• Band clamp (not supplied)<br />
Figure 2-18: Tri-Clamp ® connection<br />
1 Tank socket<br />
2 Band clamp<br />
• Make sure the tank connection is level.<br />
• Make sure that you use the applicable gasket for the connection dimensions and the process.<br />
• Align the gasket correctly.<br />
• Lower the antenna carefully into the tank.<br />
• Attach the band clamp to the process conection.<br />
• Tighten the band clamp.<br />
DIN 11851<br />
Equipment needed:<br />
• Device<br />
• Gasket (not supplied)<br />
• DIN 11851 nut<br />
Figure 2-19: DIN 11851 connection<br />
1 Tank socket<br />
2 Nut for DIN 11851 connection<br />
16<br />
www.krohne.com<br />
04/2011 - 4000050004 - QS OPTIWAVE <strong>7300</strong> R07 en
OPTIWAVE <strong>7300</strong> C<br />
INSTALLATION 2<br />
• Make sure the tank connection is level.<br />
• Make sure that you use the applicable gasket for the connection dimensions and the process.<br />
• Align the gasket correctly.<br />
• Lower the antenna carefully into the tank.<br />
• Turn the nut on the device process connection to attach the device to the tank.<br />
• Tighten the connection.<br />
i Refer to local rules and regulations for the correct torque to apply to the connection.<br />
SMS<br />
Equipment needed:<br />
• Device<br />
• Gasket (not supplied)<br />
• SMS nut<br />
Figure 2-20: SMS connection<br />
1 Tank socket<br />
2 Nut for SMS connection<br />
• Make sure the tank connection is level.<br />
• Make sure that you use the applicable gasket for the connection dimensions and the process.<br />
• Align the gasket correctly.<br />
• Lower the antenna carefully into the tank.<br />
• Turn the nut on the device process connection to attach the device to the tank.<br />
• Tighten the connection.<br />
i Refer to local rules and regulations for the correct torque to apply to the connection.<br />
2.9.4 How to attach antenna extensions<br />
Horn antenna - antenna extensions<br />
Figure 2-21: Horn antenna - how to attach antenna extensions<br />
04/2011 - 4000050004 - QS OPTIWAVE <strong>7300</strong> R07 en<br />
www.krohne.com<br />
17
2 INSTALLATION<br />
OPTIWAVE <strong>7300</strong> C<br />
Equipment needed:<br />
• 3 mm Allen wrench (not supplied)<br />
For more data, refer to the handbook.<br />
Drop antenna - antenna extensions<br />
Figure 2-22: Drop antenna - how to attach antenna extensions<br />
INFORMATION!<br />
Drop antenna: Antenna extensions can only be attached below flanges without the PP/PTFE<br />
flange plate option<br />
CAUTION!<br />
Drop antenna: Make sure that there are not more than 5 antenna extensions attached to a device<br />
with a Drop antenna. If there are more than 5 antenna extensions, the device will not measure<br />
correctly.<br />
Make sure that you put an o-ring 4 into the groove at the top of each antenna extension.<br />
Equipment needed (not supplied):<br />
• Torque wrench 200 Nm (for the H30 head of the Drop antenna sub-assembly)<br />
• 3 mm Allen wrench<br />
For more data, refer to the handbook.<br />
18<br />
www.krohne.com<br />
04/2011 - 4000050004 - QS OPTIWAVE <strong>7300</strong> R07 en
OPTIWAVE <strong>7300</strong> C<br />
INSTALLATION 2<br />
2.9.5 How to turn or remove the signal converter<br />
INFORMATION!<br />
The converter turns 360°.<br />
Figure 2-23: How to turn or remove the signal converter<br />
1 Tool: 5 mm Allen wrench (not supplied)<br />
2 Cover for the wave guide hole on top of the process connection assembly (not supplied)<br />
CAUTION!<br />
If you remove the housing, put a cover on the wave guide hole on top of the process connection<br />
assembly.<br />
When the housing is attached to the process connection assembly, tighten the lock screw.<br />
04/2011 - 4000050004 - QS OPTIWAVE <strong>7300</strong> R07 en<br />
www.krohne.com<br />
19
2 INSTALLATION<br />
OPTIWAVE <strong>7300</strong> C<br />
2.9.6 How to attach the weather protection to the device<br />
Equipment needed:<br />
• Device.<br />
• Weather protection (option).<br />
• 10 mm wrench (not supplied).<br />
The overall dimensions of the weather protection are in "Dimensions and weight" in the<br />
handbook.<br />
Figure 2-24: Installation of the weather protection<br />
• Loosen the bracket nuts on the weather protection.<br />
• Remove the bracket.<br />
• Lower the weather protection onto the device.<br />
• Turn the weather protection so that the keyhole points forward.<br />
• Attach the bracket.<br />
• Lift the weather protection to the top of the housing support pillar.<br />
• Hold the weather protection in the correct position and tighten the bracket nuts.<br />
20<br />
www.krohne.com<br />
04/2011 - 4000050004 - QS OPTIWAVE <strong>7300</strong> R07 en
OPTIWAVE <strong>7300</strong> C<br />
INSTALLATION 2<br />
2.9.7 How to open the weather protection<br />
Equipment needed:<br />
• Weather protection attached to the device.<br />
• Large slotted tip screwdriver (not supplied).<br />
Figure 2-25: How to open the weather protection<br />
1 Weather protection in its closed position<br />
2 Weather protection in its open position. Minimum clearance in front of the device: 300 mm / 12¨.<br />
• Put a large slotted tip screwdriver into the keyhole at the front of the weather protection. Turn<br />
the screwdriver counterclockwise.<br />
• Pull the top of weather protection up and forward.<br />
i This will open the weather protection.<br />
04/2011 - 4000050004 - QS OPTIWAVE <strong>7300</strong> R07 en<br />
www.krohne.com<br />
21
3 ELECTRICAL CONNECTIONS<br />
OPTIWAVE <strong>7300</strong> C<br />
3.1 Safety instructions<br />
DANGER!<br />
All work on the electrical connections may only be carried out with the power disconnected. Take<br />
note of the voltage data on the nameplate!<br />
DANGER!<br />
Observe the national regulations for electrical installations!<br />
DANGER!<br />
For devices used in hazardous areas, additional safety notes apply; please refer to the Ex<br />
documentation.<br />
WARNING!<br />
Observe without fail the local occupational health and safety regulations. Any work done on the<br />
electrical components of the measuring device may only be carried out by properly trained<br />
specialists.<br />
INFORMATION!<br />
Look at the device nameplate to ensure that the device is delivered according to your order.<br />
Check for the correct supply voltage printed on the nameplate.<br />
3.2 Electrical installation: outputs 1 and 2<br />
Figure 3-1: Electrical installation<br />
1 Terminal compartment cover<br />
2 Output 1: current output -<br />
3 Output 1: current output +<br />
4 Grounding terminal in the housing<br />
5 Output 2: current output - (option)<br />
6 Output 2: current output + (option)<br />
7 Grounding terminal between the process connection and the converter<br />
Output 1 energizes the device and is used for HART ® communication. If the device has the<br />
second current output option, use a separate power supply to energize output 2.<br />
22<br />
www.krohne.com<br />
04/2011 - 4000050004 - QS OPTIWAVE <strong>7300</strong> R07 en
OPTIWAVE <strong>7300</strong> C<br />
ELECTRICAL CONNECTIONS 3<br />
Procedure:<br />
• Remove the housing terminal compartment cover 1.<br />
• Connect the wires to the device. Obey the national electrical codes.<br />
• Make sure that the polarity of the wires is correct.<br />
• Attach the ground to 4 or 7. Both terminals are technically equivalent.<br />
3.2.1 Non-Ex devices<br />
Figure 3-2: Electrical connections for non-Ex devices<br />
1 Power supply<br />
2 Resistor for HART ® communication<br />
3 Output 1: 14...30 VDC for an output of 22 mA at the terminal<br />
4 Output 2: 10...30 VDC for an output of 22 mA at the terminal<br />
3.2.2 Devices for hazardous locations<br />
DANGER!<br />
For electrical data for device operation in hazardous locations, refer to the related certificates of<br />
compliance and supplementary instructions (ATEX, IECEx, FM, CSA, ...). You can find this<br />
documentation on the CD-ROM delivered with the device or it can be downloaded free of charge<br />
from the website (Download Center).<br />
04/2011 - 4000050004 - QS OPTIWAVE <strong>7300</strong> R07 en<br />
www.krohne.com<br />
23
3 ELECTRICAL CONNECTIONS<br />
OPTIWAVE <strong>7300</strong> C<br />
3.2.3 PROFIBUS PA<br />
For electrical data for PROFIBUS PA networks, refer to the PROFIBUS PA supplement. You can<br />
find this documentation on the CD-ROM delivered with the device or it can be downloaded free of<br />
charge from the website (Downloadcenter).<br />
3.2.4 FOUNDATION Fieldbus<br />
For electrical data for FOUNDATION Fieldbus networks, refer to the FOUNDATION Fieldbus<br />
supplement. You can find this documentation on the CD-ROM delivered with the device or it can<br />
be downloaded free of charge from the website (Downloadcenter).<br />
3.3 Protection category<br />
INFORMATION!<br />
The device fulfills all requirements per protection category IP 66/67 (equivalent to NEMA type 4X<br />
(housing) and type 6P (antenna)).<br />
DANGER!<br />
Make sure that the cable gland is watertight.<br />
Figure 3-3: How to make the installation agree with protection category IP 67<br />
• Make sure that the gaskets are not damaged.<br />
• Make sure that the electrical cables are not damaged.<br />
• Make sure that the electrical cables agree with the national electrical code.<br />
• The cables are in a loop in front of the device 1 so water does not go into the housing.<br />
• Tighten the cable feedthroughs 2.<br />
• Close unused cable feedthroughs with dummy plugs 3.<br />
24<br />
www.krohne.com<br />
04/2011 - 4000050004 - QS OPTIWAVE <strong>7300</strong> R07 en
OPTIWAVE <strong>7300</strong> C<br />
TECHNICAL DATA 4<br />
4.1 Technical data<br />
INFORMATION!<br />
• The following data is provided for general applications. If you require data that is more<br />
relevant to your specific application, please contact us or your local representative.<br />
• Additional information (certificates, special tools, software,...) and complete product<br />
documentation can be downloaded free of charge from the website (Download Center).<br />
Measuring system<br />
Measuring principle<br />
Application range<br />
Primary measured value<br />
Secondary measured value<br />
2-wire loop-powered level transmitter; K-band (24...26 GHz) FMCW radar<br />
<strong>Level</strong> measurement of liquids, pastes and slurries<br />
Δf (change in frequency) between the emitted and received signal<br />
Distance, level, volume, mass and reflectivity<br />
Design<br />
Construction<br />
Options<br />
The measurement system consists of a measuring sensor (antenna) and a signal<br />
converter which is only available in a compact version<br />
Integrated LCD display with sun cover (-20..+60°C /-4…+140°F); if the ambient<br />
temperature is not in these limits, the display switches off<br />
2nd current output<br />
FOUNDATION Fieldbus output (4-wire device with local HART communication)<br />
PROFIBUS PA output (4-wire device with local HART communication)<br />
PTFE/PP flange plate protection (for Drop antennas without antenna extensions<br />
only)<br />
Distance piece (for process temperature: +150...+200°C / +300...+390°F) 1<br />
Antenna purging system (supplied with a ¼ NPTF connection)<br />
Accessories<br />
Weather protection<br />
Antenna extensions of 105 mm / 4.1¨ length (Max length for Drop antenna versions:<br />
525 mm / 20.7¨; not available for the Hygienic antenna)<br />
Max. measuring range<br />
80 m / 260 ft<br />
Depends on the antenna option, dielectric constant of the product and installation<br />
type. Refer also to "Antenna selection".<br />
Min. tank height<br />
0.2 m / 8¨ (1 m / 40¨ for hygienic antenna)<br />
Dead zone<br />
Antenna extension length + antenna length + 0.1 m / 4¨ (500 mm / 20¨ for hygienic<br />
antenna)<br />
Beam angle of antenna Horn DN40 / 1.5¨: 20°<br />
Horn DN50 / 2¨: 15°<br />
Horn / Sheet metal horn DN80 / 3¨: 10°<br />
Horn / Sheet metal horn DN100 / 4¨: 8°<br />
Drop DN80 / 3¨: 8°<br />
Hygienic DN50 / 2¨: 15°<br />
Display and user interface<br />
Display<br />
LCD display<br />
9 lines, 160 × 160 pixels in 8-step grayscale with 4-button keypad<br />
Interface languages<br />
English, German, French, Italian, Spanish, Portuguese, Japanese, Chinese<br />
(Mandarin) and Russian<br />
04/2011 - 4000050004 - QS OPTIWAVE <strong>7300</strong> R07 en<br />
www.krohne.com<br />
25
4 TECHNICAL DATA<br />
OPTIWAVE <strong>7300</strong> C<br />
Measuring accuracy<br />
Resolution 1mm/ 0.04¨<br />
Repeatability<br />
Accuracy<br />
Reference conditions acc. to EN 60770<br />
Temperature<br />
Pressure<br />
±1 mm/ ±0.04¨<br />
Relative air humidity 60% ±15%<br />
Target<br />
±3 mm/ ±0.12¨, when distance < 10 m / 33 ft;<br />
±0.03% of measured distance, when distance > 10 m / 33 ft<br />
+20°C ±5°C / +70°F ±10°F<br />
1013 mbara ±20 mbar / 14.69 psia ±0.29 psi<br />
Metal plate in an anechoic chamber<br />
Operating conditions<br />
Temperature<br />
Ambient temperature<br />
Storage temperature<br />
Process connection temperature<br />
Pressure<br />
Operating pressure<br />
-40…+80°C / -40…+175°F (according to the temperature limits of the gasket<br />
material. Refer to "Materials" in this table.)<br />
Ex: see supplementary operating instructions or approval certificates<br />
-40…+85°C / -40…+185°F<br />
Horn / Sheet metal horn antenna:<br />
Standard: -50…+150°C /-58…+300°F<br />
Option: -50…+200°C/-58…+390°F<br />
(the process connection temperature must agree with the temperature limits of the<br />
gasket material. Refer to "Materials" in this table.)<br />
Ex: see supplementary operating instructions or approval certificates<br />
Drop antenna (PTFE):<br />
-50…+150°C/-58…+300°F (the process connection temperature must agree with<br />
the temperature limits of the gasket material. Refer to "Materials" in this table.)<br />
Ex: see supplementary operating instructions or approval certificates<br />
Drop antenna (PP):<br />
-40…+100°C/-40…+210°F (the process connection temperature must agree with<br />
the temperature limits of the gasket material. Refer to "Materials" in this table.)<br />
Ex: see supplementary operating instructions or approval certificates<br />
Hygienic antenna (PEEK):<br />
-20…+150°C/-4…+300°F (the process connection temperature must agree with<br />
the temperature limits of the gasket material. Refer to "Materials" in this table.)<br />
Ex: see supplementary operating instructions or approval certificates<br />
Drop antenna (PP):<br />
-1…16 barg / -14.5…232 psig;<br />
subject to process connection used and flange temperature<br />
Drop antenna (PTFE):<br />
-1…40 barg / -14.5…580 psig;<br />
subject to process connection used and flange temperature<br />
Hygienic antenna (PEEK):<br />
-1…10 barg / -14.5…145 psig;<br />
subject to process connection used and flange temperature<br />
Horn / Sheet metal horn antenna:<br />
Standard: -1…40 barg / -14.5…580 psig;<br />
Option: -1…100 barg / -14.5…1450 psig;<br />
subject to process connection used and flange temperature<br />
26<br />
www.krohne.com<br />
04/2011 - 4000050004 - QS OPTIWAVE <strong>7300</strong> R07 en
OPTIWAVE <strong>7300</strong> C<br />
TECHNICAL DATA 4<br />
Other conditions<br />
Dielectric constant (ε r ) ≥1.5<br />
Vibration resistance IEC 60068-2-6 and EN 50178 (10...57 Hz: 0.075 mm / 57...150 Hz:1g)<br />
Ingress protection IP 66/67 equivalent to NEMA type 4X (housing) and type 6P (antenna)<br />
Installation conditions<br />
Process connection size<br />
Process connection position<br />
Dimensions and weights<br />
The nominal diameter (DN) should be equal to or larger than the antenna diameter.<br />
If the nominal diameter (DN) is smaller than the antenna, either:<br />
- provide the means to adapt the device to a larger process connection on the tank<br />
(for example, a plate with a slot), or<br />
- use the same process connection, but remove the antenna from the device before<br />
installation and fit it from inside the tank.<br />
Make sure that there are not any obstructions directly below the process<br />
connection for the device.<br />
Refer to "Technical data: Dimensions and weights" in the Handbook.<br />
Materials<br />
Housing<br />
Standard: Aluminium with a polyester topcoat<br />
Option: Stainless steel (1.4404 / 316L) 2<br />
Wetted parts, including antenna Standard for Horn / Sheet metal horn antenna: Stainless steel (1.4404 / 316L)<br />
Process connection<br />
Gaskets (and o-rings for the<br />
sealed antenna extension option)<br />
Feedthrough<br />
Option for Horn antenna: Hastelloy ® C-22 (2.4602) 3<br />
Standard for Drop antenna: PTFE; PP<br />
Option for Drop antenna: PP or PTFE flange plate protection<br />
Hygienic antenna: PEEK - this material agrees with FDA regulations<br />
Standard for Horn, Sheet metal horn and Drop antennas:<br />
Stainless steel (1.4404 / 316L) - a PP or PTFE flange plate protection option is also<br />
available for the Drop antenna<br />
Standard for Hygienic antenna: PEEK<br />
Option: Hastelloy ® C-22 (2.4602) - for Horn antennas only<br />
Hygienic antenna:<br />
BioControl ® : FKM/FPM (-20…+150°C/-4…+300°F); EPDM (-20°C…+150°C /<br />
-4…+300°F)<br />
SMS, Tri-Clamp ® , DIN 11851: without 4<br />
PTFE Drop antenna:<br />
FKM/FPM (-40…+150°C/-40…+300°F); Kalrez ® 6375 (-20…+150°C/-4…+300°F);<br />
EPDM (-50°C…+150°C /-58…+300°F) 5<br />
PP Drop antenna:<br />
FKM/FPM (-40…+100°C/-40…+210°F); Kalrez ® 6375 (-20…+100°C/-4…+210°F);<br />
EPDM (-40°C…+100°C /-40…+210°F) 5<br />
Horn / Sheet metal horn antenna:<br />
FKM/FPM (-40…+200°C/-40…+390°F); Kalrez ® 6375 (-20…+200°C/-4…+390°F);<br />
EPDM (-50°C…+150°C /-58…+300°F) 5<br />
Standard: PEI (-50...+200°C / -58...+390°F - max. range. The feedthrough<br />
temperature limits must agree with the temperature limits of the gasket material<br />
and antenna type. If the distance piece option is not attached, the maximum<br />
temperature is 150°C / 300°F.)<br />
Option: Metaglas ® (-30...+200°C / -22...+390°F - max. range. The feedthrough<br />
temperature limits must agree with the temperature limits of the gasket material<br />
and antenna type. If the distance piece option is not attached, the maximum<br />
temperature is 150°C / 300°F.) 6<br />
Weather protection (Option) Stainless steel (1.4301 / 304)<br />
04/2011 - 4000050004 - QS OPTIWAVE <strong>7300</strong> R07 en<br />
www.krohne.com<br />
27
4 TECHNICAL DATA<br />
OPTIWAVE <strong>7300</strong> C<br />
Process connections<br />
Thread<br />
Flange version<br />
EN<br />
ASME<br />
JIS<br />
Hygienic<br />
Other<br />
G1½; 1½ NPT<br />
DN40…150 in PN16, PN40, PN63 or PN100; others on request<br />
1½¨…8¨ in 150 lb, 1½¨...6¨ in 300 lb, 1½¨...4¨ in 600 lb or 900 lb; others on request<br />
40…100A in 10K; others on request<br />
BioControl ® DN50; Tri-Clamp ® 2¨; DIN 11851 DN50; SMS 51; others on request<br />
Others on request<br />
Electrical connections<br />
Power supply Terminals output 1 - Non-Ex / Ex i:<br />
14…30 VDC; min./max. value for an output of 22 mA at the terminal<br />
Terminals output 1 - Ex d:<br />
20…36 VDC; min./max. value for an output of 22 mA at the terminal<br />
Terminals output 2 - Non-Ex / Ex i / Ex d<br />
10…30 VDC; min./max. value for an output of 22 mA at the terminal (additional<br />
power supply needed - output only)<br />
Cable entry<br />
M20×1.5; ½ NPT<br />
G ½ (not for FM- and CSA-approved devices. Not for stainless steel housings.)<br />
M25×1.5 (for stainless steel housings only)<br />
Cable gland<br />
Standard: none<br />
Options: M20×1.5 (for non-Ex and Ex -approved devices with M20×1.5 and M25×1.5<br />
cable entries); others are available on request<br />
Cable entry capacity (terminal) 0.5…1.5 mm²<br />
Input and output<br />
Current output<br />
Output signal<br />
(Output 1)<br />
4…20 mA HART ® or 3.8…20.5 mA acc. to NAMUR NE 43 7<br />
Output signal<br />
(Output 2 - optional)<br />
4…20 mA (no HART ® signal) or 3.8…20.5 mA acc. to NAMUR NE 43<br />
Resolution ±3 µA<br />
Temperature drift<br />
Typically 50 ppm/K<br />
Error signal High: 22 mA; Low: 3.6 mA acc. to NAMUR NE 43<br />
PROFIBUS PA<br />
Type<br />
4-wire (+ local HART) level transmitter; K-band FMCW radar<br />
Function blocks<br />
7 (level, distance, level conversion, level mass, reflection, ullage conversion and<br />
distance mass)<br />
Protocol / Communication PROFIBUS PA protocol that agrees with IEC 61158-2, galvanically isolated<br />
standard<br />
Physical layer types<br />
Standard power signaling, bus powered, non I.S.<br />
Other features<br />
Bus interface with integrated reverse polarity protection<br />
Device power supply (24 V input) 18...30 VDC<br />
Current consumption on 20 mA<br />
PROFIBUS network<br />
Output data<br />
<strong>Level</strong>, distance, level conversion, level mass, reflection, ullage conversion or<br />
distance mass<br />
Input data<br />
None<br />
28<br />
www.krohne.com<br />
04/2011 - 4000050004 - QS OPTIWAVE <strong>7300</strong> R07 en
OPTIWAVE <strong>7300</strong> C<br />
TECHNICAL DATA 4<br />
Error current FDE<br />
Typically 0 mA (FDE =Fault Disconnection Electronic)<br />
Address range 0...125. Default address: 126.<br />
FOUNDATION Fieldbus<br />
Type<br />
Function blocks<br />
Protocol / Communication<br />
standard<br />
4-wire (+ local HART) level transmitter; K-band FMCW radar<br />
1 × Resource Block (RB), 4 × Analog Input Blocks (RB), 1 × Transducer Block (TB)<br />
Analog Input Block: 50 ms<br />
Foundation Fieldbus protocol that agrees with IEC 61158-2, galvanically isolated<br />
ITK version 5.1<br />
Physical layer types<br />
Standard power signaling, bus powered, non I.S.<br />
Other features<br />
Bus interface with integrated reverse polarity protection<br />
Device power supply (24 V input) 18...30 VDC<br />
Bus power supply<br />
9...32 VDC (non-Ex); 9...17.5 VDC (intrinsically-safe)<br />
Basic current<br />
20 mA<br />
Maximum error current<br />
20 mA<br />
Start current after 10 ms 20 mA<br />
Polarity sensitivity<br />
Yes<br />
Minimum cycle time<br />
100 ms<br />
Output data<br />
<strong>Level</strong>, distance, level conversion, level mass, reflection, ullage conversion or<br />
distance mass<br />
Input data<br />
None<br />
Error current FDE<br />
Typically 0 mA (FDE =Fault Disconnection Electronic)<br />
Link Master function<br />
Not supported<br />
Approvals and certification<br />
CE<br />
This device fulfils the statutory requirements of the EC directives. The<br />
manufacturer certifies successful testing of the product by applying the CE mark.<br />
Explosion protection<br />
ATEX<br />
II 1 G, 1/2 G, 2 G Ex ia IIC T6...T3;<br />
KEMA 04ATEX1218 X<br />
II 1 D, 1/2 D, 2 D Ex iaD 20 or Ex iaD 20/21 IP6X T70°C...T95°C;<br />
II 1/2 G, 2 G Ex d[ia] IIC T6...T3;<br />
II 1/2 D, 2 D Ex tD[iaD] A21/20 IP6X T70°C...T95°C;<br />
II 3 G Ex nA II T6…T3 X<br />
IECEx<br />
Ga Ex ia IIC T6…T3; Ex iaD 20 IP6X T70°C…T 95°C;<br />
IECEx KEM 06.0025 X<br />
Ga/Gb Ex d[ia] IIC T6…T3; Ex tD[iaD] A21/20 IP6X T70°C…T 95°C<br />
FM - Dual Seal-approved NEC 500<br />
XP-IS / Cl. I / Div. 1 / Gr. ABCD / T6;<br />
DIP / Cl. II/III / Div. 1 / Gr. EFG / T6;<br />
IS / Cl. I/II/III / Div. 1 / Gr. ABCDEFG / T6;<br />
NI / Cl. I / Div. 2 / Gr. ABCD / T6<br />
NEC 505<br />
XP-IS / Cl. I / Zone 0 / AEx d[ia] IIC T6;<br />
IS / Cl. I / Zone 0 / AEx ia IIC T6;<br />
NI / Cl. I / Zone 2 / AEx nA[ia] IIC T6<br />
Hazardous (Classified) Locations, indoor/outdoor Type 4X and 6P, IP66, Dual Seal<br />
04/2011 - 4000050004 - QS OPTIWAVE <strong>7300</strong> R07 en<br />
www.krohne.com<br />
29
4 TECHNICAL DATA<br />
OPTIWAVE <strong>7300</strong> C<br />
CSA - Dual Seal-approved<br />
NEPSI<br />
GYJ111193/94<br />
CEPEL / INMETRO<br />
CEPEL-EX-1996/11X<br />
Other standards and approvals<br />
EMC<br />
R & TTE<br />
CEC Section 18 (Zone ratings)<br />
Cl. I, Zone 1, Ex d, IIC (Antenna: Zone 0) T6;<br />
Cl. I, Zone 0, Ex ia, IIC T6;<br />
Cl. I, Zone 2, Ex nA, IIC T6<br />
CEC Section 18 and Annex J (Division ratings)<br />
XP-IS, Cl. I, Div. 2, Gr. ABCD; Cl. II, Div. 2, Gr. FG; Cl. III, Div. 2 T6;<br />
IS, Cl. I, Div. 1, Gr. ABCD; Cl. II, Gr. FG; Cl. III T6<br />
Ex dia IIC T3~T6 DIP A21/A20 T A T70°C~T95°C IP6X;<br />
Ex ia IIC T3~T6 DIP A21/A20 T A T70°C~T95°C IP6X<br />
BR-Ex ia IIC T6…T3 Ga<br />
Ex ia IIIC T95°C Da IP67<br />
BR-Ex d[ia] IIC T6…T3 Gb<br />
Ex t[ia Da] IIIC T95°C Db IP67<br />
Electromagnetic Compatibility Directive 2004/108/EC in conjunction with<br />
EN 61326-1 (2006)<br />
Radio Equipment and Telecommunications Terminal Equipment Directive<br />
1999/5/EC in conjunction with ESTI EN 302 372 (2006)<br />
FCC Rules Part 15<br />
Industry Canada<br />
RSS-210<br />
LVD Low-Voltage Directive 2006/95/EC in conjunction with EN 61010-1 (2001)<br />
NAMUR<br />
NAMUR NE 21 Electromagnetic Compatibility (EMC) of Industrial Process and<br />
Laboratory Control Equipment<br />
NAMUR NE 43 Standardization of the Signal <strong>Level</strong> for the Failure Information of<br />
Digital Transmitters<br />
WHG (pending) In conformity with the German Federal Water Act, §9<br />
CRN<br />
This certification is for all Canadian provinces and territories. For more data, refer<br />
to the website.<br />
Construction code<br />
On request: NACE MR0175 / ISO 15156; NACE MR0103<br />
1 The device has a distance piece if it has the flange options that follow: 6¨ in 300 lb, 3¨...4¨ in 600 lb and 1½¨...4¨ in 900 lb<br />
2 This option is not available for FM- or CSA-approved devices<br />
3 Hastelloy® is a registered trademark of Haynes International, Inc.<br />
4 Tri-Clamp® is a registered trademark of Ladish Co., Inc. BioControl® is a registered trademark of Neumo-Ehrenberg-Group.<br />
5 Kalrez® is a registered trademark of DuPont Performance Elastomers L.L.C.<br />
6 Metaglas® is a registered trademark of Herberts Industrieglas, GMBH & Co., KG<br />
7 HART® is a registered trademark of the HART Communication Foundation<br />
30<br />
www.krohne.com<br />
04/2011 - 4000050004 - QS OPTIWAVE <strong>7300</strong> R07 en
OPTIWAVE <strong>7300</strong> C<br />
NOTES 5<br />
04/2011 - 4000050004 - QS OPTIWAVE <strong>7300</strong> R07 en<br />
www.krohne.com<br />
31
KROHNE product overview<br />
© KROHNE 04/2011 - 4000050004 - QS OPTIWAVE <strong>7300</strong> R07 en - Subject to change without notice.<br />
• Electromagnetic flowmeters<br />
• Variable area flowmeters<br />
• Ultrasonic flowmeters<br />
• Mass flowmeters<br />
• Vortex flowmeters<br />
• Flow controllers<br />
• <strong>Level</strong> meters<br />
• Temperature meters<br />
• Pressure meters<br />
• Analysis products<br />
• Measuring systems for the oil and gas industry<br />
• Measuring systems for sea-going tankers<br />
Head Office KROHNE Messtechnik GmbH<br />
Ludwig-<strong>Krohne</strong>-Str. 5<br />
D-47058 Duisburg (Germany)<br />
Tel.:+49 (0)203 301 0<br />
Fax:+49 (0)203 301 10389<br />
info@krohne.de<br />
The current list of all KROHNE contacts and addresses can be found at:<br />
www.krohne.com


