Kenwood TH-D7A
Kenwood TH-D7A Kenwood TH-D7A
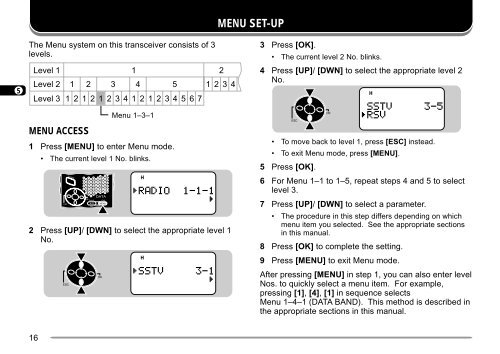
MENU SET-UP 1 2 3 4 5 6 7 8 9 10 11 12 13 14 15 16 17 18 19 20 21 22 23 The Menu system on this transceiver consists of 3 levels. Level 1 1 2 Level 2 1 2 3 4 5 1234 Level 3 12121234121234567 MENU ACCESS Menu 1–3–1 1 Press [MENU] to enter Menu mode. • The current level 1 No. blinks. STA CON PACKET96 BCONDUP 7 9 2 Press [UP]/ [DWN] to select the appropriate level 1 No. 5 5 STA CON PACKET96 BCONDUP 7 9 3 Press [OK]. • The current level 2 No. blinks. 4 Press [UP]/ [DWN] to select the appropriate level 2 No. 5 STA CON PACKET96 BCONDUP 7 9 • To move back to level 1, press [ESC] instead. • To exit Menu mode, press [MENU]. 5 Press [OK]. 6 For Menu 1–1 to 1–5, repeat steps 4 and 5 to select level 3. 7 Press [UP]/ [DWN] to select a parameter. • The procedure in this step differs depending on which menu item you selected. See the appropriate sections in this manual. 8 Press [OK] to complete the setting. 9 Press [MENU] to exit Menu mode. After pressing [MENU] in step 1, you can also enter level Nos. to quickly select a menu item. For example, pressing [1], [4], [1] in sequence selects Menu 1–4–1 (DATA BAND). This method is described in the appropriate sections in this manual. 16
MENU CONFIGURATION Level 1 Level 2 Level 3 1 RADIO 1 DISPLAY 2 SAVE 3 DTMF 4 TNC 5 AUX Selections Default Ref. page 1 P ower-ON Message S ee reference page. HELLO !! 50 2 C ontrast Level 1 (min.) ~ 16 (max.) Level 8 48 1 Battery Saver Interval 2 Automatic Power Off (APO) 0.2/ 0.4/ 0.6/ 0.8/ 1.0/ 2.0/ 3.0/ 4.0/ 5.0 sec./ OFF 1.0 sec. 49 30/ 60 minutes/ OFF 30 minutes 49 1 N umber Store S ee reference page. — 42 2 TX speed 3 TX Hold 4 Pause 1 Data band select 2 DCD sense 1 Automatic Repeater Offset 2 Scan Resume 3 Beep function 4 Tuning Enable 5 TX Inhibit 6 Advanced (TH-D7A) Intercept Point Fast/ Slow ON/ OFF 100/ 250/ 500/ 750/ 1000/ 1500/ 2000 msec. Band Both only ON/ OFF A/ Band B bands/ Data band Time-Operated/ Carrier-Operated/ Seek OFF/ KEY/ KEY+NEW DATA/ ALL ON/ OFF ON/ OFF ON/ OFF Fast 43 OFF 41 500 msec. 43 Band A 55 Data band only 55 ON 23 Time- Operated ALL 34 47,56, 63,77 OFF 50 OFF 51 OFF 51 17 1 2 3 4 5 6 7 8 9 10 11 12 13 14 15 16 17 18 19 20 21 22 23
- Page 1 and 2: INSTRUCTION MANUAL 144/440 MHz FM D
- Page 3 and 4: NOTICES TO THE USER ATTENTION (U.S.
- Page 5 and 6: CHAPTER 8 SCAN SELECTING SCAN RESUM
- Page 7 and 8: SUPPLIED ACCESSORIES Antenna Access
- Page 9 and 10: PC GPS PC GPS PC GPS The following
- Page 11 and 12: CONNECTING WITH A REGULATED POWER S
- Page 13 and 14: OPERATING BASICS SWITCHING POWER ON
- Page 15 and 16: TRANSMITTING 1 To transmit, press a
- Page 17 and 18: INDICATORS On the upper section of
- Page 19 and 20: BASIC TRANSCEIVER MODES This sectio
- Page 21 and 22: KEYPAD DIRECT ENTRY The keypad allo
- Page 23: First select the desired band. Key
- Page 27 and 28: Level 1 Level 2 3 SSTV 4 SKY CMD (T
- Page 29 and 30: PROGRAMMING OFFSET First select ban
- Page 31 and 32: AUTOMATIC REPEATER OFFSET This func
- Page 33 and 34: TONE FREQ. ID This function scans t
- Page 35 and 36: STORING SIMPLEX FREQUENCIES OR STAN
- Page 37 and 38: NAMING A MEMORY CHANNEL You can nam
- Page 39 and 40: MEMORY-TO-VFO TRANSFER You may some
- Page 41 and 42: SCAN Scan is a useful feature for h
- Page 43 and 44: VFO SCAN VFO Scan monitors all freq
- Page 45 and 46: PROGRAM SCAN Program Scan is identi
- Page 47 and 48: CONTINUOUS TONE CODED SQUELCH SYSTE
- Page 49 and 50: DUAL TONE MULTI-FREQUENCY (DTMF) FU
- Page 51 and 52: ■ Transmitting a Stored DTMF Numb
- Page 53 and 54: AUXILIARY FUNCTIONS DIRECT FREQUENC
- Page 55 and 56: TONE ALERT Tone Alert provides an a
- Page 57 and 58: AUTOMATIC POWER OFF (APO) Automatic
- Page 59 and 60: TX INHIBIT You can disable the tran
- Page 61 and 62: CONNECTING WITH A PERSONAL COMPUTER
- Page 63 and 64: SELECTING DATA BAND This transceive
- Page 65 and 66: SLOW-SCAN TELEVISION (SSTV) WITH VC
- Page 67 and 68: SELECTING COLOR FOR CALL SIGN/ MESS
- Page 69 and 70: AUTOMATIC PACKET/ POSITION REPORTIN
- Page 71 and 72: RECEIVING APRS DATA Each time new A
- Page 73 and 74: This transceiver is capable of disp
MENU SET-UP<br />
1<br />
2<br />
3<br />
4<br />
5<br />
6<br />
7<br />
8<br />
9<br />
10<br />
11<br />
12<br />
13<br />
14<br />
15<br />
16<br />
17<br />
18<br />
19<br />
20<br />
21<br />
22<br />
23<br />
The Menu system on this transceiver consists of 3<br />
levels.<br />
Level 1 1 2<br />
Level 2 1 2 3 4 5 1234<br />
Level 3 12121234121234567<br />
MENU ACCESS<br />
Menu 1–3–1<br />
1 Press [MENU] to enter Menu mode.<br />
• The current level 1 No. blinks.<br />
STA CON PACKET96 BCONDUP<br />
7 9<br />
2 Press [UP]/ [DWN] to select the appropriate level 1<br />
No.<br />
5<br />
5<br />
STA CON PACKET96 BCONDUP<br />
7 9<br />
3 Press [OK].<br />
• The current level 2 No. blinks.<br />
4 Press [UP]/ [DWN] to select the appropriate level 2<br />
No.<br />
5<br />
STA CON PACKET96 BCONDUP<br />
7 9<br />
• To move back to level 1, press [ESC] instead.<br />
• To exit Menu mode, press [MENU].<br />
5 Press [OK].<br />
6 For Menu 1–1 to 1–5, repeat steps 4 and 5 to select<br />
level 3.<br />
7 Press [UP]/ [DWN] to select a parameter.<br />
• The procedure in this step differs depending on which<br />
menu item you selected. See the appropriate sections<br />
in this manual.<br />
8 Press [OK] to complete the setting.<br />
9 Press [MENU] to exit Menu mode.<br />
After pressing [MENU] in step 1, you can also enter level<br />
Nos. to quickly select a menu item. For example,<br />
pressing [1], [4], [1] in sequence selects<br />
Menu 1–4–1 (DATA BAND). This method is described in<br />
the appropriate sections in this manual.<br />
16


