Optima Canopy group configurations instructions - Armstrong
Optima Canopy group configurations instructions - Armstrong
Optima Canopy group configurations instructions - Armstrong

Create successful ePaper yourself
Turn your PDF publications into a flip-book with our unique Google optimized e-Paper software.
ENGLISH<br />
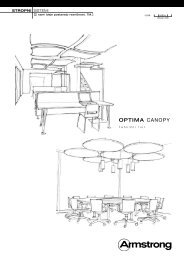
C1<br />
1219 mm<br />
1219 mm<br />
C2<br />
1219 mm<br />
1219 mm<br />
1219 mm<br />
108 mm<br />
1219 mm<br />
51 mm<br />
1219 mm<br />
108 mm<br />
1219 mm<br />
51 mm<br />
171 mm 171 mm<br />
51 mm 51 mm<br />
1219 mm 1219 mm<br />
C3 1219 mm 1219 mm<br />
C4<br />
1219 mm<br />
51 mm<br />
1219 mm<br />
51mm<br />
1219 mm<br />
51 mm<br />
1219 mm<br />
51mm<br />
51 mm 51 mm<br />
51mm<br />
51mm<br />
C5<br />
1219 mm<br />
1219 mm<br />
1219 mm<br />
1219 mm<br />
210 mm<br />
210 mm<br />
x = panel hook locations during installation<br />
• = recommended hanging point location<br />
Frame lengths:<br />
1 3150 mm<br />
Notes:<br />
Add or subtract 102 mm to frame length dimensions for each<br />
51 mm increase / decrease in spacing between panels.<br />
As visual spacing increases, use 254 mm splice as needed.<br />
General notes:<br />
Always hang <strong>group</strong>ing frame from lower frame member.<br />
Hanging point spacing along frame not to exceed 1219 mm.<br />
57 mm 57 mm<br />
8