NOZZLES FOR SPRAY DRYING - BETE Fog Nozzle, Inc.
NOZZLES FOR SPRAY DRYING - BETE Fog Nozzle, Inc.
NOZZLES FOR SPRAY DRYING - BETE Fog Nozzle, Inc.

Create successful ePaper yourself
Turn your PDF publications into a flip-book with our unique Google optimized e-Paper software.
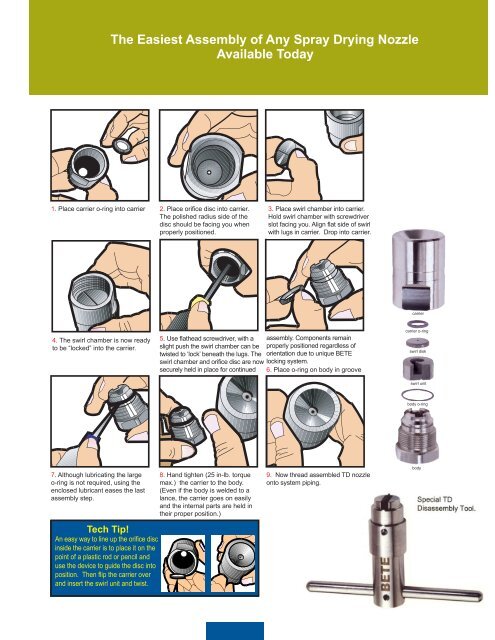
The Easiest Assembly of Any Spray Drying <strong>Nozzle</strong><br />
Available Today<br />
1. Place carrier o-ring into carrier 2. Place orifice disc into carrier.<br />
The polished radius side of the<br />
disc should be facing you when<br />
properly positioned.<br />
3. Place swirl chamber into carrier.<br />
Hold swirl chamber with screwdriver<br />
slot facing you. Align flat side of swirl<br />
with lugs in carrier. Drop into carrier.<br />
carrier<br />
4. The swirl chamber is now ready<br />
to be “locked” into the carrier.<br />
5. Use flathead screwdriver, with a assembly. Components remain<br />
slight push the swirl chamber can be properly positioned regardless of<br />
twisted to ‘lock’ beneath the lugs. The orientation due to unique <strong>BETE</strong><br />
swirl chamber and orifice disc are now locking system.<br />
securely held in place for continued 6. Place o-ring on body in groove<br />
carrier o-ring<br />
swirl disk<br />
swirl unit<br />
body o-ring<br />
7. Although lubricating the large<br />
o-ring is not required, using the<br />
enclosed lubricant eases the last<br />
assembly step.<br />
Tech Tip!<br />
An easy way to line up the orifice disc<br />
inside the carrier is to place it on the<br />
point of a plastic rod or pencil and<br />
use the device to guide the disc into<br />
position. Then flip the carrier over<br />
and insert the swirl unit and twist.<br />
8. Hand tighten (25 in-lb. torque<br />
max.) the carrier to the body.<br />
(Even if the body is welded to a<br />
lance, the carrier goes on easily<br />
and the internal parts are held in<br />
their proper position.)<br />
9. Now thread assembled TD nozzle<br />
onto system piping.<br />
body