SEP-200, INS00856 - Panamax!
SEP-200, INS00856 - Panamax!
SEP-200, INS00856 - Panamax!

Create successful ePaper yourself
Turn your PDF publications into a flip-book with our unique Google optimized e-Paper software.
<strong>SEP</strong>-<strong>200</strong> Surge Protector Five Year Product Warranty and<br />
Connected Appliance Protection Policy<br />
PRODUCT WARRANTY<br />
<strong>Panamax</strong> warrants to the original owner of the <strong>Panamax</strong> <strong>SEP</strong>-<strong>200</strong><br />
surge protector, for five (5) years following the date of purchase of the<br />
protector, that the surge protector shall be free of defects in design,<br />
material or workmanship. <strong>Panamax</strong> will repair or replace any such<br />
defective unit during the warranty period.<br />
CONNECTED MAJOR APPLIANCE PROTECTION POLICY<br />
<strong>Panamax</strong> will pay to repair or replace covered major household<br />
appliances, up to an aggregate three year total of $10,000, if the major<br />
household appliance, as defined herein, is damaged by an AC power or<br />
lightning surge. The <strong>Panamax</strong> surge protector must show signs of<br />
damage or be operating outside of design specifications.<br />
Original owner is defined as: either the original purchaser of the<br />
<strong>SEP</strong>-<strong>200</strong> protector or the first homeowner to reside in the residential<br />
household with the <strong>SEP</strong>-<strong>200</strong> protector. Major household appliances<br />
are defined as the following motor driven household loads:<br />
refrigerator, freezer, oven, range, washer, dryer, ceiling fan, or<br />
dishwasher.<br />
THIS WARRANTY IS SUBJECT TO THE CONDITIONS BELOW<br />
1. COVERED RISK: This warranty covers the above described major<br />
household appliances from any and all damage resulting from either<br />
an AC power surge or line overvoltage for the warranty period defined<br />
herein. This coverage is secondary to any existing manufacturer’s<br />
warranty, implied or expressed; or any service contract in existence at<br />
the time of the loss, or to any applicable insurance policy in effect.<br />
2. WARRANTY PERIOD: The <strong>SEP</strong>-<strong>200</strong> Warranty shall be in effect for<br />
three (3) years following the date of purchase of the protector.<br />
<strong>Panamax</strong> reserves the right to require proof of proper installation in<br />
the event of a claim.<br />
3. PROPER INSTALLATION: The <strong>SEP</strong>-<strong>200</strong> surge protector must be<br />
properly installed by a certified electrician. Building wiring, grounding<br />
and other electrical connections must conform to current applicable<br />
codes (NEC or CEC). <strong>Panamax</strong> installation instructions and diagrams<br />
must be followed.<br />
4. DETERMINATION OF FAILURE: The <strong>Panamax</strong> <strong>SEP</strong>-<strong>200</strong> protector<br />
must show signs of damage or must be performing outside of design<br />
specifications. OPENING THE ENCLOSURE, TAMPERING WITH, OR<br />
MODIFYING THE PROTECTOR IN ANY WAY SHALL VOID YOUR<br />
WARRANTY.<br />
(Valid only in the United States and Canada)<br />
5. EXCLUSIONS: The <strong>SEP</strong>-<strong>200</strong> WARRANTY DOES NOT COVER: service<br />
charges; installation costs; reinstallation costs; setup cost; diagnostic<br />
charges; periodic checkups; routine maintenance; loss of use of the<br />
product; costs or expenses arising out of reprogramming or loss of<br />
programming; shipping charges or fees; service calls; loss or damage<br />
occasioned by fire, theft, flood, wind, accident, abuse or misuse.<br />
6. MAKING A CLAIM:<br />
a) Contact the <strong>Panamax</strong> Customer Relations department by internet at<br />
www.panamax.com or call toll-free at 1-800-472-5555 to obtain a<br />
Return Authorization (RA) number. IF YOU BELIEVE YOU HAVE<br />
DAMAGE TO A MAJOR HOUSEHOLD APPLIANCE AS DEFINED, YOU<br />
MUST NOTIFY PANAMAX AT THIS TIME.<br />
b) <strong>Panamax</strong> will send you a one page claim statement to be completed<br />
and returned. You must include either the original proof of purchase of<br />
the be followed.protector or the work order for the installation of the<br />
<strong>SEP</strong>-<strong>200</strong> protector with your completed claim statement.<br />
c) Once you obtain an RA number, please clearly mark your RA number<br />
on the side of your protector. Place your protector in a box and add<br />
packing materials. On the outside of the box, please clearly mark the RA<br />
number.<br />
d) Ship the protector to <strong>Panamax</strong>. You are responsible for charges for<br />
shipping the protector to <strong>Panamax</strong>.<br />
e) Once <strong>Panamax</strong> has received your claim statement and has confirmed<br />
your eligibility, <strong>Panamax</strong>, at its sole option, will either pay the deductible<br />
amount of the original owner's insurance policy covering major<br />
household appliances or pay to repair or replace said major household<br />
appliances.<br />
f) <strong>Panamax</strong> reserves the right to inspect the damaged appliance(s),<br />
parts, or circuit board, as well as the customer’s facility (at <strong>Panamax</strong>’s<br />
expense). Damaged appliances deemed uneconomical to repair must<br />
remain available for inspection by <strong>Panamax</strong> until the claim is finalized.<br />
8. GENERAL: If you have any questions regarding this warranty, please<br />
contact the <strong>Panamax</strong> Customer Relations Department at<br />
www.panamax.com or toll-free at 1-800-472-5555. This warranty<br />
supersedes all previous warranties. This is the only warranty provided<br />
with the protector and any other implied or expressed warranties are<br />
non-existent. This warranty may not be modified except in writing,<br />
signed by an officer of the <strong>Panamax</strong> corporation.<br />
EFFECTIVE JAN. <strong>200</strong>9<br />
IWS00856 REV. A<br />
INDOOR / OUTDOOR INSTALLATION & OPERATING INSTRUCTIONS<br />
FOR SERVICE ENTRANCE PROTECTOR<br />
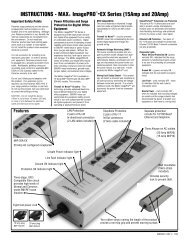
DESCRIPTION<br />
AC surge protector permanently connected to main service panel.<br />
<strong>SEP</strong>-<strong>200</strong> SERVICE ENTRANCE PROTECTOR features a compact<br />
chassis for easy installation, visible diagnostic LED,<br />
120/240 V, 1 Phase, 3 wire plus ground.<br />
For use with panels rated up to 400 Amps.<br />
APPLICATION<br />
<strong>SEP</strong>-<strong>200</strong> protects against electrical surges<br />
that can cause damage to electric and<br />
electronic equipment. Catastrophic<br />
failures and gradual component<br />
degradation can be caused by<br />
high voltage surges, which are<br />
generated by harsh weather<br />
conditions, external power<br />
problems, or day-to-day<br />
electrical component switching.<br />
<strong>SEP</strong>-<strong>200</strong><br />
The <strong>SEP</strong>-<strong>200</strong> will protect electrical<br />
equipment against surges caused by<br />
the above factors. <strong>Panamax</strong> also<br />
recommends using secondary plug-in<br />
protectors at the equipment you would like to protect.<br />
<strong>SEP</strong>-<strong>200</strong><br />
SURGE PROTECTIVE DEVICE<br />
PROTECTION OK<br />
SAFETY CONSIDERATIONS<br />
A licensed electrician must install the <strong>SEP</strong>-<strong>200</strong>. Installation must follow applicable electrical codes. Failure<br />
to follow installation instructions may result in personal injury, equipment damage and invalidation of<br />
the warranty. Your electrical system must be grounded per Article 250 of the NEC. Surge protection<br />
works best when a secure ground is established. Check grounding before restoring power.<br />
INSOO856 REV. B<br />
4<br />
1690 Corporate Circle, Petaluma, CA 94954 • 800-472-5555 • www.panamax.com
<strong>SEP</strong>-<strong>200</strong><br />
WHITE<br />
<strong>SEP</strong>-<strong>200</strong><br />
<strong>SEP</strong>-<strong>200</strong><br />
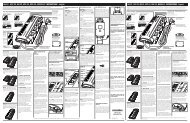
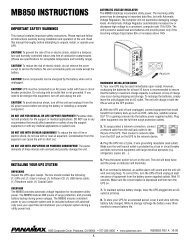
MOUNTING INSTRUCTIONS<br />
Figure 1<br />
CAUTION: When installing or removing this protector<br />
from service, disconnect power. Failure to do so may<br />
result in equipment damage, serious injury or death.<br />
Install the <strong>SEP</strong>-<strong>200</strong> according to local electrical codes,<br />
or using instructions below. Lead lengths must be as<br />
short as possible to keep voltage drop to a minimum.<br />
Trim excessive length to minimize wire impedance to<br />
the surge protector. In the event of lightning or other<br />
power transients, a one foot reduction of lead length can<br />
result in a decrease of 100 volts or more across leads.<br />
Backup Location 2<br />
Use a threaded nipple or thin-wall conduit to connect the<br />
<strong>SEP</strong>-<strong>200</strong> to the service panel. Feed the wires through<br />
the conduit and into the panel.<br />
Using the screw holes on the back plate corners, mount<br />
<strong>SEP</strong>-<strong>200</strong> as close as possible to the service panel<br />
(Figure 2).<br />
Figure 2<br />
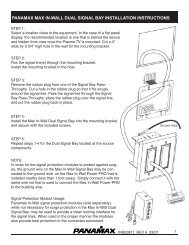
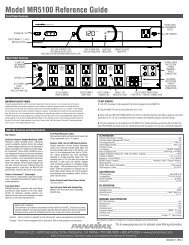
TYPE1 (INSTALLATION BEFORE THE MAIN DISCONNECT - Figure 5)<br />
WARNING: REMOVE THE METER OR OTHERWISE DISCONNECT THE AC<br />
POWER BEFORE BEGINNING THE INSTALLATION!!!<br />
USE A TEST LAMP TO CONFIRM THAT THE POWER HAS BEEN REMOVED!!<br />
The <strong>SEP</strong>-<strong>200</strong> is UL Listed for installation either before or behind the main<br />
service disconnect. Proper installation before the service disconnect usually<br />
provides better protection (lower limiting voltage)than installations behind<br />
the service disconnect. The mechanical installation to the meter pan or meter<br />
side of the service panel is as described in figures 1-3, as close as possible<br />
to the wiring between the meter and the service disconnect.<br />
CONNECTIONS:<br />
1. The 4 <strong>SEP</strong>-<strong>200</strong> wires should be connected to the points"B" in figure 5.<br />
The connections can be made at the meter socket or on the wiring to the<br />
main disconnect.<br />
2. Connect the <strong>SEP</strong>-<strong>200</strong> green (ground) wire to the service raceway, the<br />
panel ground bus, or any other part of the grounding electrode system.<br />
The ground wire should be kept as short aspossible.<br />
3. Connect the white (neutral) wire to the neutral bus.<br />
4. Connect the two <strong>SEP</strong>-<strong>200</strong> black wires to the two phase terminals of the<br />
meter socket or to the conductors to the disconnect. An insulated tap<br />
connector such as ILSCO KUPLER IPC 4/0-#6 is a fast and easy way to<br />
connect the black (phase) wires to the service conductors.<br />
Figure 5<br />
METER<br />
B<br />
B<br />
BUILDING<br />
GROUND<br />
B<br />
WIRING SCHEMATIC<br />
120V<br />
120V<br />
GROUND<br />
BLACK<br />
WHITE<br />
240V<br />
BLACK<br />
GREEN<br />
HOT<br />
NEUTRAL<br />
HOT<br />
30A BREAKER<br />
or SUB-FEED<br />
LUG SET<br />
GROUND<br />
N<br />
U.G.<br />
SVC. TERM<br />
Backup Location 1<br />
SERVICE PANEL<br />
<strong>SEP</strong>-<strong>200</strong><br />
5. Check the connections!<br />
6. Replace the meter, or turn the AC power switch back on. The green light<br />
on the <strong>SEP</strong>-<strong>200</strong> should come on, confirming that the connections are correct<br />
and there is power to both phases.<br />
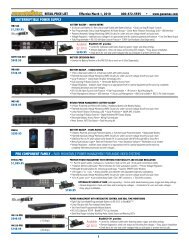
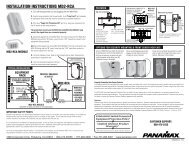
TYPE 2 (INSTALLATION AFTER THE MAIN DISCONNECT - Figure 6)<br />
SERVICE<br />
CONDUIT<br />
Back Mounting<br />
For back mounting, use<br />
pull-through elbow conduit(s)<br />
and additional conduit sections<br />
as needed. (Figures 3 & 4).<br />
Preferred Location<br />
Figure 3 Figure 4<br />
WALL BOARD<br />
<strong>SEP</strong>-<strong>200</strong><br />
TOP VIEW<br />
SERVICE<br />
PANEL<br />
<strong>SEP</strong>-<strong>200</strong><br />
SURGE<br />
PROTECTOR<br />
WALL<br />
CONDUIT ELBOW<br />
CONDUIT<br />
WALL<br />
1. The <strong>SEP</strong>-<strong>200</strong> should be installed by a qualified electrician.<br />
2. Turn "OFF" and lock out the power to the enclosure in which the <strong>SEP</strong>-<strong>200</strong> is<br />
to be installed.<br />
3. Connect the green (ground)wire to the ground bus or connector.<br />
4. Connect the white (neutral) wire to the neutral bus.<br />
5. Install the appropriate 2 pole, 30 ampere (or larger) circuit breaker or lug kit<br />
to the panel board or meter combination device. If a sub-feed lug kit is available,<br />
it is a better and more economical connection than a breaker.<br />
6. Connect the black leads to the load terminals of the circuit breaker or lug kit<br />
and tighten to the required torque.<br />
7. Double check connections, then reconnect power.<br />
8. When the LED is on, the protector is functioning as desired.<br />
Figure 6<br />
30A BREAKER<br />
OR SUB-FEED<br />
NEUTRAL BUS<br />
HOT<br />
NEUTRAL<br />
MAIN<br />
DISCONNECT<br />
NEUTRAL BUS<br />
GROUND<br />
BUS<br />
FROM <strong>SEP</strong>-<strong>200</strong><br />
2 3