DHS Blade. For osteoporotic bone.
DHS Blade. For osteoporotic bone.
DHS Blade. For osteoporotic bone.

Create successful ePaper yourself
Turn your PDF publications into a flip-book with our unique Google optimized e-Paper software.
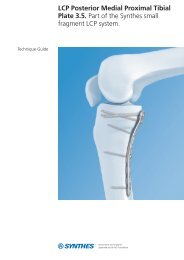
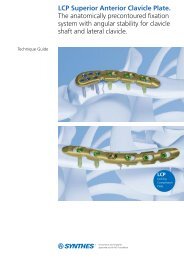
Technique Guide<br />
<strong>DHS</strong> <strong>Blade</strong>. <strong>For</strong> <strong>osteoporotic</strong> <strong>bone</strong>.
Table of Contents<br />
Introduction<br />
Features and Benefits 2<br />
Indications and Contraindications 4<br />
Clinical Cases 5<br />
Surgical Technique<br />
Implantation 6<br />
Implant Removal 14<br />
Product Information<br />
<strong>DHS</strong> <strong>Blade</strong> 15<br />
Instruments 16<br />
Sets 18<br />
Bibliography<br />
19<br />
Image intensifier control<br />
Warning<br />
This description is not sufficient for immediate application of<br />
the instrumentation. Instruction by a surgeon experienced in<br />
handling this instrumentation is highly recommended.<br />
Synthes 1
Features and Benefits<br />
Increased rotational stability<br />
The shape of the blade leads to improved rotational stability<br />
of the femoral head-neck fragment, which is vital for reducing<br />
the risk of cut-out, delayed union and varus angulation<br />
in unstable trochanteric fractures. 1<br />
Better anchorage in the femoral head<br />
The specially designed tip of the blade allows for compaction<br />
of the <strong>bone</strong> when the blade is inserted. This compaction<br />
leads to improved anchorage of the implant in the femoral<br />
head, which is beneficial especially in <strong>osteoporotic</strong> <strong>bone</strong>. 2<br />
rotational stability<br />
<strong>bone</strong> compaction<br />
no rotational stability<br />
no <strong>bone</strong> compaction<br />
Increased support surface<br />
The weight-bearing surface of the <strong>DHS</strong> <strong>Blade</strong> is greater compared<br />
to the surface of the conventional <strong>DHS</strong> Screw and can<br />
therefore take greater loads. A larger surface means less<br />
pressure from the implant onto the <strong>bone</strong> and less risk for<br />
cut-out.<br />
Less cut-out<br />
Better rotational stability, better anchorage in the femoral<br />
head and an increased support surface result in a lower risk<br />
of cut-out.<br />
<strong>DHS</strong> <strong>Blade</strong><br />
<strong>DHS</strong> Screw<br />
2 Synthes <strong>DHS</strong> <strong>Blade</strong> Technique Guide
Compatible with conventional and LCP <strong>DHS</strong> plate<br />
Both the <strong>DHS</strong> <strong>Blade</strong> and the <strong>DHS</strong> Screw are compatible with<br />
the LCP <strong>DHS</strong> plate as well as the conventional <strong>DHS</strong> plate.<br />
Various lengths ensure optimal anchorage<br />
The <strong>DHS</strong> <strong>Blade</strong> consists of a shaft part and a blade part. The<br />
length of the blade part depends on the total length of the<br />
<strong>DHS</strong> <strong>Blade</strong>: the shorter the entire <strong>DHS</strong> <strong>Blade</strong>, the shorter the<br />
blade part. This ensures an optimal anchorage of the <strong>DHS</strong><br />
<strong>Blade</strong> in the femoral head for different <strong>bone</strong> sizes.<br />
Locking mechanism<br />
During insertion: <strong>DHS</strong> <strong>Blade</strong> is unlocked<br />
The shaft part and the blade part can rotate against each<br />
other.<br />
gap<br />
After implantation: <strong>DHS</strong> <strong>Blade</strong> is locked<br />
When the bolt in the <strong>DHS</strong> <strong>Blade</strong> is screwed forward, the<br />
rotation between blade part and shaft part gets locked.<br />
The shaft part and the blade part cannot rotate against each<br />
other anymore.<br />
teeth<br />
Synthes 3
Indications and Contraindications<br />
Indications<br />
– Pertrochanteric fractures of type 31-A1 and 31-A2<br />
– Intertrochanteric fractures of type 31-A3<br />
– Basilar neck fractures 31-B<br />
Contraindications<br />
– Subtrochanteric fractures: for this type of fracture,<br />
a 95º DCS plate or the intramedullary nail PFNA Long is<br />
recommended.<br />
– The <strong>DHS</strong> is not to be used in cases where there is a<br />
high incidence of:<br />
– Sepsis<br />
– Malignant primary or metastatic tumors<br />
– Material sensitivity<br />
– Compromised vascularity<br />
31-A1 31-A2 31-A3<br />
Recommendation<br />
Use the <strong>DHS</strong> <strong>Blade</strong> for <strong>osteoporotic</strong> patients and the <strong>DHS</strong><br />
Screw for patients with good <strong>bone</strong> quality.<br />
31-B1 31-B2 31-B3<br />
4 Synthes <strong>DHS</strong> <strong>Blade</strong> Technique Guide
Clinical Cases<br />
Pertrochanteric fractures<br />
Special surgical considerations:<br />
Implant of choice<br />
Recent metanalysis has shown that the <strong>DHS</strong> tends to be statistically<br />
superior to intramedullary devices for trochanteric<br />
fractures. 3,4 Further studies are required to determine<br />
whether different types of intramedullary nails produce similar<br />
results, or whether intramedullary nails are advantageous<br />
for certain fracture types (e.g. subtrochanteric fractures). 4<br />
Prevention of cut-out: correct placement of the screw<br />
The correct placement of the <strong>DHS</strong> Screw or <strong>Blade</strong> has shown<br />
to be one of the main success factors to prevent implant<br />
cut-out. The device should ideally be positioned in a centercenter<br />
position in the femoral head and within 5 mm of<br />
subchondral <strong>bone</strong>. 5, 6 See surgical technique page 8.<br />
80 year old female,<br />
fracture 31-A2.2,<br />
preoperative<br />
postoperative<br />
3 month follow-up<br />
Femoral neck fractures<br />
Special surgical considerations:<br />
Implant of choice<br />
<strong>For</strong> unstable basicervial fractures, the <strong>DHS</strong> seems biomechanically<br />
superior to three cannulated screws. 7 Nevertheless,<br />
operations of cervical hip fractures with a dynamic hip screw<br />
or three parallel screws seem to give similar clinical results. 8<br />
Emergency treatment<br />
A femoral neck fracture should be treated surgically within<br />
6 hours of admission whenever possible. Elderly patients<br />
who had surgery within 12 hours 9 or even within 24 hours 10<br />
have a significantly lower mortality rate.<br />
81 year old female,<br />
fracture 31-B2.1,<br />
preoperative<br />
postoperative<br />
3 month follow-up<br />
Antirotation screw<br />
With the <strong>DHS</strong> <strong>Blade</strong>, rotational stability is achieved without<br />
an antirotation screw.<br />
Synthes 5
Implantation<br />
1<br />
Preoperative planning<br />
The size and angle of the plate as well as the length of<br />
the <strong>DHS</strong> <strong>Blade</strong> can be determined preoperatively by using<br />
the <strong>DHS</strong> Goniometer (Art. No. 034.000.185).<br />
Important: If the <strong>DHS</strong> <strong>Blade</strong> is from 65 to 75 mm, a <strong>DHS</strong><br />
plate with short barrel should be used to allow for sufficient<br />
dynamization.<br />
6 Synthes <strong>DHS</strong> <strong>Blade</strong> Technique Guide
2<br />
Insert guide wire<br />
Instruments<br />
292.200 Kirschner Wire 2.0 mm with trocar tip,<br />
length 150 mm<br />
338.000 <strong>DHS</strong>/DCS Guide Wire 2.5 mm<br />
338.005 <strong>DHS</strong> Angled Guide 130°<br />
338.010 <strong>DHS</strong> Angled Guide 135°<br />
338.020 <strong>DHS</strong> Angled Guide 140°<br />
338.030 <strong>DHS</strong> Angled Guide 145°<br />
338.040 <strong>DHS</strong> Angled Guide 150°<br />
The first stage of the operation remains the same as with the<br />
standard <strong>DHS</strong> Screw.<br />
Once the fracture has been stabilized with Kirschner wires<br />
and the anteversion wire has been placed in position, place<br />
the <strong>DHS</strong>/DCS guide wire at the desired angle with the correct<br />
angled guide. The guide wire should be placed in the<br />
middle of the femoral head and extend into the subchondral<br />
<strong>bone</strong>.<br />
Check the position of the guide wire in both AP and<br />
mediolateral positions.<br />
Synthes 7
Implantation<br />
3<br />
Determine length of <strong>DHS</strong> <strong>Blade</strong><br />
Instrument<br />
338.050 <strong>DHS</strong>/DCS Direct Measuring Device<br />
Read the length of the <strong>DHS</strong> <strong>Blade</strong> directly off the guide wire<br />
with the measuring device.<br />
If the guide wire is inserted into the subchondral <strong>bone</strong>,<br />
remove 5 mm from the measurement.<br />
Example: If you read 105 mm on the direct measuring<br />
device, the measured length of the implant is 100 mm.<br />
4<br />
Drill for insertion of <strong>DHS</strong> <strong>Blade</strong><br />
Instruments<br />
03.224.009 Triple Reamer for <strong>DHS</strong> <strong>Blade</strong>, complete<br />
Consisting of:<br />
03.224.003 Drill Bit 6.0/10.5 mm<br />
338.110 <strong>DHS</strong> Reamer<br />
338.120 Knut, knurled<br />
Set the triple reamer at the length of the implant selected.<br />
(100 mm in the example)<br />
Important: It is recommended that the femoral head is<br />
temporarily fixated to prevent any inadvertent rotation.<br />
8 Synthes <strong>DHS</strong> <strong>Blade</strong> Technique Guide
5<br />
Insert <strong>DHS</strong> <strong>Blade</strong><br />
Instruments<br />
03.224.001 Insertion Instrument for <strong>DHS</strong> <strong>Blade</strong><br />
03.224.007 Connecting Screw for Insertion of <strong>DHS</strong><br />
<strong>Blade</strong><br />
338.320 <strong>DHS</strong>/DCS Centering Sleeve<br />
Insert the connecting screw into the insertion instrument.<br />
Slide the appropriate <strong>DHS</strong> plate onto the insertion instrument<br />
and connect the <strong>DHS</strong> <strong>Blade</strong> to the insertion instrument.<br />
Warning: Be sure that the <strong>DHS</strong> <strong>Blade</strong> is unlocked before<br />
you insert it.<br />
Mount the centering sleeve onto the insertion instrument<br />
and insert the <strong>DHS</strong> <strong>Blade</strong> with slight hammering.<br />
If excessive hammering is needed to insert the blade, and if<br />
the triple reamer was not used to drill the entire length,<br />
remove the blade with the extraction instrument and drill the<br />
entire length.<br />
Warning: The insertion instrument should not be used for<br />
the extraction of the <strong>DHS</strong> <strong>Blade</strong>.<br />
Synthes 9
Implantation<br />
6<br />
Orient the <strong>DHS</strong> plate on the femoral shaft<br />
Once the <strong>DHS</strong> <strong>Blade</strong> has been inserted to the correct position,<br />
the centering sleeve can be removed. The plate can<br />
then be slid over the shaft of the <strong>DHS</strong> <strong>Blade</strong>.<br />
Due to the free rotation of the blade part relative to the shaft<br />
part, the <strong>DHS</strong> plate can be easily aligned to the femoral<br />
shaft.<br />
7<br />
Impact <strong>DHS</strong> plate onto the <strong>bone</strong><br />
Instruments<br />
338.280 <strong>DHS</strong>/DCS Impactor, for One-Step<br />
Insertion Technique<br />
or<br />
338.140 <strong>DHS</strong>/DCS Impactor<br />
The plate can be impacted onto the <strong>bone</strong> with one of the<br />
two impactors.<br />
10 Synthes <strong>DHS</strong> <strong>Blade</strong> Technique Guide
8<br />
Fix the <strong>DHS</strong> plate onto the shaft<br />
Remove all the insertion instruments and the guide wire.<br />
Then fix the plate to the femoral shaft.<br />
A Cortex screws for the conventional <strong>DHS</strong> plate<br />
Instruments<br />
323.460 Universal Drill Guide 4.5/3.2<br />
310.310 Drill Bit 3.2 mm<br />
319.010 Depth Gauge<br />
314.150 Screwdriver Shaft, hexagonal<br />
Use the drill guide and the drill bit to drill holes in a neutral<br />
position through the plate holes. Insert self-tapping 4.5 mm<br />
cortex screws of appropriate length.<br />
Synthes 11
Implantation<br />
B Locking screws for the LCP <strong>DHS</strong> plate<br />
Instruments<br />
323.042 LCP Drill Sleeve 5.0, for Drill Bits 4.3 mm<br />
310.430 LCP Drill Bit 4.3 mm with Stop<br />
511.771<br />
or<br />
511.774 Torque Limiter, 4.0 Nm<br />
314.119 Screwdriver Shaft Stardrive 4.5/5.0, T25,<br />
self-holding<br />
or<br />
314.152 Screwdriver Shaft 3.5, hexagonal,<br />
self-holding<br />
397.705 Handle for Torque Limiter<br />
Carefully screw the LCP drill sleeve into the desired LCP hole<br />
until it is gripped completely by the thread.<br />
Drill the screw hole using the drill bit.<br />
Read the screw length directly from the laser mark on the<br />
drill bit.<br />
Insert the self-tapping locking screws with a 4 Nm torque<br />
limiter.<br />
In case a trochanter stabilizing plate is used<br />
– Use a plate with 4 or more holes.<br />
– Leave the first and the third stem hole of the plate empty.<br />
12 Synthes <strong>DHS</strong> <strong>Blade</strong> Technique Guide
9<br />
Lock the implant<br />
Instruments<br />
03.224.004 Screwdriver Shaft Stardrive,<br />
T15, for <strong>DHS</strong> <strong>Blade</strong><br />
511.770 Torque Limiter, 1.5 Nm<br />
397.705 Handle for Torque Limiter<br />
The <strong>DHS</strong> <strong>Blade</strong> must be locked to be made rotationally<br />
stable.<br />
Assemble the screwdriver shaft, torque limiter and the<br />
handle for torque limiter.<br />
Insert the assembled instrument through the cannulation of<br />
the <strong>DHS</strong> <strong>Blade</strong> and tighten to a torque of 1.5 Nm. The <strong>DHS</strong><br />
<strong>Blade</strong> is now rotationally stable.<br />
Synthes 13
Implant Removal<br />
Instruments<br />
03.224.005 Extraction Instrument for <strong>DHS</strong> <strong>Blade</strong><br />
03.224.008 Connecting Screw for Extraction of <strong>DHS</strong><br />
<strong>Blade</strong><br />
03.010.124 Combined Hammer 500 g<br />
After removing the <strong>DHS</strong> plate, place the connecting screw<br />
through the cannulation of the extraction instrument and fix<br />
it to the <strong>DHS</strong> <strong>Blade</strong>. The blade is then removed with soft<br />
backward slide hammering on the extraction instrument.<br />
Warning: Never use the insertion instruments for implant<br />
removal.<br />
Bone growth around the shaft<br />
Instrument<br />
03.224.006 Reamer for Extraction of <strong>DHS</strong> <strong>Blade</strong><br />
If removal of blade is difficult due to <strong>bone</strong> growth around<br />
the shaft, use the reamer for extraction to drill over the shaft<br />
of the <strong>DHS</strong> <strong>Blade</strong>.<br />
14 Synthes <strong>DHS</strong> <strong>Blade</strong> Technique Guide
<strong>DHS</strong> <strong>Blade</strong><br />
<strong>DHS</strong> <strong>Blade</strong> 12.5 mm<br />
Art. No. Length mm Shaft mm <strong>Blade</strong> mm<br />
0X.224.065S 65 45 20<br />
0X.224.070S 70 50 20<br />
0X.224.075S 75 55 20<br />
0X.224.080S 80 60 20<br />
0X.224.085S 85 60 25<br />
0X.224.090S 90 65 25<br />
0X.224.095S 95 70 25<br />
0X.224.100S 100 75 25<br />
0X.224.105S 105 75 30<br />
0X.224.110S 110 80 30<br />
0X.224.115S 115 85 30<br />
0X.224.120S 120 90 30<br />
0X.224.125S 125 95 30<br />
0X.224.130S 130 100 30<br />
0X.224.135S 135 105 30<br />
0X.224.140S 140 110 30<br />
0X.224.145S 145 115 30<br />
X=2: stainless steel<br />
X=4: TAN<br />
The <strong>DHS</strong> <strong>Blade</strong> is only available sterile packed.<br />
Important: <strong>DHS</strong> <strong>Blade</strong>s from 65 to 75 mm must be used<br />
with the <strong>DHS</strong> plate with short barrel.<br />
Synthes 15
Instruments<br />
03.224.001 Insertion Instrument for <strong>DHS</strong> <strong>Blade</strong><br />
03.224.007 Coupling Screw for Insertion of <strong>DHS</strong> <strong>Blade</strong><br />
03.224.003 Drill Bit 6.0/10.5 mm, cannulated<br />
03.224.004 Screwdriver Shaft Stardrive T15,<br />
for <strong>DHS</strong> <strong>Blade</strong><br />
397.705 Handle for Torque Limiter 511.770<br />
and 511.771<br />
511.770 Torque Limiter 1.5 Nm<br />
03.010.124 Combined Hammer 500 g<br />
16 Synthes <strong>DHS</strong> <strong>Blade</strong> Technique Guide
03.224.005 Extraction Instrument for <strong>DHS</strong> <strong>Blade</strong><br />
03.224.008 Connecting Screw for Extraction of<br />
<strong>DHS</strong> <strong>Blade</strong><br />
03.224.006 Reamer for Extraction of <strong>DHS</strong> <strong>Blade</strong><br />
338.110 <strong>DHS</strong> Reamer<br />
338.120 Nut, knurled<br />
338.000 <strong>DHS</strong>/DCS Guide Wire 2.5 mm<br />
with threaded tip with trocar,<br />
length 230 mm<br />
Synthes 17
Sets<br />
<strong>DHS</strong> <strong>Blade</strong><br />
Implant Set for <strong>DHS</strong> <strong>Blade</strong>s, in suitcase for sterile implants<br />
01.224.802 stainless steel<br />
01.224.804 titanium alloy / TAN<br />
01.224.800 Instrument Set for <strong>DHS</strong> <strong>Blade</strong>s in Vario<br />
Case<br />
18 Synthes <strong>DHS</strong> <strong>Blade</strong> Technique Guide
Bibliography<br />
1 A. Lustenberger et al. (1995) Rotational instability of<br />
trochanteric fractures fixed with the dynamic hip screw.<br />
A roentgenographic analysis. Unfallchirurg 95:514-517.<br />
2 M. B. Sommers et al. (2004) A laboratory model to evaluate<br />
cutout resistance of implants for pertrochanteric fracture<br />
fixation. JOT 18:361-368.<br />
3 H. W. Jones (2006) Are short femoral nails superior to<br />
the sliding hip screw? A meta-analysis of 24 studies involving<br />
3279 fractures. Int Orthop. 30(2):69-78.<br />
4 M. J. Parker et al. (2006) Gamma and other cephalocondylic<br />
intramedullary nails versus extramedullary implants<br />
for extracapsular hip fractures in adults (Cochrane<br />
Review). The Cochrane Database of Systematic Reviews,<br />
Issue 4.<br />
5 Baumgartner et al. (1995) The value of the tip-apex distance<br />
in predicting failure of fixation of pertrochanteric<br />
fractures of the hip. Journal of Bone & Joint Surgery Am.<br />
77:1058-64.<br />
6 D. Lorich et al. (2004) Osteoporotic pertrochanteric<br />
hip fractures – management and current controversies.<br />
Journal of <strong>bone</strong> & Joint Surgery 2.<br />
7 B. Blair et al (1994) Basicervial fractures of the proximal<br />
femur: a biomechanical study of 3 internal fixation techniques.<br />
Clinical Orthopedics and related research<br />
306:256-263.<br />
8 M. J. Parker al. (1998) Choice of implant for internal<br />
fixation of femoral neck fractures. Meta-analysis of 25<br />
randomised trials including 4925 patients. Acta Orthop<br />
Scand. 69(2): 138-43.<br />
9 C. Bredahl, et al. (1992) Mortality after hip fracture:<br />
results of operation within 12 h of admission.<br />
Injury 23 (2):83-6.<br />
10 W. P. Hamlet et al. (1997) Influence of health status<br />
and the timing of surgery on mortality in hip fracture<br />
patients. J Orthop 26 (9):621-7.<br />
Synthes 19
Presented by:<br />
0123<br />
036.000.686 SE_033040 AA 30050049 © Synthes 2007 DCS, <strong>DHS</strong>, LCP, Stardrive and Vario Case are trademarks of Synthes Subject to modifications