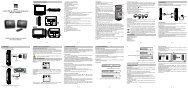
User Manual CAR RADIO CD/MP3 PLAYER WITH USB & SD ...
User Manual CAR RADIO CD/MP3 PLAYER WITH USB & SD ...
User Manual CAR RADIO CD/MP3 PLAYER WITH USB & SD ...

You also want an ePaper? Increase the reach of your titles
YUMPU automatically turns print PDFs into web optimized ePapers that Google loves.
1 3 5 7<br />
2 4 6 8<br />
1 3 5 7<br />
2 4 6 8<br />
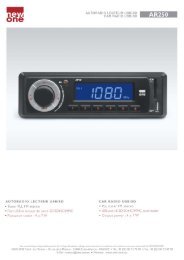
AR600<br />
<strong>User</strong> <strong>Manual</strong><br />
<strong>CAR</strong> <strong>RADIO</strong> <strong>CD</strong>/<strong>MP3</strong><br />
<strong>PLAYER</strong> <strong>WITH</strong> <strong>USB</strong> & <strong>SD</strong><br />
1.<br />
2.<br />
3.<br />
4.<br />
5.<br />
6.<br />
7.<br />
8.<br />
9.<br />
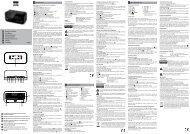
PRECAUTIONS<br />
Do not attempt to modify the unit, modifying the unit may cause an accident.<br />
Installation or servicing of the unit by persons without training and experience in<br />
electronic equipment and automotive accessories may be dangerous and could<br />
expose you to the risk of electric shock or other hazards.<br />
Stop the vehicle before carrying out any operation that could interfere with your<br />
driving.<br />
Keep the volume at a level which you could hear sounds from outside the vehicle.<br />
Do not work in extremely high or low temperature. Be sure the temperature inside<br />
the vehicle is between +60°C and -10°C before turning on your unit.<br />
When replacing the fuse(s), the replacement must be of the same amperage as<br />
shown on the fuse holder.<br />
Do not block vents or radiator panels. Blocking them will cause heat to build up<br />
inside and may result in fire.<br />
Using this unit without running the engine can result in battery drainage.<br />
Use only in cars with a 12 volt negative ground.<br />
10. After completing the installation and beginning to play the unit(including replacing<br />
the battery), please remove the front panel at first, and then press RESET button<br />
on the base with pointed object (such as ball-point pen) to set the unit to initial status.<br />
* Don’t store discs in places with high temperatures or high humidity, they can become<br />
warped. After playing, store the disc in its case.<br />
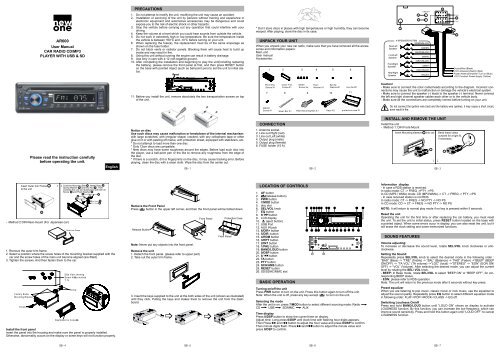
UNPACK YOUR UNIT<br />
When you unpack your new car radio, make sure that you have removed all the accessories<br />
and information papers:<br />
Main unit<br />
<strong>User</strong> manual<br />
Accessories:<br />
1 2 3 4<br />
5 6<br />
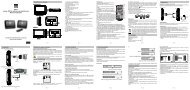
LINE OUT<br />
4-SPEAKERSYSTEM<br />
(GREEN/BLACK)<br />
RearLeft<br />
Speaker<br />
(GREEN)<br />
FrontLeft<br />
Speaker<br />
FrontRight<br />
Speaker<br />
RearRight<br />
Speaker<br />
1<br />
-<br />
-<br />
+<br />
+<br />
-<br />
-<br />
+<br />
+<br />
-<br />
-<br />
+<br />
+<br />
-<br />
-<br />
+ +<br />
3<br />
2<br />
(WHITE/BLACK)<br />
(WHITE)<br />
(GRAY/BLACK)<br />
(GRAY)<br />
(VIOLET/BLACK)<br />
(VIOLET)<br />
5<br />
FUSE holder (15 A)<br />
Part B<br />
6<br />
PartA<br />
4<br />
GroundWire (Black)<br />
+12V Accessory/Switch (Red)<br />
Power Antenna/Amplifier Turn on (Blue)<br />
+12V Constant Power Supply (Yellow)<br />
11.<br />
Before you install the unit, remove absolutely the two transportation screws on top<br />
of the unit.<br />
7<br />
8 9 10<br />
11<br />
Caution!<br />
- Make sure to connect the color coded leads according to the diagram. Incorrect connections<br />
may cause the unit to malfunction or damage the vehicle’s electrical system.<br />
- Make sure to connect the speaker (-) leads to the speaker (-) terminal. Never connect<br />
the left and right channel speaker cables each other or to the vehicle body.<br />
- Make sure all the connections are completely correct before turning on your unit.<br />
Do not connect the ignition wire (red) and the battery wire (yellow), it may cause a short circuit,<br />
even result in fire.<br />
Please read the instruction carefully<br />
before operating the unit.<br />
English<br />
Notice on disc<br />
Use such discs may cause malfunction or breakdown of the internal mechanism:<br />
with large scratches; with irregular shape; cracked; with any cellophane tape or other<br />
glue on it or with peeling off marks; with protection sheet; equipped with stabilizers, etc.<br />
* Do not attempt to load more than one disc.<br />
* Only 12cm discs are compatible.<br />
* New discs may have some roughness around the edges. Before load such disc into<br />
the player, use a ball-point pen or the like to remove any roughness from the edge of<br />
the disc.<br />
* If there is a scratch, dirt or fingerprints on the disc, it may cause tracking error. Before<br />
playing, clean the disc with a clean cloth. Wipe the disc from the center out.<br />
GB - 1<br />
CONNECTION<br />
1. Antenna socket<br />
2. Line out Right (red)<br />
3. Line out Left (white)<br />
4. Output plug (male)<br />
5. Output plug (female)<br />
6. FUSE holder (15 A)<br />
INSTALL AND REMOVE THE UNIT<br />
Install the unit<br />
- Method 1: DIN Front-Mount<br />
GB - 2 GB - 3<br />
.<br />
- Method 2 DIN Rear-mount (For Japanese car)<br />
1. Remove the outer trim frame.<br />
2. Select a position where the screw holes of the mounting bracket supplied with the<br />
car and the screw holes of the main unit become aligned (are fitted).<br />
3. Tighten the screws. And then fasten them to the car.<br />
M5 X 21<br />
M5 X 21<br />
Remove the Front Panel<br />
Press button in the upper left corner, and then the front panel will be folded down.<br />
Note: Never put any objects into the front panel.<br />
Remove the unit<br />
1. Detach the front panel. (please refer to upper part)<br />
2. Take out the outer trim frame.<br />
1.<br />
2.<br />
3.<br />
4.<br />
5.<br />
6.<br />
7.<br />
8.<br />
9.<br />
LOCATION OF CONTROLS<br />
AF button<br />
(release button)<br />
PWR button<br />
7/MOD button<br />
disc slot<br />
SEL/VOL knob<br />
EQ button<br />
9/ button<br />
L<strong>CD</strong> display<br />
(eject button)<br />
<strong>USB</strong> Port<br />
10.<br />
11.<br />
12. AUX IN jack<br />
13. 6/DIR+ button<br />
14. 5/DIR- button<br />
15. 4/RDM button<br />
16. 3/RPT button<br />
17. 2/INT button<br />
18. 1/PAU button<br />
19. BAND/LOUD button<br />
20. 0/DSP button<br />
21. 8/ button<br />
22. TA button<br />
23. PTY button<br />
24. SCH/AMS button<br />
25. RESET button<br />
26. <strong>SD</strong>/<strong>SD</strong>HC/MMC slot<br />
BASIC OPERATION<br />
25<br />
26<br />
Information display<br />
- In case a RDS station is received.<br />
In radio mode: CT -> FREQ ->PTY ->PS<br />
In <strong>CD</strong> (<strong>MP3</strong> / WMA) mode: <strong>CD</strong> (<strong>MP3</strong>/WMA) -> CT -> FREQ -> PTY ->PS<br />
- In case received station is not RDS.<br />
In radio mode: CT -> FREQ -> NO PTY -> NO PS<br />
In <strong>CD</strong> mode: <strong>CD</strong> -> CT -> FREQ -> NO PTY -> NO PS<br />
NOTE: It will return to normal play mode if no key is pressed within 5 seconds.<br />
Reset the unit<br />
Operating the unit for the first time or after replacing the car battery, you must reset<br />
the unit. To set the unit to initial status, press RESET button located on the base with<br />
a pointed object. When some errors occur in display, you can also reset the unit, but it<br />
will erase the clock setting and some memorized functions.<br />
SOUND FEATURES<br />
Volume adjusting:<br />
To increase or decrease the sound level, rotate SEL/VOL knob clockwise or anticlockwise.<br />
Setting the Sound:<br />
Repeatedly press SEL/VOL knob to select the desired mode in the following order :<br />
“BAS” (Bass) -> “TRE” (Treble) -> “BAL” (Balance) -> “FAD“ (Fader) ->“BEEP“ (BEEP<br />
ON/OFF) -> “TA VOL“ (TA volume) ->”LOC” (local) ->”STEREO” -> “EON” (EON ON/<br />
OFF) -> “VOL” (Volume). After selecting the desired mode, you can adjust the current<br />
level by rotating the SEL/ VOL knob.<br />
- BEEP: In Beep mode, rotate SEL/VOL to select “BEEP ON” or “BEEP OFF”, for corresponding<br />
BEEP status.<br />
- EON: please refer to RDS operation.<br />
Note: The unit will return to the previous mode after 5 seconds without key press.<br />
Install the front panel<br />
Insert the panel into the housing and make sure the panel is properly installed.<br />
Otherwise, abnormality occurs on the display or some keys will not function properly.<br />
3. Insert the keys supplied to the unit at the both sides of the unit (shown as illustrated)<br />
until they click. Pulling the keys and makes them to remove the unit from the dashboard.<br />
Turning on/off the unit<br />
Press PWR button to turn on the unit. Press this button again to turn off the unit.<br />
Note: When the unit is off, press any key except to turn on the unit.<br />
Selecting the mode<br />
After the unit is on, press 7/MOD button to select different sourcing mode: Radio<br />
<strong>CD</strong> <strong>USB</strong> <strong>SD</strong>/MMC AUX<br />
Time display<br />
Press 0/DSP button to show the current time on display.<br />
Adjust time: Long press 0/DSP until clock time with flashing hour digits appears.<br />
Then Press and button to adjust the hour value and press 0/DSP to confirm.<br />
Then minute digits flash. Press and button to adjust the minute value and<br />
press 0/DSP to confirm.<br />
Preset equalizer<br />
When you are listening to pop music, classic music or rock music, use the equalizer to<br />
adjust the sound quality. Repeatedly press EQ button to select different equalizer mode<br />
in following order: FLAT->POP->ROCK->CLASS -> EQ off.<br />
Switching Loudness On/off<br />
Press and hold BAND/LOUD button until “LOUD ON” shows on display to activate<br />
LOUDNESS function. By this function, you can increase the low frequency, which can<br />
improve sound sensitivity. Press and hold this button again until “LOUD OFF” to cancel<br />
LOUDNESS function.<br />
GB - 4 GB - 5<br />
GB - 6<br />
GB - 7<br />
AR-3110 IB NEWO 001 REV0 GB.indd1 1 8/26/2011 3:04:23 PM
LISTENING TO THE <strong>RADIO</strong><br />
Selecting band<br />
In tuner mode, repeatedly press BAND/ LOUD button to select bands in following order:<br />
FM1->FM2->FM3.<br />
<strong>Manual</strong>/automatic tuning<br />
- <strong>Manual</strong> Tuning<br />
Press and hold button or until “MANUAL” shows on display, then press button<br />
or continuously to select a station upward or downward. Press and hold button<br />
or to tune the station with a faster speed.<br />
- Automatic Tuning<br />
Press or once, the radio automatically searches a station upward or downward<br />
respectively and plays when it finds a station. Press or once to stop scanning.<br />
Scanning/memorizing stations automatically<br />
- By SCH/AMS button<br />
In tuner mode, press and hold SCH/AMS button for 3 seconds to start scanning for stations<br />
and store them automatically in memory.<br />
Press SCH/AMS button, the radio plays each preset station for a few seconds. Press<br />
SCH/AMS again or numeric buttons 1-6 to listen to corresponding station.<br />
- By number button 1-6<br />
1. Tune to a station by or button.<br />
2. Press and hold one of the 1- 6 Number buttons for 2 seconds until L<strong>CD</strong> shows the<br />
corresponding number, which indicates that station is stored in the corresponding number<br />
button.<br />
3. Under radio mode, press 1- 6 Number buttons to listen to stored stations.<br />
4. When you are listening to a station stored on a number button, press and hold another<br />
number button for more than 2 seconds to store the station on this number button.<br />
Note: The unit can be stored up to 6 stations for each band.<br />
-- RDS (Radio Data System) Operations --<br />
This unit has a built-in RDS decoder system that supports broadcast stations transmitting<br />
RDS data. This system can display the name of the broadcast station being received<br />
and can automatically switch to the broadcast station with the best reception as<br />
you travel on long distances (AF switching). A traffic announcement broadcast from a<br />
RDS station, no matter what mode you are. Additionally, if EON information is received,<br />
enables automatic switching of other preset stations on the same network and interruption<br />
of the station being received with traffic information. This function is not available<br />
in some areas.<br />
GB - 8<br />
Alternative frequency (AF)<br />
The AF function switches to a different frequency on the same network in order to<br />
maintain optimum reception. In FM mode, press AF button, certain program will be<br />
automatically searched and received. If the reception of the current broadcast station<br />
deteriorates, “AF” appears in the display and the radio searches for the same program<br />
on another frequency. Press AF button again to cancel this function.<br />
When reception is bad, the “AF” icon will blink.<br />
Press and hold AF button for 3 seconds, the unit will be under “REG ON” or “REG<br />
OFF” mode:<br />
REG ON: Should be selected to list the local broadcast of the current station, even<br />
if there is a national broadcast of this station.<br />
REG OFF: Should be selected to listen to the national broadcast of the current station.<br />
Traffic alarm (TA)<br />
In the TA standby mode, when a traffic announcement broadcast starts, the traffic announcement<br />
broadcast is received as top priority regardless of the function mode so<br />
you can listen to it. Traffic programme (TP) automatic tuning is also possible.<br />
Press TA button, when L<strong>CD</strong> shows “TA”, traffic program will be automatically searched<br />
and saved, when L<strong>CD</strong> shows “TP”, this means that the RDS broadcast station being<br />
received has traffic announcement programmes.<br />
If you press TA button while a traffic announcement broadcast is being received, the<br />
traffic announcement broadcast reception is cancelled and the unit goes into the TA<br />
standby mode.<br />
If a TP station is not received, the unit continues searching.<br />
Press TA button again to stop searching, “TA” goes off.<br />
ALARM<br />
“ALARM”will be displayed when an emergency broadcasting is received; meanwhile<br />
sound output level will be adjusted to the preset output level automatically when the<br />
volume control is set at minimum.<br />
EON: (Enhanced Other Networks Information)<br />
Press and rotating SEL/VOL to select EON mode, EON ON. When receive the EON<br />
information, the EON indication is on. With EON facility, it offers the ability for local<br />
stations to ”break into” a national station’s broadcast for the duration of a Traffic Announcement.<br />
Program type selecting (PTY)<br />
When PTY is selected, the radio starts to search corresponding PTY information, and<br />
stops when the corresponding PTY information is detected.<br />
If corresponding PTY information does not exist any more, PTY is automatically<br />
stopped to normal mode.<br />
When PTY mode is engaged. The PTY switch is shared as follows:<br />
PTY SPEECH group PTY MUSIC group PTY off<br />
GB - 9<br />
According to above 2 groups, the preset number is used for PTY selection as follows:<br />
MUSIC group<br />
1. POP M, ROCK M<br />
2. EASY M, LIGHT M<br />
3. CLASSICS, OTHER M<br />
4. JAZZ, COUNTRY<br />
5. NATION M, OLDIES<br />
6. FOLK M<br />
SPEECH group<br />
1. NEWS, AFFAIRS, INFO<br />
2. SPORT, EDUCATE, DRAMA<br />
3. CULTURE, SCIENCE, VARIED<br />
4. WEATHER, FINANCE, CHILDREN<br />
5. SOCIAL, RELIGION, PHONE IN<br />
6. TRAVEL, LEISURE, DOCUMENT<br />
LISTENING TO DISC/<strong>USB</strong>/<strong>SD</strong><br />
Load/Remove a disc<br />
Insert the disc into the DISC SLOT with the printed side facing up. The player will play<br />
the disc automatically. If a disc was inserted, press 7/MOD button to start playing.<br />
To remove the disc, press button.<br />
To insert a <strong>USB</strong> devices (not included)<br />
Open the front panel, connect your <strong>USB</strong> device to the <strong>USB</strong> port, it will switch to “<strong>USB</strong>”<br />
mode automatically. If <strong>USB</strong> has been inserted, press 7/MOD button to switch to <strong>USB</strong><br />
mode.<br />
To insert an <strong>SD</strong>/<strong>SD</strong>HC/MMC card (not included)<br />
Press button to fold down the front panel first. Insert your <strong>SD</strong>/<strong>SD</strong>HC/MMC card<br />
in card receptacle. Close the front panel and it will automatically start playing. If <strong>SD</strong>/<br />
<strong>SD</strong>HC/MMC card has been inserted, press 7/MOD button to switch to card mode.<br />
Basic player functions<br />
Play/pause: press 1/PAU to suspend momentarily the playing track. Press 1/PAU<br />
again to resume playing.<br />
Skip/fast search: press button to skip forward to next track and to skip backward<br />
to previous track. Press and hold or to search quickly within a track.<br />
Intro scan: press 2/INT button when it show “INT ON”, then the player will play the first<br />
10 seconds of each track in the disc, press again to cancel this function when it show<br />
“INT OFF”.<br />
Repeat : Press 3/RPT button once to repeat your desired track. Press again to repeat<br />
all.<br />
Random playback: Press 4/RDM button, all tracks will play randomly.<br />
Directory selection: Press DIR-button or DIR + button to select directory downward or<br />
upward. If the <strong>MP3</strong> disc does not contain any directory, there is no function of pressing<br />
DIR- button or DIR + button.<br />
GB - 10<br />
Searching a track in <strong>MP3</strong>-<strong>CD</strong>/<strong>USB</strong>/<strong>SD</strong>:<br />
Use the keys for corresponding number or letter when you search a music file:<br />
KEY<br />
/VOL(press)<br />
(1/PAU)<br />
(2/INT)<br />
7/MOD<br />
8/<br />
9/<br />
0/DSP<br />
(3/RPT)<br />
(4/RDM)<br />
(5/DIR -)<br />
(6/DIR +)<br />
(rotate)<br />
- Search by track number:<br />
1. Press SCH/AMS button once, L<strong>CD</strong> shows “NUM SCH” and “NUM ***”, press the<br />
keys standing for corresponding numbers (refer to upper list).<br />
2. Press SEL/VOL knob to start playing.<br />
- Search by letter:<br />
1. Press SCH/AMS button twice, L<strong>CD</strong> shows “FILE SCH” and “*- - - -”, press the keys<br />
standing for corresponding letters (refer to upper list).<br />
2. Repeat this procedure until you finish the file name.<br />
3. Press SEL/VOL knob to start searching.<br />
4. Rotate SEL/VOL knob to select the file you want. Then press to start playing.<br />
- Search by folder:<br />
1. Press SCH/AMS button thrice, L<strong>CD</strong> shows “DIR SCH” then the total directories and<br />
available directories name.<br />
2. Rotate the SEL/VOL knob to search your desired folder, press SEL/VOL knob to<br />
enter the selected directories.<br />
3. Rotate the SEL/VOL knob to select your desired track, press SEL/VOL button to<br />
start playing.<br />
Exit disc/<strong>USB</strong>/<strong>SD</strong> card mode<br />
1. Press to eject the disc. If the disc is not taken out within 10 seconds, it will be automatically<br />
reloaded.<br />
2. To exit <strong>USB</strong> mode, disconnect your <strong>USB</strong> device from the unit, it will switch to tuner<br />
mode automatically.<br />
3. To exit card mode, take out your <strong>SD</strong>/<strong>SD</strong>HC/MMC card from the unit, it will switch to<br />
tuner mode automatically.<br />
GB - 11<br />
,6<br />
Note<br />
* Do not use <strong>CD</strong>s with irregular shape (for example octagonal or heart-shaped).<br />
* Notes: <strong>CD</strong>-Rs or <strong>CD</strong>-RWs playback capability of this player may vary depending on<br />
quality media, <strong>CD</strong>-Burner, burning speed and application software.<br />
* There are many <strong>USB</strong> devices or <strong>SD</strong>/<strong>SD</strong>HC/MMC card on the market. We cannot<br />
guarantee to support all different models. Please try another <strong>USB</strong> device or <strong>SD</strong>/<strong>SD</strong>HC/<br />
MMC card if your device is not supported.<br />
* The unit might not support all the multimedia files stored in <strong>SD</strong>/<strong>SD</strong>HC/MMC card or<br />
<strong>USB</strong> because it includes some special playback procedure which might not be compatible<br />
with the procedure of this unit.<br />
LISTENING TO AUXILIARY SOURCE<br />
1. Connect your auxiliary source (e.g. mp3 player) to the AUX IN jack.<br />
2. Press PWR button to turn the unit on.<br />
3. Press 7/MOD to select AUX mode.<br />
4. Start playback from your auxiliary source.<br />
5. Adjust the volume to desired level.<br />
6. Disconnect your auxiliary source from the Aux in jack, press 7/MOD button to select<br />
other source.<br />
MAINTENANCE<br />
Precaution<br />
- Clean the front panel with a soft cloth, or damp chamois leather. Never use solvents.<br />
- Handling the Detachable Front Panel: Do not expose to rain or water.<br />
- Do not drop or apply shock.<br />
- Make sure that you keep your set away from high temperatures.<br />
- The use of apparatus in moderate climates.<br />
- Do not be exposed to dripping or splashing, and that no object filled with liquids, such<br />
as vases, shall be placed on the apparatus.<br />
- No naked flame sources such as lighted candles should be placed on the apparatus.<br />
Cleaning the Connector<br />
If the connector between the main unit and the front panel is dirty, may result in abnormal<br />
working condition. To avoid such problems, please detach the front panel, and<br />
clean the connector with an alcohol swab. Gently clean and avoid damaging the connector.<br />
TROUBLE SHOOTING GUIDE SPECIFICATIONS WARNINGS<br />
General<br />
Power Requirement<br />
Load Impedance<br />
Max. Power Output<br />
Tone Controls<br />
Dimensions<br />
Mounting Dimensions<br />
Weight Approx.<br />
FM Section<br />
Tuning Range<br />
IF Range<br />
Usable Sensitivity (-30dB)<br />
Signal-to-noise Ratio<br />
Stereo Separation<br />
<strong>CD</strong> player Section<br />
Signal-to-noise Ratio<br />
Separation<br />
Distortion<br />
Frequency Response<br />
12V DC (11-16 V allowable)<br />
4ohms<br />
20W x4<br />
±10 dB<br />
Bass at 100 Hz<br />
Treble at 10 kHz<br />
Approx. 188 x 188 x 59 mm (d / w / h)<br />
Approx. 169 x 182 x 53 mm (d / w / h)<br />
Approx. 1.2 kg<br />
87.5-108 (MHz)<br />
10.7 MHz<br />
15 dBuV<br />
50 dB<br />
25 dB<br />
60 dB<br />
50 dB<br />
0.1%<br />
20 - 20000Hz<br />
Note:<br />
Due to continuous product improvement, specifications and design are subject to<br />
change without prior notice.<br />
CAUTION! This set uses a laser beam. To prevent any accident due to this type of<br />
beam, the set should only be opened by properly trained personnel. The unit conforms<br />
to the international safety specifications and to guide lines of the European community<br />
and also complies with current standards concerning electrical safety and electromagnetic<br />
compatibility EMC.<br />
ATTENTION: To reduce the risk of electric shock, do not remove<br />
the cover. There are no user serviceable parts inside the unit. Refer<br />
all servicing to qualified personnel.<br />
The lightening flash with arrowhead symbol within the triangle is a warning<br />
sign alerting the user of “dangerous voltage” inside the unit.<br />
The exclamation point within the triangle is a warning sign alerting the user of<br />
important instructions accompanying the product.<br />
CAUTION: Invisible laser radiation when open and interlocks defeated. Avoid<br />
exposure to beam.<br />
WARNING - To reduce the risk of fire or electric shock, do not expose this appliance to<br />
rain or moisture.<br />
If at any time in the future you should need to dispose of this product please<br />
note that Waste electrical products should not be disposed of with household<br />
waste. Please recycle where facilities exist. Check with your Local Authority<br />
or retailer for recycling advice.(Waste Electrical and Electronic Equipment<br />
Directive)<br />
Notes:<br />
For the sake of safety, always shut down the engine and take out the ignition key before<br />
cleaning. Never keep your finger or any metal device on the connector directly.<br />
Replacing the Fuse<br />
Make sure the amperage matches the specified value when replacing the fuses. If the<br />
fuse is blown, check the power connection and replace with a new one. If the same<br />
problem occurs, it would be subjected to the malfunction in-house. In such cases,<br />
please consult the nearest service dealer.<br />
GB - 12<br />
GB - 13<br />
GB - 14<br />
GB - 15<br />
AR-3110 IB NEWO 001 REV0 GB.indd2 2 8/26/2011 3:04:28 PM